DeepLabV3+模型训练—学习笔记
文章目录
- 环境准备
-
- 添加依赖库
- 测试环境
- 数据准备
-
- 数据处理
- 数据目录结构
- 转换为TFRecord格式
- 训练
-
- 注册数据集
- 训练参数设置
- 数据不平衡问题
- 训练
- 训练过程可视化
- 验证
- 可视化
- 模型导出
- 测试
- 源码理解
-
- train.py
- 参考资料
环境准备
添加依赖库
# From tensorflow/models/research/
export PYTHONPATH=$PYTHONPATH:`pwd`:`pwd`/slim
export CUDA_VISIBLE_DEVICES=1
测试环境
# From tensorflow/models/research/
python3 deeplab/model_test.py
数据准备
数据处理
# !/usr/bin/python
# -*- coding = utf8 -*-
"""
# @ Author: ***
# @ Created Time: 2019-05-13 09:31:37
# @ Description: Prepare data for deeplab.
"""

import sys
import os
import argparse
import shutil
import cv2
import numpy as np

def parse_arguments(argv):
    parser = argparse.ArgumentParser()
    parser.add_argument('--input_matting',type=str,help='Directory with input \
            images.')
    parser.add_argument('--input_image', type=str, help='Directory with input \
                images.')
    parser.add_argument('--output_dir',type=str,help='Directory with output \
            alpha images.')
    return parser.parse_args(argv)

def main(args):
    output_dir = os.path.expanduser(args.output_dir)
    if not os.path.exists(output_dir):
        os.makedirs(output_dir)
    output_img = os.path.join(output_dir, 'JPEGImages')
    if not os.path.exists(output_img):
        os.makedirs(output_img)
    output_mask = os.path.join(output_dir, 'mask')
    if not os.path.exists(output_mask):
        os.makedirs(output_mask)
    output_seg = os.path.join(output_dir, 'SegmentationClass')
    if not os.path.exists(output_seg):
        os.makedirs(output_seg)
    input_matting = os.path.expanduser(args.input_matting)
    img_dir = os.path.expanduser(args.input_image)

    trainval_filename = os.path.join(output_dir, 'ImageSets', 'Segmentation', 'trainval.txt')
    train_filename = os.path.join(output_dir, 'ImageSets', 'Segmentation', 'train.txt')
    val_filename = os.path.join(output_dir, 'ImageSets', 'Segmentation','val.txt')
    with open(trainval_filename, 'w') as trainval_f, \
            open(train_filename, 'w') as train_f, \
            open(val_filename, 'w') as val_f:
        index = 0
        if os.path.isdir(input_matting):
            for sub1_name in os.listdir(input_matting):
                sub1_dir = os.path.join(input_matting, sub1_name)
                img_sub1_dir = os.path.join(img_dir, sub1_name)

                if not os.path.isdir(sub1_dir):
                    continue
                for sub2_name in os.listdir(sub1_dir):
                    sub2_dir = os.path.join(sub1_dir, sub2_name)
                    img_sub2_dir = os.path.join(img_sub1_dir, sub2_name.replace('matting','clip'))

                    if not os.path.isdir(sub2_dir):
                        continue
                    for image_name in os.listdir(sub2_dir):
                        image_path =  os.path.join(os.path.join(sub2_dir, image_name))
                        orig_image_path = os.path.join(img_sub2_dir, image_name)
                        if not os.path.isfile(orig_image_path):
                            orig_image_path = orig_image_path.replace('png','jpg')
                        print('processing', image_path)

                        image = cv2.imread(image_path, cv2.IMREAD_UNCHANGED)
                        alpha = image[:,:,3]
                        ret,mask = cv2.threshold(alpha,10,255,cv2.THRESH_BINARY)
                        cv2.imwrite(os.path.join(output_mask, image_name), mask)
                        label_img = np.where(mask == 255, 1, 0)
                        cv2.imwrite(os.path.join(output_seg, image_name), label_img)
                        shutil.copy(orig_image_path, os.path.join(output_img, image_name))

                        index += 1
                        trainval_f.write('%s\n' % image_name.split('.')[0])
                        if index <= 30000:
                            train_f.write('%s\n' % image_name.split('.')[0])
                        else:
                            val_f.write('%s\n' % image_name.split('.')[0])


if __name__=='__main__':
    main(parse_arguments(sys.argv[1:]))
数据目录结构
 + portrait  # 自己的数据集名称
    + JPEGImages #RGB original image(.jpg)
    + SegmentationClass #label image(.png)
    + ImageSets
        + Segmentation
            - train.txt # filename without extension
            - val.txt
            - trainval.txt
 + tfrecord
对于SegmentationClass中的lable图像:

ignore_label 如果你的数据集存在ignore_label,注意不要把ignore_label和background混淆。 ignore_label是没有做标注的,不在预测范围内的,ignore_label是不参与计算loss的。在mask中将ignore_label的灰度值标记为255。
[外链图片转存失败,源站可能有防盗链机制,建议将图片保存下来直接上传(img-799qj1Ng-1588058618893)(http://www.pianshen.com/images/3/f293780fc45ea58d1e5193653ac76d2b.png)]
数据不平衡问题
trian_util.py 修改
转换为TFRecord格式
python3 build_voc2012_data.py --image_folder=./portrait/JPEGImages \
                             --semantic_segmentation_folder=./portrait/SegmentationClass \
                             --list_folder=./portrait/ImageSets/Segmentation \
                             --output_dir=./portrait/tfrecord
也可以写成shell脚本:
#deeplab/gen_tf.sh
#!/bin/bash
# Update PYTHONPATH.
export PYTHONPATH=$PYTHONPATH:`pwd`:`pwd`/slim

# Set up the working environment.
CURRENT_DIR=$(pwd)
WORK_DIR="${CURRENT_DIR}/deeplab/datasets"
DATA_DIR="/xxx/data/matting_human_half/portrait"

export CUDA_VISIBLE_DEVICES=1

python3 "${WORK_DIR}"/build_voc2012_data.py \
    --image_folder="${DATA_DIR}"/JPEGImages \
    --semantic_segmentation_folder="${DATA_DIR}/SegmentationClass" \
    --list_folder="${DATA_DIR}/ImageSets/Segmentation" \
    --output_dir="${DATA_DIR}/tfrecord"

训练
注册数据集
之前的版本是修改segmentation_dataset.py
#deeplab/datasets/data_generator.py
_PORTRAIT_INFORMATION = DatasetDescriptor(
    splits_to_sizes={
        'train':30000,
        'val':4426,
        'trainval':34426
    },
    num_classes=2, #classes include background
    ignore_label=255,
)

_DATASETS_INFORMATION = {
    'cityscapes': _CITYSCAPES_INFORMATION,
    'pascal_voc_seg': _PASCAL_VOC_SEG_INFORMATION,
    'ade20k': _ADE20K_INFORMATION,
    'portrait': _PORTRAIT_INFORMATION,
}
训练参数设置
logits层是在softmax前的最后一层特征图,是没有经过归一化的预测值,如果对分类问题再经过一层softmax就可以得到每类的概率。
或者直接修改代码,在使用预训练权重的时候,不加载该logits层。
#deeplab/utils/train_utils.py
# Variables that will not be restored.
#exclude_list = ['global_step']
exclude_list = ['global_step', 'logits']
# When fine_tune_batch_norm=True, use at least batch size larger than 12
# (batch size more than 16 is better). Otherwise, one could use smaller batch
# size and set fine_tune_batch_norm=False.
# For `xception_65`, use atrous_rates = [12, 24, 36] if output_stride = 8, or
# rates = [6, 12, 18] if output_stride = 16. For `mobilenet_v2`, use None. Note
# one could use different atrous_rates/output_stride during training/evaluation.
数据不平衡问题
train_utils.py中已无修改代码。
训练
# deeplab/train_portrait.sh
#!/bin/bash
# Update PYTHONPATH.
export PYTHONPATH=$PYTHONPATH:`pwd`:`pwd`/slim

# Set up the working environment.
CURRENT_DIR=$(pwd)
WORK_DIR="${CURRENT_DIR}/deeplab"
DATA_DIR="/mnt/data/matting_human_half/portrait"

export CUDA_VISIBLE_DEVICES=1

EXP_FOLDER="exp/train_on_trainval_set"
TRAIN_LOGDIR="${DATA_DIR}/${EXP_FOLDER}/train"
EVAL_LOGDIR="${DATA_DIR}/${EXP_FOLDER}/eval"
VIS_LOGDIR="$${DATA_DIR}/${EXP_FOLDER}/vis"
EXPORT_DIR="$${DATA_DIR}/${EXP_FOLDER}/export"
mkdir -p "${TRAIN_LOGDIR}"
mkdir -p "${EVAL_LOGDIR}"
mkdir -p "${VIS_LOGDIR}"
mkdir -p "${EXPORT_DIR}"

python3 "${WORK_DIR}"/train.py \
 --logtostderr \
 --train_split="train" \
 --model_variant="xception_65" \
 --atrous_rates=6 \
 --atrous_rates=12 \
 --atrous_rates=18 \
 --output_stride=16 \
 --decoder_output_stride=4 \
 --train_crop_size=513 \
 --train_crop_size=513 \
 --train_batch_size=2 \
 --dataset="portrait" \
 --training_number_of_steps=30000 \
 --initialize_last_layer=False \
 --last_layers_contain_logits_only=True \
 --fine_tune_batch_norm=False \
 --tf_initial_checkpoint="${WORK_DIR}/datasets/pascal_voc_seg/init_models/deeplabv3_pascal_train_aug/model.ckpt" \
 --train_logdir="${TRAIN_LOGDIR}" \
 --dataset_dir="${DATA_DIR}/tfrecord"
训练过程可视化
在tf.summary里设置好要查看保存的参数后运行会生成events.out.tfevents.{time}.{machine-name}的文件,这个就是用tensorboard来查看的日志文件。当训练和验证的日志文件不在同一个文件中时,想同时查看两个日志,要转到上一层目录,使用下面的命令,在浏览器中访问 http://服务器名:6006 即可查看。
tensorboard --logdir /xxx/data/matting_human_half/portrait/exp/train_on_trainval_set
验证
下载的版本运行eval.py不会出现mIoU分数,在summary里面加入tf.Print的op就可以显示了。
print_miou = tf.Print(miou, [miou], 'miou is :') #create print op
tf.summary.scalar('print_miou', print_miou)

summary_op = tf.summary.merge_all()
 python3 "${WORK_DIR}"/eval.py \
  --logtostderr \
  --eval_split="val" \
  --model_variant="xception_65" \
  --atrous_rates=6 \
  --atrous_rates=12 \
  --atrous_rates=18 \
  --output_stride=16 \
  --decoder_output_stride=4 \
  --eval_crop_size=801 \
  --eval_crop_size=601 \
  --dataset="portrait" \
  --checkpoint_dir="${TRAIN_LOGDIR}" \
  --eval_logdir="${EVAL_LOGDIR}" \
  --dataset_dir="${DATA_DIR}/tfrecord" \
  --max_number_of_evaluations=1
注意:–eval_crop_size必须是输入测试图像中最大的图像尺寸,否则会出错。如果测试集中图像的最大宽或最大高为800,那么–eval_crop_size=801。
可视化
使用版本中已无需修改,只能从下面两个中选择。
flags.DEFINE_enum('colormap_type', 'pascal', ['pascal', 'cityscapes'],
                  'Visualization colormap type.')
python3 "${WORK_DIR}"/vis.py \
 --logtostderr \
 --vis_split="val" \
 --model_variant="xception_65" \
 --atrous_rates=6 \
 --atrous_rates=12 \
 --atrous_rates=18 \
 --output_stride=16 \
 --decoder_output_stride=4 \
 --vis_crop_size=801 \
 --vis_crop_size=601 \
 --dataset="portrait" \
 --checkpoint_dir="${TRAIN_LOGDIR}" \
 --vis_logdir="${VIS_LOGDIR}" \
 --dataset_dir="${DATA_DIR}/tfrecord" \
 --max_number_of_iterations=1
注意:–vis_crop_size同–eval_crop_size。
模型导出
# CKPT_PATH="${TRAIN_LOGDIR}/model.ckpt-${NUM_ITERATIONS}"
# EXPORT_PATH="${EXPORT_DIR}/frozen_inference_graph.pb"

# python3 "${WORK_DIR}"/export_model.py \
  # --logtostderr \
  # --checkpoint_path="${CKPT_PATH}" \
  # --export_path="${EXPORT_PATH}" \
  # --model_variant="xception_65" \
  # --atrous_rates=6 \
  # --atrous_rates=12 \
  # --atrous_rates=18 \
  # --output_stride=16 \
  # --decoder_output_stride=4 \
  # --num_classes=2 \
  # --crop_size=801 \
  # --crop_size=601 \
  # --inference_scales=1.0
测试
测试输出的数据类型为(h,w,1),数据类型为int64,需要进一步处理需要类型转换。
import sys
import os
import time
import argparse
import tensorflow as tf
import numpy as np
import cv2


def parse_arguments(argv):
    parser = argparse.ArgumentParser()
    parser.add_argument('--image_dir',type=str,help='input images  dir', \
                         default='./data/test_ids')
    parser.add_argument('--model_dir',type=str,help='input model  dir', \
                        default='./portrait/exp/train_on_trainval_set_0007/export/frozen_inference_graph.pb')
    parser.add_argument('--output_dir',type=str,help='output images  dir', \
                        default='./portrait/output')

    return parser.parse_args(argv)
def prepare_image(img):
    h, w, _ = img.shape
    print(img.shape)
    if h >= w:
        ratio = 800. / h
        img_tmp = cv2.resize(img, None, fx=ratio, fy=ratio, interpolation=cv2.INTER_AREA)
        h_new, w_new, _ = img_tmp.shape
        print(img_tmp.shape)
        if w_new > 600:
            ratio_new = 600. / w_new
            img_resized = cv2.resize(img_tmp, None, fx=ratio_new, fy=ratio_new, interpolation=cv2.INTER_AREA)
        else:
            img_resized = img_tmp
    else:
        ratio = 600. / w
        img_resized = cv2.resize(img, None, fx=ratio, fy=ratio, interpolation=cv2.INTER_AREA)

    return img_resized

def segment(net_fun, image):
    img = prepare_image(image)
    img_input = np.expand_dims(img, axis=0).astype(np.uint8)
    result = net_fun(img_input)
    print(result.shape)
    mask = np.where(result.transpose((1, 2, 0)) == 1, 255, 0)
    seg_img = np.c_[img, mask]
    return seg_img

def main(args):
    output_dir = os.path.expanduser(args.output_dir)
    if not os.path.exists(output_dir):
        os.makedirs(output_dir)

    graph = tf.Graph()
    graph_def = None
    with open(args.model_dir, "rb") as f:
        graph_def = tf.GraphDef()
        graph_def.ParseFromString(f.read())
    if graph_def is None:
        raise RuntimeError('Cannot find inference graph in tar archive.')
    with graph.as_default():
        tf.import_graph_def(graph_def, name='')
        sess = tf.Session(graph=graph, config=tf.ConfigProto(gpu_options=tf.GPUOptions(allow_growth=True)))
        input_tensor = graph.get_tensor_by_name('ImageTensor:0')
        output_tensor = graph.get_tensor_by_name('SemanticPredictions:0')
        with sess.as_default():
            net_fun = lambda img : sess.run(output_tensor, feed_dict={input_tensor:img})

    if os.path.isfile(args.image_dir):
        image = cv2.imread(args.image_dir)
        image_name = os.path.basename(args.image_dir).split('.')[0] + '.png'
        output_image = os.path.join(args.output_dir, image_name)
        seg_img = segment(net_fun, image)
        cv2.imwrite(output_image, seg_img)
    elif os.path.isdir(args.image_dir):
        for image_name in os.listdir(args.image_dir):
            image_path = os.path.join(args.image_dir, image_name)
            output_image = os.path.join(args.output_dir, image_name.split('.')[0] + '.png')
            image = cv2.imread(image_path)
            seg_img = segment(net_fun, image)
            cv2.imwrite(output_image, seg_img)

if __name__ == '__main__':
    main(parse_arguments(sys.argv[1:]))
源码理解
train.py
- 数据结构初始化
train.main()函数中

初始化结果

- 数据读取
train.main()函数中

data_generator.get_one_shot_iterator()函数中

- TFRecord数据解析
data_generator._parse_function()函数中


- 图像预处理
data_generator._preprocess_image()函数中

input_preprocess.preprocess_image_and_label()

- 随机缩放

preprocess_utils.randomly_scale_image_and_lable()

- 边界填充
input_preprocess.preprocess_image_and_label()

feature_extractor.mean_pixel()

preprocess_utils.pad_to_bounding_box()


- 随机裁剪
input_preprocess.preprocess_image_and_label()

preprocess_utils.random_crop()


preprocess_utils._crop()

- 随机翻转
input_preprocess.preprocess_image_and_label()

preprocess_utils.flip_dim()

- 学习率设置
train._train_deeplab_model()

train_utils.get_model_learning_rate()


- 损失函数计算
train._train_deeplab_model()

train._build_deeplab()

common.new()


train._build_deeplab()

model.multi_scale_logits()


model._get_logits()

model.extract_features()

feature_extractor.extract_features()
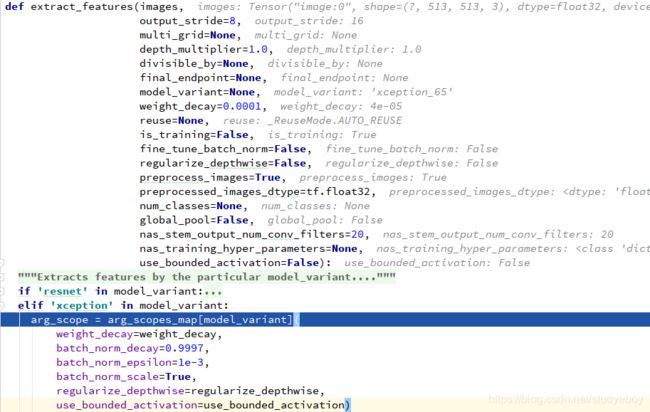
feature_extractor.arg_scopes_map()

xception.xception_arg_scope()


feature_extractor.extract_features()

feature_extractor.get_network()

feature_extractor.networks_map

xception.xception_65()


xception.xception_block()


xception.xception()

resnet_utils.conv2d_same()

arg_scope.add_arg_scope()

xception.xception()


xception.stack_blocks_dense()


arg_scope.add_arg_scope()

xception.xception_module()


xception.xception_module的子函数


xception.xception_module()


xception.xception()

model.extract_features()


utils.split_separable_conv2d()

model.extract_features()

model._get_logits()

model.refine_by_decoder()


utils.split_separable_conv2d()

model._get_logits()


model.get_branch_logits()


model.multi_scale_logits()

train._build_deeplab()

train_utils.add_softmax_cross_entropy_loss_for_each_scale()


train._build_deeplab()

train._log_summaries()

train._tower_loss()

train._train_deeplab_model()

train._average_gradients()

train._train_deeplab_model()

model.get_extra_layer_scopes()
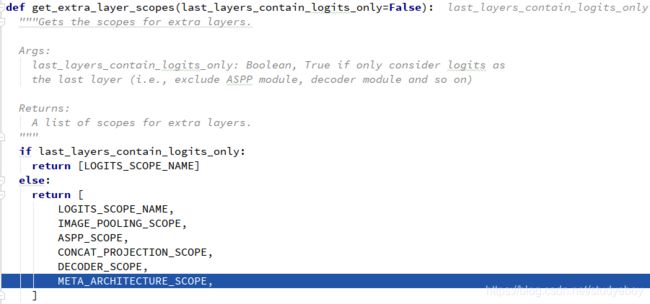
train._train_deeplab_model()

train_utils.get_model_gradient_multipliers()

train._train_deeplab_model()

train.mian()

train_utils.get_model_init_fn()

train.mian()

参考资料
- DeepLab V3+ 训练自己的数据
- 使用 deeplabv3+ 训练自己的数据集经验总结
- deeplabv3+训练自己的数据集
- Deeplab V3+训练自己数据集全过程
- TensorFlow实战:Chapter-9下(DeepLabv3+在自己的数据集训练)
- TENSORBOARD 可视化网络运行过程
- DEEPLABV3+ 命令行不显示MIOU的解决