上一篇文章剖析了 ArrayBlockingQueue 的相关源码,那这篇文章接着看另外一个常见的阻塞队列 —— LinkedBlockingQueue
简介
LinkedBlockingQueue 从字面意思可以知道,这是一个链表结构的阻塞队列。
咱们还是先从一个Demo入手吧!
public class LinkedBlockingQueueDemo {
    public static void main(String[] args) throws InterruptedException {
        // 初始化 LinkedBlockingQueue 对象,如果不指定容量大小则默认设置为 Integer.MAX_VALUE
        LinkedBlockingQueue queue = new LinkedBlockingQueue(20);
        for (int i = 1; i <= 15; i++) {
            // 添加元素
//            queue.add(i);
            queue.offer(i);
        }
        // 往链表尾部塞一个元素,当在不可执行的时候会阻塞线程,直到可以被其它线程唤醒
        queue.put(100);

        // 读取队列首个元素,但不删除
        System.out.println(queue.peek());
        System.out.println("执行peek()方法后,数组的长度为:" + queue.size());

        // 读取队首个元素并删除
        System.out.println(queue.poll());
        System.out.println("执行poll()方法后,数组的长度为:" + queue.size());

        // 读取队首个元素并删除,如果队列为空则挂起等待
        queue.take();
        System.out.println("执行take()方法后,数组的长度为:" + queue.size());

        // 删除节点
        System.out.println("如果队列头节点则删除并返回true,否则返回false:" + queue.remove());
        System.out.println("如果队列存在“2”这个元素则删除并返回true,否则返回false:" + queue.remove(2));

        System.out.println("队列是否存在“1”这个元素" + queue.contains(1));

        queue.clear();
        System.out.println("执行clear()方法后,数组的长度为:"  + queue.size());
    }
}
执行结果:
1
执行peek()方法后,数组的长度为:16
1
执行poll()方法后,数组的长度为:15
执行take()方法后,数组的长度为:14
如果队列头节点则删除并返回true,否则返回false:3
如果队列存在“2”这个元素则删除并返回true,否则返回false:false
队列是否存在“1”这个元素false
执行clear()方法后,数组的长度为:0
通过以上例子,对 LinkedBlockingQueue 有了一个初步的了解,接下来就通过源码进一步加深对 LinkedBlockingQueue 的使用吧!
源码剖析
简单的翻译下 LinkedBlockingQueue 类注释可以得出以下信息:
- 底层数据结构为链表、可选择有边界的阻塞队列
- 链表的读写顺序为先进先出(FIFO),因此链表的头节点是链表中存在时间最久的节点(最老),尾节点是链表中存在时间最短的节点(最新)
- 初始化的时候可选择链表大小,默认大小是 Integer.MAX_VALUE
- 可以使用 Iterator 和 Collection 接口的所有方法
链表节点
    static class Node {
        // 当前节点的值
        E item;
        // 下一个节点对象
        Node next;
        Node(E x) { item = x; }
    }
成员变量
    // 容量大小
    private final int capacity;

    // 当前队列元素数量
    private final AtomicInteger count = new AtomicInteger();

    // 链表头节点,其前驱节点为null
    transient Node head;

    // 链表尾节点,其后继为null
    private transient Node last;

    // 读取链表节点时加的锁
    private final ReentrantLock takeLock = new ReentrantLock();

    // 线程间通信,如果队列为空时,就阻塞
    private final Condition notEmpty = takeLock.newCondition();

    // 插入链表节点时加的锁
    private final ReentrantLock putLock = new ReentrantLock();

    // 线程间通信,如果队列满的时候,就阻塞
    private final Condition notFull = putLock.newCondition();
LinkedBlockingQueue 构造方法
    // 默认链表大小为 Integer.MAX_VALUE
    public LinkedBlockingQueue() {
        this(Integer.MAX_VALUE);
    }

    // 指定链表长度
    public LinkedBlockingQueue(int capacity) {
        if (capacity <= 0) throw new IllegalArgumentException();
        this.capacity = capacity;
        last = head = new Node(null);
    }

    // 传入 Collection 对象作为默认链表节点
    public LinkedBlockingQueue(Collection c) {
        this(Integer.MAX_VALUE);
        final ReentrantLock putLock = this.putLock;
        putLock.lock(); // Never contended, but necessary for visibility
        try {
            int n = 0;
            for (E e : c) {
                if (e == null)
                    throw new NullPointerException();
                if (n == capacity)
                    throw new IllegalStateException("Queue full");
                enqueue(new Node(e));
                ++n;
            }
            count.set(n);
        } finally {
            putLock.unlock();
        }
    }
由源码可知,初始化 LinkedBlockingQueue 可以指定链表大小,也可以指定传入 Collection 对象作为默认链表节点。
接下来的源码剖析惊奇的发现,与 ArrayBlockingQueue 的源码很多相似,判断逻辑也基本相同,如果不熟悉 ArrayBlockingQueue 的朋友可以看下我另外一篇拙作![J.U.C 阻塞队列源码剖析系列(二)之 ArrayBlockingQueue]
添加节点:add(E e)、offer(E e) 和 put(E e)
    public boolean add(E e) {
        if (offer(e))
            return true;
        else
            throw new IllegalStateException("Queue full");
    }
    // 将指定元素插入到此队列的尾部(如果立即可行且不会超出此队列的容量),在成功时返回 true,如果此队列已满,则返回 false。
    public boolean offer(E e) {
        if (e == null) throw new NullPointerException();
        final AtomicInteger count = this.count;
        if (count.get() == capacity)
            return false;
        int c = -1;
        // 将元素对象封装成一个节点对象 node
        Node node = new Node(e);
        final ReentrantLock putLock = this.putLock;
        putLock.lock();
        try {
            //判断队列是否已经满了
            if (count.get() < capacity) {
                // 调用enqueue方法执行插入节点的操作
                enqueue(node);
                // 插入元素到队列尾部,自增 count
                c = count.getAndIncrement();
                if (c + 1 < capacity)
                    notFull.signal();
            }
        } finally {
            putLock.unlock();
        }
        // 唤醒消费线程,因为队列已经有元素了( c 原本等于-1,有新元素进入后加1就等于0,也就是说队列有元素了)
        if (c == 0)
            signalNotEmpty();
        return c >= 0;
    }
    // 尾部插入节点(看到这里不禁叫了声wc,再次对 Doug Lea 表达敬佩之情!只要设计合理,代码逻辑既清晰又简单!)
    private void enqueue(Node node) {
        last = last.next = node;
    }
    // 添加元素,当队列已满时,会阻塞当前线程
    public void put(E e) throws InterruptedException {
        if (e == null) throw new NullPointerException();
        int c = -1;
        // 创建新节点
        Node node = new Node(e);
        final ReentrantLock putLock = this.putLock;
        final AtomicInteger count = this.count;
        putLock.lockInterruptibly();
        try {
            //当队列已满,添加线程阻塞
            while (count.get() == capacity) {
                notFull.await();
            }
            // 调用enqueue方法添加到队尾
            enqueue(node);
            c = count.getAndIncrement();
            //添加成功后判断是否可以继续添加,队列未满
            if (c + 1 < capacity)
                //唤醒等待添加线程
                notFull.signal();
        } finally {
            putLock.unlock();
        }
        if (c == 0)
            signalNotEmpty();
    }
对于 LinkedBlockingQueue 新增数据来说,节点都是在链表尾部添加,同时在添加数据的时候会判断是否超出链表阀值,维护 notEmpty 和 notFull ,当链表空或者满的时候就阻塞。

读取数据:peek()、poll() 和 take()方法
需要关注的问题是,哪个方法只读取不删除,哪个方法既读取又删除,哪个方法会阻塞,分别是怎样实现的。
    // 读取队列首个元素,但不删除
    public E peek() {
        // 链表为空则返回null
        if (count.get() == 0)
            return null;
        final ReentrantLock takeLock = this.takeLock;
        takeLock.lock();
        try {
            // 获取head的后继为first
            Node first = head.next;
            // 如果first为null,代表链表没有节点数据,直接返回null
            if (first == null)
                return null;
            else
                // 否则返回first的item
                return first.item;
        } finally {
            takeLock.unlock();
        }
    }

    // 读取队首个元素并删除
    public E poll() {
        final AtomicInteger count = this.count;
        // 当count为0时,代表链表为空,直接返回null
        if (count.get() == 0)
            return null;
        E x = null;
        int c = -1;
        final ReentrantLock takeLock = this.takeLock;
        takeLock.lock();
        try {
            // 当已有元素数量大于0时
            if (count.get() > 0) {
                // dequeue 方法就是将头节点移除
                x = dequeue();
                // 对已有节点数量进行自减
                c = count.getAndDecrement();
                // 判断 c 是否大于1,如果大于1则唤醒等待在 notEmpty 上的线程
                if (c > 1)
                    notEmpty.signal();
            }
        } finally {
            takeLock.unlock();
        }
        // 唤醒notFull上的等待线程
        if (c == capacity)
            signalNotFull();
        return x;
    }

    // 读取队首个元素并删除,如果队列为空则挂起等待
    public E take() throws InterruptedException {
        E x;
        int c = -1;
        final AtomicInteger count = this.count;
        final ReentrantLock takeLock = this.takeLock;
        takeLock.lockInterruptibly();
        try {
            // 当队列节点数量为0,则挂起等待
            while (count.get() == 0) {
                notEmpty.await();
            }
            x = dequeue();
            // 对已有节点数量进行自减
            c = count.getAndDecrement();
            // 判断 c 是否大于1,如果大于0则唤醒等待在 notEmpty 上的线程
            if (c > 1)
                notEmpty.signal();
        } finally {
            takeLock.unlock();
        }
        // 唤醒notFull上的等待线程
        if (c == capacity)
            signalNotFull();
        return x;
    }
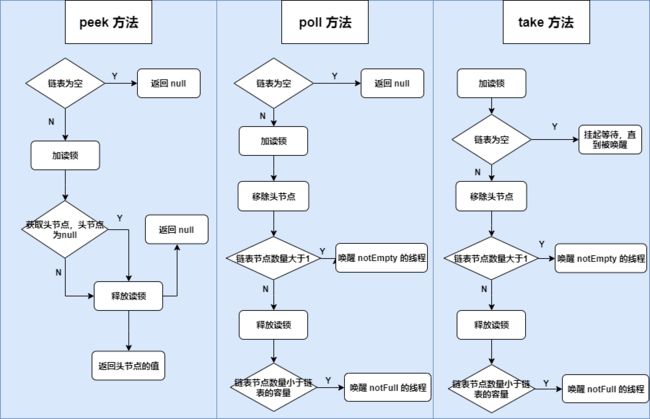
我画了一张图,可以直观的看到这三个读取方法之间的差别和实现的逻辑
删除节点:remove()、remove(Object o) 和 removeAll(Collection c)
    // 实际上就是调用poll方法删除首个节点(除了链表头节点)
    public E remove() {
        E x = poll();
        if (x != null)
            return x;
        else
            throw new NoSuchElementException();
    }

    // 删除指定元素
    public boolean remove(Object o) {
        if (o == null) return false;
        fullyLock();
        try {
            for (Node trail = head, p = trail.next;
                 p != null;
                 trail = p, p = p.next) {
                if (o.equals(p.item)) {
                    unlink(p, trail);
                    return true;
                }
            }
            return false;
        } finally {
            // 释放所有的锁
            fullyUnlock();
        }
    }
    // 将putLock和takeLock都上锁,阻止添加或获取
    void fullyLock() {
        putLock.lock();
        takeLock.lock();
    }
    // 链表中删除指定节点
    void unlink(Node p, Node trail) {
        p.item = null;
        trail.next = p.next;
        if (last == p)
            last = trail;
        if (count.getAndDecrement() == capacity)
            notFull.signal();
    }
    // 释放putLock和takeLock锁
    void fullyUnlock() {
        takeLock.unlock();
        putLock.unlock();
    }

    // 删除链表所有包含指定集合的节点
    public boolean removeAll(Collection c) {
        Objects.requireNonNull(c);
        boolean modified = false;
        Iterator it = iterator();
        while (it.hasNext()) {
            if (c.contains(it.next())) {
                it.remove();
                modified = true;
            }
        }
        return modified;
    }
清空链表所有的节点:clear()
    // 清空链表所有的节点
    public void clear() {
        // 加锁,防止其它线程读取或者插入节点
        fullyLock();
        try {
            // 遍历链表,将所有的节点赋值为null,便于GC
            for (Node p, h = head; (p = h.next) != null; h = p) {
                h.next = h;
                p.item = null;
            }
            head = last;
            // CAS设置count为0,如果原先count值与链表容量相同,则代表在执行clear方法之前,链表容量满了,会有其它线程阻塞,所以会执行唤醒线程的操作,防止其它线程一直阻塞,损耗CPU的资源
            if (count.getAndSet(0) == capacity)
                notFull.signal();
        } finally {
            // 释放所有的锁
            fullyUnlock();
        }
    }
链表长度:size()
    // 返回链表节点长度
    public int size() {
        return count.get();
    }
是否包含指定节点值:contains(Object o)
    // 返回是否包含指定的元素
    public boolean contains(Object o) {
        if (o == null) return false;
        fullyLock();
        try {
            // 从头开始向后遍历链表,如果存在与o相同的元素,就返回true
            for (Node p = head.next; p != null; p = p.next)
                if (o.equals(p.item))
                    return true;
            return false;
        } finally {
            fullyUnlock();
        }
    }
总结
如果看过 ArrayBlockingQueue 相关源码的朋友,不难发现其实 LinkedBlockingQueue 源码与 ArrayBlockingQueue 源码十分相似,那么 LinkedBlockingQueue 和 ArrayBlockingQueue 有什么区别呢?
- 创建 ArrayBlockingQueue 对象的时候强制指定数组容量大小,好处是不会造成内存溢出,但缺点也显而易见,就是当容量不足的时候不能扩容;而创建 LinkedBlockingQueue 对象可指定链表容量大小,也可以不指定容量,默认是 Integer.MAX_VALUE。好处是当无法预测容量大小的时候,使用默认容量大小,可以当作是无限大,缺点就是会存在内存溢出,万一添加速度大于删除速度,会导致大量的数据滞留在内存中,耗尽内存。
- ArrayBlockingQueue 使用数组作为数据存储容器,而 LinkedBlockingQueue 使用链表作为数据存储容器。在频繁或者大批量插入或删除元素时使用 LinkedBlockingQueue 性能会比使用 ArrayBlockingQueue 的性能低,因为 LinkedBlockingQueue 会频繁的创建或者销毁 Node 节点,对于 GC 的压力比较大。
- ArrayBlockingQueue 执行插入或者删除操作都是使用同一个 ReentrantLock 锁,而 LinkedBlockingQueue 队列的锁是分离,执行插入操作使用putLock,而删除操作的时候使用takeLock,这样的好处是提高队列的吞吐量,也就是说在高并发的情况下生产者和消费者可以并行地操作队列中的数据,以此来提高整个队列的并发性能。
- ArrayBlockingQueue 计算大小count值使用的是全局锁,而 LinkedBlockingQueue 使用的是原子变量
一句话总结就是:在高并发的情况下,读多写少的场景下采用 ArrayBlockingQueue 的性能比 LinkedBlockingQueue 要高,但在读写都多的情况下,则需要按实际选择使用 ArrayBlockingQueue 或 LinkedBlockingQueue(需要通过实际场景和压测等方式才能判断使用哪个性能上会更好)。因为 ArrayBlockingQueue 增删数据快,但读写都是同一个锁,不能并发读写,而 LinkedBlockingQueue 增删数据速度不如 ArrayBlockingQueue 快,但读写锁分离,能并发读写。
如果觉得源码剖析不错的话,麻烦点个赞哈!对于文章有哪里不清楚或者有误的地方,欢迎在评论区留言~