前言
上一篇我们分析了View的measure过程,这一篇我们再来看下View的layout过程,layout过程相对比measure过程简单一些,Layout的入口还是从ViewRootImpl的 performLayout()开始的,performLayout()里面调用layout(),我们来看下layout()方法
View#layout()
    public void layout(int l, int t, int r, int b) {
        if ((mPrivateFlags3 & PFLAG3_MEASURE_NEEDED_BEFORE_LAYOUT) != 0) {
            onMeasure(mOldWidthMeasureSpec, mOldHeightMeasureSpec);
            mPrivateFlags3 &= ~PFLAG3_MEASURE_NEEDED_BEFORE_LAYOUT;
        }

        int oldL = mLeft;
        int oldT = mTop;
        int oldB = mBottom;
        int oldR = mRight;

        boolean changed = isLayoutModeOptical(mParent) ?
                setOpticalFrame(l, t, r, b) : setFrame(l, t, r, b);

        if (changed || (mPrivateFlags & PFLAG_LAYOUT_REQUIRED) == PFLAG_LAYOUT_REQUIRED) {
            onLayout(changed, l, t, r, b);

            if (shouldDrawRoundScrollbar()) {
                if(mRoundScrollbarRenderer == null) {
                    mRoundScrollbarRenderer = new RoundScrollbarRenderer(this);
                }
            } else {
                mRoundScrollbarRenderer = null;
            }

            mPrivateFlags &= ~PFLAG_LAYOUT_REQUIRED;

            ListenerInfo li = mListenerInfo;
            if (li != null && li.mOnLayoutChangeListeners != null) {
                ArrayList listenersCopy =
                        (ArrayList)li.mOnLayoutChangeListeners.clone();
                int numListeners = listenersCopy.size();
                for (int i = 0; i < numListeners; ++i) {
                    listenersCopy.get(i).onLayoutChange(this, l, t, r, b, oldL, oldT, oldR, oldB);
                }
            }
        }

        mPrivateFlags &= ~PFLAG_FORCE_LAYOUT;
        mPrivateFlags3 |= PFLAG3_IS_LAID_OUT;
    }
首先会通过setFrame()方法来设定View的四个顶点的位置,也就是View中mLeft、mTop、mRigh、tmBottom这四个值,即View的四个顶点一旦确定,那么在父容器中的位置就确定了,再往下会调用onLayout()方法,View中的onLayout()是一个空方法,ViewGroup中是一个抽象方法,具体方法都在实现类里面,下面我们看下FrameLayout的onLayout()方法
FrameLayout#onLayout()
    @Override
    protected void onLayout(boolean changed, int left, int top, int right, int bottom) {
        layoutChildren(left, top, right, bottom, false /* no force left gravity */);
    }

    void layoutChildren(int left, int top, int right, int bottom, boolean forceLeftGravity) {
        final int count = getChildCount();

        final int parentLeft = getPaddingLeftWithForeground();
        final int parentRight = right - left - getPaddingRightWithForeground();

        final int parentTop = getPaddingTopWithForeground();
        final int parentBottom = bottom - top - getPaddingBottomWithForeground();

        for (int i = 0; i < count; i++) {
            final View child = getChildAt(i);
            if (child.getVisibility() != GONE) {
                final LayoutParams lp = (LayoutParams) child.getLayoutParams();

                final int width = child.getMeasuredWidth();
                final int height = child.getMeasuredHeight();

                int childLeft;
                int childTop;

                int gravity = lp.gravity;
                if (gravity == -1) {
                    gravity = DEFAULT_CHILD_GRAVITY;
                }

                final int layoutDirection = getLayoutDirection();
                final int absoluteGravity = Gravity.getAbsoluteGravity(gravity, layoutDirection);
                final int verticalGravity = gravity & Gravity.VERTICAL_GRAVITY_MASK;

                switch (absoluteGravity & Gravity.HORIZONTAL_GRAVITY_MASK) {
                    case Gravity.CENTER_HORIZONTAL:
                        childLeft = parentLeft + (parentRight - parentLeft - width) / 2 +
                        lp.leftMargin - lp.rightMargin;
                        break;
                    case Gravity.RIGHT:
                        if (!forceLeftGravity) {
                            childLeft = parentRight - width - lp.rightMargin;
                            break;
                        }
                    case Gravity.LEFT:
                    default:
                        childLeft = parentLeft + lp.leftMargin;
                }

                switch (verticalGravity) {
                    case Gravity.TOP:
                        childTop = parentTop + lp.topMargin;
                        break;
                    case Gravity.CENTER_VERTICAL:
                        childTop = parentTop + (parentBottom - parentTop - height) / 2 +
                        lp.topMargin - lp.bottomMargin;
                        break;
                    case Gravity.BOTTOM:
                        childTop = parentBottom - height - lp.bottomMargin;
                        break;
                    default:
                        childTop = parentTop + lp.topMargin;
                }

                child.layout(childLeft, childTop, childLeft + width, childTop + height);
            }
        }
    }
这个方法里主要是遍历子View,获取到测量值和设置的位置属性,在计算出View的四个顶点,最后子View调用layout()方法再确定自己的位置。
总结
重写onMeasure() 方法时,一定要调用 setMeasuredDimension(), 对于 onLayout 方法而言,一定要对 View调用layout() 方法,这样才能将View放置到合适的位置上去。layout 方法分别有四个参数,依次是 view 相对于 父view 的左边距,上边距,右边距,和下边距,看下下面图片
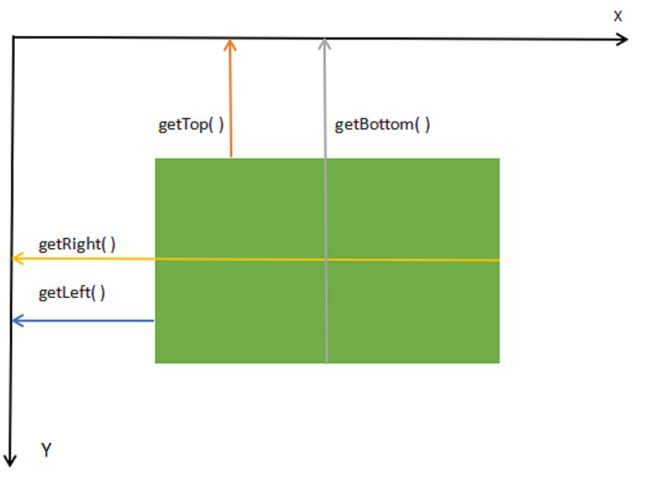
坐标示意图