RealSense D455的标定并运行VINS-FUSION
RealSense D455的标定并运行VINS-FUSION
-
- 一、使用D455运行VINS-FUSION
-
- 1.1 RealSense D455的使用
-
- 1.1.1 Intel® RealSense™ SDK 2.0的安装
- 1.1.2 realsense-ros的安装编译
- 2.1 VINS-FUSION的安装编译
- 2.2 使用D455运行VINS-FUSION
-
- 2.2.1 修改VINS-FUSION中的config文件
- 2.2.2 修改realsense-ros中的launch文件
- 2.2.3 运行VINS-FUSION
- 二、对D455进行标定
-
- 2.1 校准IMU
- 2.2 检查相机的健康状态
- 2.3 下载编译code_utils
- 2.3 下载编译imu_utils
- 2.4 下载编译Kalibr
- 2.5 IMU 标定
- 2.6 多相机标定
- 2.7 IMU+双目相机标定
- 2.8 修改配置文件
- 2.9 使用自己配置文件运行VINS-FUSION
- 参考资料
一、使用D455运行VINS-FUSION
1.1 RealSense D455的使用
1.1.1 Intel® RealSense™ SDK 2.0的安装
安装过程可以参照官网教程.
Reconnect the Intel RealSense depth camera and run: realsense-viewer to verify the installation.
使用D455相机的原装usb线到电脑(接口最好是usb3.0,否则可能导致数据传输过慢而使得数据无法实时传输,出现画面卡住的现象),并且打开一个终端输入
realsense-viewer
看这个软件能否打开来验证是否成功安装。
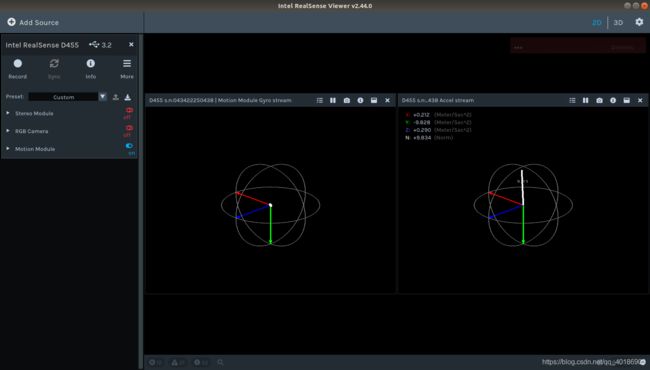
成功的界面如下:
 我们通过左边的选项打开imu,双目和rgb相机模块,同时可以查看各个模块的参数并进行设置

1.1.2 realsense-ros的安装编译
安装过程可以参考官网教程.跟着README.md进行安装就可以了
安装编译完之后,插上相机,打开一个终端
source ~/catkin_ws/devel/setup.bash
roslaunch realsense2_camera rs_camera.launch
注意:这个时候要关掉realsense-viewer,看到如图就是启动成功了

主要看RealSense Node IS Up!,如果报错显示运动模块没有启动成功,拔掉usb重新插一下,或者重新运行launch文件,像屏幕中这种错误warning就没有影响
再打开一个新的终端
rostopic list
就可以看到这个相机发布的所有topic 如图

打开一个终端
rviz
Fixed Frame选择camera_link(连接realsense数据),通过Add添加topic:/camera/accel/sample、/camera/gyro/sample/camera、/infra1/image_rect_raw、/camera/infra2/image_rect_raw后可以看到如下结果为准(说明可以成功读取到加速计、陀螺仪、双目数据,陀螺仪无法可视化)

2.1 VINS-FUSION的安装编译
- 安装ROS 根据你的Ubuntu版本安装对应的ROS版本,安装过程可以参照ROS官方教程
- 安装ceres可以参照ceres官方教程.
- 下载编译VINS-FUSION
cd ~/catkin_ws/src
git clone https://github.com/HKUST-Aerial-Robotics/VINS-Fusion.git
cd ../
catkin_make
source ~/catkin_ws/devel/setup.bash
#或者 echo "source ~/catkin_ws/devel/setup.bash" >> ~/.bashrc
#这样就不用每次打开一个新终端都要source一次了
VINS-FUSION/config/下放着各种config文件,这里也有realsense-d435i的配置文件,我们复制这个文件夹并改名为realsense-d455。
2.2 使用D455运行VINS-FUSION
2.2.1 修改VINS-FUSION中的config文件
这里我们运行双目加IMU的,进入到catkin_ws/src/realsense-ros/realsense2_camera/launch/realsense-d455(刚刚我们复制的)
- 修改realsense_stereo_imu_config.yaml
realsense_stereo_imu_config.yaml的topic改成D455相机的topic,输出的路径也改成你自己,图片的高和宽也要修改,如图所示:

- 修改left.yaml和right.yaml
修改相机图片的尺寸为D455的

保存,修改config文件不需要重新编译工程
2.2.2 修改realsense-ros中的launch文件
进入到catkin_ws/src/realsense-ros/realsense2_camera/launch/中打开rs_camera.launch(可以对原先的文件做一个备份)
- 打开双目,修改图片的width、height

- 打开imu的加速度计和陀螺仪并合并为一个topic


保存,修改launch不需要重新编译工程
2.2.3 运行VINS-FUSION
- 打开一个终端 ,用roslaunch 打开realsense摄像头
source ~/catkin_ws/devel/setup.bash
roslaunch realsense2_camera rs_camera.launch
- 打开一个终端,用于打开rviz`
source ~/catkin_ws/devel/setup.bash
roslaunch vins vins_rviz.launch
- 打开一个终端,跑起来
source ~/catkin_ws/devel/setup.bash
rosrun vins vins_node ~/catkin_ws/src/VINS-Fusion/config/yourconfig_path/your_config_file.yaml
#我的是rosrun vins vins_node ~/catkin_ws/src/VINS-Fusion/src/VINS-Fusion-master/config/realsense_d455/realsense_stereo_imu_config.yaml
三个终端运行成功的话,你的rviz会有数据,特征点和frame的pose
如图所示

相机还没有标定,轨迹特别抖,下面我们对D455相机进行标定
二、对D455进行标定
我们使用kalibr对相机进行标定,code_utils和imu_utils对imu进行标定,但是这个标定出来是没有重力加速度的。因此我们首先要看一下我们相机的加速度在静置的时候是不是正常的,正常的话我们加速度计的g_norm: 9.82左右(可以打开realsense-viewer,开启Motion Module 鼠标放在Accel上面查看)如图
如果不正常,例如我校准前的g_norm为9.13左右,你再怎么标定,最后运行VINS-FUSION都是抖的。
2.1 校准IMU
如果你的设备imu的加速度计是正常的,那你可以跳过以下的校准过程。
我们采用官方的方法对imu进行校准
可以参考https://dev.intelrealsense.com/docs/imu-calibration-tool-for-intel-realsense-depth-camera
使用官方的校准脚本按照指示进行校准

校准完之后我们会发现加速度计的值变成9.82左右,恢复正常。要是标定出来的结果的相机的重投影误差Reprojection error在0.15以上的话,当排除是标定过程不够规范的情况下,我们就要思考是不是相机健康状态的问题了。因此建议都进行相机健康状态的检查,避免浪费时间。
2.2 检查相机的健康状态
我们可以参照https://dev.intelrealsense.com/docs/calibration对相机进行各种校准

我们使用realsense-viewer的Self Calibration查看相机的健康状态。

具体的可以看链接中的官方教程
如果健康状态不佳,我们再使用Dynamic Calibration进行校准,要是结果还是不好,我们就使用Custom Calibration进行校准。
2.3 下载编译code_utils
- 创建ros工作空间,用于code_utils以及后面的imu_utils,工作空间名和路径可以自己更改,code_utils和imu_utils都是imu标定需要用到的,用于标定imu噪声密度以及随机游走系数
mkdir -p ~/imu_catkin_ws/src
cd ~/imu_catkin_ws/src
catkin_init_workspace
cd ..
catkin_make
source ~/imu_catkin_ws/devel/setup.bash
- 下载编译code_utils
cd ~/imu_catkin_ws/src
git clone git@github.com:gaowenliang/code_utils.git
cd ..
catkin_make
可能出现以下报错:
(1)catkin_make时出现libdw.h没有找到

解决方法:
sudo apt-get install libdw-dev
(2)catkin_make时出现backward.hpp没有找到

解决方法:将sumpixel_test.cpp中# include "backward.hpp"改为:#include “code_utils/backward.hpp”
2.3 下载编译imu_utils
cd ~/imu_catkin_ws/src/
git clone git@github.com:gaowenliang/imu_utils.git
cd ..
catkin_make
2.4 下载编译Kalibr
参考官方教程https://github.com/ethz-asl/kalibr/wiki/installation,建议用源码安装。
2.5 IMU 标定
- 找到realsense-ros包,进入/catkin_ws/src/realsense-ros/realsense2_camera/launch(路径仅供参考),复制其中的rs_camera.launch,并重命名为rs_imu_calibration.launch(命名随意),并对里面的内容做如下更改
将
"unite_imu_method" default=""/>
改为
"unite_imu_method" default="linear_interpolation"/>
这样做的目的是将accel和gyro的数据合并得到imu话题,如何不这样做发布的topic中只要加速计和陀螺仪分开的topic,没有合并的camera/imu topic。
然后运行启动文件
roslaunch realsense2_camera rs_imu_calibration.launch
- 编写启动文件,打开~/imu_catkin_ws/src/imu_utils/launch(路径仅供参考),打开终端运行
gedit d455_imu_calibration.launch
写入
    "imu_utils" type="imu_an" name="imu_an" output="screen">
    	<!--TOPIC名称和上面一致-->
        <param name="imu_topic" type="string" value= "/camera/imu"/>
        <!--imu_name 无所谓-->
        <param name="imu_name" type="string" value= "d455"/>
        <!--标定结果存放路径-->
        <param name="data_save_path" type="string" value= "$(find imu_utils)/data/"/>
        <!--数据录制时间-min-->
        <param name="max_time_min" type="int" value= "50"/>
        <!--采样频率,即是IMU频率,采样频率可以使用rostopic hz /camera/imu查看,设置为200,为后面的rosbag play播放频率-->
        <param name="max_cluster" type="int" value= "200"/>
    </node>

</launch>
可以把data文件夹修改为你自己创建的文件夹,但是你要先创建文件夹,系统不好根据launch文件自动创建你写的文件夹,否则就没有标定的结果文件产生
- 录制imu数据包,realsense静止放置,放置时间要稍大于d455_imu_calibration.launch中的录制时间,即大于50分钟
rosbag record -O imu_calibration /camera/imu
其中imu_calibration是bag包的名字,可以更改,录的包在当前终端目录下,/camera/imu是发布的IMU topic,可以通过以下命令查看
rostopic list
- 运行校准程序,首先激活imu_util工作空间的setup.bash,前面路径仅供参考
source ~/imu_catkin_ws/devel/setup.bash
接着
roslaunch imu_utils d455_imu_calibration.launch
- 回放数据包,打开新的终端
cd 存放imu_calibration.bag的路径
rosbag play -r 200 imu_calibration.bag
标定结束后在imu_catkin_ws/src/imu_utils/data中生成许多文件,其中d455_imu_param.yaml就是我们想要的结果,展示如下:
%YAML:1.0
---
type: IMU
name: d455
Gyr:
   unit: " rad/s"
   avg-axis:
      gyr_n: 2.2694017811443127e-03
      gyr_w: 1.5093165704007960e-05
   x-axis:
      gyr_n: 2.1390712008937025e-03
      gyr_w: 1.3700104668819177e-05
   y-axis:
      gyr_n: 3.3859514861653089e-03
      gyr_w: 1.9947367601639396e-05
   z-axis:
      gyr_n: 1.2831826563739265e-03
      gyr_w: 1.1632024841565309e-05
Acc:
   unit: " m/s^2"
   avg-axis:
      acc_n: 1.8781895411772817e-02
      acc_w: 4.2708211959312134e-04
   x-axis:
      acc_n: 1.6809059392304603e-02
      acc_w: 3.0361425556602322e-04
   y-axis:
      acc_n: 1.9089959906299522e-02
      acc_w: 5.2129306868938571e-04
   z-axis:
      acc_n: 2.0446666936714330e-02
      acc_w: 4.5633903452395503e-04
作为对比,realsense自带的参数都是0
2.6 多相机标定
- 下载打印标定板或购买标定板
到https://github.com/ethz-asl/kalibr/wiki/downloads选择
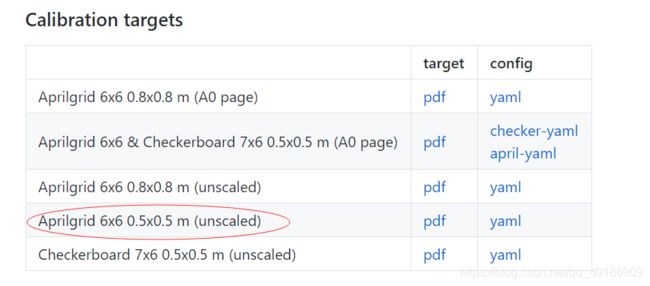
需要科学上网
下载,然后缩放到40%,用A4纸就可以打印出来
原始pdf的格子参数是:
6*6的格子
大格子边长:5.5cm
小格子边长:1.65cm
小格子与大格子边长比例:0.3
调整后的格子参数是:
大格子边长:2.2cm
小格子边长:0.66cm
小格子与大格子边长比例:0.3
但这只是理想情况,实际情况还得实际测量。
新建april_6x6_A4.yaml文件,格式参考上图的yaml,内容展示如下:
target_type: 'aprilgrid' #gridtype
tagCols: 6               #number of apriltags
tagRows: 6               #number of apriltags
tagSize: 0.022           #size of apriltag, edge to edge [m]
tagSpacing: 0.3          #ratio of space between tags to tagSize
千万要自己测量大格子边长,即tagSize
- 启动关闭结构光
默认开始结构光时,双目图像会有很多点,这些点可能对标定有影响,所以使用时需要关闭结构光。
这里有两种方法:
(1)方法一:
先启动
roslaunch realsense2_camera rs_camera.launch
新打开终端,运行
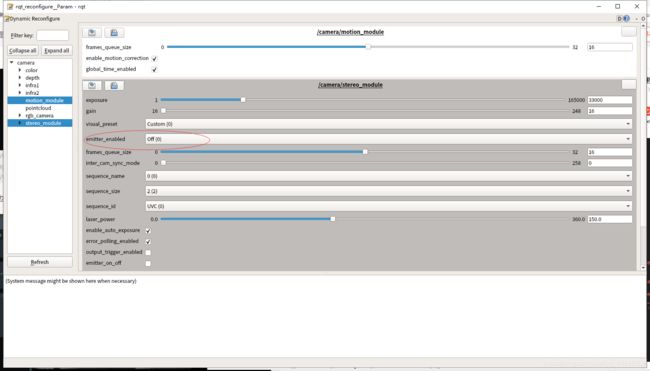
rosrun rqt_reconfigure rqt_reconfigure
打开后将camera->stereo_module中的emitter_enabled设置为off(0) ,展示如下:
(2)方法二:
打开终端
realsense-viewer
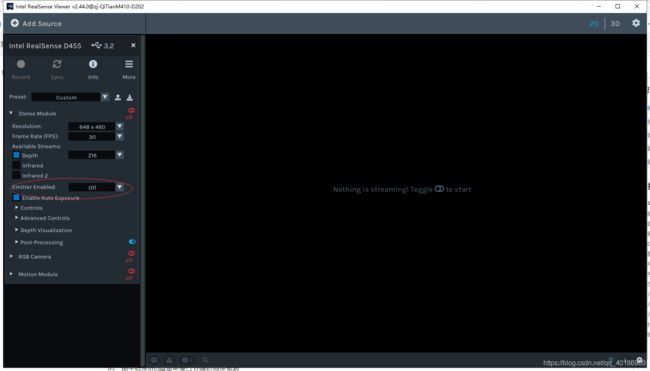
打开双目模块的下拉选项,关闭结构光
- 确定realsense合适放置位置
新打开终端,运行rviz
rviz
之后在里面add rgb和双目对应的topic,/camera/color/image_raw、/camera/infra1/image_rect_raw、/camera/infra2/image_rect_raw展示如下:

之后对准标定板,尝试移动realsense,同时要确保标定板一直在三个图像当中。录制过程参考https://www.youtube.com/watch?v=puNXsnrYWTY&app=desktop
需要科学上网观看
总结下来就是偏航角左右摆动3次,俯仰角摆动3次,滚转角摆动3次,上下移动3次,左右移动3次,前后移动3次,然后自由移动一段时间,摆动幅度要大一点,让视角变化大一点,但是移动要缓慢一点,同时要保证标定板在3个相机视野内部,整个标定时间要在90s以上更好
- 修改相机帧数(官方推荐是4Hz,尽管实际频率不完全准确,但是不影响结果)
kalibr在处理标定数据的时候要求频率不能太高,一般为4Hz,我们可以使用如下命令来更改topic的频率,实际上是将原来的topic以新的频率转成新的topic,实际测试infra1才是对应左目相机
rosrun topic_tools throttle messages /camera/color/image_raw 4.0 /color
rosrun topic_tools throttle messages /camera/infra1/image_rect_raw 4.0 /infra_left
rosrun topic_tools throttle messages /camera/infra2/image_rect_raw 4.0 /infra_right
注意:这种方式可能导致不同摄像头的时间不同步,如果出现这个问题,可以尝试不做这个操作,不这样做意味着需要更多的处理时间,这样的话后面也要相应的更改。
可以使用rqt或者rostopic hz 查看是不是设置频率成功
- 录制ROS数据包
rosbag record -O multicameras_calibration /infra_left /infra_right /color
后面三个topic就是转换频率后的topic
- 使用Kalibr标定
先激活环境变量
cd kalibr_workspace/
source /devel/setup.bash
然后
kalibr_calibrate_cameras --target /home/zj/yaml/april_6x6_A4.yaml --bag /home/zj/multicameras_calibration.bag --models pinhole-radtan pinhole-radtan pinhole-radtan --topics /infra_left /infra_right /color --bag-from-to 3 202 --show-extraction --approx-sync 0.04
其中–target /home/zj/yaml/april_6x6_A4.yaml是标定板的配置文件,注意如果选择棋格盘,注意targetCols和targetRows表示的是内侧角点的数量,不是格子数量。–bag /home/zj/multicameras_calibration.bag 是录制的数据包,models pinhole-radtan pinhole-radtan pinhole-radtan表示三个摄像头的相机模型和畸变模型(解释参考https://github.com/ethz-asl/kalibr/wiki/supported-models,根据需要选取,其中VINS使用的畸变模型是radtan), --topics /infra_left /infra_right /color表示三个摄像头对应的拍摄的数据话题,–bag-from-to 3 202表示处理bag中3-202秒的数据。–show-extraction表示显示检测特征点的过程,这些参数可以相应的调整。
可以使用rosbag info 来参看录制的包的信息

可能出现以下报错:
cannot import name NavigationToolbar2Wx,如下图所示:

解决办法:发现 matplotlib 中没有NavigationToolbar2Wx 而是换成了NavigationToolbar2WxAgg 所以修改源码,将PlotCollection.py中的NavigationToolbar2Wx换成NavigationToolbar2WxAgg
原来的PlotCollection.py:

最终得到的结果为三个文件:

2.7 IMU+双目相机标定
- 编写chain.yaml,格式参考Kalibr官方教程https://github.com/ethz-asl/kalibr/wiki/yaml-formats中的chain.yaml,具体的参数参考上面得到的yaml文件,没有的参数可以删除,最终结果示例如下:
cam0:
  camera_model: pinhole
  intrinsics: [444.4617619131555, 445.8454315652347, 432.80268892870737, 238.46447284695066]
  distortion_model: radtan
  distortion_coeffs: [0.023147944124162483, 0.009527744993635307, -0.003037057112355134,
    0.00407361570443628]
  rostopic: /infra_left
  resolution: [848, 480]
cam1:
  camera_model: pinhole
  intrinsics: [443.1096669888874, 443.9768633771752, 408.95166329682496, 240.09006087346106]
  distortion_model: radtan
  distortion_coeffs: [0.027705037462393833, -0.01574614925545594, -0.0022736743087378446,
    -0.0007310105168411698]
  T_cn_cnm1:
  [0.9998445289661612, 0.0010786898351605742, 0.017599838768357582, -0.09545379951091501]
  [-0.0010024900710803456, 0.9999900891168162, -0.004337819935958944, 0.00028687493959671543]
  [-0.017604343500683194, 0.004319501866991005, 0.9998357009996834, -0.0008795974702151129]
  [0.0, 0.0, 0.0, 1.0]
  rostopic: /infra_right
  resolution: [848, 480]
T_cn_cnm1:表示的是左目相机到右目相机的旋转和平移,具体的参数可以参考前面标定得到的结果
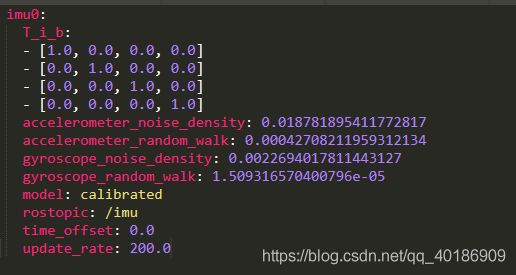
- 编写imu.yaml,格式参考https://github.com/ethz-asl/kalibr/wiki/yaml-formats中的imu.yaml,具体参数使用之前imu标定得到的参数,示例如下:
#Accelerometers
accelerometer_noise_density: 1.8781895411772817e-02   #Noise density (continuous-time)
accelerometer_random_walk:   4.2708211959312134e-04   #Bias random walk

#Gyroscopes
gyroscope_noise_density:     2.2694017811443127e-03   #Noise density (continuous-time)
gyroscope_random_walk:       1.5093165704007960e-05  #Bias random walk

rostopic:                    /imu      #the IMU ROS topic
update_rate:                 200.0      #Hz (for discretization of the values above)
- 准备好之前的april_6x6_A4.yaml,示例如下:
target_type: 'aprilgrid' #gridtype
tagCols: 6               #number of apriltags
tagRows: 6               #number of apriltags
tagSize: 0.022           #size of apriltag, edge to edge [m]
tagSpacing: 0.3          #ratio of space between tags to tagSize
- 复制realsense-ros包中rs_camera.launch,重命名为rs_imu_stereo.launch,更改内容为
(1) imu和双目数据时间对齐
"enable_sync" default="true"/>
(2)合并加速计和陀螺仪的topic
"unite_imu_method" default="linear_interpolation"/>
- 启动realsense
rosrun rqt_reconfigure rqt_reconfigure
- 关闭IR结构光,参考上面
新打开终端,运行
rosrun rqt_reconfigure rqt_reconfigure
打开后将camera->stereo_module中的emitter_enabled设置为off(0) ,展示如下:
-
打开rviz,add imu topic和infra1 topic以及infra2 topic,同时调整realsense位置,要确保双目图像数据一直包含标定板全部内容
-
调整imu和双目topic的发布频率以及以新的topic名发布它们,其中双目图像的发布频率改为20Hz,imu发布频率改为200Hz
rosrun topic_tools throttle messages /camera/infra1/image_rect_raw 20.0 /infra_left
rosrun topic_tools throttle messages /camera/infra2/image_rect_raw 20.0 /infra_right
rosrun topic_tools throttle messages /camera/imu 200.0 /imu
注意:这种调整频率的方式只是理想结果,通过rostopic hz topic名可以查看实际的频率,可以发现实际频率和设置的频率并不一定相同,但可以先这样
- 开始录制数据包,录制过程参考https://www.youtube.com/watch?v=puNXsnrYWTY&app=desktop,同样注意双目图像在整个过程要包含整个标定板,同时运动不能太快,这样会造成图像过于模糊,在前后左右上下方向来回移动,录制大概90s以上,前后几秒等下可以不使用。录制命令为:
rosbag record -O imu_stereo.bag /infra_left /infra_right /imu
相应参数需要相应更改,target.yaml对应april_6x6_A4.yaml文件
最终得到的结果为是得打yaml,txt,和pdf文件

标定结果的好坏可以看results-imucam-homezjimu_stereo.txt中的重投影误差Reprojection error,两个相机都在0.15以下说明标定的结果比较好

2.8 修改配置文件
- 根据联合标定结果中camchain-imucam-homezjimu_stereo.yaml和imu-homezjimu_stereo.yaml的结果

填写到realsense_stereo_imu_config.yaml中,我的结果如下其中
(1)cam0:T_cam_imu的内容填写到body_T_cam0,cam1的同理
(2)加速度计和陀螺仪的噪声和随机游走填入相应位置
%YAML:1.0

#common parameters
#support: 1 imu 1 cam; 1 imu 2 cam: 2 cam;
imu: 1
num_of_cam: 2

imu_topic: "/camera/imu"
image0_topic: "/camera/infra1/image_rect_raw"
image1_topic: "/camera/infra2/image_rect_raw"
output_path: "/home/zj/output/"

cam0_calib: "left.yaml"
cam1_calib: "right.yaml"
image_width: 848
image_height: 480


# Extrinsic parameter between IMU and Camera.
estimate_extrinsic: 1   # 0  Have an accurate extrinsic parameters. We will trust the following imu^R_cam, imu^T_cam, don't change it.
                        # 1  Have an initial guess about extrinsic parameters. We will optimize around your initial guess.

body_T_cam0: !!opencv-matrix
   rows: 4
   cols: 4
   dt: d
   data: [0.9997365138741053, 0.0007909661849009175, -0.022940732319293045, -0.0003203932040226351,
       -0.0006000777011822279, 0.9999651529470048, 0.008326631877666833, -0.00043200107662112015,
       0.02294651898662751, -0.008310671703778034, 0.9997021506439949, 8.480310980282157e-05,
        0.0, 0.0, 0.0, 1.0]

body_T_cam1: !!opencv-matrix
   rows: 4
   cols: 4
   dt: d
   data: [0.9999842915414713, 0.001723228976525899, -0.005333587179040158, -0.09577311637718552,
       -0.001701835550258554, 0.9999904996708382, 0.0040130192906798375, -0.00014516852512665927,
       0.0053404518593314, -0.00400387936406104, 0.9999777240138784, -0.0007910340109165637,
        0.0, 0.0, 0.0, 1.0]

#Multiple thread support
multiple_thread: 1

#feature traker paprameters
max_cnt: 150            # max feature number in feature tracking
min_dist: 30            # min distance between two features
freq: 10                # frequence (Hz) of publish tracking result. At least 10Hz for good estimation. If set 0, the frequence will be same as raw image
F_threshold: 1.0        # ransac threshold (pixel)
show_track: 0           # publish tracking image as topic
flow_back: 1            # perform forward and backward optical flow to improve feature tracking accuracy

#optimization parameters
max_solver_time: 0.04  # max solver itration time (ms), to guarantee real time
max_num_iterations: 8   # max solver itrations, to guarantee real time
keyframe_parallax: 10.0 # keyframe selection threshold (pixel)

#imu parameters       The more accurate parameters you provide, the better performance
acc_n: 0.018781895411772817          # accelerometer measurement noise standard deviation. #0.2   0.04
gyr_n: 0.0022694017811443127        # gyroscope measurement noise standard deviation.     #0.05  0.004
acc_w: 0.00042708211959312134         # accelerometer bias random work noise standard deviation.  #0.002
gyr_w: 1.509316570400796e-05      # gyroscope bias random work noise standard deviation.     #4.0e-5
g_norm: 9.82         # gravity magnitude

#unsynchronization parameters
estimate_td: 1                      # online estimate time offset between camera and imu
td: 0.00                             # initial value of time offset. unit: s. readed image clock + td = real image clock (IMU clock)

#loop closure parameters
load_previous_pose_graph: 1        # load and reuse previous pose graph; load from 'pose_graph_save_path'
pose_graph_save_path: "/home/zj/output/pose_graph/" # save and load path
save_image: 0                   # save image in pose graph for visualization prupose; you can close this function by setting 0
- 填写相机配置文件left.yaml和right.yaml
根据camchain-imucam-homezjimu_stereo.yaml中的相机内参和畸变参数填写,结果如下:
(1)left.yaml
%YAML:1.0
---
model_type: PINHOLE
camera_name: camera
image_width: 848
image_height: 480
distortion_parameters:
   k1: 0.023147944124162483
   k2: 0.009527744993635307
   p1: -0.003037057112355134
   p2: 0.00407361570443628
projection_parameters:
   fx: 444.4617619131555
   fy: 445.8454315652347
   cx: 432.80268892870737
   cy: 238.46447284695066
(2)right.yaml
%YAML:1.0
---
model_type: PINHOLE
camera_name: camera
image_width: 848
image_height: 480
distortion_parameters:
   k1: 0.027705037462393833
   k2: -0.01574614925545594
   p1: -0.0022736743087378446
   p2: -0.0007310105168411698
projection_parameters:
   fx: 443.1096669888874
   fy: 443.9768633771752
   cx: 408.95166329682496
   cy: 240.09006087346106
2.9 使用自己配置文件运行VINS-FUSION
-
依照未标定之前的样子修改launch文件,如果是一步步来的这里应该不用修改了
-
打开一个终端 ,用roslaunch 打开realsense摄像头
source ~/catkin_ws/devel/setup.bash
roslaunch realsense2_camera rs_camera.launch
- 打开一个终端,用于打开rviz`
source ~/catkin_ws/devel/setup.bash
roslaunch vins vins_rviz.launch
- 打开一个终端,跑起来
source ~/catkin_ws/devel/setup.bash
rosrun vins vins_node ~/catkin_ws/src/VINS-Fusion/config/yourconfig_path/your_config_file.yaml
#我的是rosrun vins vins_node ~/catkin_ws/src/VINS-Fusion/src/VINS-Fusion-master/config/realsense_d455/realsense_stereo_imu_config.yaml
- 运行结果
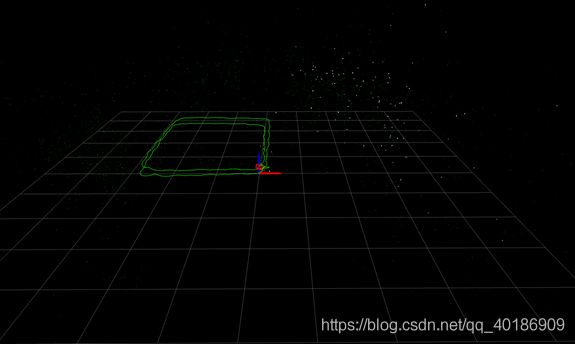
绕着走了两个矩形,理论上打开回环检测模块,结果会更加精确
注意,要关闭结构光,结构光会影响轨迹的准确性
参考资料
标定过程:https://blog.csdn.net/xiaoxiaoyikesu/article/details/105646064