-
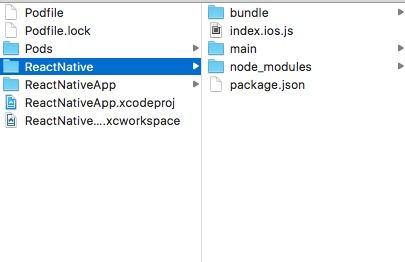
项目文件目录结构如下图所示:
 项目文件目录结构.png
目录结构解释:
- ReactNative目录:React Native所有相关的文件
- bundle:离线包所需的文件(注意:本地离线包,必须固定的名字,内容无需手动创建,通过打离线资源包,自动生成)
- main:JavaScript的所有代码文件
- index.ios.js:JavaScript的启动的入口文件(供iOS使用)
- node_modules:React Native需要的依赖包,通过命令(nom install)生成
- package.json:React Native需要的配置文件
原生iOS项目接入React Native模块
1.创建package.json,并且添加所需要的配置
{
  "name": "Calculate",
  "version": "0.0.1",
  "private": true,
  "scripts": {
    "start": "node node_modules/react-native/local-cli/cli.js start",
    "test": "jest"
  },
  "dependencies": {
    "react": "~15.4.1",
    "react-native": "0.42.3",
    "react-native-code-push": "^1.17.4-beta"
  },
  "devDependencies": {
    "babel-jest": "19.0.0",
    "babel-preset-react-native": "1.9.1",
    "eslint": "^3.19.0",
    "eslint-plugin-react": "^6.10.3",
    "jest": "19.0.2",
    "native-echarts": "^0.3.0",
    "react-navigation": "^1.0.0-beta.7",
    "react-test-renderer": "~15.4.1"
  },
  "jest": {
    "preset": "react-native"
  }
}
2.在包含package.json的根目录中输出:npm install 命令,自动生成node_modules文件

node_modules文件夹.png
3.在xcode项目的Podfile文件中配置需要的React Native组件,然后通过pod添加管理需要的依赖库(通过:pod install导入)
# platform :ios, '9.0'

target 'ReactNativeApp' do

    pod 'React', :path => ‘./ReactNative/node_modules/react-native', :subspecs => [
        'Core',
        'ART',
        'RCTActionSheet',
        'RCTAdSupport',
        'RCTGeolocation',
        'RCTImage',
        'RCTNetwork',
        'RCTPushNotification',
        'RCTSettings',
        'RCTText',
        'RCTVibration',
        'RCTWebSocket',
        'RCTLinkingIOS',
    ]
    pod "Yoga", :path => “./ReactNative/node_modules/react-native/ReactCommon/yoga"
    pod 'CodePush', :path => ‘./ReactNative/node_modules/react-native-code-push'
end
特别注意:path:=>对应的路径,需要根据项目文件所在的目录来决定
4.创建一个index.ios.js文件(这里借用React Native官网的代码)
'use strict';

import React from 'react';
import {
  AppRegistry,
  StyleSheet,
  Text,
  View
} from 'react-native';

class RNHighScores extends React.Component {
  render() {
    var contents = this.props["scores"].map(
      score => {score.name}:{score.value}{"\n"}
    );
    return (


          2048 High Scores!


          {contents}


    );
  }
}

const styles = StyleSheet.create({
  container: {
    flex: 1,
    justifyContent: 'center',
    alignItems: 'center',
    backgroundColor: '#FFFFFF',
  },
  highScoresTitle: {
    fontSize: 20,
    textAlign: 'center',
    margin: 10,
  },
  scores: {
    textAlign: 'center',
    color: '#333333',
    marginBottom: 5,
  },
});

// 整体js模块的名称
AppRegistry.registerComponent('RNHighScores', () => RNHighScores);
注意:到此,所有JS相关的代码准备已经完成,本次总结,直接跳过使用本地服务的形式,而采用bundle离线资源包的形式
5.在ReactNatvie目录中创建bundle(命名必须固定)空文件夹
1.在index.ios.js 和node_modules所在的根目录中打包
react-native bundle --entry-file index.ios.js --platform ios --dev false --bundle-output bundle/main.ios.jsbundle --assets-dest bundle
index.ios.js:为iOS平台,加载资源的入口文件
bundle/main.ios.jsbundle:bundle固定,main.ios.jsbundle为后续Xcode加载所需要的文件
--assets-dest bundle:将图片资源打包进bundle中
2.成功生成离线资源包,如下图所示

生成离线资源包.png
3.热更新............后续补充,暂时请跳转至RN热更新——codepush@bonon
//本次项目中使用到的命令

//打包命令
react-native bundle --entry-file index.ios.js --platform ios --dev false --bundle-output bundle/main.ios.jsbundle --assets-dest bundle

//上传code-push服务器
code-push release ReactNative bundle/main.ios.jsbundle 1.0.0
//解释
code-push release <#项目名称#>  bundle/<#项目中入口名称#> <#xcode项目中Version#>
6.Xcode项目中(建议直接跳过方式1,阅读方式2)
方式1:使用本地服务(即官网的基本方式)
- Xcode编辑器中,代码如下(借用官网,不推荐)
- (IBAction)highScoreButtonPressed:(id)sender {
    NSURL *jsCodeLocation = [NSURL URLWithString:@"http://localhost:8081/index.ios.bundle?platform=ios"];
    RCTRootView *rootView = [[RCTRootView alloc] initWithBundleURL:jsCodeLocation
                                                        moduleName:@"RNHighScores"
                                                 initialProperties:nil
                                                 launchOptions    :nil];
    UIViewController *vc = [[UIViewController alloc] init];
    vc.view = rootView;
    [self presentViewController:vc animated:YES completion:nil];
}
- 【终端】进入package.json所在的目录,开启本地服务,否则会如图所示
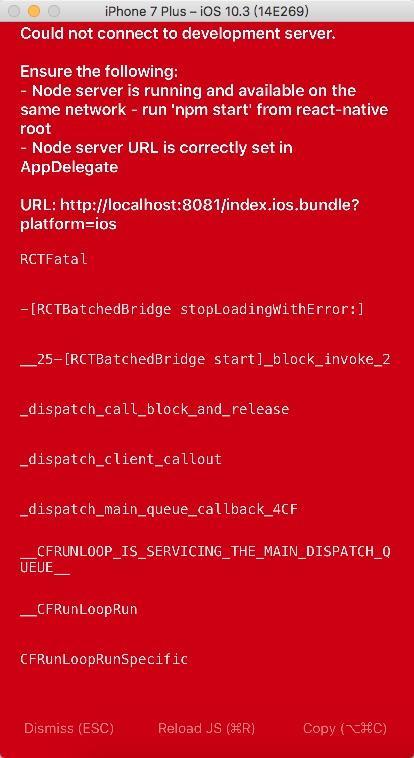
本地服务没开启.png.jpeg
//在node_modules文件所在的根目录,输入以下命令,开启本地服务
 react-native start
-
成功接入,如图所示
 成功显示.png
方式2:使用本离线资源包(后期上线使用的方式)
至此,离线包已经在5.1步骤中完成,可以直接使用
-
将bundle文件添加到Xcode项目中,如图所示
 bundle离线资源包添加到项目中.png
 头文件导入
#import       //容器
#import
#import                //热更库
- 代码
- (IBAction)onClickReactApp:(UIButton *)sender {
    NSURL *jsCodeLocation;
#ifdef DEBUG
    //Debug模式,本地调试,加载资源方式
    jsCodeLocation = [[NSBundle mainBundle] URLForResource:@"main.ios" withExtension:@"jsbundle"];
#else
    //Release模式或者服务器使用方式
    jsCodeLocation = [CodePush bundleURLForResource:@"main.ios"];
#endif

    //moduleName:即index.ios.js中的AppRegistry对应模块名称
    RCTRootView *rootView = [[RCTRootView alloc] initWithBundleURL:jsCodeLocation
                                                        moduleName:@"Calculate"
                                                 initialProperties:nil
                                                     launchOptions:nil];

    UIViewController *vc = [[UIViewController alloc] init];
    vc.view = rootView;
    [self presentViewController:vc animated:YES completion:nil];
}
- 效果如图所示

显示效果.jpeg
检查缺失的配置文件
- info.plist 中App Transport Security
NSAppTransportSecurity
NSAllowsArbitraryLoads
NSExceptionDomains
localhost
NSExceptionAllowsInsecureHTTPLoads
static.centanet.com
NSExceptionAllowsInsecureHTTPLoads
NSIncludesSubdomains
//--------------------以上---------------------//
- info.plist添加热更新所需要的标识key,
  CodePushDeploymentKey
  前面添加应用得到的发布key(注意这里要选择是正式版的key还是测试版的key,不是发布到appstore可以用Staging的key)
- 报错:Argument list too long: recursive header expansion failed at:/....../
1.原因:因为RN的文件项目路径过于长,循环遍历,遍历不过来,然后就报错提示了

2.解决:Xcode -->项目 --> Bulid Setting -->Search Paths
--> User Header Search Paths --> 将$(PODS_ROOT) 改成 $(PODS_ROOT)/React/React就OK了