挑战4天开发博客SpringBoot+Vue
目录
- DAY1
-
- 【创建项目】
- 【mybatis-plus】
-
- MyBatisPlusConfig类
- MyBatis-Plus分页插件原理
- 代码生成工具
- 测试一下
- 测试启动发生了报错
- 【统一封装结果】
-
- Result类
- 封装结果测试
- 【整合shiro+jwt】
-
- 整体逻辑分析 ❗
- jwt
- shiro-redis
- ShiroConfig类
- AccountRealm类
- 再修改ShiroConfig类
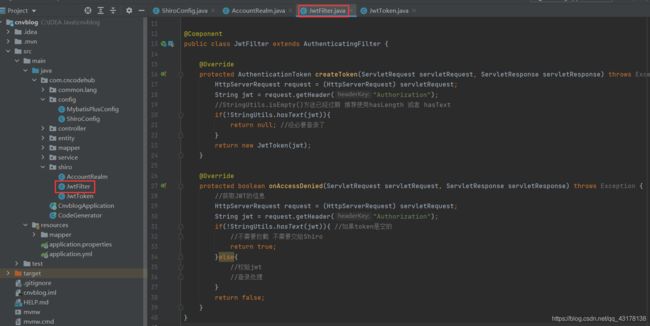
- JwtFilter JwtToken
- 【Shiro】
-
- Shiro和Spring Security
- SpringBoot整合Shiro
- DAY2
-
- 【继续整合shiro和jwt】
-
- JwtFilter类
- JwtUtils类
-
- 配置绑定小插曲
- 继续JwtFilter类
- Realm也要改
- 异常全局处理
- 【实体校验】
-
- Hibernate validator
- 添加校验规则
- 校验规则测试
- 【跨域问题】
-
- 浏览器的同源策略
- CORS-跨域资源共享
- CorsConfig类
- 【登录接口开发】
-
- LoginDTO
- AccountController
- 测试
- DAY3
-
- 【博客接口开发】
-
- BlogController
- 测试
- 让人迷惑的Bug
- 【前端开发准备】
-
- 创建新项目
- 安装element-ui
- 安装axios
- 登录界面开发
- DAY4/DAY5
-
- 【配置全局axios拦截】
- 【公共组件Header】
- 【Blogs页面开发】
-
- 安装mavon-editor
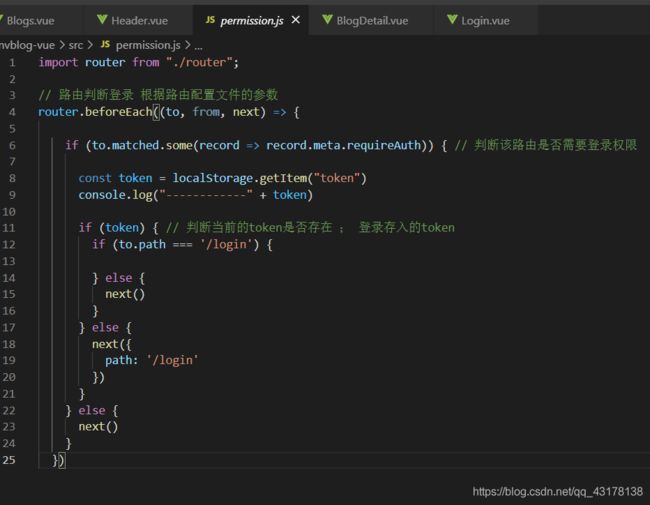
- 路由权限拦截
- 小结
前言:
快速做的一个博客项目,后端SpringBoot+前端Vue
详细技术栈见博客内容。
有拜读大佬的开源代码,然后快速复现加上做一些改动。(前端开发纯小白,只会一点点的点点Vue,非常感谢大佬的开源,让我能够学习)
本博客记录一下全过程,也算是文字版的教程???
后面可能还会再增加一些内容。
本项目github: 完整代码仓库地址
感谢大佬开源:大佬github地址
编码时间:4天
复盘时间:1天
DAY1
【创建项目】
创建一个新的项目,整合mybatis plus,加入依赖:
        <dependency>
            <groupId>com.baomidougroupId>
            <artifactId>mybatis-plus-boot-starterartifactId>
            <version>3.3.2version>
        dependency>
yml文件配置:
spring:
  datasource:
    driver-class-name: com.mysql.cj.jdbc.Driver
    url: jdbc:mysql://localhost:3306/cnvblog?serverTimezone=Asia/Shanghai
    username: root
    password: xxxxxxxxxx
mybatis-plus:
  mapper-locations: classpath*:/mapper/**Mapper.xml
server:
  port: 8086
【mybatis-plus】
mybatis-plus使用文档官网地址
PS:其实如果做SpringBoot开发的话,Spring Data JPA会更舒服一些。
MyBatisPlusConfig类
MyBatisPlus的配置类:
// 开启mapper接口扫描,添加分页插件
@Configuration
@EnableTransactionManagement
@MapperScan("com.cncodehub.mapper")
public class MybatisPlusConfig {


    //PaginationInterceptor是一个分页插件
    @Bean
    public PaginationInterceptor paginationInterceptor(){

        PaginationInterceptor paginationInterceptor = new PaginationInterceptor();
        return paginationInterceptor;
    }
}
MyBatis-Plus分页插件原理
MyBatis内部使用RowBounds对象进行分页,这是针对结果集执行的内存分页,不是数据库分页。
MyBatis-Plus的分页插件原理如下:
- 用拦截方法拦截SQL语句
- 对SQL进行解析,判断是否有page分页对象
- 如果有page分页对象进行分页解析
- 重写SQL语句(拼接limit),根据dialect方言
- 然后执行拼接后的SQL
代码生成工具
Mybatis-plus官网的代码,复制
官网链接

然后运行代码生成工具

测试一下
测试启动发生了报错
SpringBoot的依赖版本匹配真是要命。。。。。
保存信息:
Description:

An attempt was made to call a method that does not exist. The attempt was made from the following location:

    com.baomidou.mybatisplus.autoconfigure.SafetyEncryptProcessor.postProcessEnvironment(SafetyEncryptProcessor.java:55)

The following method did not exist:

    com.baomidou.mybatisplus.core.toolkit.StringUtils.isNotBlank(Ljava/lang/CharSequence;)Z

The method's class, com.baomidou.mybatisplus.core.toolkit.StringUtils, is available from the following locations:

    jar:file:/C:/Users/24725/.m2/repository/com/baomidou/mybatis-plus-core/3.0.7.1/mybatis-plus-core-3.0.7.1.jar!/com/baomidou/mybatisplus/core/toolkit/StringUtils.class

The class hierarchy was loaded from the following locations:

    com.baomidou.mybatisplus.core.toolkit.StringUtils: file:/C:/Users/24725/.m2/repository/com/baomidou/mybatis-plus-core/3.0.7.1/mybatis-plus-core-3.0.7.1.jar


Action:

Correct the classpath of your application so that it contains a single, compatible version of com.baomidou.mybatisplus.core.toolkit.StringUtils


Process finished with exit code 0

这个报错是因为开始这两个版本不一致,,,,mybatis-plus的依赖版本要一致。
Description:

An attempt was made to call a method that does not exist. The attempt was made from the following location:

    org.springframework.boot.autoconfigure.http.HttpMessageConverters.configurePartConverters(HttpMessageConverters.java:140)

The following method did not exist:

    org.springframework.http.converter.support.AllEncompassingFormHttpMessageConverter.getPartConverters()Ljava/util/List;

The method's class, org.springframework.http.converter.support.AllEncompassingFormHttpMessageConverter, is available from the following locations:

    jar:file:/C:/Users/24725/.m2/repository/org/springframework/spring-web/5.2.8.RELEASE/spring-web-5.2.8.RELEASE.jar!/org/springframework/http/converter/support/AllEncompassingFormHttpMessageConverter.class

The class hierarchy was loaded from the following locations:

    org.springframework.http.converter.support.AllEncompassingFormHttpMessageConverter: file:/C:/Users/24725/.m2/repository/org/springframework/spring-web/5.2.8.RELEASE/spring-web-5.2.8.RELEASE.jar
    org.springframework.http.converter.FormHttpMessageConverter: file:/C:/Users/24725/.m2/repository/org/springframework/spring-web/5.2.8.RELEASE/spring-web-5.2.8.RELEASE.jar


Action:

Correct the classpath of your application so that it contains a single, compatible version of org.springframework.http.converter.support.AllEncompassingFormHttpMessageConverter
这是因为依赖导入错误。
开始的依赖是org.springframework spring-web

真正需要的依赖是这个,@GetMapping就是从这个依赖包里引入的。
【统一封装结果】
Result类
本来想用泛型类来写,,无奈泛型静态方法有限制。
静态方法泛型:
静态方法不可以访问类上定义的泛型
如果静态方法操作的应用数据类型不确定,可以将泛型定义在方法上 。
@Data
//可以序列化
public class Result<T> implements Serializable {


    //三个字段
    private int code;
    private String msg;
    private T data;

    public Result<T> succ(int code, String msg, T data){

        Result<T> result = new Result<T>();
        result.setCode(code);
        result.setMsg(msg);
        result.setData(data);
        return result;
    }
}
就是说我这样写,方法不能是static。
但是我看到有博客说加static是可以的!
需要按照如下语法:
public static<T> Result<T> succ(int code, String msg, T data){

        Result<T> result = new Result<T>();
        result.setCode(code);
        result.setMsg(msg);
        result.setData(data);
        return result;
    }
封装结果测试

打开浏览器访问https://localhost:8086/user/index就可以看到数据。
【整合shiro+jwt】
安全框架选用了shiro。(换Spring Security也是可以的)
整体逻辑分析 ❗
jwt
JSON Web Token (JWT)是一个开放标准(RFC 7519),它定义了一种紧凑的、自包含的方式,用于作为JSON对象在各方之间安全地传输信息。该信息可以被验证和信任,因为它是数字签名的。
下列场景中使用JSON Web Token是很有用的:
- Authorization (授权) : 这是使用JWT的最常见场景。一旦用户登录,后续每个请求都将包含JWT,允许用户访问该令牌允许的路由、服务和资源。单点登录是现在广泛使用的JWT的一个特性,因为它的开销很小,并且可以轻松地跨域使用。
- Information Exchange (信息交换) : 对于安全的在各方之间传输信息而言,JSON Web Tokens无疑是一种很好的方式。因为JWT可以被签名,例如,用公钥/私钥对,你可以确定发送人就是它们所说的那个人。另外,由于签名是使用头和有效负载计算的,您还可以验证内容没有被篡改。
JSON Web Token由三部分组成,它们之间用圆点(.)连接。这三部分分别是:
- Header
- Payload
- Signature
shiro-redis
shiro的缓存和会话信息,一般考虑用redis来存储这些数据 (暂未实现),需要同时整合shiro和redis。
加入依赖:
<!-- https://mvnrepository.com/artifact/org.crazycake/shiro-redis -->
<dependency>
    <groupId>org.crazycake</groupId>
    <artifactId>shiro-redis</artifactId>
    <version>3.2.3</version>
</dependency>
<!-- https://mvnrepository.com/artifact/cn.hutool/hutool-all -->
<dependency>
    <groupId>cn.hutool</groupId>
    <artifactId>hutool-all</artifactId>
    <version>5.6.3</version>
</dependency>
<!-- https://mvnrepository.com/artifact/io.jsonwebtoken/jjwt -->
<dependency>
    <groupId>io.jsonwebtoken</groupId>
    <artifactId>jjwt</artifactId>
    <version>0.9.1</version>
</dependency>
ShiroConfig类
@Bean
public SessionManager sessionManager() {

    DefaultWebSessionManager sessionManager = new DefaultWebSessionManager();

    // inject redisSessionDAO
    sessionManager.setSessionDAO(redisSessionDAO);

    // other stuff...

    return sessionManager;
}

@Bean
public SessionsSecurityManager securityManager(List<Realm> realms, SessionManager sessionManager) {

    DefaultWebSecurityManager securityManager = new DefaultWebSecurityManager(realms);

    //inject sessionManager
    securityManager.setSessionManager(sessionManager);

    // inject redisCacheManager
    securityManager.setCacheManager(redisCacheManager);

    // other stuff...

    return securityManager;
}
上面的代码加进去重写。
然后然后就又出问题了
依赖简直就是玄学……
应该是这个:
		<!-- shiro-redis -->
        <dependency>
            <groupId>org.crazycake</groupId>
            <artifactId>shiro-redis-spring-boot-starter</artifactId>
            <version>3.2.1</version>
        </dependency>
AccountRealm类
自己写一个AccountRealm,Realm是Shiro的一个重要部分。

@Component
public class AccountRealm extends AuthorizingRealm {


    //拿到用户权限 把信息封装返回给shiro
    //用于认证
    @Override
    protected AuthorizationInfo doGetAuthorizationInfo(PrincipalCollection principalCollection) {

        return null;
    }

    //获取token后 密码检查 然后再返回信息
    //用于授权
    @Override
    protected AuthenticationInfo doGetAuthenticationInfo(AuthenticationToken authenticationToken) throws AuthenticationException {

        return null;
    }
}
运行然后报错:

让我考虑定义一个某类的Bean在Config类文件
再修改ShiroConfig类
那就根据报错在Shiro的配置类把下面也加上吧。
	@Bean
    public ShiroFilterChainDefinition shiroFilterChainDefinition() {

        DefaultShiroFilterChainDefinition chainDefinition = new DefaultShiroFilterChainDefinition();

        Map<String, String> filterMap = new LinkedHashMap<>();

        filterMap.put("/**", "jwt");
        chainDefinition.addPathDefinitions(filterMap);
        return chainDefinition;
    }

    @Bean("shiroFilterFactoryBean")
    public ShiroFilterFactoryBean shiroFilterFactoryBean(SecurityManager securityManager,
                                                         ShiroFilterChainDefinition shiroFilterChainDefinition) {

        ShiroFilterFactoryBean shiroFilter = new ShiroFilterFactoryBean();
        shiroFilter.setSecurityManager(securityManager);

        Map<String, Filter> filters = new HashMap<>();
        filters.put("jwt", jwtFilter);
        shiroFilter.setFilters(filters);

        Map<String, String> filterMap = shiroFilterChainDefinition.getFilterChainMap();

        shiroFilter.setFilterChainDefinitionMap(filterMap);
        return shiroFilter;
    }
shiro使用认证和授权时,都是通过ShiroFilterFactoryBean设置一些Shiro的拦截器进行的。
拦截器会通过LinkedHashMap的形式存储需要拦截的资源和连接,并且按照顺序执行,键为拦截的资源或链接,值为拦截的形式。
JwtFilter JwtToken
【Shiro】
Shiro和Spring Security都是做安全的,之前也简单用过Spring Security,难免想比较一下。
安全框架,简单说是对访问权限进行控制,应用的安全性包括用户认证(Authentication)和用户授权(Authorization)两个部分。
Shiro和Spring Security
- ❕❕❕Shiro主要功能三个核心组件❕❕❕:
Subject:“当前操作用户”、“当前跟软件交互的东西”,Subject代表了当前用户的安全操作。
SecurityManager:Shiro框架的核心,典型的Facade模式,Shiro通过SecurityManager来管理内部组件实例,通过它提供安全管理的各种服务。
Realm:Realm充当了Shiro与应用安全数据间的“桥梁”或者“连接器”。当对用户执行认证(登录)和授权(访问控制)验证时,Shiro会从应用配置的Realm中查找用户及其权限信息。 - ❕❕❕Spring Security主要功能❕❕❕
Spring Security对Web安全性的支持大量地依赖于Servlet过滤器。这些过滤器拦截进入请求,并且在应用程序处理该请求之前进行某些安全处理。
Spring Security提供有若干个过滤器,它们能够拦截Servlet请求,并将这些请求转给认证和访问决策管理器处理,从而增强安全性。根据自己的需要,可以使用适当的过滤器来保护自己的应用程序。
SpringBoot整合Shiro
Apache Shiro是一个开源的轻量级Java安全框架,提供身份验证、授权、密码管理以及会话管理等功能。
在传统的SSM框架中,手动整合Shiro比较多。
针对SpringBoot,Shiro官方提供了shiro-spring-boot-web-starter用来简化Shiro在SpringBoot中的配置。
具体的分析,,给代码加了注释了
DAY2
【继续整合shiro和jwt】
JwtFilter类
将过滤器类的两个方法继续补充:
import org.apache.shiro.authc.AuthenticationToken;
import org.apache.shiro.web.filter.authc.AuthenticatingFilter;
import org.springframework.stereotype.Component;
import org.springframework.util.StringUtils;

import javax.servlet.ServletRequest;
import javax.servlet.ServletResponse;
import javax.servlet.http.HttpServletRequest;

@Component
public class JwtFilter extends AuthenticatingFilter {


    /**
     * 登录完成之后后端会返回给用户一个jwt
     * 用户再去访问接口的时候,jwt是在header里的
     */

    @Override
    protected AuthenticationToken createToken(ServletRequest servletRequest, ServletResponse servletResponse) throws Exception {

        HttpServletRequest request = (HttpServletRequest) servletRequest;
        String jwt = request.getHeader("Authorization");
        //StringUtils.isEmpty()方法已经过期 推荐使用hasLength 或者 hasText
        if(!StringUtils.hasText(jwt)){

            return null; //没必要登录了
        }
        return new JwtToken(jwt);
    }

    @Override
    protected boolean onAccessDenied(ServletRequest servletRequest, ServletResponse servletResponse) throws Exception {

        //获取JWT的信息
        HttpServletRequest request = (HttpServletRequest) servletRequest;
        String jwt = request.getHeader("Authorization");
        if(!StringUtils.hasText(jwt)){
      //如果token是空的
            //不需要拦截 不需要交给Shiro
            return true;
        }else{

            //校验jwt
            //登录处理
        }
        return false;
    }
}
JwtUtils类
需要添加一个生成jwt和解析jwt的类~
这个类这样写:
import io.jsonwebtoken.Claims;
import io.jsonwebtoken.Jwts;
import io.jsonwebtoken.SignatureAlgorithm;
import lombok.Data;
import lombok.extern.slf4j.Slf4j;
import org.springframework.boot.context.properties.ConfigurationProperties;
import org.springframework.stereotype.Component;

import java.util.Date;

@Slf4j
@Data
@Component
@ConfigurationProperties(prefix = "cncodehub.jwt")
public class JwtUtils {

    private String secret;
    private long expire;
    private String header;

    /**
     * 生成jwt token
     */
    public String generateToken(long userId) {

        Date nowDate = new Date();
        //过期时间
        Date expireDate = new Date(nowDate.getTime() + expire * 1000);

        return Jwts.builder()
                .setHeaderParam("typ", "JWT")
                .setSubject(userId+"")
                .setIssuedAt(nowDate)
                .setExpiration(expireDate)
                .signWith(SignatureAlgorithm.HS512, secret)
                .compact();
    }

	/**
	* 解析jwt字符串
	*/
    public Claims getClaimByToken(String token) {

        try {

            return Jwts.parser()
                    .setSigningKey(secret)
                    .parseClaimsJws(token)
                    .getBody();
        }catch (Exception e){

            log.debug("validate is token error ", e);
            return null;
        }
    }

    /**
     * token是否过期
     * @return  true:过期
     */
    public boolean isTokenExpired(Date expiration) {

        return expiration.before(new Date());
    }
}
配置绑定小插曲
<dependency>
    <groupId>org.springframework.boot</groupId>
    <artifactId>spring-boot-configuration-processor</artifactId>
    <optional>true</optional>
</dependency>
继续JwtFilter类
/**
     * 是否拒绝登录,没有登录的情况下会走这个方法
     */
    @Override
    protected boolean onAccessDenied(ServletRequest servletRequest, ServletResponse servletResponse) throws Exception {

        //获取JWT的信息
        HttpServletRequest request = (HttpServletRequest) servletRequest;
        String jwt = request.getHeader("Authorization");
        if(!StringUtils.hasText(jwt)){
      //如果token是空的
            //不需要拦截 不需要交给Shiro
            return true;
        }
        //校验jwt
        Claims claims = jwtUtils.getClaimByToken(jwt); //解析jwt字符串
        //如果为空或者过期的话,抛出异常
        if(claims==null||jwtUtils.isTokenExpired(claims.getExpiration())){

            throw new ExpiredCredentialsException("token已失效,请重新登录");
        }
        //执行登录
        return executeLogin(servletRequest,servletResponse);
    }
/**
     * 登录失败
     */
    @Override
    protected boolean onLoginFailure(AuthenticationToken token, AuthenticationException e, ServletRequest request, ServletResponse response) {

        HttpServletResponse httpServletResponse = (HttpServletResponse) response;
        Throwable throwable = e.getCause() == null? e : e.getCause();
        Result result = Result.succ400(throwable.getMessage());
        String json = JSONUtil.toJsonStr(result);
        try {

            httpServletResponse.getWriter().print(json);
        } catch (IOException ioException) {


        }
        return false;
    }
Realm也要改


创建上面这个类来传递一些可以明文的数据,User的数据。
具体使用在了AccountRealm类里。
异常全局处理
上面写了一堆,,其实很多都抛出了异常。做一个异常的全局处理也符合我们一开始设计的逻辑。

【实体校验】
Hibernate validator
当我们表单数据提交的时候,前端的校验我们可以使用一些类似于jQuery Validate等js插件实现,而后端我们可以使用Hibernate validator来做校验。
使用SpringBoot框架作为基础,那么就已经自动集成了Hibernate validatior。
SpringBoot2.3之后需要手动导入Spring-boot-starter-validation
		<dependency>
            <groupId>org.springframework.boot</groupId>
            <artifactId>spring-boot-starter-validation</artifactId>
        </dependency>

        <dependency>
            <groupId>org.hibernate</groupId>
            <artifactId>hibernate-validator</artifactId>
            <version>6.1.0.Final</version>
        </dependency>
只用加上面的注解就行了,下面的不需要。
添加校验规则
校验规则测试

针对上面校验可能产生的异常再进行全局捕获:

使用Postman进行测试:

这里错误信息比较多,进行一下处理。
@ResponseStatus(HttpStatus.BAD_REQUEST)
    @ExceptionHandler(value = MethodArgumentNotValidException.class)
    public Result handler(MethodArgumentNotValidException e){

        log.error("实体校验异常");
        BindingResult bindingResult = e.getBindingResult();
        ObjectError objectError = bindingResult.getAllErrors().stream().findFirst().get();
        //这里让它只返回第一个错误
        return Result.succ(400,objectError.getDefaultMessage(),null);
    }
BindingResult用在实体类校验信息作为返回结果绑定。
@Valid和BindingResult配套使用,@Valid用在参数前,BindingResult作为校验结果绑定返回。
【跨域问题】
前后端分离,直接在后台进行全局跨域处理。
浏览器的同源策略
同源策略(Same origin policy)是一种安全约定,是所有主流浏览器最核心也是最基本的安全功能之一。同源策略规定:不同域的客户端脚本在没有明确授权的情况下,不能请求对方的资源。同源指的是:域名、协议、端口均相同。
CORS-跨域资源共享
CORS是一种W3C标准,定义了当产生跨域问题的时候,客户端与服务端如何通信解决跨域问题。实际上就是前后端约定好定义一些自定义的http请求头,让客户端发起请求的时候能够让服务端识别出来该请求是过还是不过。
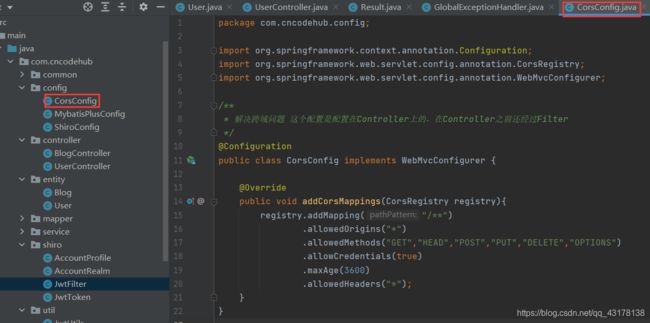
CorsConfig类
mport org.springframework.context.annotation.Configuration;
import org.springframework.web.servlet.config.annotation.CorsRegistry;
import org.springframework.web.servlet.config.annotation.WebMvcConfigurer;

/**
 * 解决跨域问题 这个配置是配置在Controller上的,在Controller之前还经过Filter
 */
@Configuration
public class CorsConfig implements WebMvcConfigurer {


    @Override
    public void addCorsMappings(CorsRegistry registry){

        registry.addMapping("/**")
                .allowedOrigins("*")
                .allowedMethods("GET","HEAD","POST","PUT","DELETE","OPTIONS")
                .allowCredentials(true)
                .maxAge(3600)
                .allowedHeaders("*");
    }
}
只在Controller做处理还不行,Filter也需要做跨域处理。

HttpServletRequest httpServletRequest = WebUtils.toHttp(request);
        HttpServletResponse httpServletResponse = WebUtils.toHttp(response);
        httpServletResponse.setHeader("Access-control-Allow-Origin", httpServletRequest.getHeader("Origin"));
        httpServletResponse.setHeader("Access-Control-Allow-Methods", "GET,POST,OPTIONS,PUT,DELETE");
        httpServletResponse.setHeader("Access-Control-Allow-Headers", httpServletRequest.getHeader("Access-Control-Request-Headers"));
        // 跨域时会首先发送一个OPTIONS请求,这里我们给OPTIONS请求直接返回正常状态
        if (httpServletRequest.getMethod().equals(RequestMethod.OPTIONS.name())) {

            httpServletResponse.setStatus(org.springframework.http.HttpStatus.OK.value());
            return false;
        }
这两块的代码都是有固定模板的,后面可以好好研究一下。
到此为止基本脚手架就差不多搭完了。
【登录接口开发】
LoginDTO
DTO,即Data Transfer Object,数据传输对象,其实就是一个简单的POJO对象(Plain Ordinary Java Object,简单Java对象),就是我们平常所见的属性,提供getter和setter的JavaBean。
AccountController
@ResponseStatus(HttpStatus.BAD_REQUEST)
    @ExceptionHandler(value = IllegalArgumentException.class)
    public Result handler(IllegalArgumentException e){

        log.error("断言异常");
        return Result.succ(400,e.getMessage(),null);
    }
/**
 * 登录接口
 */
@RestController
public class AccountController {


    @Autowired
    UserService userService;

    @Autowired
    JwtUtils jwtUtils;

    /**
     * 登录
     * @param loginDto
     * @param response
     * @return
     */
    @PostMapping("/login")
    public Result login(@Validated @RequestBody LoginDto loginDto, HttpServletResponse response){

        User user = userService.getOne(new QueryWrapper<User>().eq("username",loginDto.getUsername()));

        //这里使用断言的处理
        Assert.notNull(user,"用户不存在");

        if(!user.getPassword().equals(SecureUtil.md5(loginDto.getPassword()))){

            return Result.succ(400,"密码不正确",null);
        }
        //生成Token
        String jwt = jwtUtils.generateToken(user.getId());
        response.setHeader("Authorization",jwt);
        response.setHeader("Access-control-Expose-Headers","Authorization");
        return Result.succ200(MapUtil.builder()
                .put("id",user.getId())
                .put("username",user.getUsername())
                .put("avatar",user.getAvatar())
                .put("email",user.getEmail())
                .map()
        );
    }

    /**
     * 退出
     * @return
     */
    @RequiresAuthentication //require认证之后才能登录的一个权限
    @GetMapping("/logout")
    public Result logout(){

        SecurityUtils.getSubject().logout();
        return Result.succ200(null);
    }
}
测试
DAY3
【博客接口开发】
BlogController
@RestController
public class BlogController {


    @Autowired
    BlogService blogService;

    @GetMapping("/blog") //分页处理
    public Result list(@RequestParam(defaultValue = "1") Integer currentPage){

        Page page = new Page(currentPage,5);
        IPage pageData = blogService.page(page,new QueryWrapper<Blog>().orderByDesc("created"));
        return Result.succ200(pageData);
    }

    @GetMapping("/blog/{id}")
    public Result detail(@PathVariable(name = "id") Long id){

        Blog blog = blogService.getById(id);
        Assert.notNull(blog,"改博客不存在");
        return Result.succ200(blog);
    }

    @RequiresAuthentication //需要认证之后才能访问
    @PostMapping("/blog/edit")
    public Result edit(@Validated @RequestBody Blog blog){

        Blog temp = null;
        if(blog.getId()!=null){

            temp = blogService.getById(blog.getId());
            //只能编辑自己的文章
            Assert.isTrue(temp.getUserId()== ShiroUtil.getProfile().getId(),"没有权限编辑");
        }else {

            temp = new Blog();
            temp.setUserId(ShiroUtil.getProfile().getId());
            temp.setCreated(LocalDateTime.now());
            temp.setStatus(0);
        }
        BeanUtil.copyProperties(blog,temp,"id","userId","created","status");
        blogService.saveOrUpdate(temp);
        return Result.succ200(null);
    }

}
	@RequiresAuthentication
    @GetMapping("/blog/delete/{id}")
    public Result delete(@PathVariable(name = "id") Long id){

        boolean result = blogService.removeById(id);
        if(result==true) {

            return Result.succ(200, "文章删除成功", null);
        }else{

            return Result.succ(400,"文章删除失败",null);
        }
    }
测试
让人迷惑的Bug
测试修改博客的功能:

发生了报错
Servlet.service() for servlet [dispatcherServlet] in context with path [] threw exception [redis.clients.jedis.exceptions.JedisConnectionException: Could not get a resource from the pool] with root cause
检查一下自己的Redis:

看起来没有什么问题。

不加身份认证的话,这个登录会报401。
到这里也是正常的。
后来发现是因为配置缺失。

shiro-redis:
  enabled: true
  redis-manager:
    host: 49.235.200.38:6379
    password: xxxxxxxxxx
emmm,加上之后就OK了。

修改博客的时候又出现问题了:


控制台报的是类型转换异常,,,
晕了。
看到网上有人说把dev-tools给去掉就行了

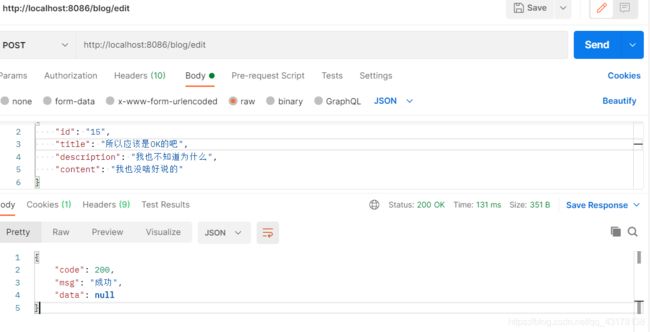
这样确实就可以了。
【前端开发准备】
创建新项目
node.js之前已经下载过了,vue也安装过了。

现在就OK啦。


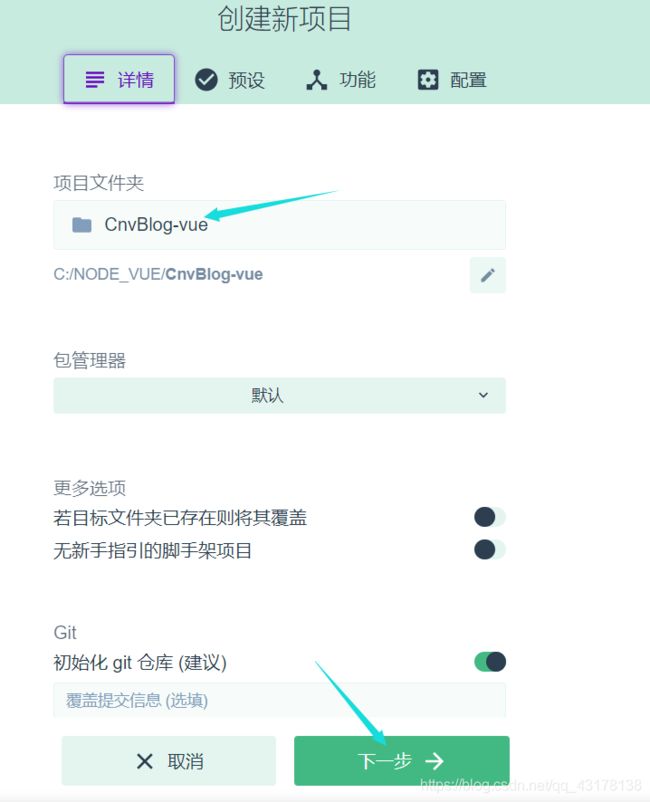

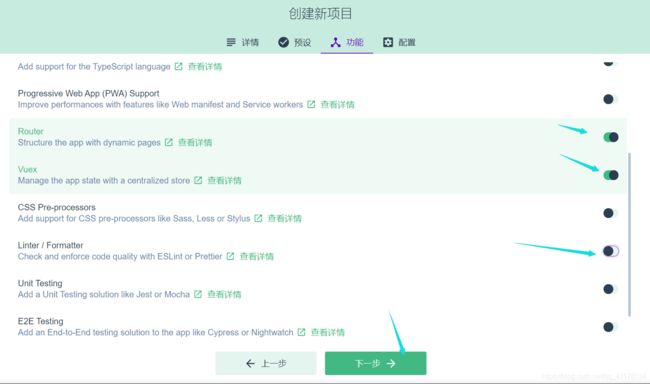


安装element-ui
>> yarn add element-ui
import ElementUI from 'element-ui'
import 'element-ui/lib/theme-chalk/index.css'
安装axios
>> yarn add axios --save
登录界面开发
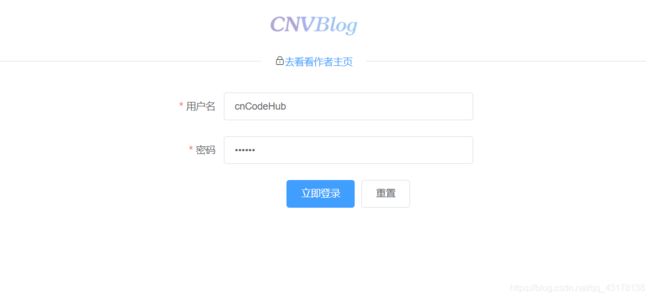
经过了诸多磨难,基本实现了登录界面。
主要还是依靠element-ui官网的模板代码。


前端连接上后端,测试一下:

200 OK
DAY4/DAY5
【配置全局axios拦截】
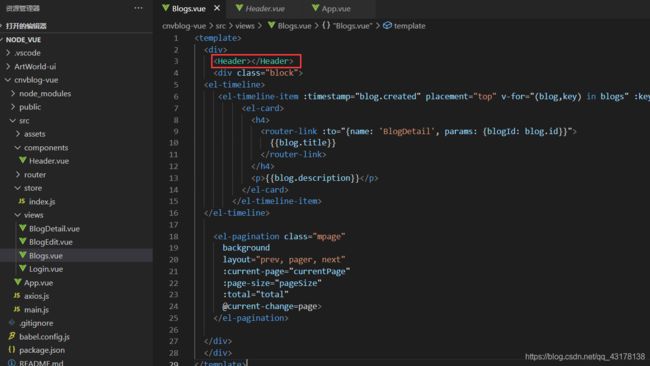
【公共组件Header】
【Blogs页面开发】
安装mavon-editor
>> yarn add mavon-editor --save
路由权限拦截
小结
前端我不太懂原理,就不详细分析了,想看代码直接看我github吧。
只说几个点:
有些按钮是不显示给其他的用户的

如果当前用户浏览的博客就是自己的博客,才会显示。

前后端数据传递,后端是@GetMapping还是@PostMapping和这里的$axios.get还是set是匹配的,后端有Shiro的权限认证注解的,前端的请求Header需要带上Authorization。

