一、什么是MVP
在介绍MVP之前,大家一定会想到MVC,我们首先简单介绍一下MVC,因为掌握了MVC对我们学习MVP是有很大帮助的。
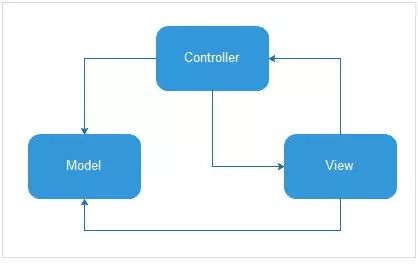
MVC 模式代表 Model-View-Controller(模型-视图-控制器) 模式。这种模式用于应用程序的分层开发。
- Model(模型) - 模型代表一个存取数据的对象或 JAVA POJO。它也可以带有逻辑,在数据变化时更新控制器。比如数据库存取操作,网络操作,复杂的算法,耗时的任务等都在model层处理。
- View(视图) - 视图代表模型包含的数据的可视化。XML布局可以视为V层,显示Model层的数据结果。
- Controller(控制器) - 控制器作用于模型和视图上。它控制数据流向模型对象,并在数据变化时更新视图。它使视图与模型分离开。在Android中,Activity处理用户交互问题,因此可以认为Activity是控制器,Activity读取V视图层的数据,控制用户输入,并向Model发送数据请求。
MVC模式有很多优点:
(1)耦合性低。所谓耦合性就是模块代码之间的关联程度。利用MVC框架使得View(视图)层和Model(模型)层可以很好的分离,这样就达到了解耦的目的,所以耦合性低,减少模块代码之间的相互影响。
(2)可扩展性好。由于耦合性低,添加需求,扩展代码就可以减少修改之前的代码,降低bug的出现率。
(3)模块职责划分明确。主要划分层M,V,C三个模块,利于代码的维护。
既然MVC模式这么厉害,那为什么还要发明MVP?因为使用MVC模式进行Android项目开发,随着项目的逐渐庞大,会逐渐显露出MVC模式在Android开发上的弊端:View层的XML文件能处理的事情非常有限,而作为Controller的Activity又天生具有操作UI的功能,我们在实际的项目中也会有很多UI操作在这一层,做了很多View中应该做的事情;当然Controller中也包含Controller应该做的事情,比如各种事件的派发回调,而且在这层中我们还会根据事件再去调用Model层操作数据,所以这种MVC的方式在实际项目中,Activity所在的Controller是非常臃肿的,各层次之间的耦合情况也比较严重,不方便单元测试。
讲了半天MVC,主角也该登场了。
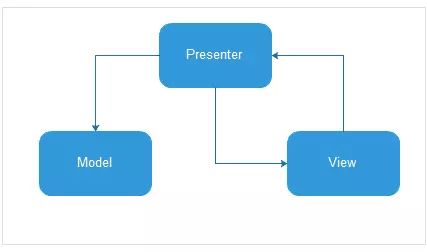
MVP作为MVC的“进化版”,最大的改进就是它彻底剥离了视图层和业务逻辑层,让各层分工更为明确,逻辑更为清晰,代码扩展性更高,后期代码迭代更新更加容易,同时也方便了单元测试的编写。
- View仅仅负责实现单纯的、独立的UI操作,尽量不要去维护数据(View层指Activity、Fragment这类层级)
- Model负责处理数据请求、业务逻辑,不涉及UI操作
- Presenter是MVP体系的控制中心,负责给View和Model安排工作 ,什么时候调用Model处理逻辑,什么时候调用View反应结果,都是Presenter说了算
- View与Model均以接口的形式出现在Presenter中,Presenter通过调用 View与Model的实现接口,来操作 View与Model;同时Presenter也是以接口的形式出现在View中,这样Presenter与View就是通过接口相互依赖了
- Presenter是主动方,View是被动方,对于绑定到View上的数据,不是View调用Presenter主动拉取数据,而是Presenter主动将数据推给View
二、MVP的简单使用
1、定义网络请求回调接口,P层通过该接口回调通知V层
public interface IRequestView {
    /**
     * 成功
     */
    void succeed(BaseResponse baseResponse);
    /**
     * 失败
     *
     * @param message 错误提示消息
     */
    void failed(String message);
}
2、Model层负责接收来自Presenter层的数据,并开始处理数据(发起网络请求)
//登录接口
public interface IUserModel {
    /**
     * 密码登录
     *
     * @param userName 用户名
     * @param password 密码
     */
    void loginByPassword(Context context, String userName, String password, IRequestView requestView);
}
###############################################################
//实现登录请求
public class UserModel implements IUserModel {
    /**
     * 密码登录
     *
     * @param userName 用户名
     * @param password 密码
     */
    @Override
    public void loginByPassword(Context context, String userName, String password, IRequestView requestView) {
        HashMap map = new HashMap<>();
        map.put("userName", userName);
        map.put("password", password);
        RetrofitManager.getInstance(context).createReq(ApiService.class)
                .signIn(map)
                .subscribeOn(Schedulers.newThread())
                .observeOn(AndroidSchedulers.mainThread())
                .subscribe(new BaseObserver(context, requestView));
    }
}
3、中间层Presenter主要负责把来自View层的数据传递给Model,Model层处理完成后再经由Presenter返回给View层用于展示
public interface IUserPresenter {
    /**
     * 密码登录
     *
     * @param userName 用户名
     * @param password 密码
     */
    void loginByPassword(String userName, String password);
}
###############################################################
public class UserPresenter implements IUserPresenter {

    private Context context;
    private IUserModel userModel;
    private IRequestView requestView;

    public UserPresenter(Context context, IRequestView requestView) {
        this.context = context;
        userModel = new UserModel();
        this.requestView = requestView;
    }

    /**
     * 密码登录
     *
     * @param userName 用户名
     * @param password 密码
     */
    @Override
    public void loginByPassword(String userName, String password) {
        if (TextUtils.isEmpty(userName)) {
            ToastUtil.showShort(context.getApplicationContext(), "用户名不能为空");
            return;
        }
        if (TextUtils.isEmpty(password)) {
            ToastUtil.showShort(context.getApplicationContext(), "密码不能为空");
            return;
        }
        if (userModel != null) {
            userModel.loginByPassword(context, userName, password, requestView);
        }
    }
}
4、View层Activity部分代码
public class LoginActivity extends BaseActivity implements IRequestView {
    ……
    private UserPresenter loginPresenter;

    /**
     * 登录
     */
    private void login() {
        //手机号
        String userName = String.valueOf(loginAccountName.getText());
        //密码
        String password = String.valueOf(loginPassword.getText());
        if (loginPresenter != null) {
            loginPresenter.loginByPassword(userName, password);
        }
    }

    /**
     * 成功
     *
     * @param baseResponse
     */
    @Override
    public void succeed(BaseResponse baseResponse) {
        Object data = baseResponse.getData();
        if (data instanceof UserData) {
            //更新UI、完成其他操作
        }
    }

    /**
     * 失败
     *
     * @param message 错误提示消息
     */
    @Override
    public void failed(String message) {
        ToastUtil.showShort(getApplicationContext(), message);
    }
}
使用了MVP模式之后,我们再回过头来看看登录功能的全部代码,是不是非常简洁,各层分工也非常明确,这样以后维护起来也会事半功倍。
参考链接
https://www.jianshu.com/p/3e981d261e90
https://www.jianshu.com/p/19283a3f61de

