两种方式:
1.在原 UItabBar 样式的基础上扩展
2.完全自定义 UITabBar 的样式
效果预览:
有4个 tabBarItem,中间按钮凸起一丢丢,原生半透明的背景。
简介
目前市场上的大部分 App UI 结构都是使用这种标签式的结构,我觉得它至少有以下优点:
- 很清晰的展示了 App 的主要入口和当前所在入口
- 各个入口间的切换也很简单,适合频繁切换
缺点:
- 入口个数不能太多(最好5个以下)
层级结构
下面讨论两种层级结构
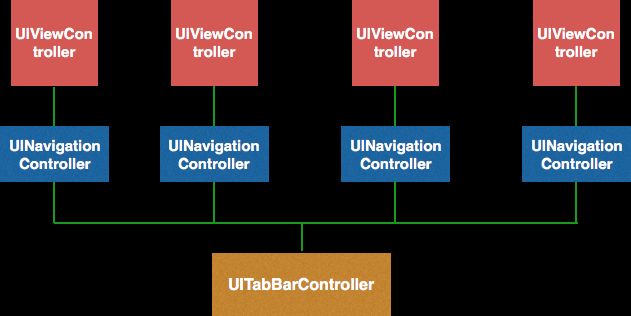
1.tabBarController 里嵌 navigationController
2.navigationController 里嵌 tabBarController
可以很明显看出这两种结构的区别(是否共用 navigationController)。我建议使用 tabBarController 里嵌 navigationController 结构,原因如下:
1.我不确定共用一个 navigationController 是不是优点?!但是缺点很明显,因为大部分情况各个 UIViewController 的 navigationBar 内容是不一样的(有的隐藏,有的有搜索框等),所以每次切换都需要改 navigationBar 的内容。
2.苹果官方也是建议使用 tabBarController 里嵌 navigationController 这种结构,在《View Controller Catalog for iOS》中的原话:
An app that uses a tab bar controller can also use navigation controllers in one or more tabs. When combining these two types of view controller in the same user interface, the tab bar controller always acts as the wrapper for the navigation controllers.
开始
正常搭建框架。因为这不是本文的重点,也不难,所以可以直接下载源码。
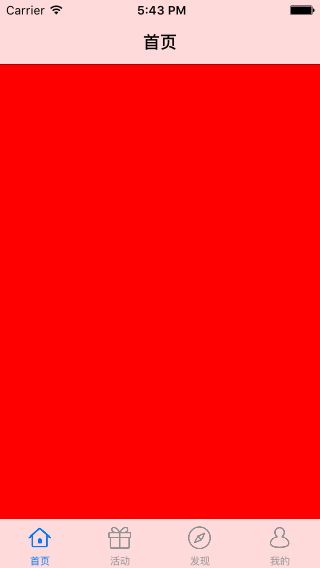
运行效果如下:
本例要达到的效果是在中间插入一个 button 并凸起一丢丢,如下:
方式一:在原 UITabBar 样式的基础上扩展
使用原生的 tabBarItem,在这基础上添加自定义控件
思路:
1.往 tabBar 上添加自定义的控件
2.重新布局 tabBarItem 和 自定义控件
3.使用自定义的 tabBar
动手
第一步 新建 UITabBar 的子类 MSCustomTabBar
@interface MSCustomTabBar : UITabBar
第二步 在 MSCustomTabBar.m 里创建并添加中间按钮(本例中中间按钮比较简单使用 UIButton 就可以了,如果复杂点的建议新建一个类)
定义属性
@interface MSExtensionalTabBar ()
/// 中间凸起的按钮
@property (nonatomic, strong) UIButton *centerBtn;

@end
重写 getter 方法
- (UIButton *)centerBtn
{
    if (_centerBtn == nil) {
        _centerBtn = [[UIButton alloc] initWithFrame:CGRectMake(0, 0, 80, 60)];
        [_centerBtn setImage:[UIImage imageNamed:@"centerIcon"] forState:UIControlStateNormal];
        [_centerBtn addTarget:self action:@selector(clickCenterBtn:) forControlEvents:UIControlEventTouchUpInside];
    }
    return _centerBtn;
}
第三步 重新布局 tabBarItem 和 自定义控件
重写 layoutSubviews
- (void)layoutSubviews
{
    [super layoutSubviews];
    // 把 tabBarButton 取出来(把 tabBar 的 subViews 打印出来就明白了)
    NSMutableArray *tabBarButtonArray = [NSMutableArray array];
    for (UIView *view in self.subviews) {
        if ([view isKindOfClass:NSClassFromString(@"UITabBarButton")]) {
            [tabBarButtonArray addObject:view];
        }
    }

    CGFloat barWidth = self.bounds.size.width;
    CGFloat barHeight = self.bounds.size.height;
    CGFloat centerBtnWidth = CGRectGetWidth(self.centerBtn.frame);
    CGFloat centerBtnHeight = CGRectGetHeight(self.centerBtn.frame);
    // 设置中间按钮的位置,居中,凸起一丢丢
    self.centerBtn.center = CGPointMake(barWidth / 2, barHeight - centerBtnHeight/2 - 5);
    // 重新布局其他 tabBarItem
    // 平均分配其他 tabBarItem 的宽度
    CGFloat barItemWidth = (barWidth - centerBtnWidth) / tabBarButtonArray.count;
    // 逐个布局 tabBarItem,修改 UITabBarButton 的 frame
    [tabBarButtonArray enumerateObjectsUsingBlock:^(UIView *  _Nonnull view, NSUInteger idx, BOOL * _Nonnull stop) {

        CGRect frame = view.frame;
        if (idx >= tabBarButtonArray.count / 2) {
            // 重新设置 x 坐标,如果排在中间按钮的右边需要加上中间按钮的宽度
            frame.origin.x = idx * barItemWidth + centerBtnWidth;
        } else {
            frame.origin.x = idx * barItemWidth;
        }
        // 重新设置宽度
        frame.size.width = barItemWidth;
        view.frame = frame;
    }];
    // 把中间按钮带到视图最前面
    [self bringSubviewToFront:self.centerBtn];
}
第四步 使用自定义的 tabBar
在 MSTabBarController.m 里使用自定义的 tabBar
- (void)viewDidLoad {
    [super viewDidLoad];
    // 利用KVO来使用自定义的tabBar
    [self setValue:[[MSCustomTabBar alloc] init] forKey:@"tabBar"];

    [self addAllChildViewController];
}
到这就已经达到我们的效果了,可以运行一下看看。
不过,本例中有一个需要额外解决的问题,还记得那个凸起一丢丢的 button 吗,那一丢丢是接收不到点击事件的,需要在 MSCustomTabBar.m 里重写 hitTest:withEvent: 方法
- (UIView *)hitTest:(CGPoint)point withEvent:(UIEvent *)event
{
    if (self.clipsToBounds || self.hidden || (self.alpha == 0.f)) {
        return nil;
    }
    UIView *result = [super hitTest:point withEvent:event];
    // 如果事件发生在 tabbar 里面直接返回
    if (result) {
        return result;
    }
    // 这里遍历那些超出的部分就可以了,不过这么写比较通用。
    for (UIView *subview in self.subviews) {
        // 把这个坐标从tabbar的坐标系转为 subview 的坐标系
        CGPoint subPoint = [subview convertPoint:point fromView:self];
        result = [subview hitTest:subPoint withEvent:event];
        // 如果事件发生在 subView 里就返回
        if (result) {
            return result;
        }
    }
    return nil;
}
想知道原理请看我的另一篇文章 iOS 点击事件分发机制 。
到这本例就已经完成了,完整源码。
方式二:完全自定义 UITabBar 的样式
tabBar 上的内容完全自定义
思路:
1.自定义一个 View 覆盖整个 tabBar
2.手动实现 tabBarItem 的功能
3.使用自定义的 tabBar
动手
第一步 新建一个 UIView 的子类 MSTabBarView,绘制 TabBar 上的内容并实现 tabBarItem 的功能
@interface MSTabBarView : UIView
绘制tabBar上的内容(本文使用xib来绘制)
view 上是5个 button,中间 button 只设置了 image 属性,其他4个 button 的 default 状态对应 tabBarItem 的未选中状态,highlight 状态和 disable 状态对应 tabBarItem 的选中状态。UIButton 的 image 和 title 是水平方向居中排列的,本例中应该是垂直方向居中排列的,想通过设置 imageEdgeInsets 和 titleEdgeInsets 来达到这个效果的前提是 UIButton 的宽度固定,不同屏幕的宽度可能是不同的,所以需要新建 UIButton 的子类来重载 layoutSubviews 方法来重新布局 UIButton 里面的内容。
创建 UIButton 的子类
@interface MSVerticalCenterButton : UIButton
重写 layoutSubviews 方法,重新布局 button 的内容
-(void)layoutSubviews {
    [super layoutSubviews];

    // 图片居中
    CGPoint center = self.imageView.center;
    center.x = self.frame.size.width/2;
    center.y = self.imageView.frame.size.height/2+5;
    self.imageView.center = center;

    // 文字居中
    CGRect newFrame = [self titleLabel].frame;
    newFrame.origin.x = 0;
    newFrame.origin.y = CGRectGetMaxY(self.imageView.frame) + 2;
    newFrame.size.width = self.frame.size.width;
    self.titleLabel.frame = newFrame;
    self.titleLabel.textAlignment = NSTextAlignmentCenter;
}
实现 tabBarItem 的功能
由于切换 viewController 需要 tabBarController 来做,所以声明一个协议,把点击事件代理给 tabBarController 来处理
@class MSTabBarView;

@protocol MSTabBarViewDelegate

- (void)msTabBarView:(MSTabBarView *)view didSelectItemAtIndex:(NSInteger)index;

- (void)msTabBarViewDidClickCenterItem:(MSTabBarView *)view;

@end
@property (nonatomic, weak) id viewDelegate;
实现点击事件(包括改变 button 的样式和切换视图)
定义一个属性来记住当前选择的位置
/// 当前选中的位置
@property (nonatomic, assign) NSInteger selectIndex;
自定义它的 setter 方法
- (void)setSelectIndex:(NSInteger)selectIndex
{
    // 先把上次选择的item设置为可用
    UIButton *lastItem = _items[_selectIndex];
    lastItem.enabled = YES;
    // 再把这次选择的item设置为不可用
    UIButton *item = _items[selectIndex];
    item.enabled = NO;
    _selectIndex = selectIndex;
}
实现 button 的点击事件
- (IBAction)selectItem:(UIButton *)sender
{
    // button的tag对应tabBarController的selectedIndex
    // 设置button的样式
    self.selectIndex = sender.tag;
    // 让代理来处理切换viewController的操作
    if ([self.viewDelegate respondsToSelector:@selector(msTabBarView:didSelectItemAtIndex:)]) {
        [self.viewDelegate msTabBarView:self didSelectItemAtIndex:sender.tag];
    }
}
实现中间 button 的点击事件(一般情况下中间按钮的功能和其他按钮是有区别的,所以使用单独的一个方法来实现比较好)
- (IBAction)clickCenterItem:(id)sender
{
    // 让代理来处理点击中间button的操作
    if ([self.viewDelegate respondsToSelector:@selector(msTabBarViewDidClickCenterItem:)]) {
        [self.viewDelegate msTabBarViewDidClickCenterItem:self];
    }
}
第二步 新建 UITabBar 的子类 MSCustomTabBar,使用自定义的 MSTabBarView来覆盖在 tabBar 上
创建 UITabBar 的子类 MSCustomTabBar
@interface MSCustomTabBar : UITabBar
使用 tabBarView 来覆盖 tabBar 的内容
在 .h 文件定义属性(在 tabBarController 那里会用到),重写 getter 方法
@property (nonatomic, strong) MSTabBarView *tabBarView;
- (MSTabBarView *)tabBarView
{
    if (_tabBarView == nil) {
        // xib的加载方式
        _tabBarView = [[[NSBundle mainBundle] loadNibNamed:@"MSTabBarView" owner:nil options:nil] lastObject];
    }
    return _tabBarView;
}
添加到 tabBar 里面并覆盖 tabBar 的内容
- (instancetype)initWithFrame:(CGRect)frame
{
    self = [super initWithFrame:frame];
    if (self) {
        [self addSubview:self.tabBarView];
    }
    return self;
}
- (void)layoutSubviews
{
    [super layoutSubviews];
    // 设置 tabBarView 的 frame
    self.tabBarView.frame = self.bounds;
    // 把 tabBarView 带到最前面,覆盖 tabBar 的内容
    [self bringSubviewToFront:self.tabBarView];
}
第三步 在 MSCustomTabBarController 里使用自定义的 MSCustomTabBar,并实现 MSTabBarView 的代理方法
使用自定义的 MSCustomTabBar
- (void)viewDidLoad {
    [super viewDidLoad];
    // 利用 KVC 来使用自定义的tabBar;
    MSCustomTabBar *tabBar = [[MSCustomTabBar alloc] init];
    tabBar.tabBarView.viewDelegate = self;
    [self setValue:tabBar forKey:@"tabBar"];

    [self addAllChildViewController];
}
实现 MSTabBarView 的代理方法
- (void)msTabBarView:(MSTabBarView *)view didSelectItemAtIndex:(NSInteger)index
{
    // 切换到对应index的viewController
    self.selectedIndex = index;
}
由于需要用到 tabBar 半透明(毛玻璃效果)的背景,所以 tabBarView 的背景是透明的,同样不显示 tabBarItem 的内容(不设置 title 和 image )。
把设置 tabBarItem 内容的相关代码注释掉
- (void)addChildViewController:(UIViewController *)vc title:(NSString *)title imageNamed:(NSString *)imageNamed
{
    UINavigationController *nav = [[UINavigationController alloc] initWithRootViewController:vc];
    // 如果同时有 navigationbar 和 tabbar 的时候最好分别设置它们的 title
    vc.navigationItem.title = title;
//    nav.tabBarItem.title = title;
//    nav.tabBarItem.image = [UIImage imageNamed:imageNamed];

    [self addChildViewController:nav];
}
到这就已经达到我们的效果了,可以运行一下看看。
这里我们同样需要处理凸起的那一丢丢接收不到点击事件的问题,在 MSCustomTabBar.m 里重写 hitTest:withEvent: 方法
- (UIView *)hitTest:(CGPoint)point withEvent:(UIEvent *)event
{
    if (self.clipsToBounds || self.hidden || (self.alpha == 0.f)) {
        return nil;
    }
    UIView *result = [super hitTest:point withEvent:event];
    // 如果事件发生在 tabbar 里面直接返回
    if (result) {
        return result;
    }
    // 这里遍历那些超出的部分就可以了,不过这么写比较通用。
    for (UIView *subview in self.tabBarView.subviews) {
        // 把这个坐标从 tabbar 的坐标系转为 subview 的坐标系
        CGPoint subPoint = [subview convertPoint:point fromView:self];
        result = [subview hitTest:subPoint withEvent:event];
        // 如果事件发生在 subView 里就返回
        if (result) {
            return result;
        }
    }
    return nil;
}
想知道原理请看我的另一篇文章 iOS 点击事件分发机制。
到这本例就已经完成了,完整源码。
总结
推荐使用 tabBarController 里面嵌 navigationController 这样的层级结构。
在原 UItabBar 样式的基础上扩展样式就是往 tabBar 上添加扩展的样式,然后重载 layoutSubviews 方法重新布局 tabBar 的内容。
完全自定义 UITabBar 的样式就是使用自定义的视图覆盖在 tabBar 上,然后自己实现 tabBarItem 的功能。
tip:如果点下 tabBar 上的按钮不松手就切换 viewController 的很有可能是使用原生的 tabBarItem(比如本文中扩展的方式、微信),如果按下时有高亮效果或者松手后才切换 viewController 的就是使用自定义的 button(比如本文中完全自定义的方式、京东)。


