接下来的几篇文章我们会结合源码来分析注册Application以及启动Executor并向Driver注册的具体流程。
上文我们跟踪源码到了SparkDeploySchedulerBackend的start()方法的实例化AppClient部分,同时SparkDeploySchedulerBackend的start()方法中首先执行的就是其父类也就是CoarseGrainedSchedulerBackend的start方法,上面的两部分源码如下:
SparkDeploySchedulerBackend中的start()方法:
override def start() {
  // 首先调用父类也就是CoarseGrainedSchedulerBackend的start方法,最重要的就是创建并注册DriverEndpoint
  super.start()

  ...

  client = new AppClient(sc.env.rpcEnv, masters, appDesc, this, conf)
  client.start()
  launcherBackend.setState(SparkAppHandle.State.SUBMITTED)
  waitForRegistration()
  launcherBackend.setState(SparkAppHandle.State.RUNNING)
}
CoarseGrainedSchedulerBackend中的start()方法:
override def start() {
  val properties = new ArrayBuffer[(String, String)]
  for ((key, value) <- scheduler.sc.conf.getAll) {
    if (key.startsWith("spark.")) {
      properties += ((key, value))
    }
  }
  // TODO (prashant) send conf instead of properties
  // 这里的ENDPOINT_NAME="CoarseGrainedScheduler"
  driverEndpoint = rpcEnv.setupEndpoint(ENDPOINT_NAME, createDriverEndpoint(properties))
}
DriverEndpoint
下面我们继续追踪源码,首先来看CoarseGrainedSchedulerBackend的start()方法(见上面的源码),从上面的源码可以看出主要的操作就是创建了DriverEndpoint并向RpcEnv进行注册,所以我们进入createDriverEndpoint方法:
protected def createDriverEndpoint(properties: Seq[(String, String)]): DriverEndpoint = {
  // 实例化DriverEndpoint
  new DriverEndpoint(rpcEnv, properties)
}
内部实例化了DriverEndpoint:
class DriverEndpoint(override val rpcEnv: RpcEnv, sparkProperties: Seq[(String, String)])
  extends ThreadSafeRpcEndpoint with Logging {
  // If this DriverEndpoint is changed to support multiple threads,
  // then this may need to be changed so that we don't share the serializer
  // instance across threads
  private val ser = SparkEnv.get.closureSerializer.newInstance()
  override protected def log = CoarseGrainedSchedulerBackend.this.log
  protected val addressToExecutorId = new HashMap[RpcAddress, String]
  private val reviveThread =
    ThreadUtils.newDaemonSingleThreadScheduledExecutor("driver-revive-thread")
可以看出DriverEndpoint继承自ThreadSafeRpcEndpoint,所以DriverEndpoint是一个消息循环体,那么他到底负责与谁进行通信呢?我们继续追踪源码,实例化完成后回到CoarseGrainedSchedulerBackend中的start方法:向RpcEnv进行注册,注册的名字是ENDPOINT_NAME,即"CoarseGrainedScheduler",注册的时候会调用DriverEndpoint的onStart方法(Rpc内部的机制决定的,具体可以参考Spark RPC 到底是个什么鬼?):
override def onStart() {
  // Periodically revive offers to allow delay scheduling to work
  val reviveIntervalMs = conf.getTimeAsMs("spark.scheduler.revive.interval", "1s")
  reviveThread.scheduleAtFixedRate(new Runnable {
    override def run(): Unit = Utils.tryLogNonFatalError {
      Option(self).foreach(_.send(ReviveOffers))
    }
  }, 0, reviveIntervalMs, TimeUnit.MILLISECONDS)
}
这里使用的是延迟调度的机制,关于延迟调度我们会单独用文章进行阐述,现在我们继续追踪源码,可以看到内部实际上是向自己发送了一条消息ReviveOffers,所以我们看DriverEndpoint接收到这条消息后都做了什么:
case ReviveOffers =>
  makeOffers()
可以看到是执行了makeOffers()方法:
// Make fake resource offers on all executors
private def makeOffers() {
  // Filter out executors under killing
  val activeExecutors = executorDataMap.filterKeys(executorIsAlive)
  val workOffers = activeExecutors.map { case (id, executorData) =>
    new WorkerOffer(id, executorData.executorHost, executorData.freeCores)
  }.toSeq
  launchTasks(scheduler.resourceOffers(workOffers))
}
首先就是提供计算资源,注释说的很清楚了“Make fake resource offers on all executors”,因为此时Executors还没有启动和注册,即还没有资源,所以是“fake”(假)的,等到Executors启动并注册后,这里就会获得空闲的计算资源,然后去执行launchTasks的操作,即向具体的Executor提交和运行tasks。所以CoarseGrainedSchedulerBackend端的start方法我们就追踪到这里,最后用一张图总结一下:

AppClient和ClientEndpoint
下面来看SparkDeploySchedulerBackend的start方法中剩余的那部分,即上篇文章中没有说完的那部分:
// Start executors with a few necessary configs for registering with the scheduler
val sparkJavaOpts = Utils.sparkJavaOpts(conf, SparkConf.isExecutorStartupConf)
val javaOpts = sparkJavaOpts ++ extraJavaOpts
val command = Command("org.apache.spark.executor.CoarseGrainedExecutorBackend",
  args, sc.executorEnvs, classPathEntries ++ testingClassPath, libraryPathEntries, javaOpt
val appUIAddress = sc.ui.map(_.appUIAddress).getOrElse("")
val coresPerExecutor = conf.getOption("spark.executor.cores").map(_.toInt)
val appDesc = new ApplicationDescription(sc.appName, maxCores, sc.executorMemory,
  command, appUIAddress, sc.eventLogDir, sc.eventLogCodec, coresPerExecutor)
client = new AppClient(sc.env.rpcEnv, masters, appDesc, this, conf)
client.start()
launcherBackend.setState(SparkAppHandle.State.SUBMITTED)
waitForRegistration()
launcherBackend.setState(SparkAppHandle.State.RUNNING)
可以看见首先创建AppClient,这里需要注意一下传进来的参数中appDesc就是上面实例化的ApplicationDescription,他封装了应用程序的一些配置参数,最重要的是command,通过他可以看出启动Executor时执行main方法的入口类就是"org.apache.spark.executor.CoarseGrainedExecutorBackend",我们后面会提到,所以这里先提一下。我们继续看实例化AppClient的部分:
private[spark] class AppClient(
    rpcEnv: RpcEnv,
    masterUrls: Array[String],
    appDescription: ApplicationDescription,
    listener: AppClientListener,
    conf: SparkConf)
  extends Logging {
  // 获得masters的RpcAddress
  private val masterRpcAddresses = masterUrls.map(RpcAddress.fromSparkURL(_))
  private val REGISTRATION_TIMEOUT_SECONDS = 20
  private val REGISTRATION_RETRIES = 3
  // 用来保存ClientEndpoint注册完成后返回的RpcEndpointRef,实际上是NettyRpcEndpointRef
  private val endpoint = new AtomicReference[RpcEndpointRef]
  // 应用程序的ID
  private val appId = new AtomicReference[String]
  // 是否已经完成注册
  private val registered = new AtomicBoolean(false)
AppClient实例化完成后调用了他的start()方法:
def start() {
  // Just launch an rpcEndpoint; it will call back into the listener.
  endpoint.set(rpcEnv.setupEndpoint("AppClient", new ClientEndpoint(rpcEnv)))
}
可以看到内部创建了一个ClientEndpoint实例并向RpcEnv注册,注册的名称为“AppClient”,注册完成后将返回的NettyRpcEndpointRef赋值给AppClient的endpoint,而且注册后调用了ClientEndpoint的onStart()方法,实例化ClientEndpoint的时候执行了一些初始化操作,基本上都是和线程池和消息相关,这里就不列出来了,我们现在关注的是这个onStart()方法:
override def onStart(): Unit = {
  try {
    registerWithMaster(1)
  } catch {
    case e: Exception =>
      logWarning("Failed to connect to master", e)
      markDisconnected()
      stop()
  }
}
进入registerWithMaster,即向Master进行注册:
private def registerWithMaster(nthRetry: Int) {
  registerMasterFutures.set(tryRegisterAllMasters())
  registrationRetryTimer.set(registrationRetryThread.scheduleAtFixedRate(new Runnable {
    override def run(): Unit = {
      if (registered.get) {
        registerMasterFutures.get.foreach(_.cancel(true))
        registerMasterThreadPool.shutdownNow()
      } else if (nthRetry >= REGISTRATION_RETRIES) {
        markDead("All masters are unresponsive! Giving up.")
      } else {
        registerMasterFutures.get.foreach(_.cancel(true))
        registerWithMaster(nthRetry + 1)
      }
    }
  }, REGISTRATION_TIMEOUT_SECONDS, REGISTRATION_TIMEOUT_SECONDS, TimeUnit.SECONDS))
}
上面的源码说明:ClientEndpoint需要向所有的masters进行异步的注册,因为ClientEndpoint并不知道哪个Master是Active级别的,如果注册失败会按照一定的时间间隔进行一定次数的重试,可以看到具体的注册是执行的tryRegisterAllMasters方法:
private def tryRegisterAllMasters(): Array[JFuture[_]] = {
  for (masterAddress <- masterRpcAddresses) yield {
    registerMasterThreadPool.submit(new Runnable {
      override def run(): Unit = try {
        if (registered.get) {
          return
        }
        // 打印日志,我们在使用spark-submit的client模式提交程序的时候可以看到这条日志
        logInfo("Connecting to master " + masterAddress.toSparkURL + "...")
        // 获取Master的RpcEndpointRef,实际上是NettyRpcEndpointRef,用来向Master发送消息
        val masterRef =
          rpcEnv.setupEndpointRef(Master.SYSTEM_NAME, masterAddress, Master.ENDPOINT_NAME)
        // 向Master发送消息,注意这里的self是指ClientEndpoint
        masterRef.send(RegisterApplication(appDescription, self))
      } catch {
        case ie: InterruptedException => // Cancelled
        case NonFatal(e) => logWarning(s"Failed to connect to master $masterAddress", e)
      }
    })
  }
}
可以看到是使用了线程池进行异步注册,线程池的大小就是Master的个数,这样可以保证同一时间可以向多个Masters发送注册请求,因为ClientEndpoint并不知道哪个Master是Active级别的,如果一个一个注册会产生阻塞。内部首先获得Master的RpcEndpoint,实际上是NettyRpcEndpointRef,然后通过这个masterRef向Master发送消息:RegisterApplication(appDescription, self),这里的self指的就是ClientEndpoint。
下面我们看Master接收到消息是如何进行处理的:
case RegisterApplication(description, driver) => {
  // TODO Prevent repeated registrations from some driver
  if (state == RecoveryState.STANDBY) {
    // ignore, don't send response
    // 如果该Master是STANDBY的状态就直接忽略,什么也不做
  } else {
    logInfo("Registering app " + description.name)
    // 创建Application,注意这里传入的driver就是ClientEndpoint
    val app = createApplication(description, driver)
    // 注册上一步创建的Application
    registerApplication(app)
    logInfo("Registered app " + description.name + " with ID " + app.id)
    // 向持久化引擎中加入该Application的信息,用于HA,底层可以依赖Zookeeper实现
    persistenceEngine.addApplication(app)
    // 向driver即ClientEndpoint发送消息RegisteredApplication(app.id, self),这里的self就是Master
    driver.send(RegisteredApplication(app.id, self))
    // 最后执行Master的schedule()方法
    schedule()
  }
}
主要的流程已经在源码中进行注释,现在我们一一进行分析,为了方便大家的阅读,这里我使用如下标题加以区分(持久化不是本文的重点,所以此处省略):
- 创建Application
- 注册Application
- 向Driver发送消息
- 执行schedule()
创建Application
首先来看Application的创建过程:
private def createApplication(desc: ApplicationDescription, driver: RpcEndpointRef):
    ApplicationInfo = {
  val now = System.currentTimeMillis()
  val date = new Date(now)
  val appId = newApplicationId(date)  // 根据当前的时间构建Application的Id
  // 实例化ApplicationInfo
  new ApplicationInfo(now, appId, desc, date, driver, defaultCores)
}
而具体实例化的时候是执行了init()方法,限于篇幅这里就不一一说明了:
private def init() {
  state = ApplicationState.WAITING
  executors = new mutable.HashMap[Int, ExecutorDesc]
  coresGranted = 0
  endTime = -1L
  appSource = new ApplicationSource(this)
  nextExecutorId = 0
  removedExecutors = new ArrayBuffer[ExecutorDesc]
  executorLimit = Integer.MAX_VALUE
  appUIUrlAtHistoryServer = None
}
注册Application
下面就是注册Application:
private def registerApplication(app: ApplicationInfo): Unit = {
  val appAddress = app.driver.address
  // 首先要判断是否发过来注册请求的driver的RpcAddress是否已经存在
  if (addressToApp.contains(appAddress)) {
    logInfo("Attempted to re-register application at same address: " + appAddress)
    return
  }
  // 关于统计系统的部分,我们这里不深入分析
  applicationMetricsSystem.registerSource(app.appSource)
  // 下面就是向Master的各种数据结构中存入该Application的信息的操作
  apps += app
  idToApp(app.id) = app
  endpointToApp(app.driver) = app
  addressToApp(appAddress) = app
  waitingApps += app
}
向Driver发送消息
然后就是向driver即ClientEndpoint发送消息:RegisteredApplication(app.id, self),ClientEndpoint在接收到消息后的处理如下:
case RegisteredApplication(appId_, masterRef) =>
  // FIXME How to handle the following cases?
  // 一些意外的情况,感兴趣的可以研究下怎么解决。
  // 1. A master receives multiple registrations and sends back multiple
  // RegisteredApplications due to an unstable network.
  // 2. Receive multiple RegisteredApplication from different masters because the master is
  // changing.
  // 将获得的appId_存入到appId中,注意这里的appId是属于AppClient的
  // 下面的registered、master也是如此
  appId.set(appId_)
  registered.set(true)
  master = Some(masterRef)
  listener.connected(appId.get)
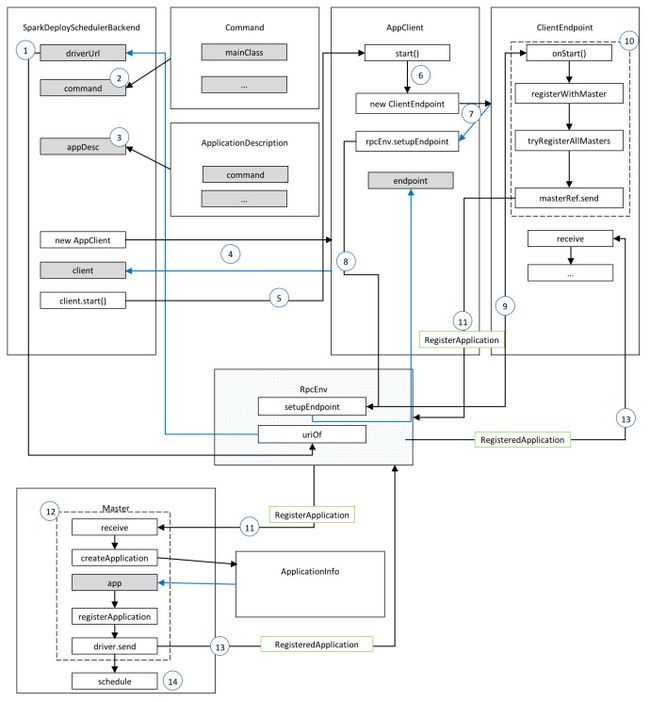
至此,我们使用一张图总结一下:
执行schedule()
我们在Spark-Core源码精读(2)、Master中的schedule详解已经分析了一部分源码,我们简单的回顾一下(我们这里都是假设集群是Standalone模式的,所以直接看Executor启动的部分):
schedule中的最后一句就是:startExecutorsOnWorkers(),我们从这里开始:
private def startExecutorsOnWorkers(): Unit = {
  // Right now this is a very simple FIFO scheduler. We keep trying to fit in the first app
  // in the queue, then the second app, etc.
  for (app <- waitingApps if app.coresLeft > 0) {
    val coresPerExecutor: Option[Int] = app.desc.coresPerExecutor
    // Filter out workers that don't have enough resources to launch an executor
    val usableWorkers = workers.toArray.filter(_.state == WorkerState.ALIVE)
      .filter(worker => worker.memoryFree >= app.desc.memoryPerExecutorMB &&
        worker.coresFree >= coresPerExecutor.getOrElse(1))
      .sortBy(_.coresFree).reverse
    val assignedCores = scheduleExecutorsOnWorkers(app, usableWorkers, spreadOutApps)
    // Now that we've decided how many cores to allocate on each worker, let's allocate them
    for (pos <- 0 until usableWorkers.length if assignedCores(pos) > 0) {
      allocateWorkerResourceToExecutors(
        app, assignedCores(pos), coresPerExecutor, usableWorkers(pos))
    }
  }
}
上面源码首先决定在每个worker上分配多少个cores,即scheduleExecutorsOnWorkers方法,默认是将exeutors分配到尽可能多的workers上,然后就是使用allocateWorkerResourceToExecutors方法在对应的Woker上启动Executor并为其分配计算资源:
private def allocateWorkerResourceToExecutors(
    app: ApplicationInfo,
    assignedCores: Int,
    coresPerExecutor: Option[Int],
    worker: WorkerInfo): Unit = {
  // If the number of cores per executor is specified, we divide the cores assigned
  // to this worker evenly among the executors with no remainder.
  // Otherwise, we launch a single executor that grabs all the assignedCores on this worker.
  val numExecutors = coresPerExecutor.map { assignedCores / _ }.getOrElse(1)
  val coresToAssign = coresPerExecutor.getOrElse(assignedCores)
  for (i <- 1 to numExecutors) {
    val exec = app.addExecutor(worker, coresToAssign)
    launchExecutor(worker, exec)
    app.state = ApplicationState.RUNNING
  }
}
内部执行的是launchExecutor(worker, exec),注意exec就是指ExecutorDesc,即Executor的描述信息,我们继续追踪launchExecutor:
private def launchExecutor(worker: WorkerInfo, exec: ExecutorDesc): Unit = {
  logInfo("Launching executor " + exec.fullId + " on worker " + worker.id)
  worker.addExecutor(exec)
  worker.endpoint.send(LaunchExecutor(masterUrl,
    exec.application.id, exec.id, exec.application.desc, exec.cores, exec.memory))
  exec.application.driver.send(
    ExecutorAdded(exec.id, worker.id, worker.hostPort, exec.cores, exec.memory))
}
可以看到具体分成了两步:
- 向worker发送启动Executor的消息
- 启动完成后向driver发送ExecutorAdded的消息,这里的driver就是ClientEndpoint
考虑到大家的阅读体验,我们将这两部分放到下一篇文章进行阐述。
本文参照的是Spark 1.6.3版本的源码,同时给出Spark 2.1.0版本的连接:
Spark 1.6.3 源码
Spark 2.1.0 源码
本文为原创,欢迎转载,转载请注明出处、作者,谢谢!