憨批的语义分割重制版3——Pytorch 搭建自己的PSPNet语义分割平台
憨批的语义分割重制版3——Pytorch 搭建自己的PSPNet语义分割平台
- 学习前言
- 什么是PSPNet模型
- 代码下载
- PSPNet实现思路
-
- 一、预测部分
-
- 1、主干网络介绍
- 2、加强特征提取结构
- 3、利用特征获得预测结果
- 二、训练部分
-
- 1、训练文件详解
- 2、LOSS解析
- 训练自己的PSPNet模型
学习前言
还是搞个Pytorch版本的,是我最后的倔强。
![]()
什么是PSPNet模型
PSPNet模型最主要的特点是采用了PSP模块。
该模型提出的金字塔池化模块(Pyramid Pooling Module)能够聚合不同区域的上下文信息,从而提高获取全局信息的能力。实验表明这样的先验表示(即指代PSP这个结构)是有效的,在多个数据集上展现了优良的效果。
PSP结构的功能是将获取到的特征层划分成不同大小的网格,每个网格内部各自进行平均池化。实现聚合不同区域的上下文信息,从而提高获取全局信息的能力。
在PSPNet中,PSP结构典型情况下,会将输入进来的特征层划分成6x6,3x3,2x2,1x1的网格,对应了图片中的绿色、蓝色、橙色、红色的的输出:
![]()
其中:
红色:将输入进来的特征层整个进行平均池化。
橙色:将输入进来的特征层划分为2×2个子区域,然后对每个子区域进行平均池化。
蓝色:将输入进来的特征层划分为3×3个子区域,然后对每个子区域进行平均池化。
绿色:将输入进来的特征层划分为6×6个子区域,然后对每个子区域进行平均池化。
代码下载
Github源码下载地址为:
https://github.com/bubbliiiing/pspnet-pytorch
PSPNet实现思路
一、预测部分
1、主干网络介绍
![]()
PSPNet在论文中采用的是Resnet系列作为主干特征提取网络,本博客会给大家提供两个主干网络,分别是resnet50和mobilenetv2。
但是由于算力限制(我没有什么卡),为了方便博客的进行,本文以mobilenetv2为例,给大家进行解析。
关于mobilenetv2的介绍大家可以看我的另外一篇博客https://blog.csdn.net/weixin_44791964/article/details/102851214。
MobileNet模型是Google针对手机等嵌入式设备提出的一种轻量级的深层神经网络,其使用的核心思想便是depthwise separable convolution。
MobileNetV2是MobileNet的升级版,它具有两个特征点:
1、Inverted residuals,在ResNet50里我们认识到一个结构,bottleneck design结构,在3x3网络结构前利用1x1卷积降维,在3x3网络结构后,利用1x1卷积升维,相比直接使用3x3网络卷积效果更好,参数更少,先进行压缩,再进行扩张。而在MobileNetV2网络部分,其采用Inverted residuals结构,在3x3网络结构前利用1x1卷积升维,在3x3网络结构后,利用1x1卷积降维,先进行扩张,再进行压缩。
![]()
2、Linear bottlenecks,为了避免Relu对特征的破坏,在在3x3网络结构前利用1x1卷积升维,在3x3网络结构后,再利用1x1卷积降维后,不再进行Relu6层,直接进行残差网络的加法。
![]()
整体网络结构如下,该图是针对输入为(224,224,3)的图片而言的:(其中bottleneck进行的操作就是上述的创新操作)
![]()
需要注意的是,在PSPNet当中,一般不会5次下采样,可选的有3次下采样和4次下采样,本文使用的4次下采样。这里所提到的下采样指的是不会进行五次长和宽的压缩,通常选用三次或者四次长和宽的压缩。
import torch
import torch.nn.functional as F
import torch.nn as nn
import math
import os
import torch.utils.model_zoo as model_zoo
BatchNorm2d = nn.BatchNorm2d

def conv_bn(inp, oup, stride):
    return nn.Sequential(
        nn.Conv2d(inp, oup, 3, stride, 1, bias=False),
        BatchNorm2d(oup),
        nn.ReLU6(inplace=True)
    )


def conv_1x1_bn(inp, oup):
    return nn.Sequential(
        nn.Conv2d(inp, oup, 1, 1, 0, bias=False),
        BatchNorm2d(oup),
        nn.ReLU6(inplace=True)
    )


class InvertedResidual(nn.Module):
    def __init__(self, inp, oup, stride, expand_ratio):
        super(InvertedResidual, self).__init__()
        self.stride = stride
        assert stride in [1, 2]

        hidden_dim = round(inp * expand_ratio)
        self.use_res_connect = self.stride == 1 and inp == oup

        if expand_ratio == 1:
            self.conv = nn.Sequential(
                # dw
                nn.Conv2d(hidden_dim, hidden_dim, 3, stride, 1, groups=hidden_dim, bias=False),
                BatchNorm2d(hidden_dim),
                nn.ReLU6(inplace=True),
                # pw-linear
                nn.Conv2d(hidden_dim, oup, 1, 1, 0, bias=False),
                BatchNorm2d(oup),
            )
        else:
            self.conv = nn.Sequential(
                # pw
                nn.Conv2d(inp, hidden_dim, 1, 1, 0, bias=False),
                BatchNorm2d(hidden_dim),
                nn.ReLU6(inplace=True),
                # dw
                nn.Conv2d(hidden_dim, hidden_dim, 3, stride, 1, groups=hidden_dim, bias=False),
                BatchNorm2d(hidden_dim),
                nn.ReLU6(inplace=True),
                # pw-linear
                nn.Conv2d(hidden_dim, oup, 1, 1, 0, bias=False),
                BatchNorm2d(oup),
            )

    def forward(self, x):
        if self.use_res_connect:
            return x + self.conv(x)
        else:
            return self.conv(x)


class MobileNetV2(nn.Module):
    def __init__(self, n_class=1000, input_size=224, width_mult=1.):
        super(MobileNetV2, self).__init__()
        block = InvertedResidual
        input_channel = 32
        last_channel = 1280

        interverted_residual_setting = [
            # t, c, n, s
            # 473,473,3 -> 237,237,32
            # 237,237,32 -> 237,237,16
            [1, 16, 1, 1],
            # 237,237,16 -> 119,119,24
            [6, 24, 2, 2],
            # 119,119,24 -> 60,60,32
            [6, 32, 3, 2],
            # 60,60,32 -> 30,30,64
            [6, 64, 4, 2],
            # 30,30,64 -> 30,30,96
            [6, 96, 3, 1],
            # 30,30,96 -> 15,15,160
            [6, 160, 3, 2],
            # 15,15,160 -> 15,15,320
            [6, 320, 1, 1],
        ]

        assert input_size % 32 == 0
        # 建立stem层
        input_channel = int(input_channel * width_mult)
        self.last_channel = int(last_channel * width_mult) if width_mult > 1.0 else last_channel

        self.features = [conv_bn(3, input_channel, 2)]

        # 根据上述列表进行循环,构建mobilenetv2的结构
        for t, c, n, s in interverted_residual_setting:
            output_channel = int(c * width_mult)
            for i in range(n):
                if i == 0:
                    self.features.append(block(input_channel, output_channel, s, expand_ratio=t))
                else:
                    self.features.append(block(input_channel, output_channel, 1, expand_ratio=t))
                input_channel = output_channel

        # mobilenetv2结构的收尾工作
        self.features.append(conv_1x1_bn(input_channel, self.last_channel))
        self.features = nn.Sequential(*self.features)

        # 最后的分类部分
        self.classifier = nn.Sequential(
            nn.Dropout(0.2),
            nn.Linear(self.last_channel, n_class),
        )

        self._initialize_weights()

    def forward(self, x):
        x = self.features(x)
        x = x.mean(3).mean(2)
        x = self.classifier(x)
        return x

    def _initialize_weights(self):
        for m in self.modules():
            if isinstance(m, nn.Conv2d):
                n = m.kernel_size[0] * m.kernel_size[1] * m.out_channels
                m.weight.data.normal_(0, math.sqrt(2. / n))
                if m.bias is not None:
                    m.bias.data.zero_()
            elif isinstance(m, BatchNorm2d):
                m.weight.data.fill_(1)
                m.bias.data.zero_()
            elif isinstance(m, nn.Linear):
                n = m.weight.size(1)
                m.weight.data.normal_(0, 0.01)
                m.bias.data.zero_()


def load_url(url, model_dir='./model_data', map_location=None):
    if not os.path.exists(model_dir):
        os.makedirs(model_dir)
    filename = url.split('/')[-1]
    cached_file = os.path.join(model_dir, filename)
    if os.path.exists(cached_file):
        return torch.load(cached_file, map_location=map_location)
    else:
        return model_zoo.load_url(url,model_dir=model_dir)

def mobilenetv2(pretrained=False, **kwargs):
    model = MobileNetV2(n_class=1000, **kwargs)
    if pretrained:
        model.load_state_dict(load_url('http://sceneparsing.csail.mit.edu/model/pretrained_resnet/mobilenet_v2.pth.tar'), strict=False)
    return model
2、加强特征提取结构
![]()
PSPNet所使用的加强特征提取结构是PSP模块。
PSP结构的做法是将获取到的特征层划分成不同大小的区域,每个区域内部各自进行平均池化。实现聚合不同区域的上下文信息,从而提高获取全局信息的能力。
在PSPNet中,PSP结构典型情况下,会将输入进来的特征层划分成6x6,3x3,2x2,1x1的区域,然后每个区域内部各自进行平均池化。
假设PSP结构输入进来的特征层为30x30x320,此时这个特征层的高和宽均为30,如果我们要将这个特征层划分成6x6的区域,只需要使得平均池化的步长stride=30/6=5和kernel_size=30/6=5就行了,此时的平均池化相当于将特征层划分成6x6的区域,每个区域内部各自进行平均池化。
当PSP结构输入进来的特征层为30x30x320时,PSP结构的具体构成如下。
![]()
class _PSPModule(nn.Module):
    def __init__(self, in_channels, pool_sizes, norm_layer):
        super(_PSPModule, self).__init__()
        out_channels = in_channels // len(pool_sizes)
        self.stages = nn.ModuleList([self._make_stages(in_channels, out_channels, pool_size, norm_layer)
                                                        for pool_size in pool_sizes])
        self.bottleneck = nn.Sequential(
            nn.Conv2d(in_channels+(out_channels * len(pool_sizes)), out_channels,
                                    kernel_size=3, padding=1, bias=False),
            norm_layer(out_channels),
            nn.ReLU(inplace=True),
            nn.Dropout2d(0.1)
        )

    def _make_stages(self, in_channels, out_channels, bin_sz, norm_layer):
        prior = nn.AdaptiveAvgPool2d(output_size=bin_sz)
        conv = nn.Conv2d(in_channels, out_channels, kernel_size=1, bias=False)
        bn = norm_layer(out_channels)
        relu = nn.ReLU(inplace=True)
        return nn.Sequential(prior, conv, bn, relu)

    def forward(self, features):
        h, w = features.size()[2], features.size()[3]
        pyramids = [features]
        pyramids.extend([F.interpolate(stage(features), size=(h, w), mode='bilinear',
                                        align_corners=True) for stage in self.stages])
        output = self.bottleneck(torch.cat(pyramids, dim=1))
        return output
3、利用特征获得预测结果
利用1、2步,我们可以获取输入进来的图片的特征,此时,我们需要利用特征获得预测结果。
利用特征获得预测结果的过程可以分为3步:
1、利用一个3x3卷积对特征进行整合。
2、利用一个1x1卷积进行通道调整,调整成Num_Classes。
3、利用resize进行上采样使得最终输出层,宽高和输入图片一样。
![]()
class PSPNet(nn.Module):
    def __init__(self, num_classes, downsample_factor, backbone="resnet50", pretrained=True, aux_branch=True):
        super(PSPNet, self).__init__()
        norm_layer = nn.BatchNorm2d
        if backbone=="resnet50":
            self.backbone = Resnet(downsample_factor, pretrained)
            aux_channel = 1024
            out_channel = 2048
        elif backbone=="mobilenet":
            self.backbone = MobileNetV2(downsample_factor, pretrained)
            aux_channel = 96
            out_channel = 320
        else:
            raise ValueError('Unsupported backbone - `{}`, Use mobilenet, resnet50.'.format(backbone))

        self.master_branch = nn.Sequential(
            _PSPModule(out_channel, pool_sizes=[1, 2, 3, 6], norm_layer=norm_layer),
            nn.Conv2d(out_channel//4, num_classes, kernel_size=1)
        )

        self.aux_branch = aux_branch

        if self.aux_branch:
            self.auxiliary_branch = nn.Sequential(
                nn.Conv2d(aux_channel, out_channel//8, kernel_size=3, padding=1, bias=False),
                norm_layer(out_channel//8),
                nn.ReLU(inplace=True),
                nn.Dropout2d(0.1),
                nn.Conv2d(out_channel//8, num_classes, kernel_size=1)
            )

        self.initialize_weights(self.master_branch)

    def forward(self, x):
        input_size = (x.size()[2], x.size()[3])
        x_aux, x = self.backbone(x)

        output = self.master_branch(x)
        output = F.interpolate(output, size=input_size, mode='bilinear', align_corners=True)
        if self.aux_branch:
            output_aux = self.auxiliary_branch(x_aux)
            output_aux = F.interpolate(output_aux, size=input_size, mode='bilinear', align_corners=True)
            return output_aux, output
        else:
            return output

    def initialize_weights(self, *models):
        for model in models:
            for m in model.modules():
                if isinstance(m, nn.Conv2d):
                    nn.init.kaiming_normal_(m.weight.data, nonlinearity='relu')
                elif isinstance(m, nn.BatchNorm2d):
                    m.weight.data.fill_(1.)
                    m.bias.data.fill_(1e-4)
                elif isinstance(m, nn.Linear):
                    m.weight.data.normal_(0.0, 0.0001)
                    m.bias.data.zero_()
二、训练部分
1、训练文件详解
我们使用的训练文件采用VOC的格式。
语义分割模型训练的文件分为两部分。
第一部分是原图,像这样:
![]()
第二部分标签,像这样:
![]()
原图就是普通的RGB图像,标签就是灰度图或者8位彩色图。
原图的shape为[height, width, 3],标签的shape就是[height, width],对于标签而言,每个像素点的内容是一个数字,比如0、1、2、3、4、5……,代表这个像素点所属的类别。
语义分割的工作就是对原始的图片的每一个像素点进行分类,所以通过预测结果中每个像素点属于每个类别的概率与标签对比,可以对网络进行训练。
2、LOSS解析
本文所使用的LOSS由两部分组成:
1、Cross Entropy Loss。
2、Dice Loss。
Cross Entropy Loss就是普通的交叉熵损失,当语义分割平台利用Softmax对像素点进行分类的时候,进行使用。
Dice loss将语义分割的评价指标作为Loss,Dice系数是一种集合相似度度量函数,通常用于计算两个样本的相似度,取值范围在[0,1]。
计算公式如下:
![]()
就是预测结果和真实结果的交乘上2,除上预测结果加上真实结果。其值在0-1之间。越大表示预测结果和真实结果重合度越大。所以Dice系数是越大越好。
如果作为LOSS的话是越小越好,所以使得Dice loss = 1 - Dice,就可以将Loss作为语义分割的损失了。
实现代码如下:
import torch
import torch.nn.functional as F
import numpy as np
from torch import nn
from torch.autograd import Variable
from random import shuffle
from matplotlib.colors import rgb_to_hsv, hsv_to_rgb
from PIL import Image
import cv2

def CE_Loss(inputs, target, num_classes=21):
    n, c, h, w = inputs.size()
    nt, ht, wt = target.size()
    if h != ht and w != wt:
        inputs = F.interpolate(inputs, size=(ht, wt), mode="bilinear", align_corners=True)

    temp_inputs = inputs.transpose(1, 2).transpose(2, 3).contiguous().view(-1, c)
    temp_target = target.view(-1)

    CE_loss  = nn.NLLLoss(ignore_index=num_classes)(F.log_softmax(temp_inputs, dim = -1), temp_target)
    return CE_loss

def Dice_loss(inputs, target, beta=1, smooth = 1e-5):
    n, c, h, w = inputs.size()
    nt, ht, wt, ct = target.size()

    if h != ht and w != wt:
        inputs = F.interpolate(inputs, size=(ht, wt), mode="bilinear", align_corners=True)
    temp_inputs = torch.softmax(inputs.transpose(1, 2).transpose(2, 3).contiguous().view(n, -1, c),-1)
    temp_target = target.view(n, -1, ct)

    #--------------------------------------------#
    #   计算dice loss
    #--------------------------------------------#
    tp = torch.sum(temp_target[...,:-1] * temp_inputs, axis=[0,1])
    fp = torch.sum(temp_inputs                       , axis=[0,1]) - tp
    fn = torch.sum(temp_target[...,:-1]              , axis=[0,1]) - tp

    score = ((1 + beta ** 2) * tp + smooth) / ((1 + beta ** 2) * tp + beta ** 2 * fn + fp + smooth)
    dice_loss = 1 - torch.mean(score)
    return dice_loss
训练自己的PSPNet模型
整个PSPNet的文件构架为:
![]()
在训练模型之前,我们需要首先准备好数据集。
大家可以下载我上传的voc数据集,也可以根据voc数据集格式进行数据集制作。
![]()
如果大家下载的是我上传的voc数据集,那么就不需要运行VOCdevkit文件夹下面的voc2pspnet.py。
如果是自己制作的数据集,那么需要运行VOCdevkit文件夹下面的voc2pspnet.py,从而生成train.txt和val.txt。
![]()
生成完成后。
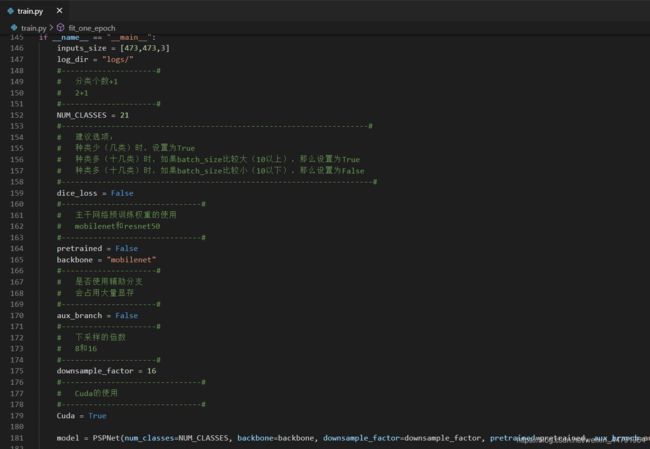
在train.py文件夹下面,选择自己要使用的主干模型和下采样因子。
本文提供的主干模型有mobilenet和resnet50。
下采样因子可以在8和16中选择。
需要注意的是,预训练模型需要和主干模型相对应。

之后就可以开始训练了。
