MyBatis-Plus学习(一)——Springboot快速开始
前言
虽然MyBatis-Plus官网的指南写得比较清楚,不过在实际开发和配置中,还是遇到了不少问题,既是写给自己看,也是把一些遇到的问题记录下来。
快速开始
数据库
首先在数据库中新建一个数据库,这里我新建的叫mybatis_plus_test。
然后执行以下脚本创建User表
DROP TABLE IF EXISTS user;

CREATE TABLE user
(
	id BIGINT(20) NOT NULL COMMENT '主键ID',
	name VARCHAR(30) NULL DEFAULT NULL COMMENT '姓名',
	age INT(11) NULL DEFAULT NULL COMMENT '年龄',
	email VARCHAR(50) NULL DEFAULT NULL COMMENT '邮箱',
	PRIMARY KEY (id)
);
接着插入数据
DELETE FROM user;

INSERT INTO user (id, name, age, email) VALUES
(1, 'Jone', 18, '[email protected]'),
(2, 'Jack', 20, '[email protected]'),
(3, 'Tom', 28, '[email protected]'),
(4, 'Sandy', 21, '[email protected]'),
(5, 'Billie', 24, '[email protected]');
初始化工程
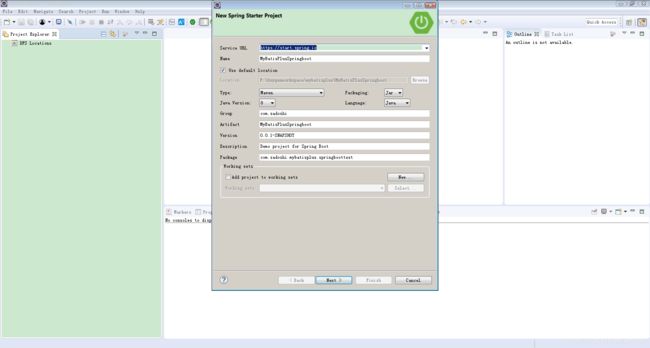
通过eclipse新建一个springboot工程
配置Maven依赖,例如以下pom文件
	4.0.0

		org.springframework.boot
		spring-boot-starter-parent
		2.5.0


	com.sadoshi
	MyBatisPlusSpringboot
	0.0.1-SNAPSHOT
	MyBatisPlusSpringboot
	Demo project for Spring Boot

		1.8
		3.1.1


			org.springframework.boot
			spring-boot-starter


			org.springframework.boot
			spring-boot-starter-test
			test


			mysql
			mysql-connector-java
			8.0.25


			com.baomidou
			mybatis-plus-boot-starter
			3.4.3


			org.projectlombok
			lombok
			1.18.20
			provided


				org.springframework.boot
				spring-boot-maven-plugin
application.properties文件配置数据库连接
spring.datasource.url=jdbc:mysql://127.0.0.1:3306/mybatis_plus_test?userSSL=true&useUnicode=false&characterEncoding=UTF8&serverTimezone=GMT
spring.datasource.username=root
spring.datasource.password=
spring.datasource.driver-class-name=com.mysql.cj.jdbc.Driver
增加日志打印,在application.properties添加如下语句,可以输出到控制台
mybatis-plus.configuration.log-impl=org.apache.ibatis.logging.stdout.StdOutImpl
编码
springboot启动类,这里因为懒得写测试类,直接在主类上调用了。主类加上@MapperScan 注解,扫描 Mapper 文件夹
package com.sadoshi.mybatisplus.springboottest;

import org.mybatis.spring.annotation.MapperScan;
import org.springframework.boot.SpringApplication;
import org.springframework.boot.autoconfigure.SpringBootApplication;
import org.springframework.context.annotation.ComponentScan;

import com.sadoshi.mybatisplus.springboottest.component.UserComponent;
import com.sadoshi.mybatisplus.springboottest.util.SpringUtil;

@SpringBootApplication
@MapperScan("com.sadoshi.mybatisplus.springboottest.mapper")
public class App {

	public static void main(String[] args) {
		SpringApplication.run(App.class, args);
		App app = new App();
		UserComponent userComponent = SpringUtil.getBean(UserComponent.class);
		userComponent.testSelect();
	}

}
创建实体类User,这里的@Data用了lombok,如果集成开发环境没安装这个插件的话,可能编译报错,自行百度解决。
package com.sadoshi.mybatisplus.springboottest.model;

import lombok.Data;

@Data
public class User {
	private Long id;
    private String name;
    private Integer age;
    private String email;
}
编写Mapper类
public interface UserMapper extends BaseMapper {

}
写一个User实体类,注入spring容器中,一会利用这个对象进行测试
package com.sadoshi.mybatisplus.springboottest.component;

import java.util.List;

import org.springframework.beans.factory.annotation.Autowired;
import org.springframework.stereotype.Component;

import com.sadoshi.mybatisplus.springboottest.mapper.UserMapper;
import com.sadoshi.mybatisplus.springboottest.model.User;

@Component
public class UserComponent {

	@Autowired
    private UserMapper userMapper;

	public void testSelect() {
        System.out.println(("----- selectAll method test ------"));
        List userList = userMapper.selectList(null);
        userList.forEach(System.out::println);
    }
}
测试
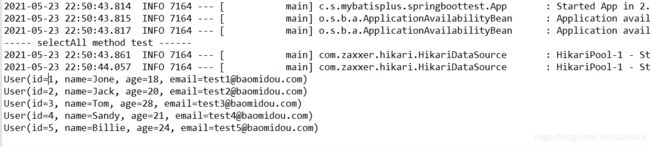
万事俱备,可以启动测试了,执行App类,结果为下图,已经正确查出数据库中的记录
问题
之前搭这个环境,还是遇到比较多的问题。
1、启动报错java.lang.annotation.AnnotationFormatError: Invalid default: public abstract java.lang.Class
这个网上很多说加上mybatis相关的依赖,但实际上是不需要的,因为现在mybatis-plus的依赖已经包含了这部分,再加上的话如果版本没对上还有可能会引起版本冲突,这个问题并不在这里。解决的办法就是把工程相关的maven仓库里的包都删了重新拉下来,就能解决了。
2、新建springboot工程后,pom文件第一行报错
这个需要在pom文件加上
		1.8
		3.1.1