识别原理
我们采取一种有监督式学习的方法来识别验证码,包含以下几个步骤
图片处理 - 对图片进行降噪、二值化处理
切割图片 - 将图片切割成单个字符并保存
人工标注 - 对切割的字符图片进行人工标注,作为训练集
训练数据 - 用KNN算法训练数据
检测结果 - 用上一步的训练结果识别新的验证码
下面我们来逐一介绍一下每一步的过程,并给出具体的代码实现。
127是我们设定的阈值,像素值大于127被置成了0,小于127的被置成了255。处理后的图片变成了这样
接下来,我们应用高斯模糊对图片进行降噪。高斯模糊的本质是用高斯核和图像做卷积,代码如下
kernel = 1/16*np.array([[1,2,1], [2,4,2], [1,2,1]])
im_blur = cv2.filter2D(im_inv,-1,kernel)
降噪后的图片如下
可以看到一些颗粒化的噪声被平滑掉了。
降噪后,我们对图片再做一轮二值化处理
ret, im_res = cv2.threshold(im_blur,127,255,cv2.THRESH_BINARY)
现在图片变成了这样
好了,接下来,我们要开始切割图片了。
小编给大家推荐一个学习氛围超好的地方,python交流企鹅裙:【611+530+101】适合在校大学生,小白,想转行,想通过这个找工作的加入。裙里有大量学习资料,有大神解答交流问题,每晚都有免费的直播课程
切割图片
这一步是所有步骤里最复杂的一步。我们的目标是把最开始的图片切割成单个字符,并把每个字符保存成如下的灰度图
首先我们用opencv的findContours来提取轮廓
im2, contours, hierarchy = cv2.findContours(im_res, cv2.RETR_EXTERNAL, cv2.CHAIN_APPROX_SIMPLE)
我们把提取的轮廓用矩形框起来,画出来是这样的
可以看到,每个字符都被检测出来了。
但这只是理想情况,很多时候,相邻字符有粘连的会被识别成同一个字符,比如像下面的情况
要处理这种情况,我们就要对上面的图片做进一步的分割。字符粘连会有下面几种情况,我们逐一来看下该怎么处理。
4个字符被识别成3个字符
这种情况,对粘连的字符轮廓,从中间进行分割,代码如下
result = []
for contour in contours:
x, y, w, h = cv2.boundingRect(contour)
if w == w_max: # w_max是所有contonur的宽度中最宽的值
box_left = np.int0([[x,y], [x+w/2,y], [x+w/2,y+h], [x,y+h]])
box_right = np.int0([[x+w/2,y], [x+w,y], [x+w,y+h], [x+w/2,y+h]])
result.append(box_left)
result.append(box_right)
else:
box = np.int0([[x,y], [x+w,y], [x+w,y+h], [x,y+h]])
result.append(box)
分割后,图片变成了这样
4个字符被识别成2个字符
4个字符被识别成2个字符有下面两种情况
对第一种情况,对于左右两个轮廓,从中间分割即可。对第二种情况,将包含了3个字符的轮廓在水平方向上三等分。具体代码如下
result = []
for contour in contours:
x, y, w, h = cv2.boundingRect(contour)
if w == w_max and w_max >= w_min * 2:
# 如果两个轮廓一个是另一个的宽度的2倍以上,我们认为这个轮廓就是包含3个字符的轮廓
box_left = np.int0([[x,y], [x+w/3,y], [x+w/3,y+h], [x,y+h]])
box_mid = np.int0([[x+w/3,y], [x+w*2/3,y], [x+w*2/3,y+h], [x+w/3,y+h]])
box_right = np.int0([[x+w*2/3,y], [x+w,y], [x+w,y+h], [x+w*2/3,y+h]])
result.append(box_left)
result.append(box_mid)
result.append(box_right)
elif w_max < w_min * 2:
# 如果两个轮廓,较宽的宽度小于较窄的2倍,我们认为这是两个包含2个字符的轮廓
box_left = np.int0([[x,y], [x+w/2,y], [x+w/2,y+h], [x,y+h]])
box_right = np.int0([[x+w/2,y], [x+w,y], [x+w,y+h], [x+w/2,y+h]])
result.append(box_left)
result.append(box_right)
else:
box = np.int0([[x,y], [x+w,y], [x+w,y+h], [x,y+h]])
result.append(box)
分割后的图片如下
4个字符被识别成1个字符
这种情况对轮廓在水平方向上做4等分即可,代码如下
result = []
contour = contours[0]
x, y, w, h = cv2.boundingRect(contour)
box0 = np.int0([[x,y], [x+w/4,y], [x+w/4,y+h], [x,y+h]])
box1 = np.int0([[x+w/4,y], [x+w*2/4,y], [x+w*2/4,y+h], [x+w/4,y+h]])
box2 = np.int0([[x+w*2/4,y], [x+w*3/4,y], [x+w*3/4,y+h], [x+w*2/4,y+h]])
box3 = np.int0([[x+w*3/4,y], [x+w,y], [x+w,y+h], [x+w*3/4,y+h]])
result.extend([box0, box1, box2, box3])
分割后的图片如下
对图片分割完成后,我们将分割后的单个字符的图片存成不同的图片文件,以便下一步做人工标注。存取字符图片的代码如下
for box in result:
cv2.drawContours(im, [box], 0, (0,0,255),2)
roi = im_res[box[0][1]:box[3][1], box[0][0]:box[1][0]]
roistd = cv2.resize(roi, (30, 30)) # 将字符图片统一调整为30x30的图片大小
timestamp = int(time.time() * 1e6) # 为防止文件重名,使用时间戳命名文件名
filename = "{}.jpg".format(timestamp)
filepath = os.path.join("char", filename)
cv2.imwrite(filepath, roistd)
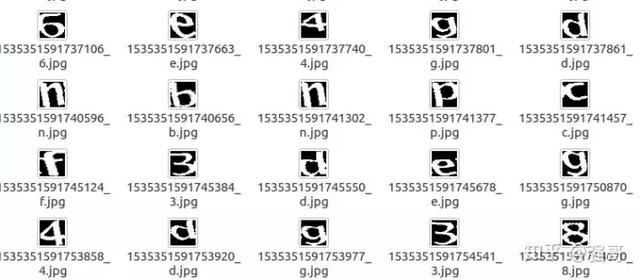
字符图片保存在名为char的目录下面,这个目录里的文件大致是长这样的(文件名用时间戳命名,确保不会重名)
接下来,我们开始标注数据。
人工标注
这一步是所有步骤里最耗费体力的一步了。为节省时间,我们在程序里依次打开char目录中的每张图片,键盘输入字符名,程序读取键盘输入并将字符名保存在文件名里。代码如下
files = os.listdir("char")
for filename in files:
filename_ts = filename.split(".")[0]
patt = "label/{}_*".format(filename_ts)
saved_num = len(glob.glob(patt))
if saved_num == 1:
print("{} done".format(patt))
continue
filepath = os.path.join("char", filename)
im = cv2.imread(filepath)
cv2.imshow("image", im)
key = cv2.waitKey(0)
if key == 27:
sys.exit()
if key == 13:
continue
char = chr(key)
filename_ts = filename.split(".")[0]
outfile = "{}_{}.jpg".format(filename_ts, char)
outpath = os.path.join("label", outfile)
cv2.imwrite(outpath, im)
这里一共标注了大概800张字符图片,标注的结果存在名为label的目录下,目录下的文件是这样的(文件名由原文件名+标注名组成)
接下来,我们开始训练数据。
训练数据
首先,我们从label目录中加载已标注的数据
filenames = os.listdir("label")
samples = np.empty((0, 900))
labels = []
for filename in filenames:
filepath = os.path.join("label", filename)
label = filename.split(".")[0].split("_")[-1]
labels.append(label)
im = cv2.imread(filepath, cv2.IMREAD_GRAYSCALE)
sample = im.reshape((1, 900)).astype(np.float32)
samples = np.append(samples, sample, 0)
samples = samples.astype(np.float32)
unique_labels = list(set(labels))
unique_ids = list(range(len(unique_labels)))
label_id_map = dict(zip(unique_labels, unique_ids))
id_label_map = dict(zip(unique_ids, unique_labels))
label_ids = list(map(lambda x: label_id_map[x], labels))
label_ids = np.array(label_ids).reshape((-1, 1)).astype(np.float32)
接下来,训练我们的模型
model = cv2.ml.KNearest_create()
model.train(samples, cv2.ml.ROW_SAMPLE, label_ids)
训练完,我们用这个模型来识别一下新的验证码。
检测结果
下面是我们要识别的验证码
对于每一个要识别的验证码,我们都需要对图片做降噪、二值化、分割的处理(代码和上面的一样,这里不再重复)。假设处理后的图片存在变量im_res中,分割后的字符的轮廓信息存在变量boxes中,识别验证码的代码如下
for box in boxes:
roi = im_res[box[0][1]:box[3][1], box[0][0]:box[1][0]]
roistd = cv2.resize(roi, (30, 30))
sample = roistd.reshape((1, 900)).astype(np.float32)
ret, results, neighbours, distances = model.findNearest(sample, k = 3)
label_id = int(results[0,0])
label = id_label_map[label_id]
print(label)
运行上面的代码,可以看到程序输出
y
y
4
e
图片中的验证码被成功地识别出来。
我们测试了下识别的准确率,取100张验证码图片(存在test目录下)进行识别,识别的准确率约为82%。看到有人说用神经网络识别验证码,准确率可以达到90%以上,下次有机会可以尝试一下。


