深度学习编程工具Tensorflow—实现LeNet-5
Tensorflow框架实现LeNet-5
- 1. 目标与背景
- 2. 基于LeNet的TensorFlow实现
-
- 2.1 程序代码分析
- 2.2 实验演示
- 3. 结尾
- 参考资料
1. 目标与背景
在这一讲中,我们将讲解深度学习的编程工具Tensorflow的基础使用规则。最初的深度学习编程工具主要由研究人员义务开发,免费发布供大家使用,如Caffe,在2014年,由美国加州大学伯克利分校贾扬清开发。随着深度学习技术的逐渐普及,开发深度学习的编程工具变得有利可图。因此,近年来编程工具的主要开发者变成了公司。
下面是各种开发工具的演变历程:
其中Caffe、PyTorch和TensorFlow分别由FaceBook和Google两家公司运营和维护,从影响力和使用频率来说,它们也是深度学习编程工具的三强。其他相对著名的工具还包括Baidu公司开发的Paddle,Microsoft公司开发的CNTK以及Amazon开发的MXNet等。
编程工具竞争的背后是软件和硬件整个标准的全面竞争,我们也希望国内的企业和科研机构能在这样的竞争中有所作为。在软件的应用方面总是存在易用性和灵活性的矛盾。例如最初的Caffe只支持卷积神经网络这一种深度学习的模型,因此它的代码简洁易懂、容易移植。近年来,随着相关领域研究的深入,灵活性的要求变得更多,能够适应多种深度学习模型的编程工具如PyTorch和TensorFlow,也包括新一代的Caffe2逐渐占据了主流的地位。
2. 基于LeNet的TensorFlow实现
2.1 程序代码分析
在本讲中,我们首先结合LetNet的例子来讲TensorFlow的基本语法。TensorFlow是以Python程序语言为接口吗,我们打开nnMnist.py程序:
nnMnist.py:
from __future__ import absolute_import
from __future__ import division
from __future__ import print_function

import gzip
import os
import tempfile
import tensorflow.compat.v1 as tf
tf.disable_v2_behavior()
import input_data
import numpy
from six.moves import urllib

mnist = input_data.read_data_sets('data/', one_hot=True)

def weight_variable(shape):
    initial = tf.truncated_normal(shape, stddev=0.1)
    return tf.Variable(initial)

def bias_variable(shape):
    initial = tf.constant(0.1, shape=shape)
    return tf.Variable(initial)

def conv2d(x, W, argument):
    return tf.nn.conv2d(x, W, strides=[1, 1, 1, 1], padding=argument)

def max_pool_2x2(x):
    return tf.nn.max_pool(x, ksize=[1, 2, 2, 1], strides=[1, 2, 2, 1], padding='SAME')


sess = tf.InteractiveSession()
x = tf.placeholder("float", shape=[None, 784])
y_ = tf.placeholder("float", shape=[None, 10])

#First convolutional layer
W_conv1 = weight_variable([5, 5, 1, 6])
b_conv1 = bias_variable([6])

x_image = tf.reshape(x, [-1,28,28,1])

h_conv1 = tf.nn.relu(conv2d(x_image, W_conv1, 'SAME') + b_conv1)
h_pool1 = max_pool_2x2(h_conv1)

#Second convolutional layer
W_conv2 = weight_variable([5, 5, 6, 16])
b_conv2 = bias_variable([16])

h_conv2 = tf.nn.relu(conv2d(h_pool1, W_conv2, 'VALID') + b_conv2)
h_pool2 = max_pool_2x2(h_conv2)

#Three fully connected layers
W_fc1 = weight_variable([5*5*16, 120])
b_fc1 = bias_variable([120])

h_pool2_flat = tf.reshape(h_pool2, [-1, 5*5*16])
h_fc1 = tf.nn.relu(tf.matmul(h_pool2_flat, W_fc1) + b_fc1)
keep_prob = tf.placeholder("float")
h_fc1_drop = tf.nn.dropout(h_fc1, keep_prob)

W_fc2 = weight_variable([120, 84])
b_fc2 = bias_variable([84])
h_fc2 =tf.nn.relu(tf.matmul(h_fc1_drop, W_fc2) + b_fc2)
h_fc2_drop = tf.nn.dropout(h_fc2, keep_prob)

W_fc3 = weight_variable([84, 10])
b_fc3 = bias_variable([10])

y_conv=tf.nn.softmax(tf.matmul(h_fc2_drop, W_fc3) + b_fc3)

#Evaluation
cross_entropy = -tf.reduce_sum(y_*tf.log(y_conv))
train_step = tf.train.AdamOptimizer(1e-4).minimize(cross_entropy)
correct_prediction = tf.equal(tf.argmax(y_conv,1), tf.argmax(y_,1))
accuracy = tf.reduce_mean(tf.cast(correct_prediction, "float"))
sess.run(tf.global_variables_initializer())
for i in range(12000):
    batch = mnist.train.next_batch(50)
    if i%100 == 0:
        train_accuracy = accuracy.eval(feed_dict={
     x:batch[0], y_: batch[1], keep_prob: 1.0})
        print ("step %d, training accuracy %g"%(i, train_accuracy))
    train_step.run(feed_dict={
     x: batch[0], y_: batch[1], keep_prob: 0.5})

print ("test accuracy %g"%accuracy.eval(feed_dict={
     x: mnist.test.images, y_: mnist.test.labels, keep_prob: 1.0}))
可以看到第1-12行是载入程序的各种库。
from __future__ import absolute_import
from __future__ import division
from __future__ import print_function

import gzip
import os
import tempfile
import tensorflow.compat.v1 as tf
tf.disable_v2_behavior()
import input_data
import numpy
from six.moves import urllib
接下来第14行是读入训练和测试的数据
mnist = input_data.read_data_sets('data/', one_hot=True)
按照前面的描述,Mnist数据集中包含60000张28×28的二值图像,分别属于0-9这十个类别的手写体数字。
第16行到第28行定义了卷积神经网络中常用的几个函数。
def weight_variable(shape):
    initial = tf.truncated_normal(shape, stddev=0.1)
    return tf.Variable(initial)

def bias_variable(shape):
    initial = tf.constant(0.1, shape=shape)
    return tf.Variable(initial)

def conv2d(x, W, argument):
    return tf.nn.conv2d(x, W, strides=[1, 1, 1, 1], padding=argument)

def max_pool_2x2(x):
    return tf.nn.max_pool(x, ksize=[1, 2, 2, 1], strides=[1, 2, 2, 1], padding='SAME')
前面的2个函数weight_variable()和bias_variable()分别对卷积神经网络找中的权重和偏置进行初始化;第3个函数conv2d()是卷积操作;第4个函数max_pool_2x2()是最大池化操作。
第31-33行是初始化的操作。
sess = tf.InteractiveSession()
x = tf.placeholder("float", shape=[None, 784])
y_ = tf.placeholder("float", shape=[None, 10])
TensorFlow的语法规则是首先开启一个流程,在程序里面用InteractiveSession()来表示,然后把整个流程清除过后再去运行它。例如第31行是开启流程的操作,而直到第75行才让整个流程运行起来,而中间就是对这个流程的描述。
第75行:
sess.run(tf.global_variables_initializer())
第32和33行描述的是输入和输出,由于输入是28×28的二值图像,共784维,而类别的数量是10,在这两行中都有所体现。值得注意的是None是占位符,它代表的是输入样本的个数,由于到现在没有确定,因此用None进行占位。TensorFlow的特点之一是先用占位符让流程走下去,到后面再一步一步的明确细节。例如直到第79和81行才把x和y_两个变量赋值清楚,从而完全确定总共有多少张图片。
第79行:
train_accuracy = accuracy.eval(feed_dict={
     x:batch[0], y_: batch[1], keep_prob: 1.0})
第81行:
train_step.run(feed_dict={
     x: batch[0], y_: batch[1], keep_prob: 0.5})
第35-66行设置了LeNet的网络结构,我们对照LeNet的网络结构图来详细说明。
![]()
在LeNet的网络结构图中,第1个卷积层是用6个5×5的卷积核卷积原图像,产生6张28×28的特征图,我们对照程序的第35-42行很容易看懂这些程序。
#First convolutional layer
W_conv1 = weight_variable([5, 5, 1, 6])
b_conv1 = bias_variable([6])

x_image = tf.reshape(x, [-1,28,28,1])

h_conv1 = tf.nn.relu(conv2d(x_image, W_conv1, 'SAME') + b_conv1)
h_pool1 = max_pool_2x2(h_conv1)
值得注意的是第41行conv2d(x_image, W_conv1, 'SAME')第3个变量SAME表示输入图像自动补零使得输出的特征图维度和输入一样。如果第3个变量改为VALID则表示不补零,那么输出的特征图的维度相比于输入的特征图有相应的减少。
第2个卷积层是16个5×5的卷积核将输入的6个14×14的特征图变成16个10×10的特征图。从程序中第44-49行可以获得。
#Second convolutional layer
W_conv2 = weight_variable([5, 5, 6, 16])
b_conv2 = bias_variable([16])

h_conv2 = tf.nn.relu(conv2d(h_pool1, W_conv2, 'VALID') + b_conv2)
h_pool2 = max_pool_2x2(h_conv2)
接下来第51-68行是三个全连接层。
#Three fully connected layers
W_fc1 = weight_variable([5*5*16, 120])
b_fc1 = bias_variable([120])

h_pool2_flat = tf.reshape(h_pool2, [-1, 5*5*16])
h_fc1 = tf.nn.relu(tf.matmul(h_pool2_flat, W_fc1) + b_fc1)
keep_prob = tf.placeholder("float")
h_fc1_drop = tf.nn.dropout(h_fc1, keep_prob)

W_fc2 = weight_variable([120, 84])
b_fc2 = bias_variable([84])
h_fc2 =tf.nn.relu(tf.matmul(h_fc1_drop, W_fc2) + b_fc2)
h_fc2_drop = tf.nn.dropout(h_fc2, keep_prob)

W_fc3 = weight_variable([84, 10])
b_fc3 = bias_variable([10])

y_conv=tf.nn.softmax(tf.matmul(h_fc2_drop, W_fc3) + b_fc3)
对照LeNet的结构图很容易看懂上述程序。值得注意的是我们引入了dropout,其中keep_prob这个表示的是我们需要保留多少比例的神经元,在程序中被复制为50%
第70-81行是训练的过程。
#Evaluation
cross_entropy = -tf.reduce_sum(y_*tf.log(y_conv))
train_step = tf.train.AdamOptimizer(1e-4).minimize(cross_entropy)
correct_prediction = tf.equal(tf.argmax(y_conv,1), tf.argmax(y_,1))
accuracy = tf.reduce_mean(tf.cast(correct_prediction, "float"))
sess.run(tf.global_variables_initializer())
for i in range(12000):
    batch = mnist.train.next_batch(50)
    if i%100 == 0:
        train_accuracy = accuracy.eval(feed_dict={
     x:batch[0], y_: batch[1], keep_prob: 1.0})
        print ("step %d, training accuracy %g"%(i, train_accuracy))
    train_step.run(feed_dict={
     x: batch[0], y_: batch[1], keep_prob: 0.5})
在第71行中,设置目标函数为交叉熵。第72行表示利用Adam优化策略进行训练。第76-81行是整个训练的循环过程,其中第77行说明每个batch有50个训练样本,由于总共有60000个训练样本,因此每120个batch遍历所有训练样本一次,第76行表明总共有12000次取batch的操作,因此整个训练过程总共遍历了训练样本100次。
最后第83行打印出测试集上的训练结果。
print ("test accuracy %g"%accuracy.eval(feed_dict={
     x: mnist.test.images, y_: mnist.test.labels, keep_prob: 1.0}))
2.2 实验演示
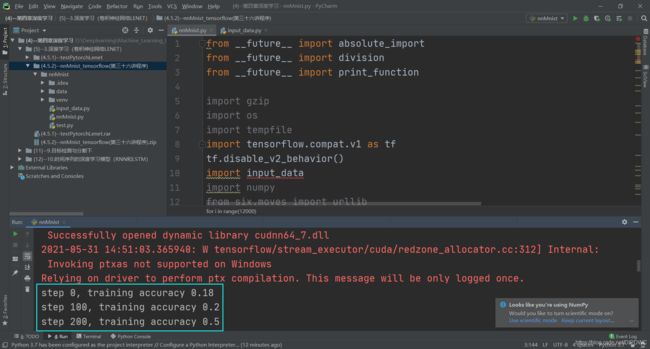
下面我们演示一下程序的运行情况,打开Pycharm,进行设置过后运行成程序。每隔100步,即每遍历所有的训练样本一次测试其识别率。
3. 结尾
在这一讲中,我们基于LeNet讲解了TensorFlow的基本语法规则,演示的程序附后供大家下载,希望大家根据TensorFlow的网站以及网上的其它参考资料在自己的计算机上调通这个程序,如果感兴趣可以去钻研TensorFlow的编程技巧,构建更加复杂的深度学习模型。
参考资料
- 浙江大学《机器学习》课程—胡浩基老师主讲
![]()


