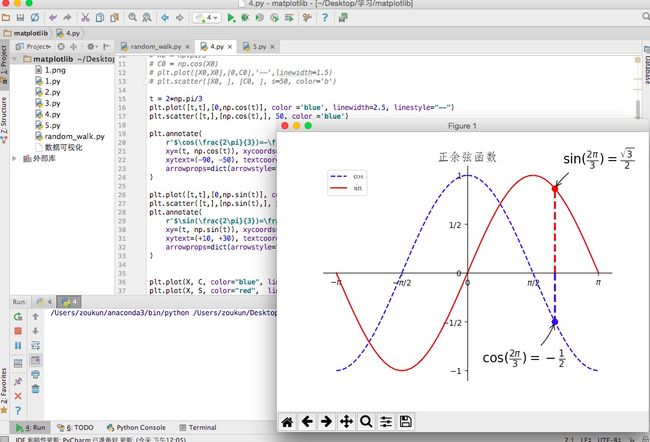
对昨天的图像进行拓展
前面提到的图例loc参数设置为upper left表示添加到右上角
loc参数还有:
'best'
'upper right'
'upper left'
'lower left'
'lower right'
'right'
'center left'
'center right'
'lower center'
'upper center'
'center'
感兴趣的读者可以自行尝试
下面给一些特殊点做注释
我们希望在 2π/3 的位置给两条函数曲线加上一个注释
首先,我们在对应的函数图像位置上画一个点
然后,向横轴引一条垂线,以虚线标记,最后,写上标签
修改后代码:
...

t = 2*np.pi/3
plt.plot([t,t],[0,np.cos(t)], color ='blue', linewidth=2.5, linestyle="--")
plt.scatter([t,],[np.cos(t),], 50, color ='blue')
plt.annotate(
    r'$\cos(\frac{2\pi}{3})=-\frac{1}{2}$',
    xy=(t, np.cos(t)), xycoords='data',
    xytext=(-90, -50), textcoords='offset points', fontsize=16,
    arrowprops=dict(arrowstyle="->", connectionstyle="arc3,rad=.2")
)

plt.plot([t,t],[0,np.sin(t)], color ='red', linewidth=2.5, linestyle="--")
plt.scatter([t,],[np.sin(t),], 50, color ='red')
plt.annotate(
    r'$\sin(\frac{2\pi}{3})=\frac{\sqrt{3}}{2}$',
    xy=(t, np.sin(t)), xycoords='data',
    xytext=(+10, +30), textcoords='offset points', fontsize=16,
    arrowprops=dict(arrowstyle="->", connectionstyle="arc3,rad=.2")
)

...
下面解释代码含义:
plt.plot([t,t],[0,np.cos(t)], color ='blue', linewidth=2.5, linestyle="--")
plt.scatter([t,],[np.cos(t),], 50, color ='blue')
从(t,np.cos(t))引垂线到x轴,设置颜色为blue,字重2.5,虚线形式
标记点(t,np.cos(t))大小为50(s=50),颜色为blue
plt.annotate(
    r'$\cos(\frac{2\pi}{3})=-\frac{1}{2}$',
    xy=(t, np.cos(t)), xycoords='data',
    xytext=(-90, -50), textcoords='offset points', fontsize=16,
    arrowprops=dict(arrowstyle="->", connectionstyle="arc3,rad=.2")
)
其中参数xycoords='data'
是说基于数据的值来选位置
xytext=(-90, -50)和textcoords='offset points'
对于标注位置的描述 和 xy 偏差值, arrowprops是对图中箭头类型的一些设置
对于xy偏差值需要读者根据实际情况进行调整
最终效果图如下:
