引入流程
现在一般用解式事务比较多,而注解事务的启用方式有两种:
- 在有@Configuration的类上使用@EnableTransactionManagement注解
- 在xml中使用tx:annotation-driven
具体使用方法请参照引入spring事务管理,本文主要是针对注解式事务的整个运作流程进行浅析。
解析自定义xml标签
xml自定义标签解析需要在项目的/META-INF/spring.schemas目录中指定namespace文件的路径,在/META-INF/spring.handlers指定解析该namespace的类。通常我们定义的解析类都继承自NamespaceHandlerSupport,然后为每个xml标签定义一个实现了BeanDefinitionParser的解析类,在parse方法中将xml解析成BeanDefinition。可以参考下spring-tx包中的使用案例。
/META-INF/spring.schemas
http\://www.springframework.org/schema/tx/spring-tx-4.0.xsd=org/springframework/transaction/config/spring-tx-4.0.xsd

/META-INF/spring.handlers
http\://www.springframework.org/schema/tx=org.springframework.transaction.config.TxNamespaceHandler

#TxNamespaceHandler
public class TxNamespaceHandler extends NamespaceHandlerSupport {
    @Override
    public void init() {
        registerBeanDefinitionParser("advice", new TxAdviceBeanDefinitionParser());
        registerBeanDefinitionParser("annotation-driven", new AnnotationDrivenBeanDefinitionParser());
        registerBeanDefinitionParser("jta-transaction-manager", new JtaTransactionManagerBeanDefinitionParser());
    }
}
解析xml中的tx:anotation-driven标签
使用注解式事务,@Transactional只是定义了事务的传播特性和隔离级别等属性。要达到管理事务的效果,必须为目标对象生成代理。AnnotationDrivenBeanDefinitionParser的parse方法,使用AopAutoProxyConfigurer类来配置代理创建器InfrastructureAdvisorAutoProxyCreator。
public BeanDefinition parse(Element element, ParserContext parserContext) {
    // mode="proxy"
    AopAutoProxyConfigurer.configureAutoProxyCreator(element, parserContext);
}
...
public static BeanDefinition registerAutoProxyCreatorIfNecessary(BeanDefinitionRegistry registry, Object source) {
    return registerOrEscalateApcAsRequired(InfrastructureAdvisorAutoProxyCreator.class, registry, source);
}
生成代理创建器后,继续添加事务advisor:BeanFactoryTransactionAttributeSourceAdvisor
RootBeanDefinition sourceDef = new RootBeanDefinition(
        "org.springframework.transaction.annotation.AnnotationTransactionAttributeSource");
sourceDef.setRole(BeanDefinition.ROLE_INFRASTRUCTURE);
String sourceName = parserContext.getReaderContext().registerWithGeneratedName(sourceDef);

// Create the TransactionInterceptor definition.
RootBeanDefinition interceptorDef = new RootBeanDefinition(TransactionInterceptor.class);
interceptorDef.setRole(BeanDefinition.ROLE_INFRASTRUCTURE);
registerTransactionManager(element, interceptorDef);
interceptorDef.getPropertyValues().add("transactionAttributeSource", new RuntimeBeanReference(sourceName));
String interceptorName = parserContext.getReaderContext().registerWithGeneratedName(interceptorDef);

// Create the TransactionAttributeSourceAdvisor definition.
RootBeanDefinition advisorDef = new RootBeanDefinition(BeanFactoryTransactionAttributeSourceAdvisor.class);
advisorDef.setSource(eleSource);
advisorDef.setRole(BeanDefinition.ROLE_INFRASTRUCTURE);
advisorDef.getPropertyValues().add("transactionAttributeSource", new RuntimeBeanReference(sourceName));
advisorDef.getPropertyValues().add("adviceBeanName", interceptorName);
if (element.hasAttribute("order")) {
    advisorDef.getPropertyValues().add("order", element.getAttribute("order"));
}
parserContext.getRegistry().registerBeanDefinition(txAdvisorBeanName, advisorDef);
从之前spring tx解析xml中的tx:annotation-driven流程中,我们发现它创建了四个对象到容器中,这四个容器对象的Role都是ROLE_INFRASTRUCTURE,后续代码会用到这个属性,不对拥有这个属性的对象进行代理。下面我们将详细对着四个对象进行分析:
- org.springframework.aop.framework.autoproxy.InfrastructureAdvisorAutoProxyCreator
- org.springframework.transaction.annotation.AnnotationTransactionAttributeSource
- org.springframework.transaction.interceptor.TransactionInterceptor
- org.springframework.transaction.interceptor.BeanFactoryTransactionAttributeSourceAdvisor
代理创建器InfrastructureAdvisorAutoProxyCreator
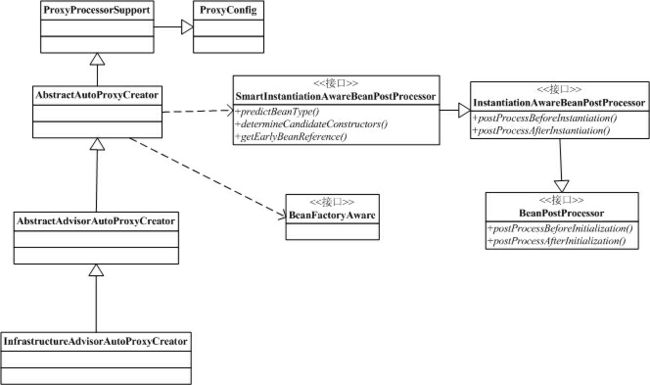
InfrastructureAdvisorAutoProxyCreator是代理对象的管理类,它扫描factory中所有的advisor,调用对应的pointcut检测需要当前对象是否需要创建代理,并把advice应用到目标类上,生成代理。从InfrastructureAdvisorAutoProxyCreator的类图中可以看到,该类主要的逻辑点在其父类AbstractorAutoProxyCreator中。
postProcessBeforeInstantiation将基础设施类排除代理范围。如果有TargetSourceCreator,则在这步会调用TargetSourceCreator返回对象。
public Object postProcessBeforeInstantiation(Class beanClass, String beanName) throws BeansException {
    Object cacheKey = getCacheKey(beanClass, beanName);
    if (beanName == null || !this.targetSourcedBeans.contains(beanName)) {
        if (this.advisedBeans.containsKey(cacheKey)) {
            return null;
        }
        if (isInfrastructureClass(beanClass) || shouldSkip(beanClass, beanName)) {
            this.advisedBeans.put(cacheKey, Boolean.FALSE);
            return null;
        }
    }
    if (beanName != null) {
        TargetSource targetSource = getCustomTargetSource(beanClass, beanName);
        if (targetSource != null) {
            this.targetSourcedBeans.add(beanName);
            Object[] specificInterceptors = getAdvicesAndAdvisorsForBean(beanClass, beanName, targetSource);
            Object proxy = createProxy(beanClass, beanName, specificInterceptors, targetSource);
            this.proxyTypes.put(cacheKey, proxy.getClass());
            return proxy;
        }
    }
    return null;
}
通常情况是在postProcessAfterInitialization中完成生成代理对象的过程的,调用wrapIfNecessary来生成代理对象。如果是预加载的对象,则是在SmartInstantiationAwareBeanPostProcessor#getEarlyBeanReference接口进行创建代理对象的。
public Object postProcessAfterInitialization(Object bean, String beanName) throws BeansException {
    if (bean != null) {
        Object cacheKey = getCacheKey(bean.getClass(), beanName);
        if (!this.earlyProxyReferences.contains(cacheKey)) {
            return wrapIfNecessary(bean, beanName, cacheKey);
        }
    }
    return bean;
}
wrapIfNecessary方法内部找到当前对象的advisor(如果存在),然后创建代理对象
protected Object wrapIfNecessary(Object bean, String beanName, Object cacheKey) {
    // Create proxy if we have advice.
    Object[] specificInterceptors = getAdvicesAndAdvisorsForBean(bean.getClass(), beanName, null);
    if (specificInterceptors != DO_NOT_PROXY) {
        this.advisedBeans.put(cacheKey, Boolean.TRUE);
        Object proxy = createProxy(bean.getClass(), beanName, specificInterceptors, new SingletonTargetSource(bean));
        this.proxyTypes.put(cacheKey, proxy.getClass());
        return proxy;
    }
    this.advisedBeans.put(cacheKey, Boolean.FALSE);
    return bean;
}
给Bean查找Advice和Advisor的过程是先调用org.springframework.aop.framework.autoproxy.BeanFactoryAdvisorRetrievalHelper.findAdvisorBeans(),该方法从bean factory中查找实现了org.springframework.aop.Advisor的对象
protected List findEligibleAdvisors(Class beanClass, String beanName) {
    List candidateAdvisors = findCandidateAdvisors();
    List eligibleAdvisors = findAdvisorsThatCanApply(candidateAdvisors, beanClass, beanName);
    extendAdvisors(eligibleAdvisors);
    if (!eligibleAdvisors.isEmpty()) {
        eligibleAdvisors = sortAdvisors(eligibleAdvisors);
    }
    return eligibleAdvisors;
}
这里会查找到之前解析tx:annotation-driven时候,添加的BeanFactoryTransactionAttributeSourceAdvisor。这个advisor的pointcut用的是TransactionAttributeSourcePointcut,advice用的是TransactionInterceptor
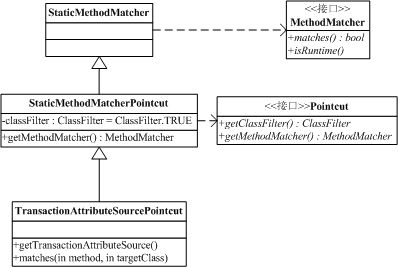
先来看看切入点规则,从TransactionAttributeSourcePointcut的类图中可以看到,该切入点的类过滤器是TRUE,即所有的类都符合条件。方法过滤器MethodMatcher则调用TransactionAttributeSource接口的getTransactionAttribute方法来判断是否符合需要代理的条件。
public boolean matches(Method method, Class targetClass) {
    TransactionAttributeSource tas = getTransactionAttributeSource();
    return (tas == null || tas.getTransactionAttribute(method, targetClass) != null);
}
在之前解析tx:annotation-driven时,给切入点使用的TransactionAttributeSource的实现类是AnnotationTransactionAttributeSource,该类的父类AbstractFallbackTransactionAttributeSource最终调用子类的findTransactionAttribute去获取TransactionAttribute属性。
public TransactionAttribute getTransactionAttribute(Method method, Class targetClass) {
    ...
    TransactionAttribute txAtt = computeTransactionAttribute(method, targetClass);
}

private TransactionAttribute computeTransactionAttribute(Method method, Class targetClass) {
    ...
    txAtt = findTransactionAttribute(specificMethod.getDeclaringClass());
}
AnnotationTransactionAttributeSource内部通过SpringTransactionAnnotationParser去将注解转换成TransactionAttribute,查找的过程是递归查找,即支持你自定义一个注解,在自定义注解上配置@Transactional(xxx="xxx"), 然后用自定义注解也可以达到效果。
protected TransactionAttribute findTransactionAttribute(Class clazz) {
    return determineTransactionAttribute(clazz);
}
protected TransactionAttribute determineTransactionAttribute(AnnotatedElement ae) {
    for (TransactionAnnotationParser annotationParser : this.annotationParsers) {
        TransactionAttribute attr = annotationParser.parseTransactionAnnotation(ae);
        if (attr != null) {
            return attr;
        }
    }
    return null;
}
分析完注解式事务的切点之后,再结合InfrastructureAdvisorAutoProxyCreator判断是否要代理对象的逻辑,就非常清晰了。
#org.springframework.aop.support.AopUtils.canApply(Pointcut, Class, boolean)
public static boolean canApply(Pointcut pc, Class targetClass, boolean hasIntroductions) {
    if (!pc.getClassFilter().matches(targetClass)) {
        return false;
    }

    MethodMatcher methodMatcher = pc.getMethodMatcher();
    Set> classes = new LinkedHashSet>(ClassUtils.getAllInterfacesForClassAsSet(targetClass));
    classes.add(targetClass);
    for (Class clazz : classes) {
        Method[] methods = clazz.getMethods();
        for (Method method : methods) {
            if (methodMatcher.matches(method, targetClass)) {
                return true;
            }
        }
    }
    return false;
}
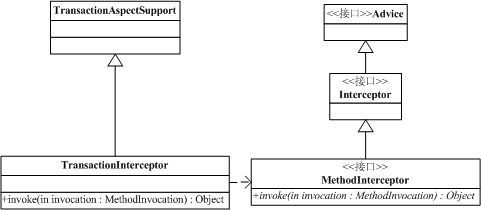
pointcut流程梳理完了,再来看看advice。解析xml中的annotation-driven的时候,使用的advice是TransactionInterceptor。最终通过invokeWithinTransaction来给目标方法进行事务管理。
public Object invoke(final MethodInvocation invocation) throws Throwable {
    Class targetClass = (invocation.getThis() != null ? AopUtils.getTargetClass(invocation.getThis()) : null);
    return invokeWithinTransaction(invocation.getMethod(), targetClass, new InvocationCallback() {
        @Override
        public Object proceedWithInvocation() throws Throwable {
            return invocation.proceed();
        }
    });
}
本文针对注解式事务的实现流程进行分析,关于spring事务具体的执行流程即TransactionInterceptor类的内部逻辑请参考后续文章。关于spring事务的使用方法请参考:引入spring事务


