一、概念
先看一个问题:UIView和CALayer之间的关系?
1、UIView主要是界面的展示,处理用户的交互,如处理手势等。CALayer才是真正的绘制
2、UIView封装了CALayer
3、他们所具有的位置相关的属性不一样,UIView具有的属性CALayer都具有,额外还多一个anchorPoint,下面的文章会具体讲到这一点
1、CALayer的概念
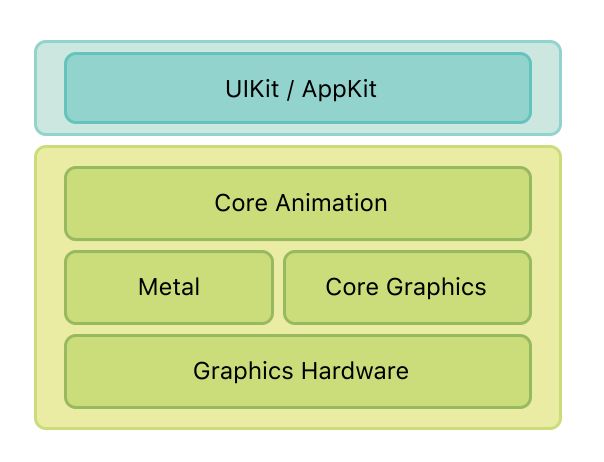
CALayer属于QuartzCore框架,QuartzCore是一个跨平台的框架。也就是说mac和iOS是同一种绘制方式,只是不同的交互方式。mac的交互方式主要是鼠标和键盘,而iOS的交互方式主要是手势。
2、隐式动画和显式动画
隐式动画是系统框架自动完成的。Core Animation在每个runloop周期中自动开始一次新的事务,即使你不显式的用[CATransaction begin]开始一次事务,任何在一次runloop循环中属性的改变都会被集中起来,然后做一次0.25秒的动画。隐式动画一直存在。
比如,修改一个view的frame、backgroundColor都存在一个隐式动画,使得这些改变不那么突兀,这个动画持续时间默认是0.25s
显式动画是Core Animation提供的显式动画类型,既可以直接对退曾属性做动画,也可以覆盖默认的图层行为。我们经常使用的CABasicAnimation,CAKeyframeAnimation,CATransitionAnimation,CAAnimationGroup等都是显式动画类型,这些CAAnimation类型可以直接提交到CALayer上。
二、CAAnimation
基础动画常见的动画有:基础动画、关键帧动画、动画组、转场动画。均继承自CAAnimation类,其继承关系如下
三、几种显示动画
1、基础动画CABasicAnimation
创建动画的三步骤:
初始化动画对象、
修改动画属性值、
将动画添加到layer上
    CABasicAnimation *anim = [CABasicAnimation animation];
    anim.keyPath = @"position.y";
    anim.toValue = @400;
    anim.duration = 1;
    // 下面两句为了让动画能够保持在最后的状态
    anim.removedOnCompletion = NO;
    anim.fillMode = kCAFillModeForwards;
    anim.delegate = self;
    [_redView.layer addAnimation:anim forKey:nil];
打印动画前后模型图层(modelLayer)和呈现图层(presentationLayer)的frame
可见,只有呈现图层的坐标变了。因为presentationLayer负责显示的。所以,看到的都是假象,通过改变keyPath后UIView并没有发生变化。
2、关键帧动画CAKeyframeAnimation
方式一:通过设置values来实现
    CAKeyframeAnimation *anim = [CAKeyframeAnimation animation];
    anim.keyPath = @"transform.rotation";
    anim.values = @[@angleToRadians(-3), @angleToRadians(3),@angleToRadians(-3)];
    anim.autoreverses = YES;
    anim.speed = 2;
    anim.duration = 1;
    anim.repeatCount = MAXFLOAT;
    [_iconView.layer addAnimation:anim forKey:nil];
这段代码可以让某个view小角度抖动,这是关键帧动画最基本的使用方式
方式二:通过设置path来实现
    #define angleToRadians(angle) ((angle)/180.0 * M_PI)
    //  绘制贝塞尔曲线
    UIBezierPath *path = [UIBezierPath bezierPath];
    [path moveToPoint:CGPointMake(20, 200)];
    [path addCurveToPoint:CGPointMake(300, 200) controlPoint1:CGPointMake(100, 100) controlPoint2:CGPointMake(200, 300)];
    //  将贝塞尔曲线显示在图层
    CAShapeLayer *shapeLayer = [CAShapeLayer layer];
    shapeLayer.path = path.CGPath;
    shapeLayer.fillColor = nil;
    shapeLayer.strokeColor = [UIColor redColor].CGColor;
    [self.view.layer addSublayer:shapeLayer];
    //  小车的layer添加在图层
    CALayer *carLayer = [CALayer layer];
    carLayer.frame = CGRectMake(15, 200-18, 36, 36);
    carLayer.contents = (id)[UIImage imageNamed:@"car"].CGImage;
    carLayer.anchorPoint = CGPointMake(0.5, 0.8);
    [self.view.layer addSublayer:carLayer];
    //  小车的layer添加动画
    CAKeyframeAnimation *anim = [CAKeyframeAnimation animation];
    anim.keyPath = @"position";
    anim.path = path.CGPath;
    anim.duration = 4.0;
    anim.rotationMode = kCAAnimationRotateAuto;
    [carLayer addAnimation:anim forKey:nil];
这段代码可以让一个小车的layer沿着贝塞尔曲线运动。
这里我们用到了CAShapeLayer,是一个画矢量图的类,内部启用了硬件加速,所以渲染快速。
为了让小车显得真实调整了锚点anchorPoint。
补充几个知识点:
1、frame和bounds的宽高是一样吗?
正常情况下是一样的,但是做了仿射变化(旋转等)就不一样了
2、UIView和CALayer关于坐标具有的属性:
UIView: frame bounds center
CALayer: frame bounds position anchorPoint
position和center对应,可见UIView具有的属性CALayer也同样具有。不同点在于layer多了个anchorPoint,anchorPoint默认值是(0.5,0.5)。放射变换都是基于锚点为中心变化的
3、转场动画CATransition
    // 修改图片
    _imgView.image = [UIImage imageNamed:imgName];
    // 添加转场动画
    CATransition *anim = [CATransition animation];
    anim.type = @"pageCurl";
    anim.duration = .8;
    anim.startProgress = .2;
    anim.endProgress = .5;
    [_imgView.layer addAnimation:anim forKey:nil];
转场动画默认是fade,即淡入淡出。
系统提供的转场动画有
| 类型字符串 | 效果说明 | 关键字 | 方向 |
|---|---|---|---|
| fade | 交叉淡化过度 | YES | |
| push | 新视图把旧视图推出去 | YES | |
| moveIn | 新视图移到旧视图上面 | YES | |
| reveal | 将旧视图移开,显示下面的新视图 | YES | |
| cube | 立体翻滚效果 | ||
| oglFlip | 上下左右翻滚效果 | ||
| suckEffect | 搜索效果,如一块布被抽走 | NO | |
| rippleEffect | 水滴效果 | NO | |
| pageCurl | 向上翻页效果 | ||
| pageUnCurl | 向下翻页效果 | ||
| cameraIrisHollowOpen | 相机镜头打开效果 | NO | |
| cameraIrisHollowClose | 相机镜头关闭效果 | NO |
4、动画组CAAnimationGroup
    // 绘制贝塞尔曲线
    UIBezierPath *path = [UIBezierPath bezierPath];
    [path moveToPoint:CGPointMake(50, 500)];
    [path addCurveToPoint:CGPointMake(400, 500) controlPoint1:CGPointMake(170, 400) controlPoint2:CGPointMake(300, 600)];
    // 添加到layer
    CAShapeLayer *shapeLayer = [CAShapeLayer layer];
    shapeLayer.path = path.CGPath;
    shapeLayer.fillColor = nil;
    shapeLayer.strokeColor = [UIColor orangeColor].CGColor;
    [self.view.layer addSublayer:shapeLayer];
    // 添加redview
    CALayer *colorLayer = [CALayer layer];
    colorLayer.frame = CGRectMake(0, 0, 66, 66);
    colorLayer.position = CGPointMake(50, 500);
    colorLayer.backgroundColor = [UIColor redColor].CGColor;
    [self.view.layer addSublayer:colorLayer];
    // redview添加关键帧动画改变移动路径
    CAKeyframeAnimation *anim = [CAKeyframeAnimation animation];
    anim.path = path.CGPath;
    anim.keyPath = @"position";
//    anim.duration = 3;
//    [colorLayer addAnimation:anim forKey:nil];

    // redview添加基础动画改变颜色
    CGFloat red = arc4random() / (CGFloat)INT_MAX;
    CGFloat green = arc4random() / (CGFloat)INT_MAX;
    CGFloat blue = arc4random() / (CGFloat)INT_MAX;
    UIColor *color = [UIColor colorWithRed:red green:green blue:blue alpha:1];
    CABasicAnimation *basicAnim = [CABasicAnimation animation];
    basicAnim.keyPath = @"backgroundColor";
    basicAnim.toValue = (id)color.CGColor;
//    basicAnim.duration = 3;
//    [colorLayer addAnimation:basicAnim forKey:nil];

    // 改变大小
    CABasicAnimation *anim1 = [CABasicAnimation animation];
    anim1.keyPath = @"transform.scale";
    anim1.toValue = @.5;
//    anim1.duration = 3;
//    [colorLayer addAnimation:anim1 forKey:nil];

    // 将上面的三个动画和成为一个动画组
    CAAnimationGroup *group = [CAAnimationGroup animation];
    group.animations = @[anim, basicAnim, anim1];
    group.duration = 3;
    group.removedOnCompletion = NO;
    group.fillMode = kCAFillModeForwards;
    [colorLayer addAnimation:group forKey:nil];
可见,我们其实可以在colorLayer上单独加三个动画可以实现。但是会发现duration等属性一直在重复设置,显得过于繁琐。所以我们可以用动画组,将三个动画组合在一起,设置一些共有的属性。
通过这个demo,我们不难看出复杂动画都是由多个简单动画组成的。所以任何一个复杂动画都可以拆分为多个简单动画,所以会拆分动画是一个很重要的步骤。
参考链接
iOS Core Animation: Advanced Techniques中文译本


