@author Jacky wang
转载请注明出处,http://www.jianshu.com/p/4cfedabca746
一、 RabbitMQ的介绍
RabbitMQ是消息中间件的一种,消息中间件即分布式系统中完成消息的发送和接收的基础软件.这些软件有很多,包括ActiveMQ(apache公司的),RocketMQ等。
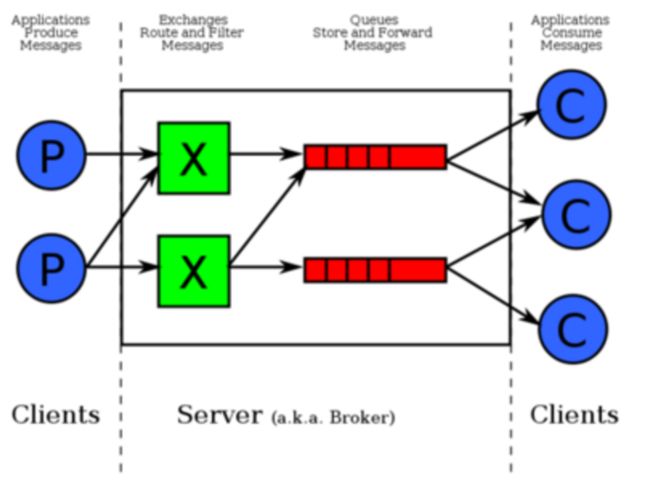
消息中间件的工作过程可以用生产者消费者模型来表示.即,生产者不断的向消息队列发送信息,而消费者从消息队列中消费信息.具体过程如下:
从上图可看出,对于消息队列来说:生产者,消息队列,消费者是最重要的三个概念,生产者发消息到消息队列中去,消费者监听指定的消息队列,并且当消息队列收到消息之后,接收消息队列传来的消息,并且给予相应的处理。消息队列常用于分布式系统之间互相信息的传递。
对于RabbitMQ来说,除了这三个基本模块以外,还添加了一个模块,即交换机(Exchange).它使得生产者和消息队列之间产生了隔离,生产者将消息发送给交换机,而交换机则根据调度策略把相应的消息转发给对应的消息队列.那么RabitMQ的工作流程如下所示:
交换机Exchange:交换机的主要作用是接收相应的消息并且绑定到指定的队列。交换机有四种类型,分别为Direct,topic,headers,Fanout:
Direct 是RabbitMQ默认的交换机模式,也是最简单的模式.即创建消息队列的时候,指定一个BindingKey.当发送者发送消息的时候,指定对应的Key.当Key和消息队列的BindingKey一致的时候,消息将会被发送到该消息队列中。
topic 转发信息主要是依据通配符,队列和交换机的绑定主要是依据一种模式(通配符+字符串),而当发送消息的时候,只有指定的Key和该模式相匹配的时候,消息才会被发送到该消息队列中。
headers 也是根据一个规则进行匹配,在消息队列和交换机绑定的时候会指定一组键值对规则,而发送消息的时候也会指定一组键值对规则,当两组键值对规则相匹配的时候,消息会被发送到匹配的消息队列中。
Fanout 是路由广播的形式,将会把消息发给绑定它的全部队列,即便设置了key,也会被忽略。
二、SpringBoot整合RabbitMQ
RabbitMQ的安装参考:01_RabbitMQ的安装
Springboot集成RabbitMQ十分简单!下面开始搭建环境。
下面例子中Direct,Topic,Fanout模式的pom和application.properties的配置都是一样的。并且,都采用的交换机模式的demo。
2.1 Direct模式
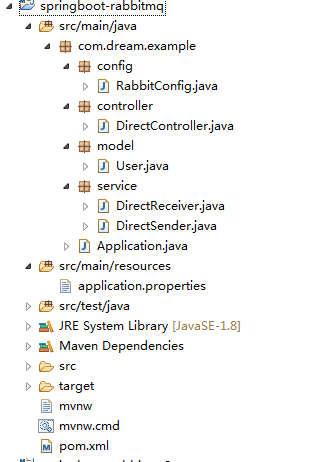
包结构如下图:
2.1.1 pom.xml依赖与application.properites配置
pom.xml :
提供springboot集成RabbitMQ的依赖:


    org.springframework.boot
    spring-boot-starter-parent
    1.5.8.RELEASE


    UTF-8
    UTF-8
    1.8


        org.springframework.boot
        spring-boot-starter-web


        org.springframework.boot
        spring-boot-starter-amqp


        com.google.code.gson
        gson


        org.springframework.boot
        spring-boot-devtools
        runtime
        true


            org.springframework.boot
            spring-boot-maven-plugin

                true
application.properties:
server.port=9090

spring.application.name=spirngboot-rabbitmq
spring.rabbitmq.host=192.168.1.188
spring.rabbitmq.port=5672
spring.rabbitmq.username=jack
spring.rabbitmq.password=jack2017
spring.rabbitmq.virtual-host=/
2.1.2 RabbitMQ配置类及生产消费者配置
RabbitConfig配置类:
@SpringBootConfiguration
public class RabbitConfig {

    public static final String ROUTING_KEY = "hello";
    public static final String DIRECT_EXCHANGE = "directExchange";

    /**
     * DirectQueue名为abc的队列
     */
    @Bean
    public Queue queueABC() {
        return new Queue("abc");
    }

    /**
     * DirectQueue名为xyz的队列
     */
    @Bean
    public Queue queueXYZ() {
        return new Queue("xyz");
    }

    @Bean
    DirectExchange exchange() {
        return new DirectExchange(DIRECT_EXCHANGE);
    }

    /**
     * 将abc消息队列绑定到directExchange交换机上,bingding-key为hello
     *
     * @param helloQueue
     * @param exchange
     * @return
     */
    @Bean
    Binding bindingExchangeABC(Queue queueABC, DirectExchange exchange) {
        return BindingBuilder.bind(queueABC).to(exchange).with(ROUTING_KEY);
    }

    /**
     * 将xyz消息队列绑定到directExchange交换机上,bingding-key为hello
     *
     * @param queueXYZ
     * @param exchange
     * @return
     */
    @Bean
    Binding bindingExchangeXYZ(Queue queueXYZ, DirectExchange exchange) {
        return BindingBuilder.bind(queueXYZ).to(exchange).with(ROUTING_KEY);
    }
}
DirectSender生产者:
@Component
public class DirectSender {

    //rabbitTemplate直接注入使用
    @Autowired
    private AmqpTemplate rabbitTemplate;

    public void send() {
        SimpleDateFormat sdf = new SimpleDateFormat("yyyy-MM-dd HH:mm:ss");
        System.err.println("sender1 : " + sdf.format(new Date()));
        rabbitTemplate.convertAndSend(RabbitConfig.DIRECT_EXCHANGE, RabbitConfig.ROUTING_KEY, sdf.format(new Date()));
    }

    public void send2() {
        User user = new User("Jack", 24);
        System.err.println("sender2 : " + new Gson().toJson(user));
        rabbitTemplate.convertAndSend(RabbitConfig.DIRECT_EXCHANGE, RabbitConfig.ROUTING_KEY, new Gson().toJson(user));
    }
}
DirectReceiver消费者:
@Component
public class DirectReceiver {

    @RabbitListener(queues = { "abc" }) //监听abc队列
    public void processABC(String msg) {
        System.err.println("Receiver Queue ABC : " + msg);
    }

    @RabbitListener(queues = {"xyz"}) //监听xyz队列
    public void processXYZ(String msg) {
        System.err.println("Receiver Queue XYZ : " + msg);
    }
}
2.1.3 Application入口类及Controller测试入口
Application项目启动入口:
@SpringBootApplication
public class Application {

    public static void main(String[] args) {
        SpringApplication.run(Application.class, args);
    }
}
DirectController测试入口:
@RestController
public class DirectController {

    @Autowired
    private DirectSender sender;

    @RequestMapping("/send")
    public void send() {
        sender.send();
    }

    @RequestMapping("/send2")
    public void send2() {
        sender.send2();
    }
}
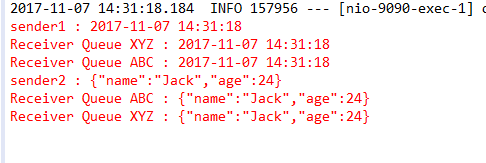
2.1.4 测试结果+总结
关键在于绑定时绑定的交换机以及binding-key,生产者在发送消息时,指定了交换机和bingding-key,rabbitmq根据在RabbitMQ配置类绑定的Bean找到对应的消息队列Queue,从而将消息传递过去。
2.2 Topic模式
包结构如下图:
2.2.1 pom.xml依赖与application.properites配置
pom.xml依赖与application.properties的配置与Direct模式一致,略。
2.2.2 RabbitMQ配置类及生产消费者配置
RabbitConfig配置类:
@SpringBootConfiguration
public class RabbitConfig {

    // 队列routing key
    public static final String TOPIC_MESSAGE = "topic.message";
    public static final String TOPIC_MESSAGES = "topic.messages";
    // 交换机exchange
    public static final String TOPIC_Exchange = "topic_exchange";

    @Bean
    public Queue queueMessage() {
        return new Queue(TOPIC_MESSAGE);
    }

    @Bean
    public Queue queueMessages() {
        return new Queue(TOPIC_MESSAGES);
    }

    @Bean
    public TopicExchange exchange() {
        return new TopicExchange(TOPIC_Exchange);
    }

    /**
     * 将队列topic.message与exchange绑定,binding_key为topic.message,就是完全匹配
     * @param queueMessage
     * @param exchange
     * @return
     */
    @Bean
    Binding bindingExchangeMessage(Queue queueMessage, TopicExchange exchange) {
        return BindingBuilder.bind(queueMessage).to(exchange).with("topic.message");
    }

    /**
     * 将队列topic.messages与exchange绑定,binding_key为topic.#,模糊匹配
     * @param queueMessage
     * @param exchange
     * @return
     */
    @Bean
    Binding bindingExchangeMessages(Queue queueMessages, TopicExchange exchange) {
        return BindingBuilder.bind(queueMessages).to(exchange).with("topic.#");// *表示一个词,#表示零个或多个词
    }
}
TopicSender生产者:
@Component
public class TopicSender {

    @Autowired
    private AmqpTemplate rabbitTemplate;

    public void send() {
        String msg1 = "I am topic.mesaage msg======";
        System.err.println("sender1 : " + msg1);
        rabbitTemplate.convertAndSend(RabbitConfig.TOPIC_Exchange, "topic.message", msg1);
    }

    public void send2() {
        String msg2 = "I am topic.mesaages msg########";
        System.err.println("sender2 : " + msg2);
        rabbitTemplate.convertAndSend(RabbitConfig.TOPIC_Exchange, "topic.messages", msg2);
    }
}
TopicReceiver消费者:
@Component
public class TopicReceiver {

    @RabbitListener(queues = RabbitConfig.TOPIC_MESSAGE) // 监听器监听指定的queue
    public void process1(String message) {
        System.err.println("Receiver1 >>> " + message);
    }

    @RabbitListener(queues = RabbitConfig.TOPIC_MESSAGES) // 监听器监听指定的queue
    public void process2(String messages) {
        System.err.println("Receiver2 >>> " + messages);
    }
}
2.2.3 Application入口类及Controller测试入口
Application项目启动入口:
@SpringBootApplication
public class Application {

    public static void main(String[] args) {
        SpringApplication.run(Application.class, args);
    }
}
TopicController测试入口:
@RestController
public class TopicController {

    @Autowired
    private TopicSender sender;

    @RequestMapping("/send")
    public void send() {
        sender.send();
    }

    @RequestMapping("/send2")
    public void send2() {
        sender.send2();
    }
}
2.2.4 测试结果+总结
rabbitTemplate.convertAndSend(RabbitConfig.TOPIC_Exchange, "topic.message", msg1);

方法的第一个参数是交换机名称,第二个参数是发送的key,第三个参数是传递消息的内容。
RabbitMQ将会根据第二个参数去寻找有没有匹配此规则的队列,如果有,则把消息给它,如果有不止一个,则把消息分发给匹配的队列(每个队列都有消息!)。
显然在我们的测试中,参数2匹配了两个队列(topic.message和topic.#),因此消息将会被发放到这两个队列中,而监听这两个队列的监听器都将收到消息!
那么如果把参数2改为topic.messages呢?显然只会匹配到一个队列,那么process2方法对应的监听器收到消息!
2.3 Fanout模式
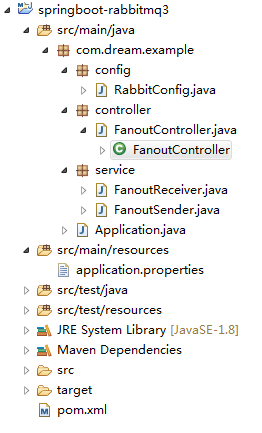
包结构与上述一致,如下图:
2.3.1 pom.xml依赖与application.properites配置
pom.xml依赖与application.properties的配置与Direct模式一致,略。
2.3.2 RabbitMQ配置类及生产消费者配置
RabbitConfig配置类:
@SpringBootConfiguration
public class RabbitConfig {

    // 队列routing key
    public static final String FANOUT_A = "fanout.a";
    public static final String FANOUT_B = "fanout.b";
    public static final String FANOUT_C = "fanout.c";

    // 交换机exchange
    public static final String FANOUT_Exchange = "fanout_Exchange";

    @Bean
    public Queue aMessage() {
        return new Queue(FANOUT_A);
    }

    @Bean
    public Queue bMessage() {
        return new Queue(FANOUT_B);
    }

    @Bean
    public Queue cMessage() {
        return new Queue(FANOUT_C);
    }

    /**
     * fanout路由交换器
     */
    @Bean
    FanoutExchange fanoutExchange() {
        return new FanoutExchange(FANOUT_Exchange);
    }

    /**
     * 将队列fanout.a与fanoutExchange绑定
     * @param aMessage
     * @param fanoutExchange
     * @return
     */
    @Bean
    Binding bindingExchangeA(Queue aMessage, FanoutExchange fanoutExchange) {
        return BindingBuilder.bind(aMessage).to(fanoutExchange);
    }

    /**
     * 将队列fanout.a与fanoutExchange绑定
     * @param bMessage
     * @param fanoutExchange
     * @return
     */
    @Bean
    Binding bindingExchangeB(Queue bMessage, FanoutExchange fanoutExchange) {
        return BindingBuilder.bind(bMessage).to(fanoutExchange);
    }

    /**
     * 将队列fanout.c与fanoutExchange绑定
     * @param cMessage
     * @param fanoutExchange
     * @return
     */
    @Bean
    Binding bindingExchangeC(Queue cMessage, FanoutExchange fanoutExchange) {
        return BindingBuilder.bind(cMessage).to(fanoutExchange);
    }
}
FanoutSender生产者:
@Component
public class FanoutSender {

    @Autowired
    private AmqpTemplate rabbitTemplate;

    public void send() {
        String msg1 = "I am fanout.mesaage msg======";
        System.err.println("fanoutSender : " + msg1);
        rabbitTemplate.convertAndSend(RabbitConfig.FANOUT_Exchange, "abcd.efg", msg1);
    }
}
FanoutReceiver消费者:
@Component
public class FanoutReceiver {

    @RabbitListener(queues = RabbitConfig.FANOUT_A) // 监听器监听指定的queue
    public void process1(String message) {
        System.err.println("FanoutReceiver1 >>> " + message);
    }

    @RabbitListener(queues = RabbitConfig.FANOUT_B) // 监听器监听指定的queue
    public void process2(String messages) {
        System.err.println("FanoutReceiver2 >>> " + messages);
    }

    @RabbitListener(queues = RabbitConfig.FANOUT_C) // 监听器监听指定的queue
    public void process3(String messages) {
        System.err.println("FanoutReceiver3 >>> " + messages);
    }
}
2.3.3 Application入口类及Controller测试入口
Application项目启动入口:
@SpringBootApplication
public class Application {

    public static void main(String[] args) {
        SpringApplication.run(Application.class, args);
    }
}
FanoutController测试入口:
@RestController
public class FanoutController {

    @Autowired
    private FanoutSender sender;

    @RequestMapping("/send")
    public void send() {
        sender.send();
    }
}
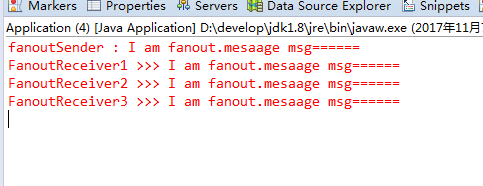
2.3.4 测试结果+总结
rabbitTemplate.convertAndSend(RabbitConfig.FANOUT_Exchange, "abcd.efg", msg1);
由以上结果可知:就算fanoutSender发送消息的时候,指定了routing_key为"abcd.efg",但是所有接收者都接受到了消息
2.4 消息发送之后的回调callback
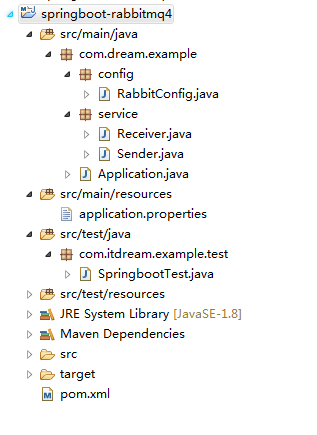
包结构如下图:
2.4.1 pom.xml依赖与application.properites配置
pom.xml:
主要依赖是:spring-boot-starter-amqp,其他依赖都是为了方便测试

    org.springframework.boot
    spring-boot-starter-parent
    1.5.8.RELEASE


    UTF-8
    UTF-8
    1.8


        org.springframework.boot
        spring-boot-starter-web


        org.springframework.boot
        spring-boot-starter-amqp


        org.springframework.boot
        spring-boot-starter-test
        test


        com.google.code.gson
        gson


        org.springframework.boot
        spring-boot-devtools
        runtime
        true


            org.springframework.boot
            spring-boot-maven-plugin

                true
application.properties添加以下配置:

server.port=9090
spring.application.name=spirngboot-rabbitmq
spring.rabbitmq.host=192.168.1.188
spring.rabbitmq.port=5672
spring.rabbitmq.username=jack
spring.rabbitmq.password=jack2017
spring.rabbitmq.virtual-host=/
#如果要进行消息回调,则这里必须要设置为true
spring.rabbitmq.publisher-confirms=true
spring.rabbitmq.publisher-returns=true
2.4.2 RabbitMQ配置类
RabbitConfig配置类,作用为指定队列,交换器类型及绑定操作:
共声明了2个队列,分别是topic.a,topic.b,交换器类型为TopicExchange,并与topic.a,topic.b队列分别绑定。

@SpringBootConfiguration
public class RabbitConfig {

    // 队列routing key
    public static final String TOPIC_A = "topic.a";
    public static final String TOPIC_B = "topic.b";

    // 交换机exchange
    public static final String TOPIC_Exchange = "topicExchange";

    @Bean
    public Queue queueA() {
        return new Queue(TOPIC_A, true);// true表示持久化该队列
    }

    @Bean
    public Queue queueB() {
        return new Queue(TOPIC_B, true);
    }


    /**
     * Topic路由交换器
     */
    @Bean
    TopicExchange topicExchange() {
        return new TopicExchange(TOPIC_Exchange);
    }

    /**
     * 将队列topic.a与topicExchange绑定
     */
    @Bean
    Binding bindingExchangeA(Queue queueA, TopicExchange topicExchange) {
        return BindingBuilder.bind(queueA).to(topicExchange).with("topic.a");//bindingKey为topic.a
    }

    /**
     * 将队列topic.b与topicExchange绑定
     */
    @Bean
    Binding bindingExchangeB(Queue queueB, TopicExchange topicExchange) {
        return BindingBuilder.bind(queueB).to(topicExchange).with("topic.#");
    }
}
2.4.3 Sender消息生产者
Sender消息生产者:
@Component
public class Sender implements RabbitTemplate.ConfirmCallback, ReturnCallback {

    @Autowired
    private RabbitTemplate rabbitTemplate;

    // 标注了@PostConstruct注释的方法将在类实例化之后调用
    // 标注了@PreDestroy注释的方法将在类销毁之前调用
    @PostConstruct
    public void init() {
        rabbitTemplate.setConfirmCallback(this);
        rabbitTemplate.setReturnCallback(this);
    }

    @Override
    public void confirm(CorrelationData correlationData, boolean ack, String cause) {
        if (ack) {
            System.err.println("消息发送成功:" + correlationData);
        } else {
            System.err.println("消息发送失败:" + cause);
        }
        System.out.println("-----------------------------------------------------------------");
    }

    @Override
    public void returnedMessage(Message message, int replyCode, String replyText, String exchange, String rerringKey) {
        System.err.println(message.getMessageProperties().getCorrelationIdString() + " 发送失败");
    }

    // 发送消息
    public void send(String msg) {
        CorrelationData correlationId = new CorrelationData(UUID.randomUUID().toString());

        System.err.println("开始发送消息 : " + msg.toLowerCase() + ">>" + correlationId);
        String response = rabbitTemplate.convertSendAndReceive(RabbitConfig.TOPIC_Exchange, "topic.a", msg, correlationId).toString();
        System.err.println("结束发送消息 : " + msg.toLowerCase());
        System.err.println("消费者响应 : " + response + " 消息处理完成");
    }
}
要点:
1.注入RabbitTemplate

2.实现RabbitTemplate.ConfirmCallback, RabbitTemplate.ReturnCallback接口(后者非必须)。
    ConfirmCallback接口用于实现消息发送到RabbitMQ交换器后接收ack回调。
    ReturnCallback接口用于实现消息发送到RabbitMQ交换器,但无相应队列与交换器绑定时的回调。

3.实现消息发送方法。调用rabbitTemplate相应的方法即可。
2.4.4 Receiver消息生产者
application.properties增加以下配置:
spring.rabbitmq.listener.concurrency=2    //最小消息监听线程数
spring.rabbitmq.listener.max-concurrency=2 //最大消息监听线程数


由于定义了2个队列,所以分别定义不同的监听器监听不同的队列。
由于最小消息监听线程数和最大消息监听线程数都是2,所以每个监听器各有2个线程实现监听功能。
Receiver消息生产者:
@Component
public class Receiver {

    @RabbitListener(queues = RabbitConfig.TOPIC_A) // 监听器监听指定的queue
    public String processMessage1(String msg) {
        System.err.println(Thread.currentThread().getName() + " 接收到来自topic.a队列的消息:" + msg);
        return msg.toUpperCase();
    }

    @RabbitListener(queues = RabbitConfig.TOPIC_B) // 监听器监听指定的queue
    public void process2(String msg) {
        System.err.println(Thread.currentThread().getName() + " 接收到来自topic.b队列的消息:" + msg);
    }
}
要点:
1.监听器参数类型与消息实际类型匹配。在生产者中发送的消息实际类型是String,所以这里监听器参数类型也是String。

2.如果监听器需要有响应返回给生产者,直接在监听方法中return即可。
2.4.5 Application入口类及测试入口
Application项目启动入口:
@SpringBootApplication
public class Application {

    public static void main(String[] args) {
        SpringApplication.run(Application.class, args);
    }
}
测试:
@RunWith(SpringRunner.class)
@SpringBootTest(classes = { Application.class })
public class SpringbootTest {

    @Autowired
    private Sender sender;

    @Test
    public void sendTest() throws Exception {
        while (true) {
            String msg = new Date().toString();
            sender.send(msg);
            Thread.sleep(1000);
        }
    }
}
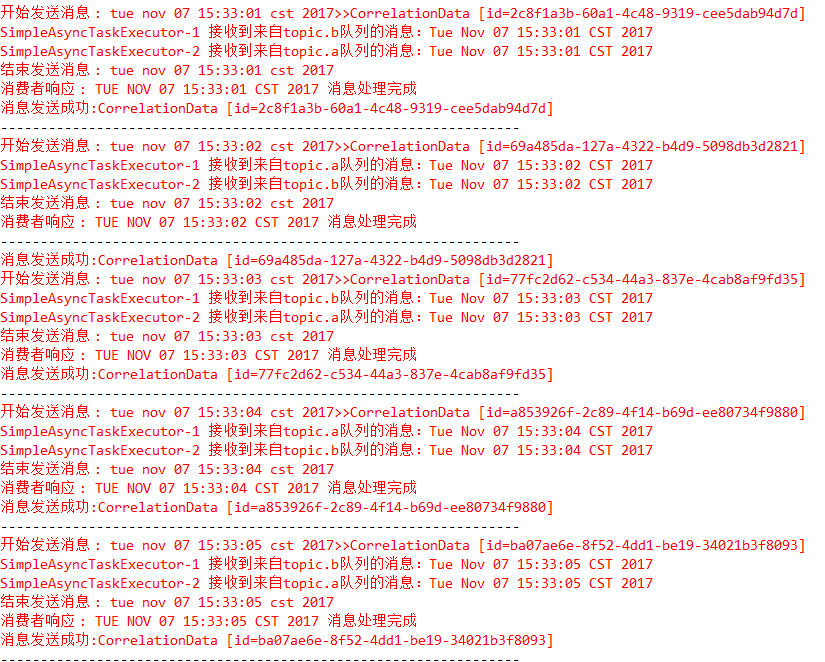
2.4.6 测试结果+总结
到这里,总结就结束了,最后,再附两张经过以上测试后,RabbitMQ中的exchange与Queue的展示:
这是因为,项目已启动,我们配置类中配置的就自动会添加到RabbitMQ中对应的exchange或者Queue,并完成绑定。

