人脸检测之MTCNN算法:论文阅读及源码解析
文章目录
- 前言
-
- 一、MTCNN论文阅读
-
-
- 1.1 论文信息
- 1.2 论文摘要翻译
- 1.3 论文核心(三级级联网络)
- 1.4 论文核心(级联子网络结构)
- 1.5 损失函数
-
- 二、源码解析
-
-
- 2.1 三级级联网络结构
- 2.2 压缩图像金字塔算法
- 2.3 PNet网络核心算法
- 2.4 RNet网络核心算法
- 2.5 ONet网络核心算法
-
前言
MTCNN算法是经典的人脸检测算法,本篇讲述内容包含两个部分:MTCNN论文的核心要点以及github上运用Pytorch框架复现的源码。
本系列所有代码是用python3编写,可在平台Anaconda中运行实现,在使用代码时,默认你已经安装相关的python库。本篇对源码的解析完全是基于我的个人理解,如有问题,欢迎指出。
一、MTCNN论文阅读
1.1 论文信息
- 论文名称:《Joint Face Detection and Alignment using Multi-task Cascaded Convolutional Networks》《同时用于人脸检测和对齐的多任务级联卷积网络》
- 发表时间:2016年4月11日
- 作者:Kaipeng Zhang, Zhanpeng Zhang, Zhifeng Li, Senior Member, IEEE, and Yu Qiao, Senior Member, IEEE
- 下载地址:https://arxiv.org/ftp/arxiv/papers/1604/1604.02878.pdf
1.2 论文摘要翻译
由于不同姿势,照明和遮挡,无约束环境中的面部检测和对齐具有挑战性。最近的研究表明,深度学习方法可以在这两项任务上取得极好的性能。 在本文中,我们提出了一个深度级联的多任务框架,它利用了检测和对齐之间的内在联系来提高它们的性能。特别是,我们的框架利用级联架构,通过三个阶段精心设计的深度卷积网络,从粗到细的方式检测人脸和人脸关键点。此外,在学习过程中我们提出了一种新的在线难例样本挖掘策略,可自动提高实践中的性能而不需要人工的样本选择。我们的方法在人脸检测具有挑战性的FDDB和WIDER FACE基准以及面部对齐的AFLW基准测试中实现了超过最先进技术的卓越精度,同时保持了实时性能。
1.3 论文核心(三级级联网络)
如下图1.1为MTCNN算法网络的三级级联框架:
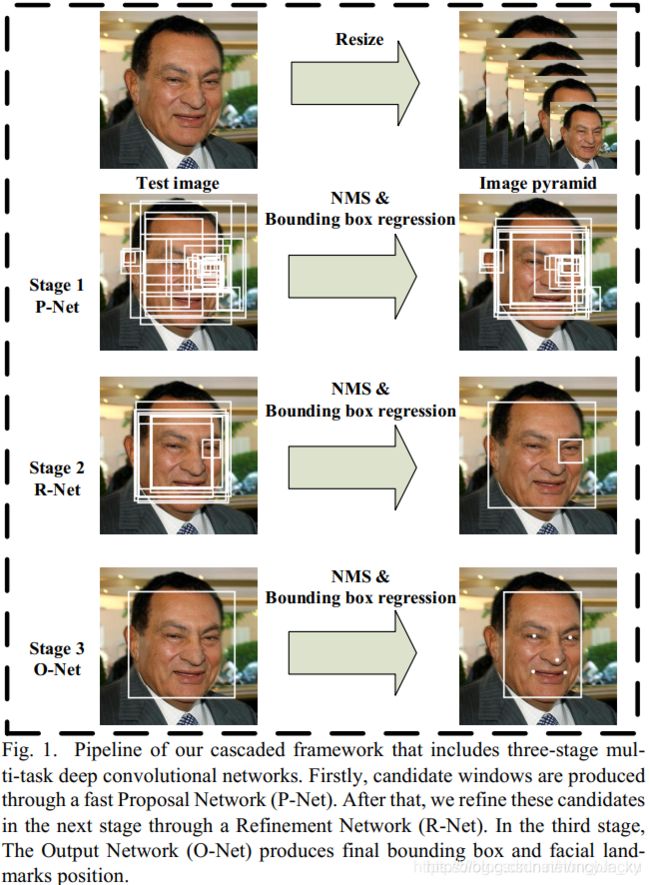
结构解析:
- 先将原始图片缩放到不同尺度,形成一个图像金字塔(Image Pyramid);
- 阶段一:P-Net(Proposal Net)区域候选网络,先使用卷积网络获取人脸框和边界框回归向量(Bounding Box Regression),再用边界框回归向量进行人脸框校准,之后用非极大抑制(NMS)去除重合度高的候选框
- 阶段二:R-Net(Refine Net),将P-Net得到的回归框输入到R-Net中,再对回归框进行校准,并使用NMS去重
- 阶段三:O-Net(Output Net),将R-Net输出的回归框输入到O-Net中,再对回归框进行校准,并使用NMS去重,同时会输出5个人脸的特征点。(从最终输出结果可以看出在此网络中不仅输出了人脸检测框,而且还输出了人脸特征关键点)
1.4 论文核心(级联子网络结构)
- P-Net网络结构

- 将原图压缩到不同尺度的图像金字塔输入到P-Net中(可以更大程度确保不同大小的人脸都被检测到)。
- 取图片12x12x3的区域作为输入,通过卷积和池化输出:人脸分类(2个输出)、边界框回归(回归框的左上和右下坐标,4个输出)、人脸关键点定位(P-Net中不输出)。
- R-Net网络结构
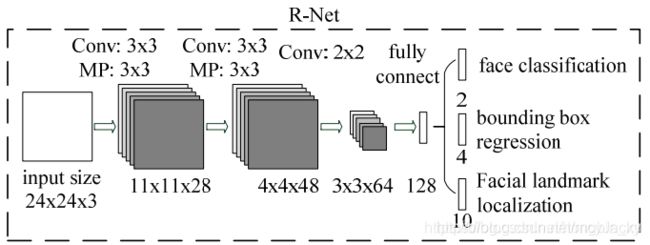
- P-Net网络简单速度快,但准确率较低,所有用R-Net来进一步做检测。把P-Net人脸检测窗口resize为24x24x3大小,再传入R-Net中,可消除很多误判。
- R-Net的输出和P-Net的输出结果一样:人脸分类(2个输出)、边界框回归(回归框的左上和右下坐标,4个输出)、人脸关键点定位(R-Net中不输出)。
- O-Net网络结构

- 把R-Net得到窗口resize为48x48x3大小,再传入O-Net进行检测。
- O-Net的输出为:人脸分类(2个输出)、边界框回归(回归框的左上和右下坐标,4个输出)、人脸关键点定位(10个输出)。
1.5 损失函数
-
人脸分类损失,预测输入框是否有人脸,使用交叉熵损失(cross-entropy loss):
L i d e t = − ( y i d e t log ( p i ) + ( 1 − y i d e t ) ( 1 − log ( p i ) ) ) L_i^{det} = -(y_i^{det}\log(p_i) + (1-y_i^{det})(1-\log(p_i))) Lidet=−(yidetlog(pi)+(1−yidet)(1−log(pi)))
其中, p i p_i pi是预测值, y i d e t ∈ { 0 , 1 } y_i^{det} \in \{0,1\} yidet∈{ 0,1}是实际值。 -
边界框回归损失,计算边界框和Ground Truth之间的偏差:
L i b o x = ∥ y ^ i b o x − y i b o x ∥ 2 2 L_i^{box}={\Vert \hat y_i^{box} - y_i^{box}\Vert}_2^2 Libox=∥y^ibox−yibox∥22
其中, y ^ i b o x \hat y_i^{box} y^ibox是预测框, y i b o x y_i^{box} yibox是Ground Truth框。 -
人脸关键点回归损失,预测了人脸5个关键点坐标,使用L2损失:
L i l a n d m a r k = ∥ y ^ i l a n d m a r k − y i l a n d m a r k ∥ 2 2 L_i^{landmark}={\Vert \hat y_i^{landmark} - y_i^{landmark}\Vert}_2^2 Lilandmark=∥y^ilandmark−yilandmark∥22
其中, y ^ i l a n d m a r k \hat y_i^{landmark} y^ilandmark是预测关键点, y i l a n d m a r k y_i^{landmark} yilandmark是实际关键点。 -
Mult-source training,由于使用多个数据集进行训练,对于不同的训练数据,三类误差要有不同的权重:
min ∑ i = 1 N ∑ j ∈ { d e t , b o x , l a n d m a r k } α j β i j L i j \min \sum_{i=1}^N \sum_{j \in \{det, box, landmark\}} \alpha_j\beta_i^jL_i^j mini=1∑Nj∈{ det,box,landmark}∑αjβijLij
其中, α j \alpha_j αj是任务重要度,我们使用 ( α d e t = 1 , α b o x = 0.5 , α l a n d m a r k = 0.5 ) (\alpha_{det}=1,\alpha_{box}=0.5,\alpha_{landmark}=0.5) (αdet=1,αbox=0.5,αlandmark=0.5)用于P-Net和R-Net,使用 ( α d e t = 1 , α b o x = 0.5 , α l a n d m a r k = 1 ) (\alpha_{det}=1,\alpha_{box}=0.5,\alpha_{landmark}=1) (αdet=1,αbox=0.5,αlandmark=1)用于O-Net。其中 β i j ∈ { 0 , 1 } \beta_i^j \in \{0,1\} βij∈{ 0,1}表示样本类型。 -
Online Hard sample mining,在每个mini-batch中计算所有样本的loss,并对其进行降序排序,取前70%的样本进行训练。
二、源码解析
本篇源码是基于pytorch框架实现,源码的GitHub开源地址为:https://github.com/TropComplique/mtcnn-pytorch
2.1 三级级联网络结构
# 三级网络输出
pnet = PNet()
rnet = RNet()
onet = ONet()

# 网络实现原理
import torch
import torch.nn as nn
import torch.nn.functional as F
from collections import OrderedDict
import numpy as np

# PNet网络
class PNet(nn.Module):
    def __init__(self):
        super(PNet, self).__init__()
        self.features = nn.Sequential(OrderedDict([
            ('conv1', nn.Conv2d(3, 10, 3, 1)),
            ('prelu1', nn.PReLU(10)),
            ('pool1', nn.MaxPool2d(2, 2, ceil_mode=True)),

            ('conv2', nn.Conv2d(10, 16, 3, 1)),
            ('prelu2', nn.PReLU(16)),

            ('conv3', nn.Conv2d(16, 32, 3, 1)),
            ('prelu3', nn.PReLU(32))
        ]))

        self.conv4_1 = nn.Conv2d(32, 2, 1, 1)
        self.conv4_2 = nn.Conv2d(32, 4, 1, 1)

        weights = np.load('src/weights/pnet.npy')[()]
        for name, param in self.named_parameters():
            param.data = torch.FloatTensor(weights[name])

    def forward(self, x):
        """
        Arguments:
            x: a float tensor with shape [batch_size, 3, h, w].
        Returns:
            b: a float tensor with shape [batch_size, 4, h', w'].
            a: a float tensor with shape [batch_size, 2, h', w'].
        """
        x = self.features(x)
        a = self.conv4_1(x)
        b = self.conv4_2(x)
        a = F.softmax(a)
        return b, a

# RNet网络
class RNet(nn.Module):
    def __init__(self):
        super(RNet, self).__init__()
        self.features = nn.Sequential(OrderedDict([
            ('conv1', nn.Conv2d(3, 28, 3, 1)),
            ('prelu1', nn.PReLU(28)),
            ('pool1', nn.MaxPool2d(3, 2, ceil_mode=True)),

            ('conv2', nn.Conv2d(28, 48, 3, 1)),
            ('prelu2', nn.PReLU(48)),
            ('pool2', nn.MaxPool2d(3, 2, ceil_mode=True)),

            ('conv3', nn.Conv2d(48, 64, 2, 1)),
            ('prelu3', nn.PReLU(64)),

            ('flatten', Flatten()),
            ('conv4', nn.Linear(576, 128)),
            ('prelu4', nn.PReLU(128))
        ]))

        self.conv5_1 = nn.Linear(128, 2)
        self.conv5_2 = nn.Linear(128, 4)

        weights = np.load('src/weights/rnet.npy')[()]
        for name, param in self.named_parameters():
            param.data = torch.FloatTensor(weights[name])

    def forward(self, x):
        """
        Arguments:
            x: a float tensor with shape [batch_size, 3, h, w].
        Returns:
            b: a float tensor with shape [batch_size, 4].
            a: a float tensor with shape [batch_size, 2].
        """
        x = self.features(x)
        a = self.conv5_1(x)
        b = self.conv5_2(x)
        a = F.softmax(a)
        return b, a

# ONet网络
class ONet(nn.Module):
    def __init__(self):
        super(ONet, self).__init__()
        self.features = nn.Sequential(OrderedDict([
            ('conv1', nn.Conv2d(3, 32, 3, 1)),
            ('prelu1', nn.PReLU(32)),
            ('pool1', nn.MaxPool2d(3, 2, ceil_mode=True)),

            ('conv2', nn.Conv2d(32, 64, 3, 1)),
            ('prelu2', nn.PReLU(64)),
            ('pool2', nn.MaxPool2d(3, 2, ceil_mode=True)),

            ('conv3', nn.Conv2d(64, 64, 3, 1)),
            ('prelu3', nn.PReLU(64)),
            ('pool3', nn.MaxPool2d(2, 2, ceil_mode=True)),

            ('conv4', nn.Conv2d(64, 128, 2, 1)),
            ('prelu4', nn.PReLU(128)),

            ('flatten', Flatten()),
            ('conv5', nn.Linear(1152, 256)),
            ('drop5', nn.Dropout(0.25)),
            ('prelu5', nn.PReLU(256)),
        ]))

        self.conv6_1 = nn.Linear(256, 2)
        self.conv6_2 = nn.Linear(256, 4)
        self.conv6_3 = nn.Linear(256, 10)

        weights = np.load('src/weights/onet.npy')[()]
        for name, param in self.named_parameters():
            param.data = torch.FloatTensor(weights[name])

    def forward(self, x):
        """
        Arguments:
            x: a float tensor with shape [batch_size, 3, h, w].
        Returns:
            c: a float tensor with shape [batch_size, 10].
            b: a float tensor with shape [batch_size, 4].
            a: a float tensor with shape [batch_size, 2].
        """
        x = self.features(x)
        a = self.conv6_1(x)
        b = self.conv6_2(x)
        c = self.conv6_3(x)
        a = F.softmax(a)
        return c, b, a
注意点:本论文是通过已训练好的三级网络权重,权重文件为pnet.npy、pnet.npy和rnet.npy。通过np.load(‘src/weights/onet.npy’)[()] 将权重加载至网络模型中。
2.2 压缩图像金字塔算法
# 将原图进行缩放成图像金字塔
def pyramid_image(img):
    min_face_size = 15 # 定义最小人脸尺寸
    min_detection_size = 12 # 最小检测框尺寸
    factor = 0.707 #缩放因子

    width, height = img.size
    print("width, heigh:", width, height)

    max_scale = min_detection_size / min_face_size # 图片最大缩放比例
    min_length = min(width, height)
    min_length *= max_scale

    #缩放比率列表
    scales = []
    factor_count = 0
    while min_length > min_detection_size:
        scales.append(max_scale * factor ** factor_count)
        min_length *= factor
        print("min_length:", min_length)
        factor_count += 1

    print('scales:', ['{:.2f}'.format(s) for s in scales])
    print('number of different scales:', len(scales))

    return scales
# 可以输出原图的缩放比例列表,如下:
# scales: ['0.80', '0.57', '0.40', '0.28', '0.20', '0.14', '0.10', '0.07', '0.05', '0.04']
图像金字塔原理
- 先根据检测图片最小人脸尺寸和最小检测框尺寸计算图片最大缩放比例:max_scale。第一次缩放将图片长宽中的短边按最大比例缩放,这次缩放可以保证检测框可以检测到最小人脸,即min_length *= max_scale
- 之后按面积约等于原面积一半缩放:假设原面积为 x y xy xy,缩放比例为 f a c t o r factor factor,若按面积一半的原理即 x y = 2 f a c t o r 2 x y xy = 2factor^2xy xy=2factor2xy,消除两边的 x y xy xy得到 f a c t o r = 2 2 ≈ 0.707 factor = \frac{\sqrt{2}}{2} \approx 0.707 factor=22≈0.707
2.3 PNet网络核心算法
1. PNet主要运行程序
# 预测框
bounding_boxes = []

# run P-Net on different scales
for s in scales:
    boxes = run_first_stage(image, pnet, scale=s, threshold=thresholds[0])
    if boxes is not None:
        print("boxes.shape:", boxes.shape)
    bounding_boxes.append(boxes)

# collect boxes (and offsets, and scores) from different scales
bounding_boxes = [i for i in bounding_boxes if i is not None]
bounding_boxes = np.vstack(bounding_boxes)
print('number of bounding boxes:', bounding_boxes.shape, len(bounding_boxes))
# number of bounding boxes: (338, 9) 338
注意点:run_first_stage()方法就是将原图按图像金字塔的缩放比例压缩后输入PNet网络输出不同的回归框。
2. run_first_stage()方法解析
def run_first_stage(image, net, scale, threshold):
    """Run P-Net, generate bounding boxes, and do NMS.

    Arguments:
        image: an instance of PIL.Image.
        net: an instance of pytorch's nn.Module, P-Net.
        scale: a float number,
            scale width and height of the image by this number.
        threshold: a float number,
            threshold on the probability of a face when generating
            bounding boxes from predictions of the net.

    Returns:
        a float numpy array of shape [n_boxes, 9],
            bounding boxes with scores and offsets (4 + 1 + 4).
    """
    # scale the image and convert it to a float array
    width, height = image.size
    sw, sh = math.ceil(width*scale), math.ceil(height*scale)
    img = image.resize((sw, sh), Image.BILINEAR)
    img = np.asarray(img, 'float32')

    img = Variable(torch.FloatTensor(_preprocess(img)))  #(1)
    output = net(img) #(2)
    #print("output0:", output[0].data.numpy().shape) # (1, 4, 145, 195)
	#print("output1:", output[1].data.numpy().shape) # (1, 2, 145, 195)
    probs = output[1].data.numpy()[0, 1, :, :] #(145, 195)
    offsets = output[0].data.numpy()

    boxes = _generate_bboxes(probs, offsets, scale, threshold) #(3)
    if len(boxes) == 0:
        return None

    keep = nms(boxes[:, 0:5], overlap_threshold=0.5) #(4)
    return boxes[keep]
run_first_stage方法主要包含4个步骤:
- (1)_preprocess()方法对图片进行预处理 ,原理是将图片的通道顺序进行转换,并对其进行归一化为处理:由于图片每个像素点上是[0, 255]的数,都是非负数,对每个像素点做(x – 127.5)/128,可以把[0, 255]映射为(-1, 1)。
- (2)将预处理后的图片输入到PNe网络中,输出人脸分类预测probs和回归框预测offsets;
- (3) _generate_bboxes()方法是对人脸预测框置信度大于阈值的框筛选出来。并将预测回归框放大至原图尺寸,其中主要公式是:
x 1 = s t r i d e ∗ x s c a l e , y 1 = s t r i d e ∗ y s c a l e , x 2 = x 1 + c e l l s c a l e , y 2 = y 1 + c e l l s c a l e x_1 = \frac {stride * x} {scale}, y_1 =\frac {stride*y} {scale}, x_2 = \frac{x_1 + cell}{scale}, y_2 = \frac{y_1 + cell}{scale} x1=scalestride∗x,y1=scalestride∗y,x2=scalex1+cell,y2=scaley1+cell
其中 ( x 1 , y 1 ) , ( x 2 , y 2 ) (x_1, y_1),(x_2, y_2) (x1,y1),(x2,y2)分别是输入矩阵中一个矩形区域的左上角和右下角坐标, s t r i d e stride stride为卷积步长, x , y x,y x,y是得分矩阵上任意一点坐标(详情原理可参考:http://www.sfinst.com/?p=1683)。源码计算如下,其中与上述公式存在差异之处是+1.0,这个是对计算结果的一个修正。
# 源码中_generate_bboxes()计算原图预测框:
bounding_boxes = np.vstack([
        np.round((stride*inds[1] + 1.0)/scale), # xmin (434,)
        np.round((stride*inds[0] + 1.0)/scale), # ymin(434,)
        np.round((stride*inds[1] + 1.0 + cell_size)/scale), # xmax(434,)
        np.round((stride*inds[0] + 1.0 + cell_size)/scale), # ymax(434,)
        score,   # (434,)
        offsets  # (4, 434)
    ])
- (4)nms()方法是通过非极大抑制的方法去除重合区域面积过大的预测框。
3. 显示图像框方法解析
from PIL import ImageDraw
def show_bboxes(img, bounding_boxes, facial_landmarks=[]):
    """Draw bounding boxes and facial landmarks.
    Arguments:
        img: an instance of PIL.Image.
        bounding_boxes: a float numpy array of shape [n, 5].
        facial_landmarks: a float numpy array of shape [n, 10].
    Returns:
        an instance of PIL.Image.
    """
    img_copy = img.copy()
    draw = ImageDraw.Draw(img_copy)

    for b in bounding_boxes:
        draw.rectangle([
            (b[0], b[1]), (b[2], b[3])
        ], outline='white')

    for p in facial_landmarks:
        for i in range(5):
            draw.ellipse([
                (p[i] - 1.0, p[i + 5] - 1.0),
                (p[i] + 1.0, p[i + 5] + 1.0)
            ], outline='blue')

    return img_copy
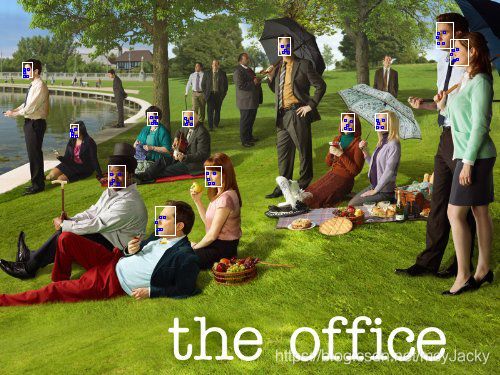
该方法是要是对预测的回归边框绘制矩形框以及对预测出来的人脸关键点绘制椭圆框。预测显示效果如下:

4. 对PNet预测框结果进行校准(calibration)
- 主校准步骤
# 1.非极大抑制
keep = nms(bounding_boxes[:, 0:5], nms_thresholds[0]) #(1)
bounding_boxes = bounding_boxes[keep]

# 2.校准use offsets predicted by pnet to transform bounding boxes
bounding_boxes = calibrate_box(bounding_boxes[:, 0:5], bounding_boxes[:, 5:]) #(2)
# shape [n_boxes, 5]

# 3.转换为方形
bounding_boxes = convert_to_square(bounding_boxes) #(3)
bounding_boxes[:, 0:4] = np.round(bounding_boxes[:, 0:4])
print('number of bounding boxes:', len(bounding_boxes))
PNet输出的预测框需要进行代码中以下3步的校准:
- (1)nms方法()通过设定的阈值再次进行非极大抑制处理;
- (2)calibrate_box()方法是通过预测回归框offeses和边界框bbounding_bbox来转换使得bbounding_bboxes更接近实际边界框,转换公式如下:
x 1 c a l i b r a t i o n = x 1 o r i g i n + w ∗ d x 1 , y 1 c a l i b r a t i o n = y 1 o r i g i n + h ∗ d y 1 x1_{calibration} = x1_{origin} + w * {dx1}, y1_{calibration} = y1_{origin} + h * {dy1} x1calibration=x1origin+w∗dx1,y1calibration=y1origin+h∗dy1
x 2 c a l i b r a t i o n = x 2 o r i g i n + w ∗ d x 2 , y 2 c a l i b r a t i o n = y 2 o r i g i n + h ∗ d y 2 x2_{calibration} = x2_{origin} + w * {dx2}, y2_{calibration} = y2_{origin} + h * {dy2} x2calibration=x2origin+w∗dx2,y2calibration=y2origin+h∗dy2
其中, x 1 o r i g i n , y 1 o r i g i n , x 2 o r i g i n , y 2 o r i g i n x1_{origin},y1_{origin},x2_{origin},y2_{origin} x1origin,y1origin,x2origin,y2origin为之前_generate_bboxes()得到计算回归框坐标, d x 1 , d y 1 , d x 2 , d y 2 dx1,dy1,dx2,dy2 dx1,dy1,dx2,dy2为预测回归框offsets坐标,具体校准实现如下:
# 预测框校准方法
def calibrate_box(bboxes, offsets):
    """Transform bounding boxes to be more like true bounding boxes.
    'offsets' is one of the outputs of the nets.
    Arguments:
        bboxes: a float numpy array of shape [n, 5].
        offsets: a float numpy array of shape [n, 4].
    Returns:
        a float numpy array of shape [n, 5].
    """
    x1, y1, x2, y2 = [bboxes[:, i] for i in range(4)]
    w = x2 - x1 + 1.0 #(n,)
    h = y2 - y1 + 1.0 #(n,)
    w = np.expand_dims(w, 1) # (n,1)
    h = np.expand_dims(h, 1) # (n,1)
    # this is what happening here:
    # tx1, ty1, tx2, ty2 = [offsets[:, i] for i in range(4)]
    # x1_true = x1 + tx1*w
    # y1_true = y1 + ty1*h
    # x2_true = x2 + tx2*w
    # y2_true = y2 + ty2*h
    # below is just more compact form of this

    # are offsets always such that
    # x1 < x2 and y1 < y2 ?
    translation = np.hstack([w, h, w, h])*offsets # (n, 4) x (n,4)
    bboxes[:, 0:4] = bboxes[:, 0:4] + translation
    return bboxes
- (3)convert_to_square()方法主要将预测框转变为正方形,原理如下图所示:如原来预测框为黑色框,左上角和右下角坐标分别为 x 1 , y 1 , x 2 , y 2 x_1,y_1,x_2,y_2 x1,y1,x2,y2,经过转换后的正方形为红色框,左上角和右下角的坐标分别为 x 1 , , y 1 , , x 2 , , y 2 , x_1^, ,y_1^,,x_2^,,y_2^, x1,,y1,,x2,,y2,。转换是按照中心位置不变,将原预测框长宽的短边进行转换。

- (4)经过校准后的原图预测结果如下:
2.4 RNet网络核心算法
- 主运行程序
# 将PNet预测框,resize至24x24大小,输入rnet进行训练输出
img_boxes = get_image_boxes(bounding_boxes, image, size=24) #(1)
img_boxes = Variable(torch.FloatTensor(img_boxes))
output = rnet(img_boxes)
offsets = output[0].data.numpy()  # shape [n_boxes, 4]
probs = output[1].data.numpy()  # shape [n_boxes, 2]

# 保留人脸分类概率大于阈值的预测框
keep = np.where(probs[:, 1] > thresholds[1])[0]
bounding_boxes = bounding_boxes[keep]
bounding_boxes[:, 4] = probs[keep, 1].reshape((-1,))
offsets = offsets[keep]

# 显示预测回归框
show_bboxes(image, bounding_boxes)
- (1)get_image_boxes方法即如何从原先输出框resize至24x24大小是本步骤的关键。具体的源码如下,
def get_image_boxes(bounding_boxes, img, size=24):
    """Cut out boxes from the image.
    Arguments:
        bounding_boxes: a float numpy array of shape [n, 5].
        img: an instance of PIL.Image.
        size: an integer, size of cutouts.
    Returns:
        a float numpy array of shape [n, 3, size, size].
    """
    num_boxes = len(bounding_boxes)
    width, height = img.size

    [dy, edy, dx, edx, y, ey, x, ex, w, h] = correct_bboxes(bounding_boxes, width, height) #(1)
    img_boxes = np.zeros((num_boxes, 3, size, size), 'float32')

    for i in range(num_boxes):
        img_box = np.zeros((h[i], w[i], 3), 'uint8')

        img_array = np.asarray(img, 'uint8')
        img_box[dy[i]:(edy[i] + 1), dx[i]:(edx[i] + 1), :] =\
            img_array[y[i]:(ey[i] + 1), x[i]:(ex[i] + 1), :]

        # resize
        img_box = Image.fromarray(img_box)
        img_box = img_box.resize((size, size), Image.BILINEAR)
        img_box = np.asarray(img_box, 'float32')

        img_boxes[i, :, :, :] = _preprocess(img_box)

    return img_boxes
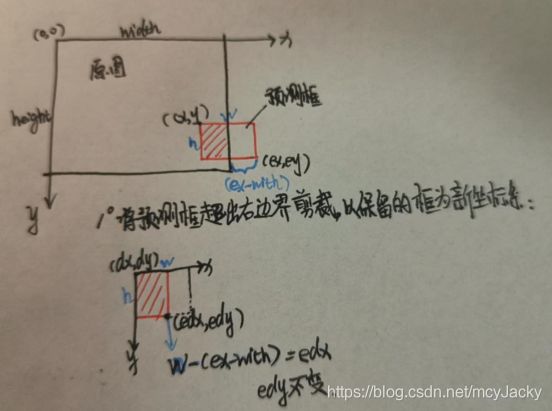
其中correct_bboxes()方法的作用是对原图预测框超出原图边界的部分进行剪裁修改。其中4种超出原图的框需要剪裁(预测框超出原图右边,预测框超出原图下边,预测框超出原图上边,预测框超出原图左边), 预测框超出原图右剪裁原理如下图:
- (2)将原图剪裁下来的图片,以该图片为新的坐标系,并resize至24x24大小图片输入到RNet进行训练输出人脸分类概率预测probs和回归框预测offsets。
- (3) 与PNet输出类似,保留人脸分类预测结果大于阈值的回归框。校准前的预测结果如下,可以看出RNet可以剔除掉大部分不符合人脸框预测的回归框:

- 对RNet输出预测框进行校准(calibration)
与PNet预测框校准原理相同,对RNet输出预测框也需要进行校准。
# 对重叠框进行非极大抑制处理
keep = nms(bounding_boxes, nms_thresholds[1])
bounding_boxes = bounding_boxes[keep]

# 预测框进行校准
bounding_boxes = calibrate_box(bounding_boxes, offsets[keep])

# 预测框转为方形
bounding_boxes = convert_to_square(bounding_boxes)
bounding_boxes[:, 0:4] = np.round(bounding_boxes[:, 0:4])
校准后原图检测结果如下:

2.5 ONet网络核心算法
- 主运行程序
# 获取RNet预测框,并resize至48*48尺寸
img_boxes = get_image_boxes(bounding_boxes, image, size=48)
img_boxes = Variable(torch.FloatTensor(img_boxes))
output = onet(img_boxes)
landmarks = output[0].data.numpy()  # shape [n_boxes, 10]
offsets = output[1].data.numpy()  # shape [n_boxes, 4]
probs = output[2].data.numpy()  # shape [n_boxes, 2]

#取大于阈值分类
keep = np.where(probs[:, 1] > thresholds[2])[0]
bounding_boxes = bounding_boxes[keep]
bounding_boxes[:, 4] = probs[keep, 1].reshape((-1,))
offsets = offsets[keep]
landmarks = landmarks[keep]

#计算人脸关键点(将坐标百分比转换为实际坐标值)
width = bounding_boxes[:, 2] - bounding_boxes[:, 0] + 1.0
height = bounding_boxes[:, 3] - bounding_boxes[:, 1] + 1.0
xmin, ymin = bounding_boxes[:, 0], bounding_boxes[:, 1]

landmarks[:, 0:5] = np.expand_dims(xmin, 1) + np.expand_dims(width, 1)*landmarks[:, 0:5]
landmarks[:, 5:10] = np.expand_dims(ymin, 1) + np.expand_dims(height, 1)*landmarks[:, 5:10]

#显示预测结果
show_bboxes(image, bb_boxes, landmarks)
注意点:ONet输出与PNet和RNet不同,多了一个人脸关键点landmarks结果输出。校准前预测结果显示如下图:

2. 对ONet预测框结果进行校准(calibration)
#对Onet输出结果进行校准
bounding_boxes = calibrate_box(bounding_boxes, offsets)
keep = nms(bounding_boxes, nms_thresholds[2], mode='min')
bounding_boxes = bounding_boxes[keep]
landmarks = landmarks[keep]

#显示预测结果
show_bboxes(image, bounding_boxes, landmarks)
对Onet输出结果进行校准方式与之前PNet和RNet顺序不同,这边先做calibrate_box()方法校准,后进行非极大抑制操作。最终预测结果如下:
转载声明:
版权声明:非商用自由转载-保持署名-注明出处
署名 :mcyJacky
文章出处:https://blog.csdn.net/mcyJacky