基于 consul + upsync 的动态upstream管理
upsync介绍
upsync是微博开源的基于nginx的动态流量管理方案. github地址: https://github.com/weibocom/nginx-upsync-module.
nginx-upsync-module,它的功能是拉取 consul 的后端 server 的列表,并更新 Nginx 的路由信息。此模块不依赖于任何第三方模块。 consul 作为 Nginx 的 db,利用 consul 的 KV 服务,每个 Nginx work 进程独立的去拉取各个 upstream 的配置,并更新各自的路由。
consul简介
Consul是HashiCorp公司推出的开源工具,用于实现分布式系统的服务发现与配置. consul是分布式的, 高可用的, 可横向扩展的. 它具备以下特性:
服务发现: consul提供了通过DNS或者HTTP接口的方式来注册服务和发现服务. 一些外部的服务通过consul很容易的找到它所依赖的服务.
健康检测: consul的client提供了健康检查的机制, 可以通过用来避免流量被转发到有故障的服务上.
Key/Value存储: 应用程序可以根据自己的需要使用Consul提供的Key/Value存储. Consul提供了简单易用的HTTP接口, 结合其他工具可以实现动态配置, 功能标记, 领袖选举等等功能.
多数据中心: Consul支持开箱即用的多数据中心. 这意味着用户不需要担心需要建立额外的抽象层让业务扩展到多个区域.
consul架构
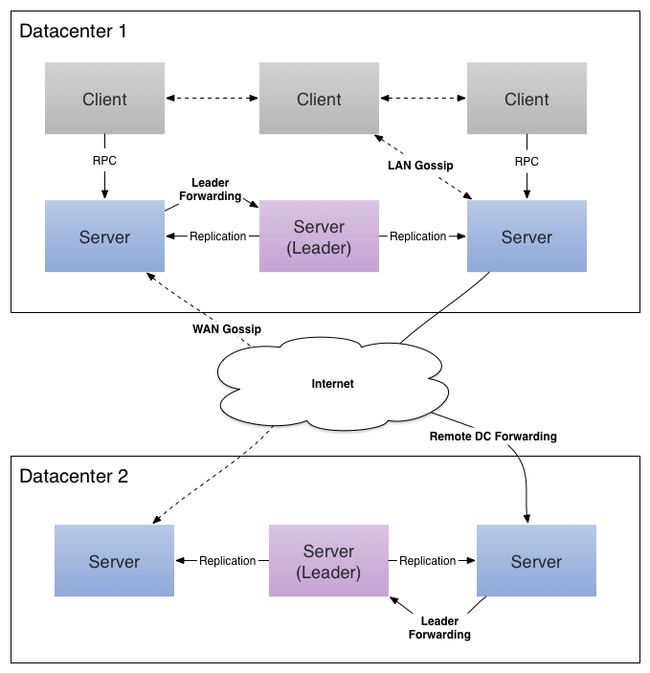
consul cluster由部署和运行了consul agent的节点组成. 在cluster中有两种角色: server 和 client.
server 和 client 的角色和consul cluster上运行的应用服务无关, 是基于consul层面的一种角色划分.
consul server: 用于维护consul cluster的状态信息. 官方文档中给出的建议是: 至少要运行3个或者3个以上的consul server. 多个server之中需要选举一个leader, 这个选举过程consul基于raft协议实现. 多个server节点上的consul数据信息保持强一致性.
consul client: 只维护自身的状态, 并上报请求给server.
consul的安装和启动
consul的安装比较简单, 可参考官方文档: https://www.consul.io/intro/getting-started/install.html
启动consul集群
启动两台consul server:
consul agent -server -bootstrap-expect 1 -data-dir /tmp/consul -client 0.0.0.0 -bind=192.168.100.123 -ui-dir /root/consul_ui -node=server01 -dc=upstream
consul agent -server -data-dir /tmp/consul -client 0.0.0.0 -bind=192.168.100.125 -node=server02 -dc=upstream
一台 consul client:
consul agent -data-dir /tmp/consul -client 0.0.0.0 -bind=192.168.100.127 -node=client01 -dc=upstream
- 查看集群成员:
[root@ruby-100-123 ~]# consul members
Node      Address               Status  Type    Build  Protocol  DC
client01  192.168.100.127:8301  alive   client  0.7.3  2         upstream
server01  192.168.100.123:8301  alive   server  0.7.3  2         upstream
server02  192.168.100.125:8301  alive   server  0.7.3  2         upstream
通过以上命令可以查看集群中的地址信息, 健康状态, 启动的角色, 版本信息等.
如果需要查看一些元数据的话, 可以通过加 -detailed 参数查看:
[root@ruby-100-123 ~]# consul members --detailed
Node      Address               Status  Tags
client01  192.168.100.127:8301  alive   build=0.7.3:'a90bb8f,dc=upstream,id=64ff71ab-465d-1d7e-22f6-9df6860c0293,role=node,vsn=2,vsn_max=3,vsn_min=2
server01  192.168.100.123:8301  alive   bootstrap=1,build=0.7.3:'a90bb8f,dc=upstream,id=7e1a3bed-2474-898f-275b-212d5fb8f646,port=8300,role=consul,vsn=2,vsn_max=3,vsn_min=2
server02  192.168.100.125:8301  alive   build=0.7.3:'a90bb8f,dc=upstream,id=ad7549e5-b1b6-7d52-a04f-1efd4e0fd58a,port=8300,role=consul,vsn=2,vsn_max=3,vsn_min=2
服务注册
服务注册有两种方式: 通过服务定义配置文件 和 通过HTTP接口. consul推荐使用第一种配置方式.
mkdir /etc/consul.d
echo '{"service": {"name": "web", "tags": ["rails"], "port": 80}}' >/etc/consul.d/web.json

consul agent -server -data-dir /tmp/consul -client 0.0.0.0 -bind=192.168.100.125 -node=server02 -dc=upstream  -config-dir /etc/consul.d/
然后我们可以通过HTTP接口查询注册的服务:
-bash: Python: command not found
[root@ruby-2-1-source ~]# curl -s http://localhost:8500/v1/catalog/service/web | python -m json.tool
[
    {
        "Address": "192.168.100.125",
        "CreateIndex": 186121,
        "ID": "ad7549e5-b1b6-7d52-a04f-1efd4e0fd58a",
        "ModifyIndex": 186121,
        "Node": "server02",
        "NodeMeta": {},
        "ServiceAddress": "",
        "ServiceEnableTagOverride": false,
        "ServiceID": "web",
        "ServiceName": "web",
        "ServicePort": 80,
        "ServiceTags": [
            "rails"
        ],
        "TaggedAddresses": {
            "lan": "192.168.100.125",
            "wan": "192.168.100.125"
        }
    }
]
健康监测
同样地, 我们可以通过定义配置文件 或 HTTP接口来定义健康监测.
我们定义一个简单的ping检查, 每隔30s一次, 然后重新启动client.
echo '{"check": {"name": "ping", "script": "ping -c1 www.zhe800.com >/dev/null", "interval": "30s"}}' >/etc/consul.d/ping.json

consul agent -server -data-dir /tmp/consul -client 0.0.0.0 -bind=192.168.100.125 -node=server02 -dc=upstream  -config-dir /etc/consul.d/
定义完健康监测的配置之后, 我们可以通过HTTP接口来检查各个agent的运行状态.
curl -s http://localhost:8500/v1/health/state/any | python -m json.tool
Key/Value存储
consul 提供了一个简单易用的Key/Value存储系统, 并提供了相关的HTTP接口, 可以用来动态获取配置(我们的动态upstream项目就是这种应用)、进行服务协调、主节点选举等.
可以通过HTTP接口查看K/V系统中存储了哪些内容:
curl -v http://127.0.0.1:8500/v1/kv/?recurse
通过HTTP接口往K/V系统写入数据:
curl -X PUT -d 'test' http://127.0.0.1:8500/v1/kv/key1/
curl -X PUT -d 'test' http://127.0.0.1:8500/v1/kv/key1/key2?param1=test
curl -X PUT -d 'test' http://127.0.0.1:8500/v1/kv/key1/key2/key3
写入数据之后, 可以通过上面的命令查看. 其value采用Base64加密.
另外, 也可以查看某个单个的key:
curl -s http://127.0.0.1:8500/v1/kv/key1 |python -m json.tool
WEB界面
URL: http://192.168.100.123:8500/ui
启动命令需要增加: -ui-dir 参数, 用于指前端相关的文件位置.
动态upsteams管理系统
结合zhe800自身的业务来说:
- 降低运维配置的复杂度:
原本的配置方式:
upstream test {
server 127.0.0.1:9601 weight=40 max_fails=10 fail_timeout=30s;
server 127.0.0.1:9602 weight=20 max_fails=10 fail_timeout=30s;
server 127.0.0.1:9603 weight=5 max_fails=10 fail_timeout=30s;
server 127.0.0.1:9604 weight=20 max_fails=10 fail_timeout=30s;
server 127.0.0.1:9605 weight=10 max_fails=10 fail_timeout=30s;
server 127.0.0.1:9606 weight=20 max_fails=10 fail_timeout=30s;
keepalive 166;
}
使用 upsync 之后的配置方式:
upstream test {
server 127.0.0.1:11111;
upsync 192.168.100.123:8500/v1/kv/upstreams/test upsync_timeout=6m upsync_interval=500ms upsync_type=consul strong_dependency=off;
upsync_dump_path /usr/local/nginx/conf/servers/servers_test.conf;
}
- 便于动态扩容缩容
运维可以很方便的在后台增删服务器
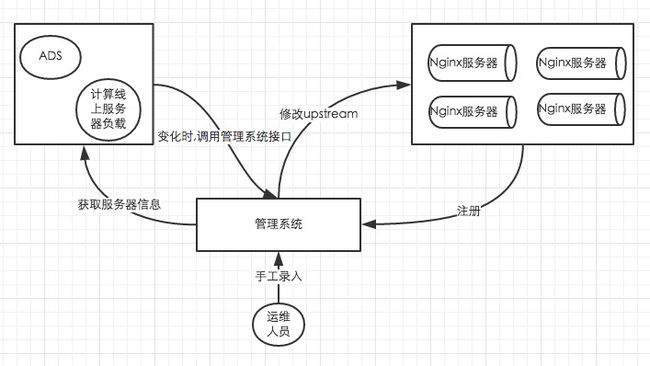
- 基于upstreams后台提供的服务器列表信息, 结合ads可以实现上线更新时的无缝切换
系统提供了每个upstream对应的服务列表的API, 以及启动, 关闭相关服务的API. ads系统更新上线的时候, 通过调用相关的API, 完成无缝上线.


