我们在平时开发过程中使用到多线程的场景大部分都是创建一个线程来处理任务,当这个任务处理完后线程也就自动销毁。如果有这样一种场景:我们创建一个线程来处理任务,当任务处理完后线程就处理休眠状态但是并不销毁,等待有新的任务过来时,线程就被唤醒接着处理任务,处理完继续进入休眠状态等待被唤醒。这种多线程的应用场景,我们该如何来设计尼?
我们先来看下线程处理完任务后就自动销毁的示例,我们创建一个Thread类继承自NSThread,在控制器中创建一个线程来处理任务,代码如下:
Thread:
@interface Thread : NSThread

@end


@implementation Thread

- (void)dealloc {

    // 执行线程销毁的打印工作
    NSLog(@"%s", __func__);
}
@end
ViewController控制器:
@interface ViewController ()

@end

@implementation ViewController

- (void)viewDidLoad {
    [super viewDidLoad];
    // Do any additional setup after loading the view.

}

- (void)touchesBegan:(NSSet *)touches withEvent:(UIEvent *)event {

    // 创建一个线程
    Thread *thread = [[Thread alloc] initWithTarget:self selector:@selector(test) object:nil];
    [thread start];
}

// 线程执行任务
- (void)test {
    NSLog(@"%@:线程开始做任务", [NSThread currentThread]);

    NSLog(@"----任务已处理完-----");
}
@end
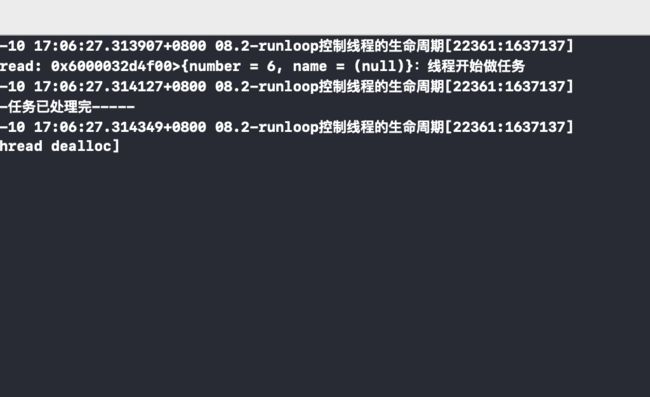
此时我们点击屏幕执行touchesBegan:方法,创建了一个线程,并让线程执行了test函数内任务,我们通过打印发现,当线程执行完打印任务后,线程也销毁了
这时我们会想,线程执行完任务就销毁了,是不是因为没有启动runloop导致的尼?
这时我们添加一个runloop,我们修改test函数代码如下:
- (void)test {
    NSLog(@"%@:线程开始做任务", [NSThread currentThread]);

    NSLog(@"----任务已处理完-----");

    [[NSRunLoop currentRunLoop] run];

    NSLog(@"---------");
}
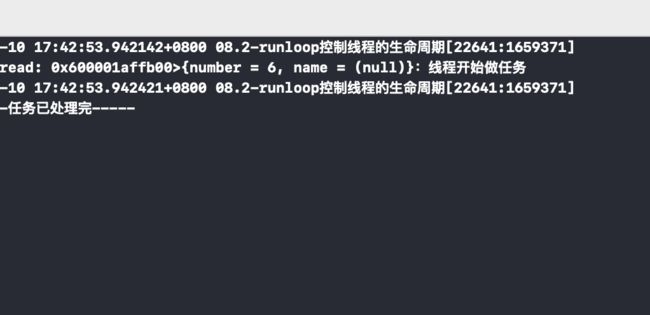
这时我们点击屏幕创建一个线程执行test任务,打印发现当线程执行完任务后,线程任然销毁了。添加了runloop后线程为啥还会销毁尼?,添加一个runloop不是可以让线程休眠吗?
这里线程还会销毁是因为此时创建的runloop对象中并没有Item(当runloop中没有Item时,线程执行完任务就会直接退出),也就是说没有timer、source、observer,我们给runloop添加一个source,代码如下:
- (void)test {
    NSLog(@"%@:线程开始做任务", [NSThread currentThread]);

    NSLog(@"----任务已处理完-----");

    // 给runloop添加一个source,port属于source1
    [[NSRunLoop currentRunLoop] addPort:[[NSPort alloc] init] forMode:NSDefaultRunLoopMode];

    // 获取当前线程
    [[NSRunLoop currentRunLoop] run];

    NSLog(@"---------");
}
此时再点击屏幕执行线程任务,发现当执行完任务后,线程并没有销毁
接下来我们再进行改造,将Thread使用属性进行强引用,然后使用performSelector:onThread:withObject:waitUntilDone:函数来执行线程的任务,具体代码如下:
@interface ViewController ()

@property (nonatomic, strong) Thread *thread;
@end

@implementation ViewController

- (void)viewDidLoad {
    [super viewDidLoad];
    // Do any additional setup after loading the view.

    // 创建线程
    self.thread = [[Thread alloc] initWithTarget:self selector:@selector(addRunLoop) object:nil];
    [self.thread start];
}

- (void)touchesBegan:(NSSet *)touches withEvent:(UIEvent *)event {

    // performSelector:函数的作用就是在指定的线程上执行任务
    [self performSelector:@selector(doTask) onThread:self.thread withObject:nil waitUntilDone:NO];
}

- (void)doTask {
    NSLog(@"开始执行任务");
}

// 此函数的作用是给线程添加一个runloop,让线程有任务就工作,没有任务就处于休眠状态
- (void)addRunLoop {
    NSLog(@"当前的线程:%@", [NSThread currentThread]);

    // 给runloop添加Item,也就是添加一个Source1
    [[NSRunLoop currentRunLoop] addPort:[[NSPort alloc] init] forMode:NSDefaultRunLoopMode];
    [[NSRunLoop currentRunLoop] run];
}
@end

- (void)dealloc {
    NSLog(@"%s", __func__);
}
上面的示例虽然可以保证线程执行完任务后不被销毁,但是此时又带来了控制器和线程都不被销毁的内存泄漏问题,我们当退出控制器,我们发现此时的控制器和线程都没有执行dealloc函数
我们先来修改创建线程的方式来解决控制器循环引用的问题,修改代码如下:
@interface ViewController ()

@property (nonatomic, strong) Thread *thread;
@end

@implementation ViewController

- (void)viewDidLoad {
    [super viewDidLoad];
    // Do any additional setup after loading the view.

    // 创建线程的方式改为使用block回调来执行线程的任务
    self.thread = [[Thread alloc] initWithBlock:^{
        NSLog(@"当前的线程:%@", [NSThread currentThread]);
        NSLog(@"---begin---");

        // 给runloop添加Item,也就是添加一个Source
        [[NSRunLoop currentRunLoop] addPort:[[NSPort alloc] init] forMode:NSDefaultRunLoopMode];
        [[NSRunLoop currentRunLoop] run];

        NSLog(@"---end---");
    }];
    [self.thread start];
}

- (void)touchesBegan:(NSSet *)touches withEvent:(UIEvent *)event {

    // performSelector:函数的作用就是在指定的线程上执行任务
    [self performSelector:@selector(doTask) onThread:self.thread withObject:nil waitUntilDone:NO];
}

- (void)doTask {
    NSLog(@"开始执行任务");
}

- (void)dealloc {
    NSLog(@"%s", __func__);
}
我们将创建线程的方式由
     // Thread线程内部会对self产生强引用,所以使用此方式创建的线程赋值给属性thread会产生循环引用问题
    self.thread = [[Thread alloc] initWithTarget:self selector:@selector(addRunLoop) object:nil];
改为:
self.thread = [[Thread alloc] initWithBlock:^{
        NSLog(@"当前的线程:%@", [NSThread currentThread]);
        NSLog(@"---begin---");

        // 给runloop添加Item,也就是添加一个Source
        [[NSRunLoop currentRunLoop] addPort:[[NSPort alloc] init] forMode:NSDefaultRunLoopMode];
        [[NSRunLoop currentRunLoop] run];

        NSLog(@"---end---");
    }];
这样创建的线程就不会对控制器对象产生循环引用了,这是因为initWithTarget:方法创建的线程,在函数内部会对self进行了强引用,使用block方式创建的线程我们可以在block内部使用weakSelf
当我们退出当前控制器时,这时线程还是没有销毁,这是因为当执行[[NSRunLoop currentRunLoop] run];这句代码后,线程就阻塞在这里,不在继续往下执行了
接下来我们尝试手动调用runloop的销毁函数CFRunLoopStop来销毁runloop,测试代码如下:
- (void)stopRunLoop {

    // 此函数的作用是用来停止指定的runloop
    CFRunLoopStop(CFRunLoopGetCurrent());
}

- (void)dealloc {
    NSLog(@"%s", __func__);

    // 我们在控制器销毁的函数中给self.thread线程添加一个任务,用来停止runloop
    [self performSelector:@selector(stopRunLoop) onThread:self.thread withObject:nil waitUntilDone:NO];
}
我们运行代码发现,此时runloop并没有被销毁,这是因为[[NSRunLoop currentRunLoop] run],run函数创建的是一个永远不会被销毁的runloop,所以说我们创建runloop时不能调用run方法,我们可以使用runMode:beforeDate方法。
最终runloop控制线程的生命周期实现代码如下:
@interface ViewController ()

@property (nonatomic, strong) Thread *thread;
@property (nonatomic, assign, getter=isStoped) BOOL stoped;
@end

@implementation ViewController

- (void)viewDidLoad {
    [super viewDidLoad];
    // Do any additional setup after loading the view.

    self.stoped = NO;

    __weak typeof(self) weakSelf = self;

    // 创建线程
    self.thread = [[Thread alloc] initWithBlock:^{
        NSLog(@"---begin---%@", [NSThread currentThread]);

        // 给runloop添加Item,也就是添加一个Source(port属于source1)
        [[NSRunLoop currentRunLoop] addPort:[[NSPort alloc] init] forMode:NSDefaultRunLoopMode];

        while (weakSelf && !weakSelf.isStoped) {
            // 使用runMode方法替代run方法来启动runloop
            [[NSRunLoop currentRunLoop] runMode:NSDefaultRunLoopMode beforeDate:[NSDate distantFuture]];
        }

        NSLog(@"---end---%@",[NSThread currentThread]);
    }];

    // 启动线程
    [self.thread start];
}

- (void)touchesBegan:(NSSet *)touches withEvent:(UIEvent *)event {
    if (!self.thread) return;

    // performSelector:函数的作用就是在指定的线程上执行任务
    [self performSelector:@selector(doTask) onThread:self.thread withObject:nil waitUntilDone:NO];
}

- (void)doTask {
    NSLog(@"开始执行线程分配的任务");
}

- (void)stopRunLoop {
    self.stoped = YES;

    // 此函数的作用是用来停止指定的runloop
    CFRunLoopStop(CFRunLoopGetCurrent());

    NSLog(@"------%@",[NSThread currentThread]);

    self.thread = nil;
}

- (void)clear {
    if (!self.thread) return;

    // 我们在控制器销毁的函数中给self.thread线程添加一个任务,用来停止runloop
    [self performSelector:@selector(stopRunLoop) onThread:self.thread withObject:nil waitUntilDone:YES];
}

- (void)dealloc {
    NSLog(@"%s", __func__);

    // 控制器即将销毁时,停止runloop
    [self clear];
}
@end
讲解示例Demo地址:https://github.com/guangqiang-liu/08.2-RunloopThread
更多文章
- ReactNative开源项目OneM(1200+star):https://github.com/guangqiang-liu/OneM:欢迎小伙伴们 star
- iOS组件化开发实战项目(500+star):https://github.com/guangqiang-liu/iOS-Component-Pro:欢迎小伙伴们 star
- 主页:包含多篇iOS和RN开发相关的技术文章http://www.jianshu.com/u/023338566ca5 欢迎小伙伴们:多多关注,点赞
- ReactNative QQ技术交流群(2000人):620792950 欢迎小伙伴进群交流学习
- iOS QQ技术交流群:678441305 欢迎小伙伴进群交流学习

