用Unity制作游戏确实“多快好省”。作为一个新手,需要大量的练习制作游戏,才能以最快速度熟悉Unity。本项目的代码可以在 Github 上欢迎下载。PS: 本教程的代码位置在 Tag “v1.0”。
在开始本教程前,你至少要对Unity2D有一个初步了解。至少要学习过了官方的UFO 2D项目。如果没有学习过,强烈建议先学习一下。官网上的视频被墙了,但是目在B站上有搬运。
准备工作
首先新建一个2D项目,命名为FlappyBird。
然后创建好如下文件夹:下载好资源,放入我们项目中。我们需要的资源在工程相关目录下可以找到。
实现游戏背景环境
游戏看起来是小鸟在飞,实际上,为了方便实现,我们可以理解为小鸟不动,是背景在往后移动。
先找到background资源导入时修改为Sprite,Sprite Mode: Single,Pixels Per Unit: 32。然后 Apply。同样对land,pipe1,pipe2执行类似的操作,知识注意Pivot锚点的位置。land为Top,pipe1为Top, pipe2为Bottom。更改锚点是为了之后布局更方便。
创建背景和地面
Hierarchy 下创建一个空游戏对象。Hierarchy->Create->Create Empty。命名为Ground,再在其子对象中创建一个MovingGround1。将background, land拖入。
接着我们要设置position: background:(0,2,0)、land(0,-3,0)。
设置SortLayer: 默认情况下,我们的Sprite加入后都是Default层,故我们要给land更高一些。点击 SortingLayer -> Add Sorting Layer 来增加四个SortLayer: Background,Pipes,Foreground, Player。然后给background设为Background,land设置为Foreground。也可以在菜单Eidt->ProjectSettings->Tags&Layers去设置。所以我们的图层排序就是从下到上: Background->Pipes->Foreground->Player。
当然你可以都使用Default,然后去更改Order in Layer。在我们这个小游戏中并没什么关系,但是如果游戏复杂以后,最好使用Sorting Layer。
给MovingGround1添加物理系统组件 :Box Collider 2D组件,Rigidbody 2D组件。
添加Box Collider 2D时,要正好把land上部包含,以便之后能正确的和小鸟发生碰撞检测。
让我们把背景动起来吧!在Scripts下创建MovingGround.cs。并将它们绑定到MovingGround1中。
// MovingGround.cs
public class MovingGround : MonoBehaviour {

    public float speed = 2;
    private Rigidbody2D rb2D;

    void Awake() {
        rb2D = GetComponent();
        rb2D.velocity = new Vector2(-speed, 0);
    }
    void Update() {
        //if (GameController.instance.isGameOver) {
          //  rb2D.velocity = Vector2.zero;
        //}
    }
}
顾名思义,这个脚本会让物体向后移动起来。它之后同样可以用到我们的其他“不动的物体”例如:管道。
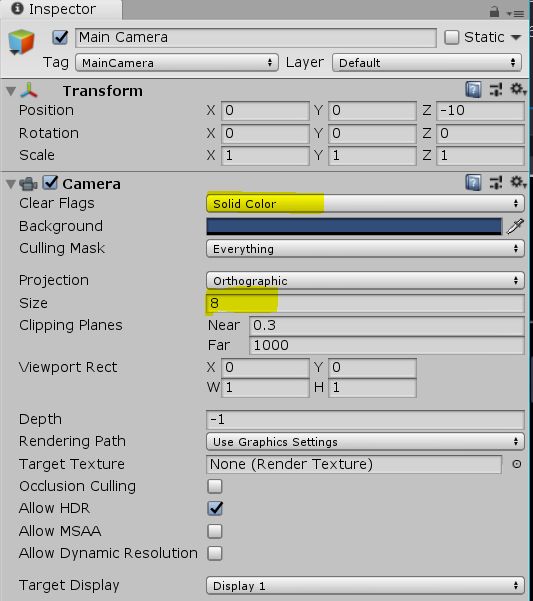
现在运行一下,看看,我们的背景开始往后移动了。但是好像很糟,因为图片比较窄,并没有把屏幕包含满。
接下我们设置下摄像机:然后我们将MovingGround1拖入到 Project->Prefabs,作为预制体。然后Ctrl+D(Mac: CMD+D)复制另外三个出来。调整Transform.Position让他们横排排列好。最终MovingGround1,2,3,4的位置为:(-7,-1.7,0)、(2,-1.7,0)、(11,-1.7,0)、(20,-1.7,0)。
这样,我们的4个背景形成一个整体,一起往后移动。接下来只要让他们移动到看不见的位置时,又重新移动到开始的位置即可。这样我们的环境就可以不断的移动,永远不会停下来了。
给MovingGround1添加脚本LoopGround.cs,并要Apply一下,让其他三个同样拥有这个脚本组件。
// LoopGround.cs
public class LoopGround : MonoBehaviour {

    private BoxCollider2D groundCollider;
    private float boxColliderWidth;

    void Start() {
        groundCollider = GetComponent();
        boxColliderWidth = groundCollider.size.x;
    }

    void Update () {
        // 到看不见的位置后,立马移动到最初的位置
        if (transform.position.x < -2 * boxColliderWidth) {
            transform.position = new Vector3(
                transform.position.x + 4 * boxColliderWidth,
                transform.position.y,
                transform.position.z);
        }
    }
}
很好,我们的背景和地面就完成了。
小鸟
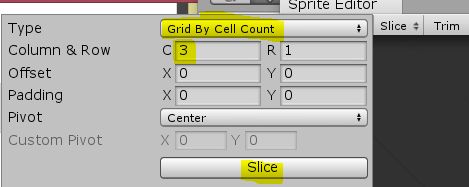
首先同样我们将资源导入。注意,我们这个图片是一个帧动画的序列图,需要分割一下。点击 Sprite Editor。完成后,点击Apply,图片就切好了。
制作玩家对象。我们将birds_0拖入Hierarchy,并修改为Player,设置Tag为Player,并设置位置,设置Sorting Layer为Player,否则将看不到。
添加动画。选中birds_0,birds_1,birds_2,一起拖到Player上,这时弹出保存为动画的选项框,保存为BirdFly.anim。并将其存到Assets/Animations下。这时Animations下多出两个文件,一个是birds_0的AnimatorController文件,一个BirdFly的Animation文件。我们修改birds_0为Bird,然后双击,这时就会打开Animator的窗体。默认情况下,我们的精灵Player就会自动执行BirdFly的动画。
为小鸟添加物体系统组件。
添加脚本Bird.cs
// Brid.cs
public class Bird : MonoBehaviour {

    public float upBounce = 300;

    private Rigidbody2D rb2D;

    private void Awake() {
        rb2D = GetComponent();
        anim = GetComponent();
    }

    private void Update() {
        if (Input.GetKeyDown(KeyCode.Space) || Input.GetMouseButtonDown(0)) {
            Fly();
        }
    }

    private void OnCollisionEnter2D(Collision2D collision) {
        Debug.Log("Bird Dead, Game Over!");
    }

    private void Fly() {
        rb2D.velocity = Vector2.zero;
        // 添加一个向上的力,使得小鸟向上飞
        Vector2 upForce = Vector2.up * upBounce;
        rb2D.AddForce(upForce);
        //SoundManager.instance.PlayFly();
    }

    private void Die() {
        rb2D.velocity = Vector2.zero;
        //GameController.instance.GameOver();
    }
}
这时,我们运行看看,我们的小鸟可以自由自在的飞翔了。就下来就只差管道了。
障碍物:管道
管道在之前已经被导入了,由于我们的图片资源一个向下,一个向上,所以特地设定了Pivot为Bottom和Top。这样我们将它们组成一个整体时,可以以中心对称。
这里记得将MovingGround.cs脚本组件添加到Pipes上,这样管道才会跟着背景一起移动。注意,我们要为pipe1,pipe2的SortLayer设置为Background。
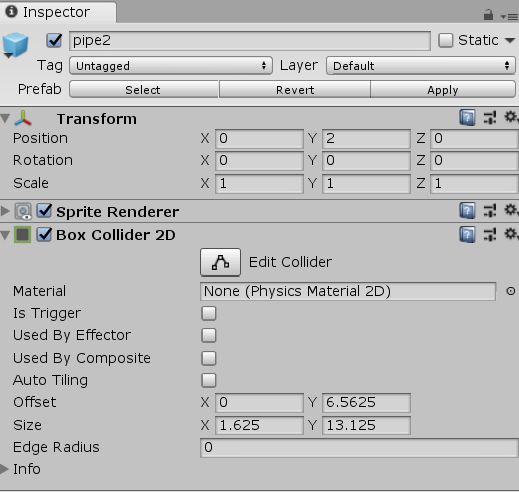
我们要为Pipes父对象添加碰撞检测区域和刚体组件。
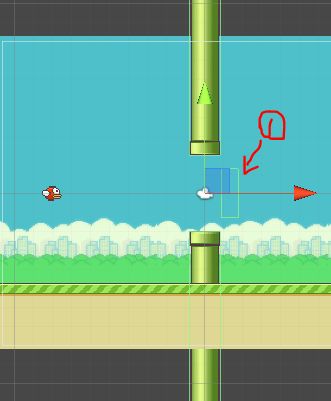
最后的样子如下,其中标记的1就是小鸟在通过时,可以检测到小鸟通过了,可以进行加分的功能。
然后我们添加碰撞检测的逻辑,实现这个加分吧。给Pipes添加自定义脚本Pipes.cs
// Pipes.cs
public class Pipes : MonoBehaviour {

    private void OnTriggerEnter2D(Collider2D collision) {
        // 管道的中间位置的探测区域,如果碰撞物体为小鸟(被标记为了Player),计分
        if (collision.tag == "Player") {
            Debug.Log("You are good!");

            //GameController.instance.PassOnePip();
            //SoundManager.instance.PlayPass();
        }
    }
}
好的,完成了,运行一下。(好吧,我看着总觉得会有马里奥从管道里爬出来。:)
游戏管理
项目到这里为止,我们还只有一个管道。随着场景的移动,我们当然需要不停的添加管道。这里我们添加一个GameController。
using System.Collections.Generic;
using UnityEngine;
using UnityEngine.SceneManagement;

public class GameController : MonoBehaviour {

    public static GameController instance = null;

    // 管道预制件
    public GameObject pipesPrefabs;

    public Text countText;
    public GameObject gameOverTips;

    // 管道产生的频率,每几秒产生一个
    public float createPipesRate = 3f;

    // 管道中心位置的y最小值
    public float minPipPosY = -1f;
    // 管道中心位置的y最大值
    public float maxPipPosY = 4f;
    // 初始化管道的位置,x最好为负数不可见位置
    public Vector2 startPipPos = new Vector2(-12f, 0f);

    // 统计已经成功过了几个管道
    private int count = 0;
    // 小鸟是否已经死了
    [HideInInspector] public bool isGameOver;

    // 上一次创建出管道的时间
    private float lastCreatePipTime = float.NegativeInfinity;

    // 缓存管道的链表,用来复用管道
    private List pipes = new List();
    // 管道缓存的个数
    private const int PIPESTOTAL = 8;
    // 当前管道下标,用来更新管道
    private int currPipesIndex = 0;

    private void Awake() {
        if (instance == null) {
            instance = this;
        } else if (instance != this) {
            Destroy(gameObject);
        }
    }

    private void Start() {
        isGameOver = false;
        gameOverTips.SetActive(false);
        // 开始时,创建出管道缓存
        InitPipesPool();
    }

    private void Update() {

        // 当可以创建出管道时,拿出缓存中一个管道来更新位置
        if (!isGameOver && lastCreatePipTime + createPipesRate < Time.time) {

            lastCreatePipTime = Time.time;

            UpdatePipesPosition();
            currPipesIndex = (currPipesIndex + 1) % PIPESTOTAL;
        }

        if (isGameOver && Input.GetKeyDown(KeyCode.Space)) {
            GameRestart();
        }
    }

    public void PassOnePip() {
        count++;
        countText.text = "Count: " + count.ToString();
    }

    public void GameOver() {
        if (isGameOver) return;

        isGameOver = true;
        gameOverTips.SetActive(true);
    }

    private void GameRestart() {
        SceneManager.LoadScene(SceneManager.GetActiveScene().buildIndex);
    }

    // 初始化管道缓存池
    private void InitPipesPool() {
        for (int i = 0; i < PIPESTOTAL; ++i) {
            GameObject obj = Instantiate(pipesPrefabs, startPipPos, Quaternion.identity);
            pipes.Add(obj);
        }
    }

    // 更新当前管道的位置
    private void UpdatePipesPosition() {
        float randomPosY = Random.Range(minPipPosY, maxPipPosY);
        Vector2 position = new Vector2(10f, randomPosY);
        pipes[currPipesIndex].transform.position = position;
    }
}
GameController管理了一个Pipes的管道池来复用管道,就不用不停的创建和销毁了。通过一次创建,之后每隔createPipesRate秒钟就刷新一个管道的位置,让他移动到适合的位置。
然后我们需要将Hierarchy中的Pipes拖到Project/Prefabs作为预制体。Hierarchy中的需要删掉。之后管道就都由GameController来管理了。
添加基本UI。我们像 UFO项目一样添加基本的UI。这里就不详细解释了。
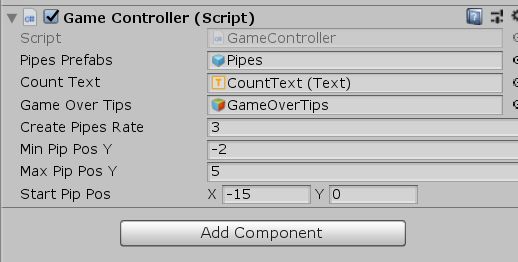
Hierarchy创建一个空游戏对象,命名为GameController。并将上面GameController.cs脚本组件关联上。并将内容补充完整。
音效
最后,我们添加一些简单的音效吧。新建一个SoundManager的空游戏对象,添加AudioSource组件,并创建脚本SoundManager.cs。
using UnityEngine;

public class SoundManager : MonoBehaviour {

    public static SoundManager instance = null;

    public AudioClip flyClip;
    public AudioClip dieClip;
    public AudioClip pointClip;

    private AudioSource audioSource;

    void Awake() {
        if (instance == null) {
            instance = this;
        } else if (instance != this) {
            Destroy(gameObject);
        }

        audioSource = GetComponent();
    }

    public void PlayFly() {
        audioSource.clip = flyClip;
        audioSource.Play();
    }

    public void PlayDie() {
        audioSource.clip = dieClip;
        audioSource.Play();
    }

    public void PlayPass() {
        audioSource.clip = pointClip;
        audioSource.Play();
    }
}
将之前代码里SoundManager有关代码反注释。最后,我们运行。
到这里,我们的FlappyBird就基本完成了。给自己点一个大大的赞吧!:)。如果有什么问题,欢迎在下面评论。
FlappyBird 教程2


