Python实现三维世界坐标向二维像素坐标的转换(附源码)
Autonomous vehicle 杂谈_01
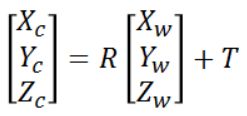
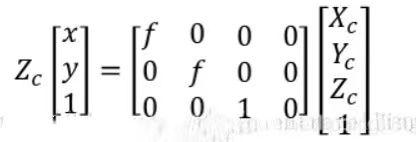
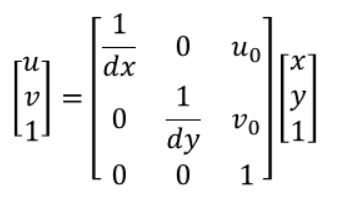
一. 坐标转换的过程
PS: 世界坐标: (Xw, Yw, Zw)、 相机坐标:(Xc, Yc, Zc)、 图像坐标:(x, y)、 像素坐标: (u, v)、 相机焦距: f、 旋转矩阵:R、 平移矩阵: T
二. 需要做的前期准备
- 通过 calibration 得到的相机内外参数
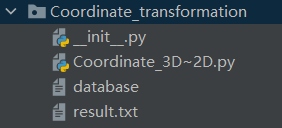
- set up 一个用于存放py源码(.py)、待转换三维坐标(.txt)__ps: 格式为(Xw,Yw,Zw)、转换二维坐标结果(.txt)的文件夹,大概就是像下边图片中的一样

- 随便一个可以run python文件的IDE
三. 源码如下(需要更改自己的相机参数)
# 实现三维坐标向二维坐标的转换

import numpy as np

# 各种内参、外参矩阵

# 旋转矩阵  (需要改)
R = np.mat([
    [-0.117, -0.992, 0.028],
    [-0.0033, -0.0278, -0.9996],
    [0.993, -0.1174, 0.00000315]
])

# 旋转矩阵的逆矩阵
R1 = np.linalg.inv(R)

# 平移矩阵 (需要改)
t = np.mat([
    [-0.125, 0.2525, 0.0716]
])

# 外参矩阵 (需要改)
Out = np.mat([
    [-0.117, -0.992, 0.028, -0.125],
    [-0.0033, -0.0278, -0.9996, 0.2525],
    [0.993, -0.1174, 0.00000315, 0.0716],
    [0, 0, 0, 1]
])

# 外参矩阵的逆
Out1 = np.linalg.inv(Out)

# 内参矩阵 (需要改)
K = np.mat([
    [610.53, 0, 368.114],
    [0, 605.93, 223.969],
    [0, 0, 1]
])

# 内参矩阵的逆矩阵
K1 = np.linalg.inv(K)

# R1 * K1
result_01 = np.multiply(R1, K1)
use1 = result_01

# R1 * t
result_02 = np.multiply(R1, t)
use2 = result_02


# 打开用于存放世界坐标的txt文件,将其中的以字符串格式保存的世界坐标转换成(Xw, Yw, Zw, 1)的元组格式
f = open('database', 'r')
database = []
for line in f.readlines():
    coordinate = line.strip()  # 去掉左右的空格符
    coordinate = eval(coordinate)  # 将字符串格式的坐标转换为元组格式
    database.append(coordinate)
# print(database)

world_coordinate_list = []
for item in database:
    world_coordinate_part = (item[0], item[1], item[2], 1)
    world_coordinate_list.append(world_coordinate_part)
# print(world_coordinate_list)


pixel_coordinate_list = []

for item in world_coordinate_list:
    world_coordinate = np.mat([
        [item[0]],
        [item[1]],
        [item[2]],
        [item[3]]
    ])
    print(f'世界坐标是:{world_coordinate},请您检验')
    # print(type(world_coordinate))

    # 世界坐标系转换为相加坐标系 (Xw,Yw,Zw)--> (Xc,Yc,Zc)
    camera_coordinate = Out * world_coordinate
    print(f'相机坐标为:{camera_coordinate}')
    Zc = float(camera_coordinate[2])
    print(f'Zc={Zc}')

    # 相机坐标系转图像坐标系 (Xc,Yc,Zc) --> (x, y)  下边的f改为焦距
    focal_length = np.mat([
        [f, 0, 0, 0],
        [0, f, 0, 0],
        [0, 0, 1, 0]
    ])
    image_coordinate = (focal_length * camera_coordinate) / Zc
    print(f'图像坐标为:{image_coordinate}')

    # 图像坐标系转换为像素坐标系
    pixel_coordinate = K * image_coordinate
    print(f'像素坐标为:{pixel_coordinate}')
    pixel_coordinate_list.append(pixel_coordinate)
    print('---------------------分割线--------------------------------')

print(pixel_coordinate_list)
f = open("result.txt", "w", encoding="utf-8")
for item in pixel_coordinate_list:
    f.write(str(item)+'\n')
    f.write('------------分割线-----------------'+'\n')
f.close()


