一、知识介绍
1.1 为什么要抓取hprof
hprof文件中记录了当前进程内存的使用情况,对于一些难以解决的OOM问题,提取出对应进程的hprof文件可以很好的分析这种问题。
分析hprof的工具
- Java Heap Analyzes Tool
- Eclipse Memory Analyzer
1.2 生成hprof指令
adb shell am dumpheap pid/pkgName file
进入adb 之后,可以不用前面的adb shell,直接使用am dumpheap pkgName file,这个file是文件存储的完整路径加上文件名.
1.3 得到pid
adb shell ps -e | grep pkgName
加入pkgName是 com.android.systemui,生成结果如下:
这些item分别代表什么意思了?

USER:进程当前的用户
PID:当前进程ID
PPID:当前进程父进程ID
VSZ:进程的虚拟内存大小,单位KB
RSS:进程实际占用内存大小,单位KB
WCHAN:进程正在sleep的内核函数名,根据/root/sysytem.map
ADDR:进程地址空间
S:进程状态
NAME:当前进程的名称
我们这里关注的是PID,根据这个描述,那么《pid过滤指令》图中的PID是 1918,这个PID是生成hprof的重要参数。
1.4 生成指定pid的hprof
am dumpheap pid /data/local/tmp/fileName.hprof
上面的pid就是进程id,其实在O版本上也可以直接用processName代替的,例如要获取com.android.systemui的hprof信息,可以写成如下:
am dump com.android.systemui /data/local/tmp/fileName.hprof
二、抓取hprof文件的方法
2.1 在当前进程中抓取当前进程的hprof信息
这个正常的app就可以做这样的工作,因为在当前进程dump当前进程的信息,这是没有什么权限问题的,关键的接口就是 android.os.Debug.java
Debug.java
public final class Debug
{
   public static void dumpHprofData(String fileName) throws IOException {
        VMDebug.dumpHprofData(fileName);
    }

  public static void dumpHprofData(String fileName, FileDescriptor fd)
            throws IOException {
        VMDebug.dumpHprofData(fileName, fd);
    }

  public static void dumpHprofDataDdms() {
        VMDebug.dumpHprofDataDdms();
    }

  public static native void dumpNativeHeap(FileDescriptor fd);

  public static native void dumpNativeMallocInfo(FileDescriptor fd);
}
上面列出Debug.java中主要的dump方法,我们通常使用方法是
public static void dumpHprofData(String fileName, FileDescriptor fd)
当前dump的文件名和存储的位置。
2.2 在某一进程中抓取任意进程的hprof信息
这里的意思是指我在其中一个进程中封装了dumpHeap数据的接口,只要调用这个接口,可以dump任意一个进程的hprof信息,这个对dump进程的要求比较高,必须是root权限,我们首先看看手机上系统的权限分组。
1|sakura:/ # ps -e | grep com.android.camera
u0_a39       19205   852 4453068 103556 SyS_epoll_wait 78a3efd460 S com.android.camera
com.android.camera是用户权限的进程。
sakura:/ # ps -e |grep com.android.systemui
system        1934   852 4720188 160372 SyS_epoll_wait 78a3efd460 S com.android.systemui
com.android.systemui是系统权限的进程
sakura:/ # ps -e |grep mqsasd
root           457     1   18368    844 binder_thread_read 7c36582550 S mqsasd
mqsasd是root权限的进程,具有最高的权限,而抓取任意进程的hprof信息,比较具有root权限的进程才能完成这样的操作。
普通手机没有root的情况下是不可能做到这一点的。root的手机如果想实现在某一进程中抓取任意进程的hprof信息,必须要配置SELinux权限,这是一种基于 域-类型 模型的强制访问控制安全系统,Linux内核大多使用这套安全子系统,Android底层kernel是基于Linux的,所以也就采用了这套安全子系统。这套子系统如何应用,请看《3.1 SELinux权限》。
2.3 执行shell命令的封装
这个是自己封装的一个执行Android中普通shell命令的类,大家可以参考一下。
下面贴上了这个核心类的代码,如下所示。
import java.io.BufferedReader;
import java.io.DataOutputStream;
import java.io.IOException;
import java.io.InputStreamReader;
import java.util.List;

public class CommandShellUtils {

    public static final String COMMAND_SU = "su";
    public static final String COMMAND_SH = "sh";
    public static final String COMMAND_LINE_END = "\n";
    public static final String COMMAND_EXIT = "exit\n";

    public static boolean checkRootPermission() {
        Process process = null;
        DataOutputStream os = null;

        try {
            process = Runtime.getRuntime().exec("su");
            os = new DataOutputStream((process.getOutputStream()));
            os.writeBytes(COMMAND_EXIT);
            os.flush();
            int result = process.waitFor();
            if (result == 0) {
                return true;
            } else {
                return false;
            }

        } catch (Exception e) {
            return false;
        }
        finally {
            try {
                if (os != null) {
                    os.close();
                }
            } catch (IOException e) {

            }

            if (process != null) {
                process.destroy();
            }
        }
    }


    public static CommandResult execCommand(String command, boolean isRoot) {
        return execCommand(new String[] {command}, isRoot, true);
    }

    public static CommandResult execCommand(List commands, boolean isRoot) {
        return execCommand(commands == null ? null : commands.toArray(new String[]{}), isRoot, true);
    }

    public static CommandResult execCommand(String[] commands, boolean isRoot) {
        return execCommand(commands, isRoot, true);
    }

    public static CommandResult execCommand(String command, boolean isRoot, boolean isNeedResultMsg) {
        return execCommand(new String[]{command}, isRoot, isNeedResultMsg);
    }

    public static CommandResult execCommand(String[] commands, boolean isRoot, boolean isNeedResultMsg) {
        int result = -1;
        if (commands == null || commands.length == 0) {
            return new CommandResult(result, null, null);
        }

        Process process = null;
        BufferedReader successResult = null;
        BufferedReader errorResult = null;
        StringBuilder successMsg = null;
        StringBuilder errorMsg = null;

        DataOutputStream os = null;

        try {
            process = Runtime.getRuntime().exec(isRoot ? COMMAND_SU : COMMAND_SH);
            os = new DataOutputStream(process.getOutputStream());
            for(String command : commands) {
                if (command == null){
                    continue;
                }

                os.write(command.getBytes());
                os.writeBytes(COMMAND_LINE_END);
                os.flush();
            }
            os.writeBytes(COMMAND_EXIT);
            os.flush();

            result = process.waitFor();
            if (isNeedResultMsg) {
                successMsg = new StringBuilder();
                errorMsg = new StringBuilder();
                successResult = new BufferedReader(new InputStreamReader(process.getInputStream()));
                errorResult = new BufferedReader(new InputStreamReader(process.getErrorStream()));
                String line;
                while((line = successResult.readLine()) != null) {
                    successMsg.append(line);
                }

                while((line = errorResult.readLine()) != null) {
                    errorMsg.append(line);
                }
            }
        } catch (IOException e) {

        } catch (InterruptedException e) {

        } finally {
            try {
                if (os != null) {
                    os.close();
                }
                if (successResult != null) {
                    successResult.close();
                }
                if (errorResult != null) {
                    errorResult.close();
                }
            } catch (IOException e) {

            }

            if (process != null) {
                process.destroy();
            }
        }

        return new CommandResult(result, successMsg == null ? null : successMsg.toString(), errorMsg == null ? null : errorMsg.toString());

    }

    public static class CommandResult {
        public int result;
        public String successMsg;
        public String errorMsg;

        public CommandResult(int result) {
            this.result = result;
        }

        public CommandResult(int result, String successMsg, String errorMsg) {
            this.result = result;
            this.successMsg = successMsg;
            this.errorMsg = errorMsg;
        }
    }
}
可以发现,最终调用的是Runtime.getRuntime().exec(...),下面的时序图表示当前执行的路径。
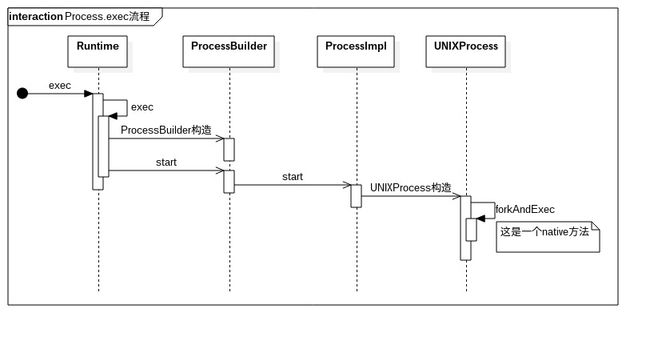
深入到native层查看,发现是调用Unix底层的shell命令,这是上层封装好了接口方便开发者调用,但是这个接口执行shell命令有一些限制,权限限制,需要充分搞清楚需要的权限,对于一些system权限的应用是不能执行root权限的shell指令的。
从当前的进程触发,如果是dump当前进程的hprof文件,那么不需要root权限,如果是dump其他进程的hprof文件,还是需要root权限的,至于怎么配置相应的权限,下面会详细讲解。
三、关键点释疑
3.1 SELinux权限
执行dumpheap指令的时候,会出现如下的log提示:
08-06 16:44:36.417 E/SELinux ( 453): avc: denied { find } for service=activity pid=6615 uid=0 scontext=u:r:mqsasd:s0 tcontext=u:object_r:activity_service:s0 tclass=service_manager
遇到这些SELinux问题,我们一个一个解决就可以的,首先分解一下上面的log,没有{ find }权限,关注一下Android的sepolicy规则。
allow sourcecontext targetcontext:tclass {}
sourcecontext就是mqsasd
targetcontext就是activity_service
class就是service_manager
{}中包括的是权限,就是{ find }
至于在什么地方修改,一般对于private的都在 /system/sepolicy/private/XXXXXX.te文件中,至于哪一个te文件,直接找到对应的tclass,本提示中的tclass是mqsasd,说明要找到/system/seplocy/private/mqsasd.te文件。少哪一个权限就加上哪一个权限。
如果不想一个一个权限解决,那么刚刚开始也可以采用一种方法暴露所有的缺失权限:
首先在adb shell中输入 setenforce 0,表明当前放开所有的权限,这时候会输出下面的logcat
08-09 13:47:34.966 I/cmd     ( 5986): type=1400 audit(0.0:310): avc: denied { read } for name="enforce" dev="selinuxfs" ino=4 scontext=u:r:mqsasd:s0 tcontext=u:object_r:selinuxfs:s0 tclass=file permissive=1
08-09 13:47:34.966 I/cmd     ( 5986): type=1400 audit(0.0:311): avc: denied { open } for path="/sys/fs/selinux/enforce" dev="selinuxfs" ino=4 scontext=u:r:mqsasd:s0 tcontext=u:object_r:selinuxfs:s0 tclass=file permissive=1
08-09 13:47:34.966 I/cmd     ( 5986): type=1400 audit(0.0:312): avc: denied { read } for name="perms" dev="selinuxfs" ino=67111945 scontext=u:r:mqsasd:s0 tcontext=u:object_r:selinuxfs:s0 tclass=dir permissive=1
08-09 13:47:34.966 I/cmd     ( 5986): type=1400 audit(0.0:313): avc: denied { open } for path="/sys/fs/selinux/class/file/perms" dev="selinuxfs" ino=67111945 scontext=u:r:mqsasd:s0 tcontext=u:object_r:selinuxfs:s0 tclass=dir permissive=1
08-09 13:47:34.966 I/cmd     ( 5986): type=1400 audit(0.0:314): avc: denied { write } for name="access" dev="selinuxfs" ino=6 scontext=u:r:mqsasd:s0 tcontext=u:object_r:selinuxfs:s0 tclass=file permissive=1
08-09 13:47:34.966 I/cmd     ( 5986): type=1400 audit(0.0:315): avc: denied { compute_av } for scontext=u:r:mqsasd:s0 tcontext=u:object_r:kernel:s0 tclass=security permissive=1
这时候已经有权限了,但是会给你警告,我们抽取其中的一行log分析:
08-09 13:47:34.966 I/cmd ( 5986): type=1400 audit(0.0:310): avc: denied { read } for name="enforce" dev="selinuxfs" ino=4 scontext=u:r:mqsasd:s0 tcontext=u:object_r:selinuxfs:s0 tclass=file permissive=1
重要的关键是 permissive=1 表明当前是有这个权限的。
最后在mqsasd.te中添加如下:
/system/sepolicy/private/mqsasd.te

# For dumpheap info
allow mqsasd activity_service:service_manager { find };
allow mqsasd selinuxfs:file { read open write };
allow mqsasd mqsasd:netlink_selinux_socket { create bind };
allow mqsasd selinuxfs:dir { read open };
allow mqsasd kernel:security { compute_av };
添加完成之后,直接编译make bootimage
编译完成之后会生成 boot.img,使用下面的指令讲boot.img刷入手机中:
# 擦除手机中的boot
fastboot erase boot
# 刷入本地编译好的boot.img
fastboot flash boot boot.img
fastboot reboot重启之后,发现没有这些的SELinux权限提示,手机已经可以正常抓取dump heap信息了.