学号:20021210668
姓名:梅诗国
原文链接:https://samuel92.blog.csdn.net/article/details/85089453
【嵌牛导读】Tensorflow③ Keras的LSTM和TF的LSTM实现的源码剖析
【嵌牛鼻子】LSTM源码剖析
【嵌牛正文】
0. 常见的LSTM层选择
经过初步调查,常用的LSTM层有Keras.layers.LSTM 和 Tensorflow.contrib.nn.LSTMCell 及 Tensorflow.nn.rnn_cell.LSTMCell ,其中后面两个的实现逻辑是一样的。这里,Keras.layers.LSTM的计算源码文件为keras/layers/recurrent.py中的LSTMCell类。Tensorflow.contrib.nn.LSTMCell和Tensorflow.nn.rnn_cell.LSTMCell的计算源码文件为tensorflow/python/ops/rnn_cell_impl.py中的LSTMCell类。
1. Keras的LSTM计算逻辑梳理
从代码的清晰程度和模型实现的方便情况来说,Keras确实很方便,为了搞清楚实现逻辑,我搭了一个根据ABC—>D, BCD—>E, …, WXY—>Z的根据前三个字母预测下一个字母的模型。我将每个字母用一个数字表示,A = 0, B = 1,…,Z = 25,时间步为3,每个时间步对应的输入维度为1(因为将每个字母都编成长度为1的数字/数组):
# coding: UTF-8
"""
@author: samuel ko
@date: 2018/12/12
@link: https://blog.csdn.net/zwqjoy/article/details/80493341
"""
import numpy
from keras.models import Sequential
from keras.utils import np_utils
numpy.random.seed(5)
# 定义数据集
alphabet = "ABCDEFGHIJKLMNOPQRSTUVWXYZ"
print(len(alphabet))
# create mapping of characters to integers (0-25) and the reverse
char_to_int = dict((c, i) for i, c in enumerate(alphabet))
int_to_char = dict((i, c) for i, c in enumerate(alphabet))
# 预备数据集
seq_length = 3
dataX = []
dataY = []
for i in range(0, len(alphabet) - seq_length, 1):
seq_in = alphabet[i:i + seq_length]
seq_out = alphabet[i + seq_length]
dataX.append([char_to_int[char] for char in seq_in])
dataY.append(char_to_int[seq_out])
print(seq_in, '->', seq_out)
# 喂入网络的特征为 [batch_size, time_step, input_dim] 3D的Tensor
# 用易懂的语言就是: time_step为时间步的个数, input_dim为每个时间步喂入的数据
X = numpy.reshape(dataX, (len(dataX), seq_length, 1))
X = X / float(len(alphabet))
# 对标签进行one-hot处理
y = np_utils.to_categorical(dataY)
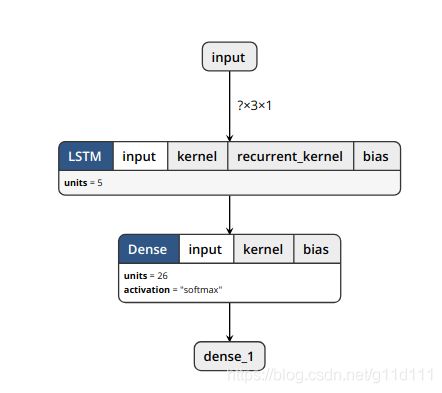
由上面代码可以看出,X是输入数据,y是标签,那么搭建模型进行训练(简单起见,一层LSTM加一个全连接层,Tensorflow里面也是采用这样的结构):
model = Sequential()
# input_shape = (time_step, 每个时间步的input_dim)
# LSTM的第一个参数5表示LSTM的单元数为5,我们可以把LSTM理解为一个特殊的且带有时序信息的全连接层。
# Dense的第一个参数为y.shape[1] = 26,也就是label个数,显而易见,有26个字母可能被预测出来,即26分类任务。
model.add(LSTM(5, input_shape=(X.shape[1], X.shape[2])))
model.add(Dense(y.shape[1], activation='softmax'))
model.compile(loss='categorical_crossentropy', optimizer='adam', metrics=['accuracy'])
model.fit(X, y, nb_epoch=100, batch_size=1, verbose=2)
model.save("simplelstm.h5")
整体代码为:
# coding: UTF-8
"""
@author: samuel ko
@date: 2018/12/12
@link: https://blog.csdn.net/zwqjoy/article/details/80493341
"""
import numpy
from keras.models import Sequential
from keras.layers import Dense
from keras.layers import LSTM, SimpleRNN
from keras.utils import np_utils
# fix random seed for reproducibility
numpy.random.seed(5)
# define the raw dataset
alphabet = "ABCDEFGHIJKLMNOPQRSTUVWXYZ"
print(len(alphabet))
# create mapping of characters to integers (0-25) and the reverse
char_to_int = dict((c, i) for i, c in enumerate(alphabet))
int_to_char = dict((i, c) for i, c in enumerate(alphabet))
# prepare the dataset of input to output pairs encoded as integers
seq_length = 3
dataX = []
dataY = []
for i in range(0, len(alphabet) - seq_length, 1):
seq_in = alphabet[i:i + seq_length]
seq_out = alphabet[i + seq_length]
dataX.append([char_to_int[char] for char in seq_in])
dataY.append(char_to_int[seq_out])
print(seq_in, '->', seq_out)
# 我们运行上面的代码,来观察现在我们的input和output数据集是这样一种情况
# A -> B
# B -> C
# ...
# Y -> Z
# 喂入网络的特征为 [batch_size, time_step, input_dim] 3D的Tensor
# 用易懂的语言就是: time_step为时间步的个数, input_dim为每个时间步喂入的数据
X = numpy.reshape(dataX, (len(dataX), seq_length, 1))
# print(X)
# [[[ 0]]
# [[ 1]]
# [[ 2]]
# [[ 3]]
# ...
# [[24]]]
# normalize 最后接一个分类的任务
X = X / float(len(alphabet))
print(X.shape)
# (25, 3, 1)
# one hot编码输出label
y = np_utils.to_categorical(dataY)
print(y.shape)
# 创建&训练&保存模型
model = Sequential()
# input_shape = (time_step, 每个时间步的input_dim)
model.add(LSTM(5, input_shape=(X.shape[1], X.shape[2])))
model.add(Dense(y.shape[1], activation='softmax'))
model.compile(loss='categorical_crossentropy', optimizer='adam', metrics=['accuracy'])
model.fit(X, y, nb_epoch=100, batch_size=1, verbose=2)
model.save("simplelstm.h5")
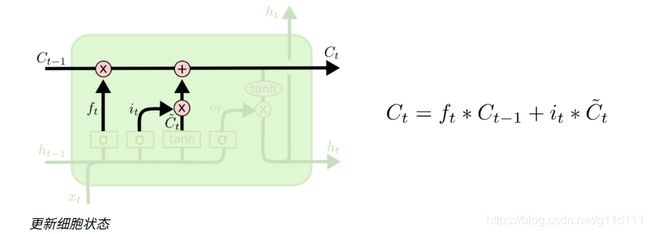
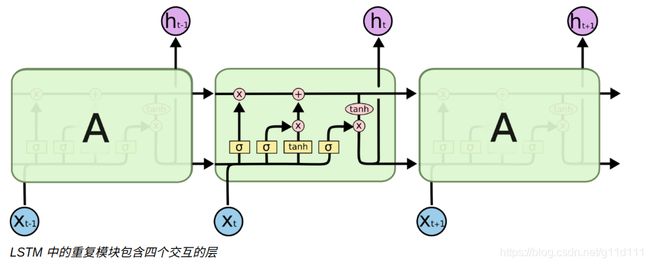
代码跑完之后,得到simplelstm.h5模型,下面我从Netron[1]里面,可以拆分得到权重。这里面涉及到LSTM的一点知识,我们知道,LSTM有4个branch,对应有4个权重,按Keras的说法,分别为i: input输入门, c: new_input: 新输出,f: forget遗忘门,o: output输出门,具体情况请参考[2]:
① forget门对应位置
② new_input门(C ~ t \tilde{C}_tC~t)和input输入门
③ 更新cell状态得到下一时间步的输出C t C_tCt
④ 计算输出门output, 根据o t o_tot和c t c_tct得到这一时间步的输出h t h_tht
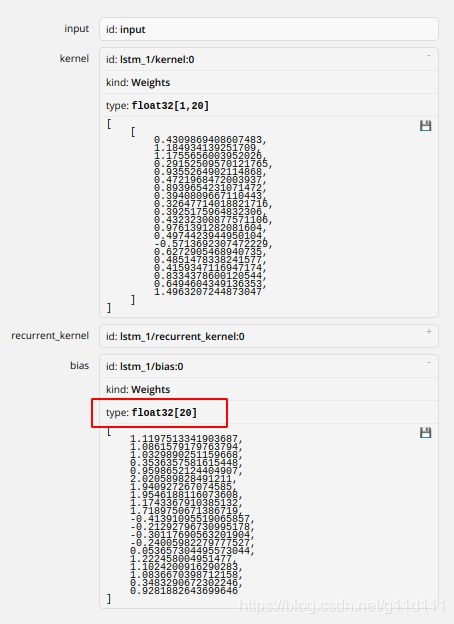
可能大家会问了,4个权重比较容易理解,但是为什么看simplelstm.h5的可视化结构时候,会有kernel和recurrent_kernel两个东西呢?
以我们的3个时间步的结构为例,如下,每个时间步的输入都有两个,一个是x t x_txt对应数据X每个时间步输入的维度,对我们的例子是1x1的数据;而h t h_tht则对应了同层间不同时间步传递的memory state/hidden state。
这个跟我们之前设置的LSTM(5, input_shape=(X.shape[1], X.shape[2]))的5直接相关。对于4个不同的权重,它的维度都是5(LSTM层的units设置) x 5(LSTM层的units设置)的。
而对于x t x_txt对应的权重,它们的维度都是1(输入维度) x 5(LSTM层的units设置)
。
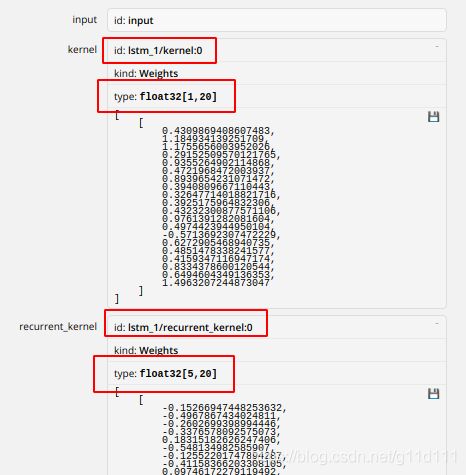
下面继续返回看Netron里面的kernel,recurrent_kernel以及bias的内容,我们发现其形状分别为1 x 20, 5 x 20, 1 x 20:
那么聪明的你应该可以想到,Keras是将i, j, c, o对应的4个1 x 5的kernel和bias以及4个5 x 5的recurrent kernel合在一起了,那么看源码进行对应的拆解就行了。
class LSTMCell(Layer):
...
def build(self, input_shape):
input_dim = input_shape[-1]
# self.kernel处理传入本层的输入
self.kernel = self.add_weight(shape=(input_dim, self.units * 4),
name='kernel',
initializer=self.kernel_initializer,
regularizer=self.kernel_regularizer,
constraint=self.kernel_constraint)
# self.recurrent_kernel处理本层不同时间步的输入
self.recurrent_kernel = self.add_weight(
shape=(self.units, self.units * 4),
name='recurrent_kernel',
initializer=self.recurrent_initializer,
regularizer=self.recurrent_regularizer,
constraint=self.recurrent_constraint)
if self.use_bias:
if self.unit_forget_bias:
def bias_initializer(_, *args, **kwargs):
return K.concatenate([
self.bias_initializer((self.units,), *args, **kwargs),
initializers.Ones()((self.units,), *args, **kwargs),
self.bias_initializer((self.units * 2,), *args, **kwargs),
])
else:
bias_initializer = self.bias_initializer
self.bias = self.add_weight(shape=(self.units * 4,),
name='bias',
initializer=bias_initializer,
regularizer=self.bias_regularizer,
constraint=self.bias_constraint)
else:
self.bias = None
# 解析顺序
self.kernel_i = self.kernel[:, :self.units]
self.kernel_f = self.kernel[:, self.units: self.units * 2]
self.kernel_c = self.kernel[:, self.units * 2: self.units * 3]
self.kernel_o = self.kernel[:, self.units * 3:]
self.recurrent_kernel_i = self.recurrent_kernel[:, :self.units]
self.recurrent_kernel_f = (
self.recurrent_kernel[:, self.units: self.units * 2])
self.recurrent_kernel_c = (
self.recurrent_kernel[:, self.units * 2: self.units * 3])
self.recurrent_kernel_o = self.recurrent_kernel[:, self.units * 3:]
if self.use_bias:
self.bias_i = self.bias[:self.units]
self.bias_f = self.bias[self.units: self.units * 2]
self.bias_c = self.bias[self.units * 2: self.units * 3]
self.bias_o = self.bias[self.units * 3:]
...
可以看出,1 x 20 的kernel和bias以及 5 x 20 的recurrent kernel对应的解析顺序为i, f, c, o,以kernel为例,我们对kernel的权重解析顺序如下:
下面,我将把权重和bias都解析出来,并按照源码中定好的计算逻辑,基于numpy科学计算库,实现一版。并验证其结果和Keras原生的效果:
① 首先,我们先做一个shape为(1, 3, 1)的输入,输入网络,将LSTM层的输出打印出来:
"""
@author: samuel ko
@date: 2018/12/17
@target: 研究模型的中间输出结果
@ref: 作者:挥挥洒洒
来源:CSDN
原文:https://blog.csdn.net/u010420283/article/details/80303231
"""
from keras.models import load_model
from keras import backend as K
import numpy as np
model = load_model("simplelstm.h5")
layer_1 = K.function([model.layers[0].input], [model.layers[0].output])#第一个 model.layers[0],不修改,表示输入数据;第二个model.layers[you wanted],修改为你需要输出的层数的编号
layer_11 = K.function([model.layers[0].input], [model.layers[1].input])#第一个 model.layers[0],不修改,表示输入数据;第二个model.layers[you wanted],修改为你需要输出的层数的编号
# 定义shape为(1, 3, 1)的输入,输入网络
inputs = np.array([[0], [0.03846154], [0.07692308]])
inputs = np.expand_dims(inputs, 0)
print(layer_1([inputs])[0]); print(layer_1([inputs])[0].shape)
print(layer_11([inputs])[0]); print(layer_11([inputs])[0].shape)
输出为(可以看到,LSTM层输出的结果跟Dense层的输入是一样的~):
[[-0.6918077-0.5736012-0.6106971-0.23724467-0.28232932]](1,5)[[-0.6918077-0.5736012-0.6106971-0.23724467-0.28232932]](1,5)
② 接着,我们根据Netron的网络图结果,拆解权重,并把Keras.layers.LSTM的计算逻辑用numpy重新实现:
"""
@author: samuel ko
@date: 2018/12/17
@target: 研究模型的中间输出结果
@ref: 作者:挥挥洒洒
来源:CSDN
原文:https://blog.csdn.net/u010420283/article/details/80303231
"""
from keras.models import load_model
from keras import backend as K
import numpy as np
h_tm_i, h_tm_o, h_tm_c, h_tm_f, c_tm = None, None, None, None, None
def hard_sigmoid(x):
x = 0.2 * x + 0.5
x[x < -2.5] = 0
x[x > 2.5] = 1
return x
def lstm_keras_verify(inputs):
global h_tm_c, h_tm_f, h_tm_i, h_tm_o, c_tm
# kernel初始化
kernel_i = np.array([0.4309869408607483, 1.184934139251709, 1.1755656003952026, 0.29152509570121765, 0.9355264902114868])
kernel_f = np.array([0.4721968472003937, 0.8939654231071472, 0.3940809667110443, 0.32647714018821716, 0.3925175964832306])
kernel_c = np.array([0.43232300877571106, 0.9761391282081604, 0.4974423944950104, -0.5713692307472229, 0.6272905468940735])
kernel_o = np.array([0.4851478338241577, 0.4159347116947174, 0.8334378600120544, 0.6494604349136353, 1.4963207244873047])
recurrent_kernel_i = np.array([[-0.15266947448253632, -0.4967867434024811, -0.2602699398994446, -0.3376578092575073, 0.18315182626247406],
[0.40668627619743347, 0.11702277511358261, 0.2870166599750519, -0.09417486935853958, 1.2248116731643677],
[0.13948452472686768, -0.2935984432697296, -0.18430666625499725, 0.04545489326119423, 0.8304147720336914],
[-0.9957871437072754, -1.2020113468170166, -1.1591960191726685, -0.2052622139453888, -1.3381662368774414],
[1.1894947290420532, 0.675262451171875, 0.6069576144218445, 0.5705539584159851, 0.9218697547912598]])
recurrent_kernel_f = np.array([[-0.548134982585907, -0.12552201747894287, -0.41158366203308105, 0.09746172279119492, 0.19226618111133575],
[0.10524879395961761, 0.032132066786289215, 0.0605274997651577, 0.07235733419656754, 0.7413577437400818],
[-0.17540045082569122, -0.40539026260375977, -0.18782351911067963, 0.20610281825065613, 0.8710744380950928],
[-0.7760279178619385, -0.9006417393684387, -0.7003670334815979, -0.22393617033958435, -0.5202550888061523],
[0.7772086262702942, 0.7663999199867249, 0.5117960572242737, 0.13461880385875702, 0.7836397290229797]])
recurrent_kernel_c = np.array([[1.580788493156433, 1.0911318063735962, 0.6749269366264343, 0.30827417969703674, 0.7559695839881897],
[0.7300652265548706, 0.9139286875724792, 1.1172183752059937, 0.043491244316101074, 0.8009109497070312],
[1.49398934841156, 0.5944592356681824, 0.8874677419662476, -0.1583320051431656, 1.3592860698699951],
[0.032015360891819, -0.5035645365715027, -0.3792402148246765, 0.42566269636154175, -0.6349631547927856],
[0.12018230557441711, 0.33967509865760803, 0.5114297270774841, -0.062018051743507385, 0.5401539206504822]])
recurrent_kernel_o = np.array([[-0.41055813431739807, -0.017661772668361664, 0.06882145255804062, 0.09856614470481873, 0.44098445773124695],
[0.5692929625511169, 0.5409368872642517, 0.3319447338581085, 0.4997922480106354, 0.9462743401527405],
[0.1794481724500656, 0.10621143877506256, -0.0016202644910663366, -0.010369917377829552, 0.4268817901611328],
[-1.026210904121399, -0.6898611783981323, -0.9652346968650818, -0.07141508907079697, -0.6710768938064575],
[0.5829002261161804, 0.6890853047370911, 0.5738061666488647, -0.16630153357982635, 1.2376824617385864]])
bias_i = np.array([1.1197513341903687, 1.0861579179763794, 1.0329890251159668, 0.3536357581615448, 0.9598652124404907])
bias_f = np.array([2.020589828491211, 1.940927267074585, 1.9546188116073608, 1.1743367910385132, 1.7189750671386719])
bias_c = np.array([-0.41391095519065857, -0.21292796730995178, -0.30117690563201904, -0.24005982279777527, 0.053657304495573044])
bias_o = np.array([1.222458004951477, 1.1024200916290283, 1.0836670398712158, 0.3483290672302246, 0.9281882643699646])
# step 1 计算W * x
x_i = inputs * kernel_i
x_f = inputs * kernel_f
x_c = inputs * kernel_c
x_o = inputs * kernel_o
# step 2 加上bias
x_i += bias_i
x_f += bias_f
x_c += bias_c
x_o += bias_o
# step 3 计算
if not isinstance(h_tm_i, np.ndarray):
h_tm_i = np.zeros((1, 5))
h_tm_o = np.zeros((1, 5))
h_tm_f = np.zeros((1, 5))
h_tm_c = np.zeros((1, 5))
c_tm = np.zeros((1, 5))
i = hard_sigmoid(x_i + np.dot(h_tm_i, recurrent_kernel_i))
f = hard_sigmoid(x_f + np.dot(h_tm_f, recurrent_kernel_f))
c = f * c_tm + i * np.tanh(x_c + np.dot(h_tm_c, recurrent_kernel_c))
o = hard_sigmoid(x_o + np.dot(h_tm_o, recurrent_kernel_o))
h = o * np.tanh(c)
h_tm_c = h_tm_f = h_tm_o = h_tm_i = h
c_tm = c
print("当前的hidden state", h)
print("当前的cell state", c)
return h, c
得到结果:
[[-0.6918077 -0.5736012 -0.6106971 -0.23724467 -0.28232932]]
(1, 5)
[[-0.6918077 -0.5736012 -0.6106971 -0.23724467 -0.28232932]]
(1, 5)
输入内容: [[0.]]
当前的hidden state [[-0.20567793 -0.10758754 -0.14600677 -0.07612558 0.02542126]]
当前的cell state [[-0.2836353 -0.15045176 -0.20660162 -0.13443607 0.03709382]]
输入内容: [[0.03846154]]
当前的hidden state [[-0.52542272 -0.34593632 -0.39644344 -0.1596688 -0.1078329 ]]
当前的cell state [[-0.83987432 -0.52042347 -0.6076283 -0.29302937 -0.16417923]]
输入内容: [[0.07692308]]
当前的hidden state [[-0.69180776 -0.57360109 -0.61069705 -0.23724468 -0.28232936]]
当前的cell state [[-1.51751077 -1.19211365 -1.25843129 -0.46999835 -0.55761341]]
可以看到,Keras的LSTM层输出的结果跟LSTM层最后一个时间步输出的memory state/hidden state一致。(有一点精度损失,可能是Cuda导致的…)
# Keras结果[[-0.6918077-0.5736012-0.6106971-0.23724467-0.28232932]]
# Numpy自己实现结果[[-0.69180776-0.57360109-0.61069705-0.23724468-0.28232936]]
2. Tensorflow的LSTM计算逻辑梳理
正如在文章开头提到的,Tensorflow.contrib.nn.LSTMCell和Tensorflow.nn.rnn_cell.LSTMCell的计算源码文件为tensorflow/python/ops/rnn_cell_impl.py中的LSTMCell类,是一样的。所以我这里使用的是tf.contrib.rnn.LSTMCell,输入数据X和标签y跟Keras采用的一样(直接拿过来用就行,这里就不贴了),模型定义也很相似,遵循TF的特定范式:
"""
@author: samuel ko
@date: 2018/12/18
@target: 训练一个只带一层LSTM的TF模型
@ref: 作者:谢小小XH
来源:CSDN
原文:https://blog.csdn.net/xierhacker/article/details/78772560
"""
inputs = tf.placeholder(shape=(None, 3, 1), dtype=tf.float32, name='Inputs')
labels = tf.placeholder(shape=(None, 26), dtype=tf.float32, name="Labels")
lstm_cell = tf.contrib.rnn.LSTMCell(num_units=5)
# initialize to zero
init_state = lstm_cell.zero_state(batch_size=1, dtype=tf.float32)
output, state = tf.nn.dynamic_rnn(
cell=lstm_cell,
inputs=inputs,
dtype=tf.float32,
initial_state=init_state,
)
print("output.shape:", output.shape)
print("len of state tuple", len(state))
print("state.h.shape:", state.h.shape)
print("state.c.shape:", state.c.shape)
# output = tf.layers.dense(output, 26)
output = tf.layers.dense(state.h, 26, name="Outputs")
loss = tf.losses.softmax_cross_entropy(onehot_labels=labels, logits=output)
optimizer = tf.train.AdamOptimizer(0.001).minimize(loss=loss)
init = tf.global_variables_initializer()
saver = tf.train.Saver(max_to_keep=5)
#-------------------------------------------Define Session---------------------------------------#
with tf.Session() as sess:
sess.run(init)
for epoch in range(1, 100+1):
train_losses = []
print("epoch:", epoch)
for j in range(23):
_, train_loss = sess.run(
fetches=(optimizer, loss),
feed_dict={
inputs: X[j: j+1],
labels: y[j: j+1]
}
)
train_losses.append(train_loss)
print("average training loss:", sum(train_losses) / len(train_losses))
saver.save(sess, "model/simple_lstm")
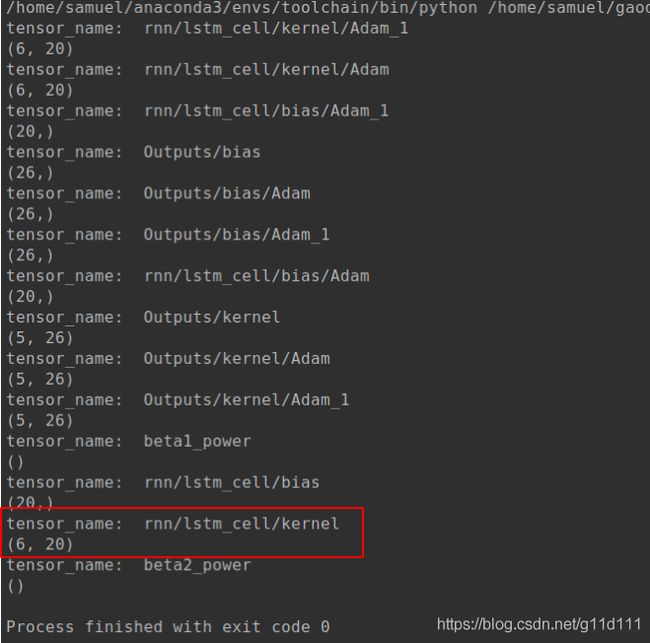
训练完成后,得到
形式。
跟Keras的LSTM拆解类似,我们首先根据源码分析不同的kernel,bias,recurrent_kernel的存放位置,然后再去拆解并用Numpy重新实现计算逻辑,代码如下:
# coding: UTF-8
"""
@author: samuel ko
@date: 2018/12/18
@target: 研究TF模型的中间输出结果
"""
import sys
import os
import numpy as np
import tensorflow as tf
h_tm_i, h_tm_o, h_tm_c, h_tm_f, c_tm = None, None, None, None, None
def sigmoid(x):
return 1.0 / (1.0 + np.exp(-x))
def lstm_tf_verify(inputs):
"""
2018/12/18
TF原生的解析顺序为i, j, f, o (j就是keras中的c)
:param inputs:
:return:
"""
global h_tm_c, h_tm_f, h_tm_i, h_tm_o, c_tm
bias_i = ...
bias_j = ...
bias_f = ...
bias_o = ...
kernel_i = ...
kernel_j = ...
kernel_f = ...
kernel_o = ...
recurrent_i = ...
recurrent_j = ...
recurrent_f = ...
recurrent_o = ...
# step 1 计算W * x
x_i = inputs * kernel_i
x_f = inputs * kernel_f
x_j = inputs * kernel_j
x_o = inputs * kernel_o
# step 2 加上bias
x_i += bias_i
x_f += bias_f
x_j += bias_j
x_o += bias_o
# step 3 计算
if not isinstance(h_tm_i, np.ndarray):
h_tm_i = np.zeros((1, 5))
h_tm_o = np.zeros((1, 5))
h_tm_f = np.zeros((1, 5))
h_tm_c = np.zeros((1, 5))
c_tm = np.zeros((1, 5))
i = sigmoid(x_i + np.dot(h_tm_i, recurrent_i))
# Tensorflow默认有一个forget_bias, 默认设置为1.0
f = sigmoid(x_f + np.dot(h_tm_f, recurrent_f) + 1.0)
c = f * c_tm + i * np.tanh(x_j + np.dot(h_tm_c, recurrent_j))
o = sigmoid(x_o + np.dot(h_tm_o, recurrent_o))
h = o * np.tanh(c)
h_tm_c = h_tm_f = h_tm_o = h_tm_i = h
c_tm = c
print("当前的hidden state", h)
print("当前的cell state", c)
return h, c
跟Tensorflow的模型的LSTM层输出结果进行比较,根据定义
output, state = tf.nn.dynamic_rnn(
cell=lstm_cell,
inputs=inputs,
dtype=tf.float32,
initial_state=init_state,
)
输出有output和state两个,其中output是每个时间步输出的h t h_tht的汇总,state有两个内容:state.h和state.c,前者是本层最后一个时间步输出的hidden state/memory state,后者是本层最后一个时间步输出的cell state(细胞状态)。
整体代码如下:
# coding: UTF-8
"""
@author: samuel ko
@date: 2018/12/18
@target: 研究TF模型的中间输出结果
"""
import sys
import os
import numpy as np
import tensorflow as tf
path_file = __file__
dir_name = os.path.dirname(path_file)
# 1. 准备输入
inputs = np.array([[0], [0.03846154], [0.07692308]])
inputs = np.expand_dims(inputs, 0)
labels = np.array([[0, 1, 0, 0, 0, 0, 0, 0, 0, 0,
0, 0, 0, 0, 0, 0, 0, 0, 0, 0,
0, 0, 0, 0, 0, 0]])
# 2. 加载模型, 输出中间结果和最后结果
with tf.Session() as sess:
graph = tf.get_default_graph()
new_saver = tf.train.import_meta_graph(os.path.join(dir_name, 'model/simple_lstm.meta'))
# 注: tf.train_get_checkpoint_state不允许接收中文, tf.train.latest_checkpoint就没问题...
# new_saver.restore(sess, tf.train.get_checkpoint_state(os.path.join(dir_name, "model/")))
new_saver.restore(sess, tf.train.latest_checkpoint(os.path.join(dir_name, "model/")))
input_x = graph.get_tensor_by_name("Inputs:0")
label_x = graph.get_tensor_by_name("Labels:0")
# out 是输入到下一层的汇总 3 x 1 x 5
out = graph.get_tensor_by_name('rnn/TensorArrayStack/TensorArrayGatherV3:0')
# state_h 是LSTM层最后一个时间步的结果 1 x 5
state_h = graph.get_tensor_by_name('rnn/while/Exit_4:0') # 最后一个时间步的memory state 和state_h = graph.get_tensor_by_name('rnn/while/Switch_4:0') 一样!
# state_h = graph.get_tensor_by_name('rnn/while/Exit_3:0') # 最后一个时间步的cell state
print(sess.run(out, feed_dict={input_x: inputs,
label_x: labels,
}))
print(sess.run(state_h, feed_dict={input_x: inputs,
label_x: labels,
}))
h_tm_i, h_tm_o, h_tm_c, h_tm_f, c_tm = None, None, None, None, None
def sigmoid(x):
return 1.0 / (1.0 + np.exp(-x))
def lstm_tf_verify(inputs):
"""
2018/12/18
TF原生的解析顺序为i, j, f, o (j就是keras中的c)
:param inputs:
:return:
"""
global h_tm_c, h_tm_f, h_tm_i, h_tm_o, c_tm
bias_i = np.array([0.9502341, 1.1212865, 0.5962041, 0.56686985, 0.65736747])
bias_j = np.array([-0.28798968, 0.31724977, -0.08590735, -0.13165179, -0.05694159])
bias_f = np.array([0.89209175, 1.0639387, 0.3089665, 0.42762548, 0.4232108])
bias_o = np.array([1.0723785, 1.2605966, 0.5964751, 0.6030057, 0.6930808])
kernel_i = np.array([0.96915483, 0.5620192, 0.5136176, 0.1521692, 0.96555483])
kernel_j = np.array([0.6295774, -0.72134864, 0.64238673, 0.48595947, 0.570404])
kernel_f = np.array([0.7884312, 0.56634164, 0.14510694, 0.19882877, 0.6444183])
kernel_o = np.array([0.55998164, 0.5682311, 0.9390488, 0.8536483, 0.9704966])
recurrent_i = np.array([[-0.30848396, -0.13132317, 0.6034289, 0.59028447, 0.09684605],
[0.28015903, -0.24312414, -0.42499176, -0.3367074, -0.06846467],
[0.7987564, 0.93413734, -0.15053841, 0.66372687, 0.06576955],
[0.24111897, 0.1684269, 0.5229809, 0.09525479, 0.28952646],
[0.70739645, 0.8474347, 0.19091478, 0.02707534, 0.52820826]])
recurrent_j = np.array([[1.272224, -1.475185, 0.38326767, 0.64769256, 0.83099645],
[-0.5344824, 1.2404263, -0.88588023, -0.7727197, -1.167835],
[0.86383224, -0.8951096, 0.08373257, 0.89576524, 0.53091526],
[0.7915831, -0.93986595, -0.02958089, 0.82741463, 0.55338454],
[0.39262557, -0.86354613, 0.62125677, 0.82101977, 0.13056423]])
recurrent_f = np.array([[0.17595771, 0.27790356, 0.6525466, 0.05647744, 0.06983535],
[0.26703873, 0.04883758, 0.0888641, -0.05813761, 0.0277635],
[0.6442748, 0.4176797, 0.5382307, 0.48299634, 0.7003999],
[0.19449034, 0.01752495, 0.13846086, 0.00932326, 0.4014144],
[0.6212245, 0.59203285, 0.05094814, 0.85539377, 0.6473349]])
recurrent_o = np.array([[0.29326066, 0.50268304, 0.544091, 0.76660025, 0.29213676],
[-0.44291726, -0.338039, -0.17275955, -0.7254445, -0.7070001],
[0.13272414, 0.8238844, -0.09202695, 0.9273238, 0.15251717],
[0.06204496, 0.6531808, 0.00607, 0.33238858, 0.04696886],
[0.9217779, 0.6748385, 0.61127436, 0.5573597, 0.21182081]])
# step 1 计算W * x
x_i = inputs * kernel_i
x_f = inputs * kernel_f
x_j = inputs * kernel_j
x_o = inputs * kernel_o
# step 2 加上bias
x_i += bias_i
x_f += bias_f
x_j += bias_j
x_o += bias_o
# step 3 计算
if not isinstance(h_tm_i, np.ndarray):
h_tm_i = np.zeros((1, 5))
h_tm_o = np.zeros((1, 5))
h_tm_f = np.zeros((1, 5))
h_tm_c = np.zeros((1, 5))
c_tm = np.zeros((1, 5))
i = sigmoid(x_i + np.dot(h_tm_i, recurrent_i))
# Tensorflow默认有一个forget_bias, 默认设置为1.0
f = sigmoid(x_f + np.dot(h_tm_f, recurrent_f) + 1.0)
c = f * c_tm + i * np.tanh(x_j + np.dot(h_tm_c, recurrent_j))
o = sigmoid(x_o + np.dot(h_tm_o, recurrent_o))
h = o * np.tanh(c)
h_tm_c = h_tm_f = h_tm_o = h_tm_i = h
c_tm = c
print("当前的hidden state", h)
print("当前的cell state", c)
return h, c
if __name__ == "__main__":
for i in range(3):
print("输入内容:", inputs[:, i])
# lstm_keras_verify(inputs[:, i])
lstm_tf_verify(inputs[:, i])
输出结果为:
# output 3 x 1 x 5 当前层的每个时间步的hidden state汇总
[[[-0.14857864 0.17725913 -0.03559565 -0.05385567 -0.02496454]]
[[-0.3793954 0.45447606 -0.13174371 -0.17756298 -0.17771873]]
[[-0.5253717 0.55423415 -0.25274208 -0.25586015 -0.34587777]]]
# state.h 最后一个时间步的hidden state
[[-0.5253717 0.55423415 -0.25274208 -0.25586015 -0.34587777]]
输入内容: [[0.]]
当前的hidden state [[-0.14857867 0.17725915 -0.03559565 -0.05385567 -0.02496454]]
当前的cell state [[-0.20212986 0.23156138 -0.05525611 -0.08351723 -0.03746516]]
输入内容: [[0.03846154]]
当前的hidden state [[-0.37939543 0.45447602 -0.13174374 -0.17756298 -0.17771877]]
当前的cell state [[-0.58665553 0.71037671 -0.21416421 -0.31547094 -0.28813169]]
输入内容: [[0.07692308]]
当前的hidden state [[-0.5253716 0.55423418 -0.25274209 -0.25586014 -0.34587777]]
当前的cell state [[-1.12897442 1.26972863 -0.47543917 -0.66030582 -0.70899148]]
可以看出,我们的实现跟TF基本一样(跟Keras一样,都有一点点精度损失)。
# TF结果
[[-0.5253717 0.55423415 -0.25274208 -0.25586015 -0.34587777]]
# Numpy自己实现结果
[[-0.5253716 0.55423418 -0.25274209 -0.25586014 -0.34587777]]
3. Keras和TF的LSTM层异同分析
这部分,我们将对Keras和Tensorflow的LSTM层的计算逻辑进行细致的分析,源码位置在文章一开头,建议大家进去看后再来看这部分,会更加明白。
实现的代码主要对比lstm_keras_verify函数和lstm_tf_verify函数:顾名思义,前面是Keras的LSTM实现逻辑,后面的是Tensorflow的LSTM实现逻辑,下面讲到的异同点如果源码里面不好理解,直接看这里的实现区别也行。
① TF的self._kernel包含了input_depth(本例为1)和h_depth(本例为num_units,为5),即把Keras里面的kernel和recurrent_kernel统一放到了self._kernel里面了。
所以,当我打印simple_lstm的Tensorflow模型时发现,rnn/lstm_cell/kernel的size为6 x 20, 6是啥意思呢?6也很简单,其包含了一个1 x 20的(input_w_kernel)和 5 x 20的(recurrent_w_kernel)——解析顺序也是这样的。(即不像Keras分为kernel和recurrent_kernel两个分别保存权重。)
Tensorflow中LSTM用于存储权重的self._kernel代码:
@tf_export("nn.rnn_cell.LSTMCell")
class LSTMCell(LayerRNNCell):
...
@tf_utils.shape_type_conversion
def build(self, inputs_shape):
if inputs_shape[-1] is None:
raise ValueError("Expected inputs.shape[-1] to be known, saw shape: %s"
% str(inputs_shape))
input_depth = inputs_shape[-1]
h_depth = self._num_units if self._num_proj is None else self._num_proj
...
# self._kernel即包含Keras里面的kernel,也包含recurrent_kernel,是对Keras的LSTM层权重的2合1.
self._kernel = self.add_variable(
_WEIGHTS_VARIABLE_NAME,
shape=[input_depth + h_depth, 4 * self._num_units],
initializer=self._initializer,
partitioner=maybe_partitioner)
...
self._bias = self.add_variable(
_BIAS_VARIABLE_NAME,
shape=[4 * self._num_units],
initializer=initializer)
② TF里面的i, j, f, o分别对应Keras的LSTM中的i, c, f, o。也就是说:Keras对应的权重和Tensorflow的权重顺序不一样了!!!
3.2.1 Tensorflow的LSTM权重拆解顺序
@tf_export("nn.rnn_cell.LSTMCell")
class LSTMCell(LayerRNNCell):
...
def call(self, inputs, state):
# i, j, f, o其中,j为下面Keras对应的c
i, j, f, o = array_ops.split(
value=lstm_matrix, num_or_size_splits=4, axis=1)
# Diagonal connections
if self._use_peepholes:
# 我们先不看peephole这个LSTM变种.
...
else:
c = (sigmoid(f + self._forget_bias) * c_prev + sigmoid(i) *
self._activation(j))
...
m = sigmoid(o) * self._activation(c)
3.2.2 Keras的LSTM权重拆解顺序
class LSTMCell(Layer):
def build(self, input_shape):
...
# Keras的4个权重存储顺序i, f, c, o与Tensorflow的权重存储顺序i, j, f, o中间顺序调了一下,
# 也就是Keras的权重顺序是a, b, c, d那么Tensorflow对应的权重存储为a, c, b, d.
self.kernel_i = self.kernel[:, :self.units]
self.kernel_f = self.kernel[:, self.units: self.units * 2]
self.kernel_c = self.kernel[:, self.units * 2: self.units * 3]
self.kernel_o = self.kernel[:, self.units * 3:]
# recurrent_kernel与kernel的顺序是一样的.
self.recurrent_kernel_i = self.recurrent_kernel[:, :self.units]
self.recurrent_kernel_f = (
self.recurrent_kernel[:, self.units: self.units * 2])
self.recurrent_kernel_c = (
self.recurrent_kernel[:, self.units * 2: self.units * 3])
self.recurrent_kernel_o = self.recurrent_kernel[:, self.units * 3:]
if self.use_bias:
self.bias_i = self.bias[:self.units]
self.bias_f = self.bias[self.units: self.units * 2]
self.bias_c = self.bias[self.units * 2: self.units * 3]
self.bias_o = self.bias[self.units * 3:]
...
③ Keras的LSTM中的recurrent_activation: (对应Part1的Keras的LSTM计算逻辑梳理介绍里面的σ σσ)用的是一种叫做hard_sigmoid的实现,TF的两个的实现都是一样的,用的是正常的sigmoid。而无论是Keras还是Tensorflow,它们的activation都是tanh,这个是一样的。
# Tensorflow LSTM用的recurrent_activation.
def sigmoid(x):
return 1.0 / (1.0 + np.exp(-x))
# Keras LSTM用的recurrent_activation.
def hard_sigmoid(x):
x = 0.2 * x + 0.5
x[x < -2.5] = 0
x[x > 2.5] = 1
return x
④ Tensorflow还有一个叫做forget_bias的东西,默认为1.0,关于这个参数的介绍如下:
Biases of the forget gate are initialized by default to 1 in order to reduce the scale of forgetting at the beginning of the training. Must set it manually to 0.0 when restoring from CudnnLSTM trained checkpoints.
它用在遗忘门(forget gate)(上面的lstm_tf_verify函数),如下:
# Tensorflow默认有一个forget_bias, 默认设置为1.0
f = sigmoid(x_f + np.dot(h_tm_f, recurrent_f) + 1.0)
# 而Keras默认不带这个东西:
f = hard_sigmoid(x_f + np.dot(h_tm_f, recurrent_kernel_f))
⑤ Keras的LSTM实现起来很清爽,没有什么乱78糟的参数;而Tensorflow可以直接在LSTM上面做变种——比如peephole connection[3], 就是说,我们让门层也会接受细胞状态(cell state)的输入。
4. 一点思考
还有就是TF和Keras的LSTM实现上有一些不一致的地方,需要大家小心对待,找出异同点,根据自己的情况对层进行拆解,方便的完成解耦工作。
关于Keras和Tensorflow的LSTM层分析基本也就到此结束了,如果想更加深入的理解它们的实现,比如分析这种带时间信息的层的反向传播逻辑,建议深挖源码,这块我也不甚了解。希望能跟大家多多交流,谢谢~
5. 参考资料
[1] Netron: a viewer for neural network, deep learning and machine learning models.
[2] 理解 LSTM(Long Short-Term Memory, LSTM) 网络
[3] Gers & Schmidhuber (2000) : Recurrent Nets that Time and Count


