01 | Appium环境安装
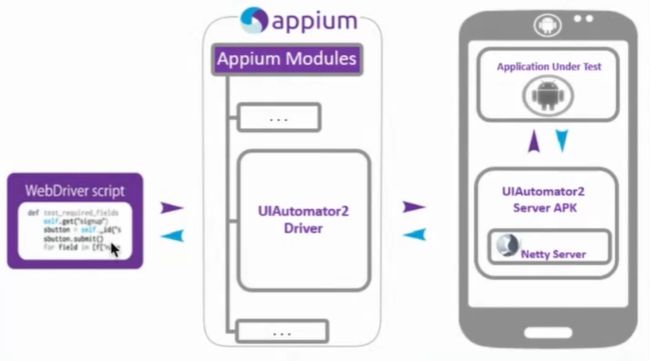
appium生态工具
- adb:android的控制工具,用于获取android的各种数据和控制
- Appium Desktop:内嵌了appium server和inspector的综合工具
- Appium Server:appium的核心工具,命令行工具
- Appium client:各种语言的客户端封装库,用于连接appium server
- AppCrawler自动遍历工具
环境安装
- java1.8
1.下载地址:https://www.oracle.com/cn/java/technologies/javase-jdk8-downloads.html
2.配置环境变量
JAVA_HOME D:\Android\Java\jdk1.8.0_25
classpath .;%JAVA_HOME%\lib\dt.jar;%JAVA_HOME%\lib\tools.jar;
path %JAVA_HOME%\bin;%JAVA_HOME%\jre\bin;
3.验证
java -version
javac -version - android sdk
1.下载:http://tools.android-studio.org/index.php/sdk,下载压缩包即可
2.升级:解压后,在readme里找到升级命令,并执行tools\android.bat update sdk --no-ui
3.配置环境变量:
ANDROID_HOME D:\Programs\android-sdk-windows
PATH %ANDROID_HOME%\tools;%ANDROID_HOME%\platform-tools
4.检查是否安装成功:adb - node js (>=10),npm(>=6)
- python3
- appium-desktop(appium server + appium inspector工具)
1.下载地址:https://github.com/appium/appium-desktop/releases
2.如果不需要安装appium inspector,可通过npm直接安装appium
npm install -g appium官方(不推荐)
npm install -g cnpm --registry=https://registry.npm.taobao.org淘宝镜像(推荐)
cnpm install -g appium
3.验证:appium(不报错说明安装成功) - Appium python client
1.安装:pip install appium-python-client - appium-doctor
1.安装:cnpm install -g appium-doctor
2.使用:appium-doctor
02 | Appium用例录制
android自动化依赖
- adb工具
- 模拟器 or 真机
1.模拟器:网易mumu,genimotion,sdk自带模拟器
2.真机需要root权限 - Appium Desktop:入门学习工具
具体操作
- 连接mumu模拟器:
adb connect 127.0.0.1:7555 - 查看设备名称:
adb devices - 查看appPackage、appActivity:
adb logcat | grep -i displayed -
appium-desktop操作
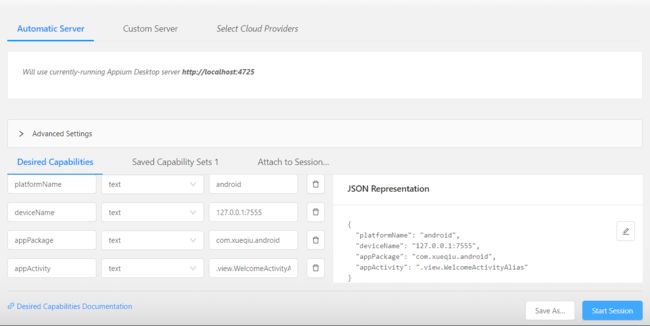 image.png
获取app的信息
- app信息
1.获取当前界面元素:adb shell dumpsys activity top(推荐)(重点)
2.获取任务列表:
adb shell dumpsys activity activities
adb shell dumpsys window | grep mCurrent获取当前页面信息 - app入口
1.adb logcat | grep -i displayed(推荐)(重点)
2.aapt dump badging mobike.apk | grep launchable-activity
3.apkanalyzer 最新版本中的sdk才有 - 启动应用
1.adb shell am start -W -n com.xueqiu.android/.view.WelcomeActivityAlias -S(重点)
03 | 元素定位与隐式等待
Capability设置
- 官方文档:https://github.com/appium/appium/blob/master/docs/en/writing-running-appium/caps.md
- app apk地址
- appPackage 包名
- appActivity Activity名字
- unicodeKeyBoard resetKeyBoard 是否需要输入非英文之外的语言并在测试完成后重置输入法
- dontStopAppOnReset 首次启动后不终止app进程(可在调试或运行时提升运行速度)
- skipDeviceInitialization 跳过安装、权限设置等操作(可在调试或运行时提升运行速度)
-
autoGrantPermissions:True默认选择,如是否获取通讯录等 -
noReset:True不清空应用数据,默认false -
fullReset:True清空应用数据并卸载
by_accessibility_id
driver.find_element_by_accessibility_id("content-desc")
三种经典等待方式
- 强制等待
- 隐式等待
- 显式等待
示例
from time import sleep

from appium import webdriver

desired_caps = {
    "platformName": "Android",
    "deviceName": "127.0.0.1:7555",
    "platformVersion": "6.0",
    "appPackage": "com.xueqiu.android",
    "appActivity": ".view.WelcomeActivityAlias",
    "noReset": "true",
    "dontStopAppOnReset": "true",
    "skipDeviceInitialization": "true"
}

driver = webdriver.Remote('http://127.0.0.1:4723/wd/hub', desired_caps)
driver.implicitly_wait(10)
driver.find_element_by_id("com.xueqiu.android:id/tv_search").click()
driver.find_element_by_id("com.xueqiu.android:id/search_input_text").send_keys("alibaba")
driver.find_element_by_accessibility_id("content-desc")
driver.back()
driver.back()
sleep(3)
driver.quit()
04 | app控件定位
android基础知识
-
布局
1.android 是通过布局来管理控件的位置关系,布局过程是把控件根据间距大小摆放在正确的位置
2.LinearLayout(线性布局)(水平和垂直,用的最多)
3.RelativeLayout(相对布局)(先确定A控件布局的位置,再根据间距确定B控件布局的位置)
4.RrameLayout(帧布局)(最低层的布局,其他布局在此布局基础上再进行布局,用的最多)
5.AbsoluteLayout(绝对布局)(根据绝对坐标布局,很少用,兼容不好)
6.TableLayout(表格布局)(将页面的文字、图片放在表格里布局)
7.GridLayout(网络布局)(与表格布局相似)
8.ConstraintLayout(约束布局)
9.布局里不仅能放置控件还能嵌套布局
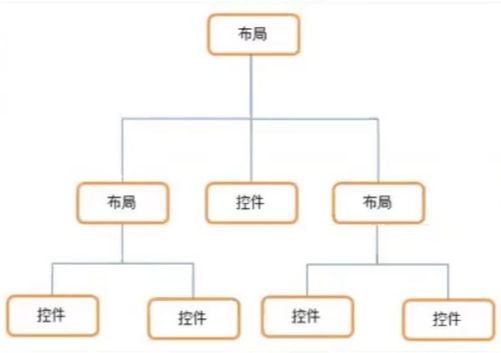 image.png
 Android四大组件
1.activity 与用户交互的可视化界面,每个activity有布局结构
2.service 实现程序后台运行的解决方案,如点击home键后台运行程序
3.content provider 内容提供者,提供程序所需要的数据(可通过文件、数据库、网络形式提供)
4.broadcast receier 广播接收器,监听外部事件的到来(比如来电、短信、通知消息)常用控件
1.TextView(文本控件)EditText(可编辑文本控件)
2.Button(按钮)ImageButton(图片按钮)loggleButton(开关按钮)
3.ImageView(图片控件)
4.CheckBox(复选框控件)RadioButton(单选框控件)
ios基础知识
- 布局
1.去掉了布局的概念,直接用变量间的相对关系完成位置的计算 - 开发环境
1.系统:MacOS X
2.开发工具:Xcode
3.开发语言:ObjectC
4.安装文件:.ipa/.app - 注意
1.使用appium测试必须使用苹果系统
dom结构解读
- 元素定位
1.实际是控件定位
2.想要一个脚本同事支持android/ios连个系统,就要保证元素属性(id,aid,xpath)一致 - dom
1.document object model文件对象模型
2.用于html和js的交互,表示界面的控件层级,界面的结构化描述,常见格式是html、xml,核心元素为节点和属性
3.xpath:xml路径语言,用于xml中的节点定位 - android的层级结构
1.anddroid应用的层级结构与html不一样,是一个定制的xml
2.app source类似于dom,表示app的层级,代表了界面里所有控件树的结构
3.每个控件都有它的属性(resourceid,xpath,aid),没有css属性 - ios与android的区别
1.名字和属性的命名不同(android resourceid, ios name; android content-des, ios accessibility-id)
id、aid、xpath定位方法
- 定位方式
1.id定位
dirver.find_element_by_id(resouce-id)
driver.find_element(MobileBy.ID,"resource-id")
2.accessibility_id定位
dirver.find_element_by_accessibility_id
driver.find_element(MobileBy.ACCESSIBILITY_ID,"content_desc") - xpath定位
driver.find_element_by_xpath() - classname定位(不推荐)
uiautomatorviewer定位工具使用
- 在sdk\tools下
我的uiautomatorviewer识别的屏幕是横屏的,需要保存到本地,转成竖屏再导入,挺麻烦的,如果是这样,不如用inspector了
示例
from time import sleep
from appium import webdriver


class TestDW:
    def setup(self):
        desired_caps = {
            "platformName": "Android",
            "deviceName": "127.0.0.1:7555",
            "platformVersion": "6.0",
            # "appPackage": "com.xueqiu.android",
            # "appActivity": ".view.WelcomeActivityAlias",
            "noReset": "true",
            "dontStopAppOnReset": "true",
            "skipDeviceInitialization": "true",
            "unicodeKeyBoard": "true",
            "resetKeyBoard": "true"
        }

        self.driver = webdriver.Remote('http://127.0.0.1:4723/wd/hub', desired_caps)
        self.driver.implicitly_wait(10)

    def teardown(self):
        self.driver.back()
        # self.driver.quit()

    def test_search(self):
        """
        1.打开雪球app
        2.点击搜索输入框
        3.搜索输入框输入“阿里巴巴”
        4.搜索结果中选择“阿里巴巴”并点击
        5.获取阿里巴巴的股价,并判断价格>200
        """
        self.driver.find_element_by_id("com.xueqiu.android:id/tv_search").click()
        self.driver.find_element_by_id("com.xueqiu.android:id/search_input_text").send_keys("阿里巴巴")
        self.driver.find_element_by_xpath("//*[@resource-id='com.xueqiu.android:id/name' and @text='阿里巴巴']").click()
        current_price = float(self.driver.find_element_by_id("com.xueqiu.android:id/current_price").text)
        assert current_price > 200
        sleep(3)
05 | app控件交互
元素的常用方法
element.click()element.send_key("")-
element.set_value("")设置元素的值 -
element.clear()清除 -
element.is_displayed()是否可见 -
element.is_enabled()是否可用 -
element.is_selected()是否被选中 -
get_attribute(name)获取属性值
元素的常用属性
-
element.text获取元素文本 -
element.location获取元素坐标:{'y':19,'x':498} -
element.size获取元素尺寸(高和宽):{'width':500,'height':22}
案例
from time import sleep
from appium import webdriver


class TestDW:
    def setup(self):
        desired_caps = {
            "platformName": "Android",
            "deviceName": "127.0.0.1:7555",
            "platformVersion": "6.0",
            # "appPackage": "com.xueqiu.android",
            # "appActivity": ".view.WelcomeActivityAlias",
            "noReset": "true",
            "dontStopAppOnReset": "true",
            "skipDeviceInitialization": "true",
            "unicodeKeyBoard": "true",
            "resetKeyBoard": "true"
        }

        self.driver = webdriver.Remote('http://127.0.0.1:4723/wd/hub', desired_caps)
        self.driver.implicitly_wait(10)

    def teardown(self):
        self.driver.back()
        # self.driver.quit()

    def test_atrr(self):
        """
        1.打开雪球首页
        2.定位首页搜索框
        3.判断搜索框是否可用,并打印搜索框name属性值
        4.打印搜索框左上角坐标和它的宽高
        5.向搜索框输入alibaba
        6.判断【阿里巴巴】是否可见
        7.如果可见,打印“搜索成功”,如果不可见,打印“搜索失败”
        """
        search = self.driver.find_element_by_id("com.xueqiu.android:id/tv_search")
        search_enabled = search.is_enabled()
        print(search.text)
        print(search.location)
        print(search.size)
        if search_enabled == True:
            search.click()
            self.driver.find_element_by_id("com.xueqiu.android:id/search_input_text").send_keys("alibaba")
            alibaba_element = self.driver.find_element_by_xpath("//*[@resource-id='com.xueqiu.android:id/name' and @text='阿里巴巴']")
            # alibaba_element.is_displayed()
            element_display = alibaba_element.get_attribute("displayed")
            if element_display == "true":
                print("搜索成功")
            else:
                print("搜素失败")
06 | 触屏操作自动化
TouchAction
- 官方文档:https://github.com/appium/appium/blob/master/docs/en/writing-running-appium/touch-actions.md
案例
from time import sleep
from appium import webdriver
from appium.webdriver.common.touch_action import TouchAction


class TestTouchAction:
    def setup(self):
        desired_caps = {
            "platformName": "Android",
            "deviceName": "127.0.0.1:7555",
            "platformVersion": "6.0",
            # "appPackage": "com.xueqiu.android",
            # "appActivity": ".view.WelcomeActivityAlias",
            "noReset": "true",
            "dontStopAppOnReset": "true",
            "skipDeviceInitialization": "true",
            "unicodeKeyBoard": "true",
            "resetKeyBoard": "true"
        }

        self.driver = webdriver.Remote('http://127.0.0.1:4723/wd/hub', desired_caps)
        self.driver.implicitly_wait(10)

    def teardown(self):
        pass
        # self.driver.back()
        # self.driver.quit()

    def test_atrr(self):
        action = TouchAction(self.driver)
        # action.press(x=386.5,y=1076.3).wait(200).move_to(x=386.5,y=519.5).release().perform()
        window_rect = self.driver.get_window_rect()
        width = window_rect['width']
        height = window_rect['height']
        x1 = int(width / 2)
        y_start = int(height * 4 / 5)
        y_end = int(height * 1 / 5)
        action.press(x=x1, y=y_start).wait(200).move_to(x=x1, y=y_end).release().perform()
07 | 高级定位
xpath定位进阶
- 层级定位
1.父节点定位子节点
2.子节点定位父节点
3.子节点定位兄弟节点
4.爷爷节点定位孙子节点 - 基本语法
1.https://www.runoob.com/xpath/xpath-syntax.html - 案例
1.定位股票
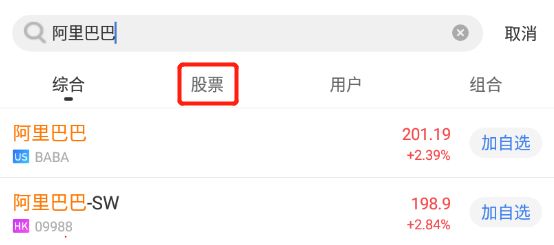 image.png
//*[@resource-id='com.xueqiu.android:id/title_container']/ android.widget.TextView[2]/..
2.定位0988股票的价格
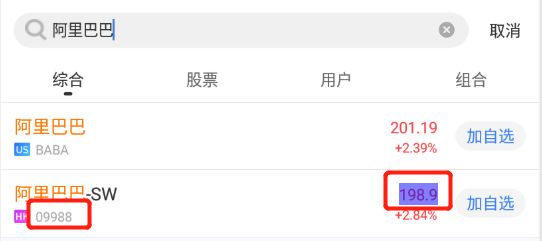 image.png
//*[@text='09988']/../../..//*[@resource-id='com.xueqiu.android:id/current_price']
uiautomator定位表达式(一般不用)
- 参考资料
https://developer.android.com/reference/android/support/test/uiautomator/UiSelector.html - 优点
1.xpath定位速度慢
2.uiautomator是android的工作引擎,速度快 - 缺点
1.表达式书写复杂,容易写错且IDE没有提示 - 用法
driver.find_element_by_android_uiautomator(表达式).click()
1.通过text文本定位
new UiSelector().text("text文本")
2.文本较长,可模糊匹配
new UiSelector().textContains("包含text文本")
3.以某个文本开头匹配
new UiSelector().textStartsWith("文本开头")
4.用正则表达式textMatches匹配
new UiSelector().textMatches("正则表达式")
5.通过resourceid定位
new UiSelector().resourceId("id")
6.通过classname定位
new UiSelector().className("className")
7.通过content-desc定位
new UiSelector().description("content-desc属性")
8.id与text属性组合定位
id_text = 'new UiSelector().resourceId("com.baidu.yuedu:id/webbooktitle").text("我的")'
driver.find_element_by_android_uiautomator(id_text).click()
9.class与text属性组合
class_text = 'new UiSelector().className("android.widget.TextView").text("图书")'
driver.find_element_by_android_uiautomator(class_text).click()
10.父子关系定位
new UiSelector().resourceId("").childSelector(text(""))
11.兄弟定位
new Uiselector().resourceId("").fromParent(text(""))
滑动定位
from time import sleep
from appium import webdriver


class TestDW:
    def setup(self):
        desired_caps = {
            "platformName": "Android",
            "deviceName": "127.0.0.1:7555",
            "platformVersion": "6.0",
            "appPackage": "com.xueqiu.android",
            "appActivity": ".view.WelcomeActivityAlias",
            "noReset": "true",
            # "dontStopAppOnReset": "true",
            "skipDeviceInitialization": "true",
            "unicodeKeyBoard": "true",
            "resetKeyBoard": "true"
        }

        self.driver = webdriver.Remote('http://127.0.0.1:4723/wd/hub', desired_caps)
        self.driver.implicitly_wait(10)

    def teardown(self):
        self.driver.back()
        # self.driver.quit()

    def test_scroll_find(self):
        self.driver.find_element_by_android_uiautomator('new UiSelector().text("关注")').click()
        self.driver.find_element_by_android_uiautomator('new UiScrollable( new UiSelector().'
                                                        'scrollable(true).instance(0)).'
                                                        'scrollIntoView(new UiSelector().text("美股马甲")'
                                                        '.instance(0))').click()
        sleep(5)
08 | 显示等待机制
强制等待
-
sleep(sec)不推荐
隐式等待
driver.implicitly_wait(sec)
显示等待
WebDriverWait(self.driver,10).until(expected_conditions.visibility_of_element_located(locator))- 一般页面元素的呈现
1.首先,title
2.其次,dom(隐式等待判断元素是否已出现在dom树里,但无法判断其属性是否展示)
3.然后,css(可见visibility)
4.最后,js(可点击clickable,显示等待一般判断元素是否可见、可点击) - html是自上而下加载的
- js加载会阻塞html的加载,为此有些js使用异步加载的方式
expected_condition
-
presence_of_element_located只能判断此元素在dom里,不能判断元素的属性(如可点击、可见的等)已添加
案例
from time import sleep
from appium import webdriver
from appium.webdriver.common.mobileby import MobileBy
from selenium.webdriver.support import expected_conditions
from selenium.webdriver.support.wait import WebDriverWait


class TestDW:
    def setup(self):
        desired_caps = {
            "platformName": "Android",
            "deviceName": "127.0.0.1:7555",
            "platformVersion": "6.0",
            "appPackage": "com.xueqiu.android",
            "appActivity": ".view.WelcomeActivityAlias",
            "noReset": "true",
            # "dontStopAppOnReset": "true",
            "skipDeviceInitialization": "true",
            "unicodeKeyBoard": "true",
            "resetKeyBoard": "true"
        }

        self.driver = webdriver.Remote('http://127.0.0.1:4723/wd/hub', desired_caps)
        self.driver.implicitly_wait(10)

    def teardown(self):
        self.driver.back()
        # self.driver.quit()

    def test_search(self):
        self.driver.find_element_by_id("com.xueqiu.android:id/tv_search").click()
        self.driver.find_element_by_id("com.xueqiu.android:id/search_input_text").send_keys("alibaba")
        self.driver.find_element_by_xpath("//*[@resource-id='com.xueqiu.android:id/name' and @text='阿里巴巴']").click()

        locator = (MobileBy.XPATH, "//*[@text='09988']/../../..//*[@resource-id='com.xueqiu.android:id/current_price']")
        # WebDriverWait(self.driver, 10).until(expected_conditions.element_to_be_clickable(locator))
        ele = WebDriverWait(self.driver, 10).until(lambda x: x.find_element(*locator))
        # ele = self.driver.find_element(*locator)
        print(ele.text)
        current_price = float(ele.text)
        expect_price = 170
        assert current_price > expect_price
        sleep(3)
09 | toast控件识别
toast定位
- appium使用uiautomator底层的机制来分析抓取toast,并把toast放到控件树里,但本身并不属于控件
- automationName: uiautomator2
- 必须使用xpath查找
1.//*[@class='android.widget.Toast']
2.//*[contains(@text,"xxxx")]
示例
driver.page_source
driver.find_element(MobileBy.XPATH,"//*[@class='android.widget.Toast']").text
driver.find_element(MobileBy.XPATH,"//*[contains(@text,'Clicked popup')]").text
10 | 属性获取与断言
get atrribute原理分析
- 官方文档:http://appium.io/docs/en/commands/element/attributes/attribute/
- 官网没有详细说明,可通过android studio查看源码
- 源码从github上搜索appium,在utils里
- 示例
search_ele = self.driver.find_element_by_id("com.xueqiu.android:id/tv_search")
print(search_ele.get_attribute("content-desc"))
print(search_ele.get_attribute("enabled"))
print(search_ele.get_attribute("clickable"))
断言
- 普通断言 assert
a = 10
b = 20
assert a > b # 若断言失败,其后的断言将不会执行
assert 'h' in 'this'
- Hamcrest断言
1.github地址:https://github.com/hamcrest/PyHamcrest
2.Hamcrest是以测试为目的,组合成灵活表达式的匹配器类库。用于编写断言的框架,使用这个框架编写断言,提高可读性及开发测试的效率
3.Hamcrest提供了大量被称为“匹配器”的方法。每个匹配器都设计用户执行特定的比较操作
4.Hamcrest的可扩展性强,让你能够穿件自定义的匹配器
5.支持多种语言:java,python,ruby,object-c,php,erlang,swift
6.示例
assert_that(10,equal_to(9),'这是一个提示')
assert_that(13,close_to(10,2))
11 | appium参数化用例
案例
from time import sleep
import pytest
from appium import webdriver
from appium.webdriver.common.mobileby import MobileBy
from hamcrest import *


class TestDW:
    def setup(self):
        desired_caps = {
            "platformName": "Android",
            "deviceName": "127.0.0.1:7555",
            "platformVersion": "6.0",
            "appPackage": "com.xueqiu.android",
            "appActivity": ".view.WelcomeActivityAlias",
            "noReset": True,
            # "dontStopAppOnReset": True,
            "skipDeviceInitialization": True,
            "unicodeKeyBoard": "true",
            "resetKeyBoard": "true"
        }

        self.driver = webdriver.Remote('http://127.0.0.1:4723/wd/hub', desired_caps)
        self.driver.implicitly_wait(10)

    def teardown(self):
        self.driver.find_element(MobileBy.ID, 'com.xueqiu.android:id/action_close').click()
        # self.driver.back()
        # self.driver.quit()

    @pytest.mark.parametrize('searchkey,type,expect_price', [
        ('alibaba', 'BABA', 190),
        ('xiaomi', '01810', 10)
    ])
    def test_search(self, searchkey, type, expect_price):
        self.driver.find_element_by_id("com.xueqiu.android:id/tv_search").click()
        self.driver.find_element_by_id("com.xueqiu.android:id/search_input_text").send_keys(searchkey)
        self.driver.find_element_by_xpath(f"//*[@text='{type}']").click()

        current_price = self.driver.find_element(MobileBy.XPATH,
                                                 f"//*[@text='{type}']/../../..//*[@resource-id='com.xueqiu.android:id/current_price']").text
        current_price_float = float(current_price)
        # expect_price = 180
        assert_that(current_price_float, close_to(expect_price, expect_price * 0.2))
        sleep(3)
12 | 数据驱动
https://github.com/tim8709/hogwarts_testing/tree/master/test_appium
13 | Android WebView测试
纯网页应用
手机端
1.safari,chrome,Browser for android
2.不能是第三方浏览器(uc,QQ)pc端
1.安装Chrome浏览器,并能登录https://www.google.com
2.下载手机浏览器对应的driver版本
国内镜像地址:https://npm.taobao.org/mirrors/chromedriver/
appium github:https://github.com/appium/appium/blob/master/docs/en/writing-running-appium/web/chromedriver.md客户端代码
1.desirecapability
"browser" = "Browser" 或者 "browser" = "Chrome"
"chromedriverExecutable" = "指定driver地址"查看浏览器版本信息
1.adb shell pm list package | grep browser
2.adb shell pm dump com.android.browser | grep versionappium的chromedriver
1.默认地址:C:\Users\25236\AppData\Local\Programs\Appium\resources\app\node_modules\appium\node_modules\appium-chromedriver\chromedriver\win
2.adb查不到手机自带浏览器的版本号,appium可以查到
[图片上传失败...(image-dd2754-1589359890550)]
3.下载2.24版本的chromedriverchrome://inspect
1.直接在pc的chrome中输入chrome://inspect会空白
2.要么翻墙,要么下载android webview的离线调试工具代码
from appium import webdriver
from time import sleep

class TestBrowser():
    def setup(self):
        des_caps = {
            'platformName': 'android',
            'platformVersion': '6.0',
            'browserName': 'Browser',
            'noRest': True,
            'deviceName': '127.0.0.1:7555',
            'skipServerInstallation': 'true',
            'chromedriverExecutableDir': 'xxx', # 路径下可放多个webdriver
            'chromedriverExecutable': 'D:\workspace\hogwarts\dirver\chromedriver2.24.exe'  # 指定Chromedriver存放的位置
        }
        self.driver = webdriver.Remote("http://127.0.0.1:4723/wd/hub", des_caps)
        self.driver.implicitly_wait(10)

    def teardown(self):
        # self.driver.quit()
        pass

    def test_browser(self):
        self.driver.get("http://www.baidu.com")
        sleep(5)
android混合页面测试
- 原生应用中嵌入了webview
- 如何判断页面是webview
1.断网查看
2.看加载条
3.看顶部是否有关闭按钮
4.下拉刷新,看页面是否刷新
5.下拉刷新,看是否有网络提供方(下拉腾讯新闻,提示qq浏览器内核)
6.用工具查看(inspect) - webview
1.android系统提供能显示网页的系统控件 - 前提条件
1.pc
浏览器能访问 http://ww.google.com
chromedriver 下载对应的版本
2.手机端
应用代码需要打开webview开关,后让开发留个后门
3.代码
appPackage,appActivity
desirecapability添加:chromedriverExecutable:driver路径 - 元素定位
1.页面渲染后,通过accessibility定位(不稳定)
self.driver.find_element(MobileBy.ACCESSIBILITY_ID,'xxx')
2.切换上下文定位
# 进入webview页面后
print(self.driver.contexts)
self.driver.switch_to.context(self.driver.contexts[-1])
print(self.driver.page_source)

print(self.driver.window_handles)
self.driver.switch_to.window(self.driver.window_handles[-1])
3.若知道html的地址,可用浏览器直接访问(不稳定)
4.adb logcat -v time | grep http 查找当前页面地址
遇到的坑
1.设备
android模拟器6.0默认支持webview操作(mumu不可以,genimotion和sdk自带的emulator可以)
其他模拟器和物理机需要打开app内开关(webview调试开关)
2.pc浏览器定位元素
chrome浏览器- chrome62才能更好的看见webview的内部,其他版本都有bug
换成chromium浏览器可以避免很多坑,展示效果和速度比chrome要快
3.代码
不推荐使用find_element_by_accessibility_id()定位页面元素
推荐使用switch_to.context()、switch_to.window()webview开关
1.文档:https://developers.google.com/web/tools/chrome-devtools/remote-debuging/webviews?hl=zh-cn
2.android6.0不打开也能查看页面结构
3.启动webview调试,需在webview类上调用静态方法,此设置适用于应用的所有WebView
if (Build.VERSION.SDK_INT >= Build.VERSION_CODES.KITKAT){
        Webview.setWebContentsDebuggingEnabled(true);
}
14 | 实战1
appium的设计理念
- client/server设计模式
- server可以放在任何地方
连接真机&模拟器
- 打开开发者模式:连续点击版本号7次
- 开发者选项中打开usb调试
- 模拟器还是没连接上,用`adb connect
- 真机还需要安装驱动,可以用豌豆荚或手机助手
测试苹果机需要的环境
- pc:macOS、Xcode、libimobiledevice、ideviceinstaller
- 手机:WDA facebook(webdriver agent)
模拟器
- mumu(推荐)
- Genimotion
1.可以模拟不同手机尺寸,不同版本的手机设备 - emulator
1.android sdk自带的emulator,使用Android Studio创建
2.emulator启动方法
emulator -list-avds
emulator @Pixel_3a_XL_API_23_x86-6-0
模拟器安装卸载应用
- 下载apk到电脑
- 方式1:拖动apk到模拟器安装,长按应用拖拽删除
- 方式2:
adb install xx.apk
adb install -r xx.apk(覆盖安装)
adb -s 指定设备
adb uninstall 包名
adb常用命令
adb devicesadb logcat | grep -i displayedadb shell am start -n activity
15 | 实战2
常用的接口信息
- 4723:客户端与server端通信的端口
- 5037:adb server与adbd通信端口
- 7555:windows上模拟器与pc机建立连接的端口
- 800*:与chromdriver通信的端口号
adb
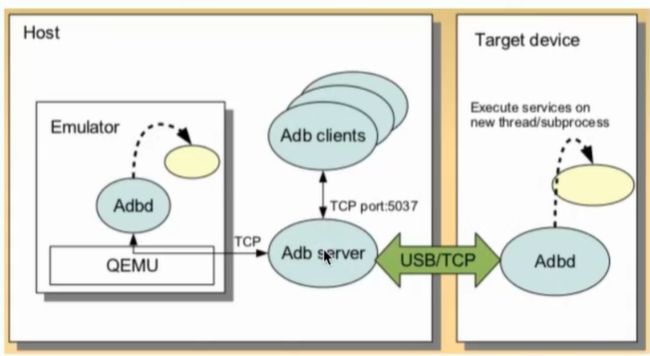
- 文档:https://developer.android.google.cn/studio/command-line/adb#wireless
- adb client
- adb server
- adbd(adb daemon)
元素定位
- 推荐使用优先级
1.ID定位(优先级最高)
2.Accessibility ID定位(其次)
3.XPATH定位(速度慢,但定位灵活)
4.Uiautomator定位(速度快,但语法复杂)
企业微信
from time import sleep
import pytest
from appium import webdriver
from appium.webdriver.common.mobileby import MobileBy


class TestBrowser():

    def setup_class(self):
        des_caps = {
            'platformName': 'android',
            'deviceName': '127.0.0.1:7555',
            'appPackage': 'com.tencent.wework',
            'appActivity': '.launch.WwMainActivity',
            'noReset': True,
            'chromedriverExecutable': 'D:\workspace\hogwarts\dirver\chromedriver2.24.exe'  # 指定Chromedriver存放的位置
        }
        self.driver = webdriver.Remote("http://127.0.0.1:4723/wd/hub", des_caps)
        self.driver.implicitly_wait(10)

    def teardown_class(self):
        self.driver.quit()

    # def setup(self):
    #     pass
    #
    # def teardown(self):
    #     self.driver.back()

    # @pytest.fixture()
    # def add_fixture(self):
    #     yield
    #     self.driver.back()

    @pytest.mark.parametrize('name,gender,phone', [
        ('姓名16', '男', '13200000016'),
        ('姓名17', '男', '13200000017')
    ])
    def test_add_member(self, add_fixture, name, gender, phone):
        # name = "姓名6"
        # gender = "男"
        # phone = "13211111116"
        # 进入通讯录
        self.driver.find_element(MobileBy.XPATH, '//*[@text="通讯录"]').click()
        # 滚动查找“添加成员”
        self.driver.find_element_by_android_uiautomator('new UiScrollable( new UiSelector().'
                                                        'scrollable(true).instance(0)).'
                                                        'scrollIntoView(new UiSelector().text("添加成员")'
                                                        '.instance(0))').click()
        # 手动添加
        self.driver.find_element(MobileBy.ID, "com.tencent.wework:id/c7g").click()

        current_act = self.driver.current_activity
        assert ".contact.controller.ContactAddActivity" in current_act

        self.driver.find_element(MobileBy.XPATH, '//*[contains(@text,"姓名")]/../*[@text="必填"]').send_keys(name)
        self.driver.find_element(MobileBy.ID, 'com.tencent.wework:id/dux').click()
        sleep(1)
        if gender == "男":
            self.driver.find_element(MobileBy.XPATH, '//*[@text="男"]').click()
        else:
            self.driver.find_element(MobileBy.XPATH, '//*[@text="女"]').click()

        self.driver.find_element(MobileBy.ID, 'com.tencent.wework:id/eq7').send_keys(phone)
        self.driver.find_element(MobileBy.ID, 'com.tencent.wework:id/gur').click()
        sleep(1)
        # print(self.driver.page_source)
        assert "添加成功" in self.driver.find_element(MobileBy.XPATH, '//*[@text="添加成功"]').text

    @pytest.mark.parametrize('name', [
        '姓名5', '姓名7'
    ])
    def test_delete_member(self, name):
        self.driver.find_element(MobileBy.XPATH, '//*[@text="通讯录"]').click()
        self.driver.find_element(MobileBy.XPATH, f'//*[@text="{name}"]').click()
        self.driver.find_element(MobileBy.ID, 'com.tencent.wework:id/guk').click()
        self.driver.find_element(MobileBy.ID, 'com.tencent.wework:id/azd').click()
        self.driver.find_element(MobileBy.ID, 'com.tencent.wework:id/duq').click()
        self.driver.find_element(MobileBy.ID, 'com.tencent.wework:id/b_4').click()
        sleep(3)
        deleted_member = self.driver.find_elements(MobileBy.XPATH, f'//*[@text="{name}"]')
        assert len(deleted_member) == 0

    def test_delete_member2(self):
        self.driver.find_element(MobileBy.XPATH, '//*[@text="通讯录"]').click()
        while True:
            members = self.driver.find_elements(MobileBy.XPATH, '//*[contains(@text,"姓名")]')
            if len(members) ==0:
                print("没有要删除的成员了")
                break
            text = members[0].text
            members[0].click()
            self.driver.find_element(MobileBy.ID, 'com.tencent.wework:id/guk').click()
            self.driver.find_element(MobileBy.ID, 'com.tencent.wework:id/azd').click()
            self.driver.find_element(MobileBy.ID, 'com.tencent.wework:id/duq').click()
            self.driver.find_element(MobileBy.ID, 'com.tencent.wework:id/b_4').click()
            sleep(3)
            assert text not in self.driver.page_source
16 | 实战3(PO设计模式在Appium中的应用)
PageObject设计原则
- 用公共方法代表UI提供的服务
- 方法应该返回其他的PageObject或返回用于断言的数据
- 同样的行为不同的结果可以建模为不同的方法
- 不要在方法内加断言
- 不要暴露页面内部的元素给外部
- 不需要为UI内所有元素建模
代码
https://github.com/tim8709/hogwarts_testing/tree/master/test_appium/page_object2