本笔记是来源自Udemy的课程:[Android Jetpack, Clean Architecture & Testing Masterclass]
此课程主要介绍了Android中 databinding,livedata, jetpack,dagger等使用。对于开发者而言,大有益处,奈何要13美金才能观看,故做笔记分享与诸君。
Section 2 Data Binding
Data binding Usage
1.Enabling data binding inside this android section in build.gradle, then click on sync.
dataBinding{
    enabled = true
}
2.In your layout file, wrap the layout with
<...>
3.In the activity, declare a variable for the binding object which type is XXXactivityBinding.
private lateinit var binding:ActivityMainBinding
4.Use the setcontent view function of the DataBindingUtil and provide the activity and resource id to bind our activity and view.
binding = DataBindingUtil.setContentView(this,R.layout.activity_main)
5.Object has properties for each of these views in the xml layout file, which remove the underscores.
binding.submitButton.setOnClickListener {
    displayGreeting()
}
Note: starting from Android Gradle Plugin 4.0.0, the gradle should be written as follow:
android {
    buildFeatures{
         dataBinding = true
    }
}
Send data directly to view
-
In the xml file, add the tags. Inside data tag, create
tag and add the name and type attributes. Type is the class name. -
In the widget such as TextView, add the @ sign curly braces. In this curly braces, add the property of the variable.
NOTE:
If you need two-way binding, you need write it as follows:
android:text="@={student.name}"Usually, we use it on EditView.
-
In the activity, the binding will get a new property as the name of variable, so you can use it to update data.
binding.student = getStudent()
Section 3 View Model
Why need view model
For the configuration changes, such as screen rotations, keyboard changes, language changes etc. The activity will be destroyed as well as values. The data will download for amount of times.
View model has a longer life cycle, therefore it can hold the value created by activity.
View model usage
1.Open this website as follows:
https://developer.android.com/jetpack/androidx/releases/lifecycle
2.Copy these dependencies into build.gradle.
def lifecycle_version = "2.3.1"
// ViewModel
implementation "androidx.lifecycle:lifecycle-viewmodel-ktx:$lifecycle_version"
// LiveData
implementation "androidx.lifecycle:lifecycle-livedata-ktx:$lifecycle_version"
3.Create a view model class extends ViewModel.
class MainActivityViewModel: ViewModel()
4.Put the variable definition into view model, and write the set and get function.
private var count: Int = 0
fun getCurrentCount(): Int{
}
fun getUpdatedCount(): Int{
}
5.Get the instance of the view model with ViewModelProvider function.
viewModel = ViewModelProvider(this).get(MainActivityViewModel::class.java)
6.Use instance of view model to assign the value to the variable.
binding.countText.text = viewModel.getCurrentCount().toString()
Life Cycle of View Model
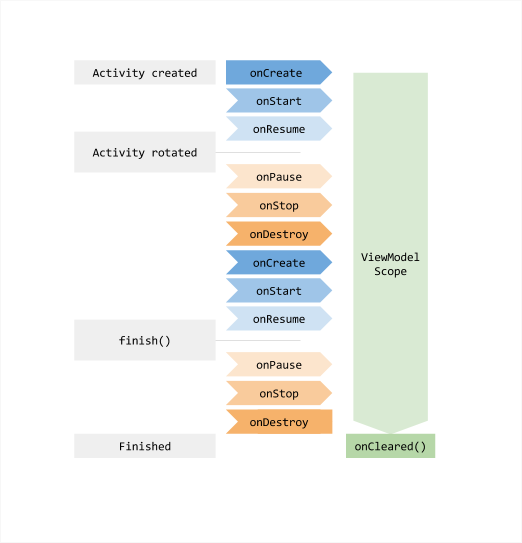
When the onCleared() is called
when the app is put into the background and the app process is killed in order to free up the system's memory.
View Model Factory
To create a custom View Model.
-
Create a view model factory extended
ViewModelProvider.Factory,with the parameter you wanna assign for your view model.class MainActivityViewModelFactory(private val startingTotal: Int) : ViewModelProvider.Factory -
Implement the create function and judge model class can be assignable from the View Model Class, then return a View model.
if(modelClass.isAssignableFrom(MainActivityViewModel::class.java)){ return MainActivityViewModel(startingTotal) as T } -
Throw a illegal argument exception.
throw IllegalArgumentException("unknow") -
In MainActivity, create an instance of the ViewModelFactory, and pass it as the second parameter of the ViewModelProvider.
mainActivityViewModelFactory = MainActivityViewModelFactory(100)
viewModel = ViewModelProvider(this,mainActivityViewModelFactory).get(MainActivityViewModel::class.java)
Section 4 Live Data
LiveData is a lifecycle-aware observable data holder class. That means it can be used in the components which have the lifecycle such as activity, fragment, service.
What are the benefits of using live data. LiveData automatically updates the UI when app data changes and they clean up themselves when their associated lifecycle is destroyed.
Therefore no memory leaks or crashes will happen as a result of destroyed activities or fragments.
Live Data VS Mutable Live Data
Data in a LiveData object are only readable, cant be edited.
Usage
-
Add dependencies in gradle.
implementation "androidx.lifecycle:lifecycle-extensions:$lifecycle_version" -
Change the attributes as the MutableLiveData.
var total = MutableLiveData() -
In the init, assign the value to init this attribute.
init { total.value = startingTotal } -
Delete the get function and assign value in set function
total.value = (total.value)?.plus(input) -
In the activity, use the observe function and implement the Observer interface.
viewModel.total.observe(this, Observer {
           binding.resultTextView.text = it.toString()
       })
Section 5 View Model & Live Data With Data Binding
In the xml bind a click function for button.
android:onClick="@{()->myViewModel.setUpdatedCount(1)}"
Usage
- In XML, bind the Live Data directly.
android:text="@{myViewModel.countData.toString()}"
- Assign the viewModel to myViewModel in Activity.
binding.myViewModel = viewModel
- Set the lifecycleOwner of binding as this.
binding.lifecycleOwner = this
- Delete the observe function of data.
Note:
If we want to provide more security to our data, If we want to encapsulate our data
we can make this variable private and create a public live data variable.
private var count = MutableLiveData()
val countData : LiveData
get() = count
Two Way Data Binding
android:text="@={myViewModel.username}"