-
springcloud介绍:
Spring Cloud Netflix项目是Spring Cloud的子项目之一,主要内容是对Netflix公司一系列开源产品的包装,它为Spring Boot应用提供了自配置的Netflix OSS整合。通过一些简单的注解,开发者就可以快速的在应用中配置一下常用模块并构建庞大的分布式系统。它主要提供的模块包括:服务发现(Eureka),断路器(Hystrix),智能路由(Zuul),客户端负载均衡(Ribbon)等。
- SpringBoot&Spring什么关系?
SpringBoot底层就是Spring,简化使用Spring的方式而已,多加了好多的自动配置;
- Spring Cloud&SpringBoot什么关系?
Spring Cloud是分布式系统的整体解决方案,底层用的SpringBoot来构建项目,Cloud新增很多的分布式的starter,包括这些starter的自动配置;
-
Eureka注册中心:
1.Eureka:就是服务注册中心(可以是一个集群),对外暴露自己的地址
2.提供者:启动后向Eureka注册自己信息(地址,提供什么服务)
3.消费者:向Eureka订阅服务,Eureka会将对应服务的所有提供者地址列
表发送给消费者,并且定期更新
4.心跳(续约):提供者定期通过http方式向Eureka刷新自己的状态
-
搭建注册中心
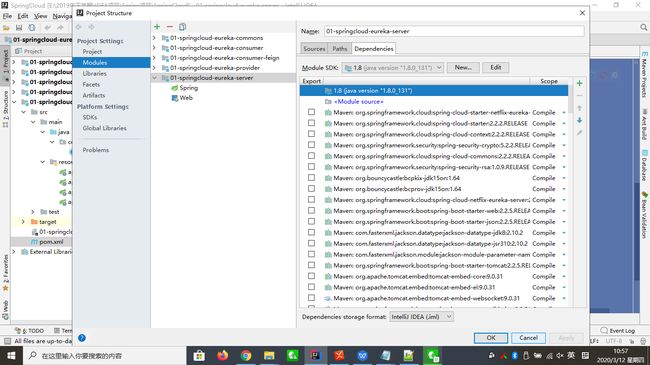
1、创建一个SpringBoot项目:
2、在 Spring Boot 的入口类上添加一个@EnableEurekaServer 注解,用于 开启 Eureka 注册中心服务端
import org.springframework.boot.SpringApplication;
import org.springframework.boot.autoconfigure.SpringBootApplication;
import org.springframework.cloud.netflix.eureka.server.EnableEurekaServer;

@EnableEurekaServer//开启注册中心服务端
@SpringBootApplication
public class Application {

    public static void main(String[] args)
    {
        SpringApplication.run(Application.class, args);
    }

}
3、编写resources下的application.properties配置文件
#内嵌定时tomcat的端口
server.port=8761
#设置该服务注册中心的hostname
eureka.instance.hostname=localhost
#由于我们目前创建的应用是一个服务注册中心,而不是普通的应用,默认情况下,这个应用会向注册中心(也是它自己)注册它自己,设置为false表示禁止这种自己向自己注册的默认行为
eureka.client.register-with-eureka=false
#表示不去从服务端检索其他服务信息,因为自己就是服务端,服务注册中心本身的职责就是维护服务实例,它不需要去检索其他服务
eureka.client.fetch-registry=false
#指定服务注册中心的位置
#eureka.client.service-url.defaultZone=http://${eureka.instance.hostname}:${server.port}/eureka/
eureka.client.service-url.defaultZone=http://localhost:8761/eureka
#服务名称
pring.application.name=springcloud-eureka-server
4、检查pom文件依赖是否导入,maven的jar包是否下载无误
    4.0.0

        org.springframework.boot
        spring-boot-starter-parent
        2.2.5.RELEASE


    com.qinglin
    01-springcloud-eureka-server
    1.0-SNAPSHOT


        1.8
        Hoxton.SR3


            org.springframework.cloud
            spring-cloud-starter-netflix-eureka-server


            org.springframework.boot
            spring-boot-starter-test
            test


                    org.junit.vintage
                    junit-vintage-engine


                org.springframework.cloud
                spring-cloud-dependencies
                ${spring-cloud.version}
                pom
                import


                org.springframework.boot
                spring-boot-maven-plugin
5、检查导入的jar包有没有损坏
6、启动与测试
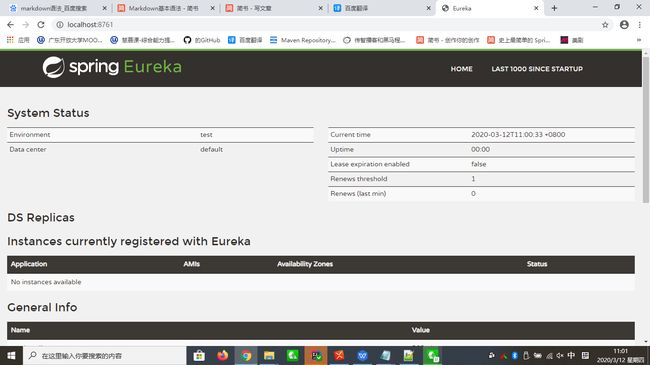
直接在主类运行程序,启动成功后在浏览器访问
出现以下页面则表示注册中心已经搭建成功
-
搭建生产者中心
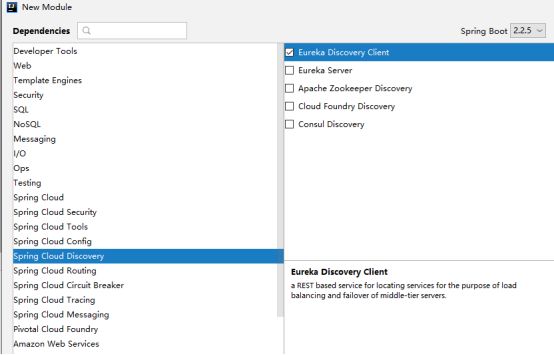
1、创建一个SpringBoot项目:
2、检查pom文件的依赖:
    4.0.0

        org.springframework.boot
        spring-boot-starter-parent
        2.2.5.RELEASE


    com.qinglin
    01-springcloud-eureka-provider
    0.0.1-SNAPSHOT
    01-springcloud-eureka-provider
    生产者


        1.8
        UTF-8
        Hoxton.SR3


            org.springframework.boot
            spring-boot-starter-web


            org.springframework.cloud
            spring-cloud-starter-netflix-eureka-client


            org.springframework.boot
            spring-boot-starter-tomcat


            org.springframework.boot
            spring-boot-starter-test
            test


                    org.junit.vintage
                    junit-vintage-engine


                org.springframework.cloud
                spring-cloud-dependencies
                ${spring-cloud.version}
                pom
                import


                org.springframework.boot
                spring-boot-maven-plugin
3、激活 Eureka 中的 EnableEurekaClient 功能:
在 Spring Boot 的入口函数处,通过添加@EnableEurekaClient 注解来表明自己是一个 eureka 客户端,让我的服务提供者可以连接 eureka 注册中心
import org.springframework.beans.factory.annotation.Value;
import org.springframework.boot.SpringApplication;
import org.springframework.boot.autoconfigure.SpringBootApplication;
import org.springframework.cloud.netflix.eureka.EnableEurekaClient;
import org.springframework.web.bind.annotation.RequestMapping;
import org.springframework.web.bind.annotation.RestController;

@EnableEurekaClient//通过添加@EnableEurekaClient 注解来表明自己是一个 eureka 客户端
@RestController
@SpringBootApplication
public class Application {

    @Value("${server.port}")//获取端口号
    private String port;
    public static void main(String[] args) {
        SpringApplication.run(Application.class, args);
    }

    @RequestMapping("yang")
    public String zhengxixi() throws InterruptedException {
        //Thread.sleep(2000); //这个是让程序休眠2000毫秒
        return "我是来自生产者的杨清林,端口号是:"+port;
    }

}
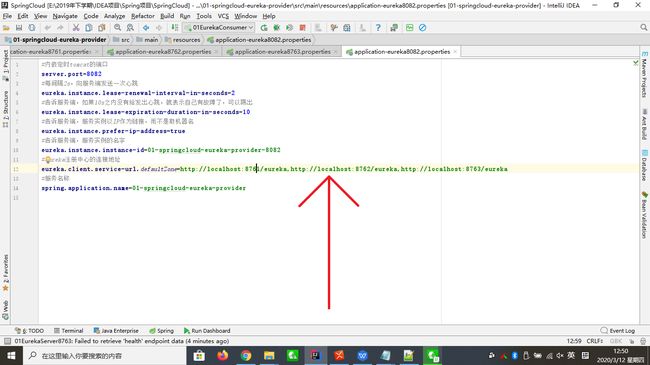
4、编写resources下的application.properties,配置文件配置服务名称和注册中心地址
#内嵌定时tomcat的端口
server.port=8082
#每间隔2s,向服务端发送一次心跳
eureka.instance.lease-renewal-interval-in-seconds=2
#告诉服务端,如果10s之内没有给发出心跳,就表示自己有故障了,可以踢出
eureka.instance.lease-expiration-duration-in-seconds=10
#告诉服务端,服务实例以IP作为链接,而不是取机器名
eureka.instance.prefer-ip-address=true
#告诉服务端,服务实例的名字
eureka.instance.instance-id=01-springcloud-eureka-provider
#eureka注册中心的连接地址
eureka.client.service-url.defaultZone=http://localhost:8761/eureka,http://localhost:8762/eureka,http://localhost:8763/eureka
#服务名称
spring.application.name=01-springcloud-eureka-provider-8082
5、启动服务
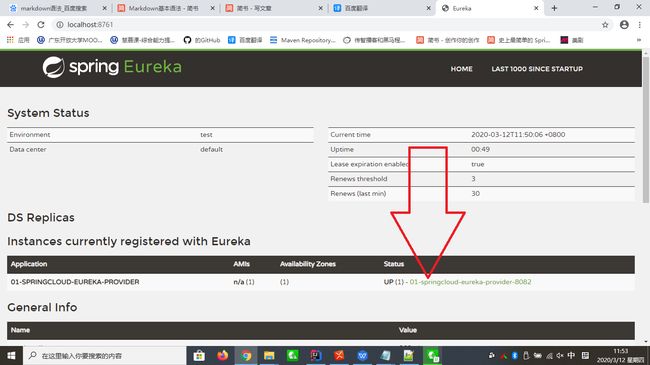
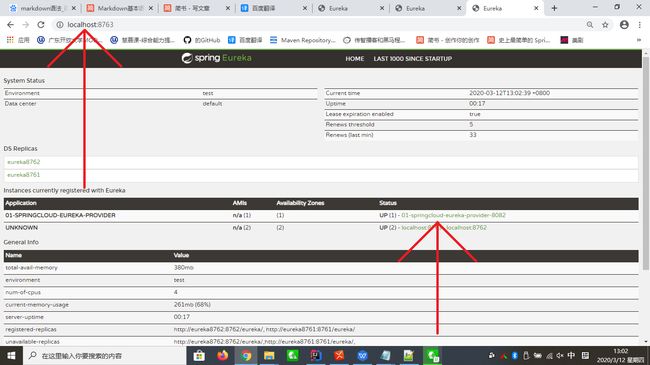
6、通过浏览器访问eureka注册中心
我们可以看到箭头所指的方向,有我们生产者的注册的实例的名称
那么在这个时候,生产者也已经搭建起来了
-
搭建消费者中心
1、查看pom文件依赖是否导入成功
    4.0.0

        org.springframework.boot
        spring-boot-starter-parent
        2.2.5.RELEASE


    com.qinglin
    01-springcloud-eureka-consumer
    0.0.1-SNAPSHOT
    01-springcloud-eureka-consumer
    消费者


        1.8
        Hoxton.SR3


            org.springframework.boot
            spring-boot-starter-web


            org.springframework.cloud
            spring-cloud-starter-netflix-eureka-client


            org.springframework.boot
            spring-boot-starter-test
            test


                    org.junit.vintage
                    junit-vintage-engine


            org.springframework.cloud
            spring-cloud-starter-netflix-hystrix


                org.springframework.cloud
                spring-cloud-dependencies
                ${spring-cloud.version}
                pom
                import


                org.springframework.boot
                spring-boot-maven-plugin
2、创建一个SpringBoot项目:
3、激活 Eureka 中的 EnableEurekaClient 功能:
在 Spring Boot 的入口函数处,通过添加@EnableEurekaClient 注解来表明自己是一个 eureka 客户端,让我的服务提供者可以连接 eureka 注册中心
import com.netflix.hystrix.contrib.javanica.annotation.HystrixCommand;
import org.springframework.beans.factory.annotation.Autowired;
import org.springframework.boot.SpringApplication;
import org.springframework.boot.autoconfigure.SpringBootApplication;
import org.springframework.cloud.client.discovery.EnableDiscoveryClient;
import org.springframework.cloud.client.loadbalancer.LoadBalanced;
import org.springframework.cloud.netflix.eureka.EnableEurekaClient;
import org.springframework.cloud.netflix.hystrix.EnableHystrix;
import org.springframework.context.annotation.Bean;
import org.springframework.web.bind.annotation.RequestMapping;
import org.springframework.web.bind.annotation.RestController;
import org.springframework.web.client.RestTemplate;

@EnableEurekaClient  //通过添加@EnableEurekaClient 注解来表明自己是一个 eureka
@RestController
@SpringBootApplication
@RequestMapping("consumer")
@EnableHystrix
public class Application {

    @Autowired
    private RestTemplate rtl;

    public static void main(String[] args) {

        SpringApplication.run(Application.class, args);
    }

    @Bean
    @LoadBalanced//使用ribbon实现负载均衡调用
    public RestTemplate restTemplate(){
        return new RestTemplate();
    }

    @RequestMapping("xixi")
    @HystrixCommand(fallbackMethod = "yang")
    public String xixi(){

        return rtl.getForObject("http://01-SPRINGCLOUD-EUREKA-PROVIDER/yang",String.class);
    }

    public String yang()
    {
        return "我现在心情不好,等下再过来点我";
    }

}
4、编写resources下的application.properties配置文件
#内嵌定时tomcat的端口
server.port=8081
#每间隔2s,向服务端发送一次心跳
eureka.instance.lease-renewal-interval-in-seconds=2
#告诉服务端,如果10s之内没有给发出心跳,就表示自己有故障了,可以踢出
eureka.instance.lease-expiration-duration-in-seconds=10
#告诉服务端,服务实例以IP作为链接,而不是取机器名
eureka.instance.prefer-ip-address=true
#告诉服务端,服务实例的名字
eureka.instance.instance-id=01-springcloud-eureka-consumser
#eureka注册中心的连接地址
eureka.client.service-url.defaultZone=http://localhost:8761/eureka,http://localhost:8762/eureka,http://localhost:8763/eureka
#服务名称
spring.application.name=01-springcloud-eureka-consumser-8081
5、在调用服务生产者时需要使用 ribbon 来调用
加入了 ribbon 的支持,那么在调用时,即可改为使用服务名称来访问:
import com.netflix.hystrix.contrib.javanica.annotation.HystrixCommand;
import org.springframework.beans.factory.annotation.Autowired;
import org.springframework.boot.SpringApplication;
import org.springframework.boot.autoconfigure.SpringBootApplication;
import org.springframework.cloud.client.discovery.EnableDiscoveryClient;
import org.springframework.cloud.client.loadbalancer.LoadBalanced;
import org.springframework.cloud.netflix.eureka.EnableEurekaClient;
import org.springframework.cloud.netflix.hystrix.EnableHystrix;
import org.springframework.context.annotation.Bean;
import org.springframework.web.bind.annotation.RequestMapping;
import org.springframework.web.bind.annotation.RestController;
import org.springframework.web.client.RestTemplate;

@EnableEurekaClient  //通过添加@EnableEurekaClient 注解来表明自己是一个 eureka
@RestController
@SpringBootApplication
@RequestMapping("consumer")
@EnableHystrix
public class Application {

    @Autowired
    private RestTemplate rtl;

    public static void main(String[] args) {

        SpringApplication.run(Application.class, args);
    }

    @Bean
    @LoadBalanced//使用ribbon实现负载均衡调用
    public RestTemplate restTemplate(){
        return new RestTemplate();
    }

    @RequestMapping("xixi")
    @HystrixCommand(fallbackMethod = "yang")
    public String xixi(){
                //这里通过RestTemplate对象,向构造方法中写入实例的名称,返回值的类型调用指定的实例
        return rtl.getForObject("http://01-SPRINGCLOUD-EUREKA-PROVIDER/yang",String.class);
    }

    public String yang()
    {
        return "我现在心情不好,等下再过来点我";
    }

}
6、启动测试
如果出现了测试类中写的程序的文字即代表成功
-
Eureka注册中心集群
以上的案例存在的问题:
由于注册中心 eureka 本身也是一个服务,如果它只有一个节点,那么它有可能发生故障,这样我们就不能注册与查询服务了,所以我们需要一个高可用的服务注册中心,这就需要通过注册中心集群来解决。 eureka 服务注册中心它本身也是一个服务,它也可以看做是一个提供者,又可 以看做是一个消费者,我们之前通过配置resources下的application.properties配置文件:
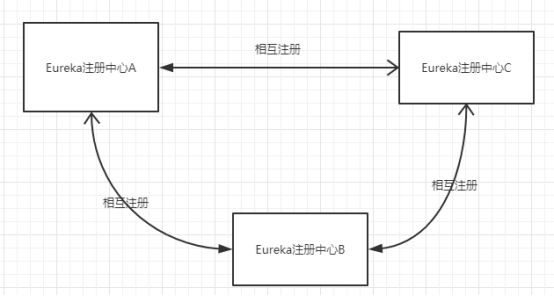
eureka.client.register-with-eureka=false 让注册中心不注册自己,但是可以向其他注册中心注册自己;Eureka Server 的高可集群用实际上就是将自己作为服务向其他服务注册中心注册 自己,这样就会形成一组互相注册的服务注册中心,进而实现服务清单的互相同 步,往注册中心 A 上注册的服务,可以被复制同步到注册中心 B 上,所以从任何一台注册中心上都能查询到已经注册的服务,从而达到高可用的效果。
1、配置步骤:
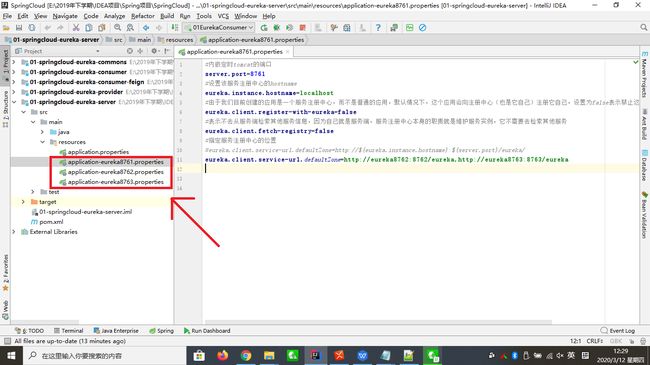
1.1、resources下配置文件创建3个springboot的配置文件
2.2、在 8761 的配置文件中,让它的 service-url 指向 8762和8763,
3.3、在 8762 的配置文件中让它的 service-url 指向 8761和8763,
在 8763 的配置文件中让它的 service-url 指向 8761和8762;
#内嵌定时tomcat的端口
server.port=8761
#设置该服务注册中心的hostname
eureka.instance.hostname=localhost
#由于我们目前创建的应用是一个服务注册中心,而不是普通的应用,默认情况下,这个应用会向注册中心(也是它自己)注册它自己,设置为false表示禁止这种自己向自己注册的默认行为
eureka.client.register-with-eureka=false
#表示不去从服务端检索其他服务信息,因为自己就是服务端,服务注册中心本身的职责就是维护服务实例,它不需要去检索其他服务
eureka.client.fetch-registry=false
#指定服务注册中心的位置
#eureka.client.service-url.defaultZone=http://${eureka.instance.hostname}:${server.port}/eureka/
eureka.client.service-url.defaultZone=http://eureka8762:8762/eureka,http://eureka8763:8763/eureka
2、修改hosts文件,在文件中添加ip与域名的映射
127.0.0.1 eureka8761
127.0.0.1 eureka8762
127.0.0.1 eureka8763
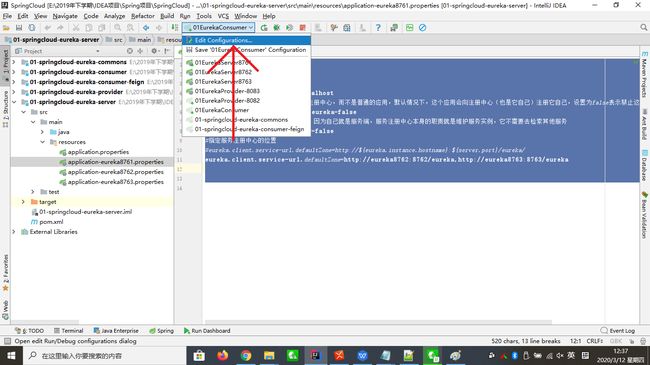
3、运行时,在运行配置项目 Program Arguments 中配置:
//参数代码
--spring.profiles.active=eureka8761
--spring.profiles.active=eureka8762
--spring.profiles.active=eureka8763
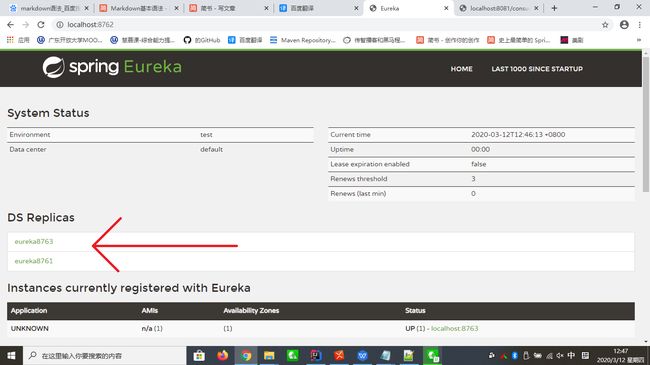
4、分别启动三个注册中心,访问三个注册中心页面,观察注册中心页面是否正常
5、搭建了Eureka集群之后,在消费者端的resources下的application.properties配置文件:eureka.client.service-url.defaultZone项 向集群注册
6、启动服务提供者服务
然后观察注册中心页面,可以看到服务会在三个注册中心上都注册成功
7、Eureka服务注册中心自我保护机制
在没有 Eureka 自我保护的情况下,如果 Eureka Server 在一定时间内没有接收到某个微服务实例的心跳,Eureka Server 将会注销该实例,但是如果只是偶尔网络不好,就把实例给踢出,那么微服务与 Eureka Server 之间将无法正常通信,这种行为可能会变得很危险,因为微服务本身是正常的,此时不应该注销这个微服务,如果没有自我保护机制,那么 Eureka Server 就会将此服务注销掉。 Eureka 通过“自我保护模式”来解决这个问题——当 Eureka Server 节点在短时间内丢失过多客户端时(可能发生了网络故障),那么就会把这个微服务节点进行保护。一旦进入自我保护模式,Eureka Server 就会保护服务注. 册表中的信息,不删除服务注册表中的数据(也就是不会注销任何微服务)。当网络故障恢复后,该 Eureka Server 节点会再自动退出自我保护模式。 所以,自我保护模式是一种应对网络异常的安全保护措施,它的架构哲学是宁可同时保留所有微服务(健康的微服务和不健康的微服务都会保留),也不盲目注 销任何健康的微服务,使用自我保护模式,可以让 Eureka 集群更加的健壮、稳定。 当然也可以使用配置项:eureka.server.enable-self-preservation = false 禁用自我保护模式。关闭自我保护模式后会出现红色
但是 Eureka Server 自我保护模式也会带来一些困扰,如果在保护期内 某个服务提供者刚
好非正常下线了,此时服务消费者就会拿到一个无效的服务实 例,此时会调用失败,对于这个问题需要服务消费者端具有一些容错机制,如重试,断路器等。
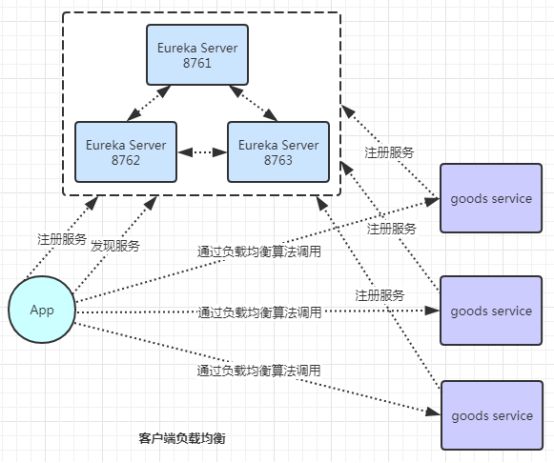
8、Ribbon是Netflix公司发布的开源项目(组件、框架、jar包),主要功能是提供客户端的软件负载均衡算法,它会从eureka中获取一个可用的服务端清单,通过心跳检测来剔除故障的服务端节点以保证清单中都是可以正常访问的服务端节点。
当客户端发送请求,则ribbon负载均衡器按某种算法(比如轮询、权重、 最小连接数等)从维护的可用服务端清单中取出一台服务端的地址,然后进行请求;
Ribbon非常简单,可以说就是一个jar包,这个jar包实现了负载均衡算法,Spring Cloud 对 Ribbon 做了二次封装,可以让我们使用 RestTemplate 的服务请求,自动转换成客户端负载均衡的服务调用。 Ribbon 支持多种负载均衡算法,还支持自定义的负载均衡算法。
-
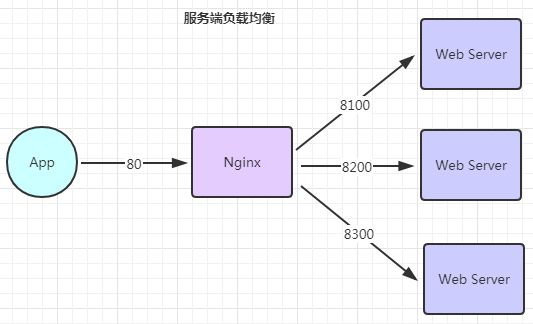
客户端负载均衡 vs 服务端负载均衡
-
Feign
-
Feign的介绍
Feign 是 Netflix 公司开发的一个声明式的 REST 调用客户端; (调用远程的restful风格的http接口 的一个组件)
调用组件其实很多,比如:
1、Httpclient(apache)
2、Httpurlconnection (jdk)
3、restTemplate(spring)
4、OkHttp(android)
5、Feign (Netflix) --> 实现非常优雅
Spring Cloud Feign 对 Ribbon 负载均衡进行了简化,在其基础上进行了进一步的封装,在配置上大大简化了开发工作,它是一种声明式的调用方式,它的使用方法是定义一个接口,然后在接口上添加注解,使其支持了Spring MVC标准注解和HttpMessageConverters,Feign可以与Eureka和Ribbon组合使用以支持负载均衡。
Feign的用途
Feign旨在简化微服务消费方(调用者,客户端)代码的开发,前面在使用Ribbon+RestTemplate进行服务调用时,利用RestTemplate对http请求的封装处理,形成了一套模版化的调用方式,但是在实际开发中,由于服务提供者提供的接口非常多,一个接口也可能会被多处调用,Feign在Ribbon+RestTemplate的基础上做了进一步封装,在Feign封装之后,我们只需创建一个接口并使用注解的方式来配置,即可完成对服务提供方的接口绑定,简化了使用Ribbon + RestTemplate的调用,自动封装服务调用客户端,减少代码开发量;
-
使用Feign开发消费者
使用 Feign 实现消费者,我们通过下面步骤进行:
-
第一步 :检查pom文件依赖是否导入
    4.0.0

        org.springframework.boot
        spring-boot-starter-parent
        2.2.5.RELEASE


    com.qinglin
    01-springcloud-eureka-commons
    0.0.1-SNAPSHOT
    01-springcloud-eureka-commons
    基于fegin的消费者


        1.8
        Hoxton.SR3


            org.springframework.boot
            spring-boot-starter-web


            org.springframework.cloud
            spring-cloud-starter-netflix-eureka-client


            org.springframework.cloud
            spring-cloud-starter-openfeign


            org.springframework.boot
            spring-boot-starter-test
            test


                    org.junit.vintage
                    junit-vintage-engine


                org.springframework.cloud
                spring-cloud-dependencies
                ${spring-cloud.version}
                pom
                import


                org.springframework.boot
                spring-boot-maven-plugin
-
第二步 :创建普通 Spring Boot 工程
-
第三步 :把接口放在通用的接口层、常量类、model的项目中
-
第四步 :声明服务
定义一个 GoodsRemoteClient 接口,通过@FeignClient 注解来指定服务名称,进而绑定服务,然后再通过 SpringMVC 中提供的注解来绑定服务提供
-
第五步 :创建一个消费者项目(web)
-
第六步 : 检查pom依赖文件的导入
    4.0.0

        org.springframework.boot
        spring-boot-starter-parent
        2.2.5.RELEASE


    com.qinglin
    01-springcloud-eureka-consumer-feign
    0.0.1-SNAPSHOT
    war
    01-springcloud-eureka-consumer-feign
    消费者


        1.8


            com.qinglin
            01-springcloud-eureka-commons
            0.0.1-SNAPSHOT


            org.springframework.boot
            spring-boot-starter-web


            org.springframework.boot
            spring-boot-starter-tomcat


            org.springframework.boot
            spring-boot-starter-test
            test


                    org.junit.vintage
                    junit-vintage-engine


                org.springframework.boot
                spring-boot-maven-plugin
-
第七步 : 添加注解
在项目入口类上添加@EnableFeignClients 注解表示开启 Spring Cloud Feign的支持功能;
package com.qinglin.springcloud;

import com.qinglin.springcloud.service.GoodsRemoteClient;
import org.springframework.beans.factory.annotation.Autowired;
import org.springframework.boot.SpringApplication;
import org.springframework.boot.autoconfigure.SpringBootApplication;
import org.springframework.cloud.openfeign.EnableFeignClients;
import org.springframework.web.bind.annotation.RequestMapping;
import org.springframework.web.bind.annotation.RestController;

@SpringBootApplication
@EnableFeignClients

public class Application {

   public static void main(String[] args)
   {
       SpringApplication.run(Application.class, args);
   }

}
-
第八步 : 使用 Controller 注解 调用服务
kage com.qinglin.springcloud.controller;

import com.qinglin.springcloud.service.GoodsRemoteClient;
import org.springframework.beans.factory.annotation.Autowired;
import org.springframework.web.bind.annotation.RequestMapping;
import org.springframework.web.bind.annotation.RestController;

@RestController
@RequestMapping("zheng")
public class UserController {
    @Autowired
    private GoodsRemoteClient goodsRemoteClient;

    @RequestMapping("xixi")
    public String zhengxixi()
    {
        return goodsRemoteClient.zhengxixi();
    }
}
-
第九步 : 编写resources下的application.properties,配置文件配置服务名称和注册中心地址
#内嵌定时tomcat的端口
server.port=9999
#每间隔2s,向服务端发送一次心跳
eureka.instance.lease-renewal-interval-in-seconds=2
#告诉服务端,如果10s之内没有给发出心跳,就表示自己有故障了,可以踢出
eureka.instance.lease-expiration-duration-in-seconds=10
#告诉服务端,服务实例以IP作为链接,而不是取机器名
eureka.instance.prefer-ip-address=true

eureka.client.fetch-registry=true
#告诉服务端,服务实例的名字
eureka.instance.instance-id=01-springcloud-eureka-consumser-feign
#eureka注册中心的连接地址
eureka.client.service-url.defaultZone=http://localhost:8761/eureka,http://localhost:8762/eureka,http://localhost:8763/eureka
#服务名称
spring.application.name=01-springcloud-eureka-consumser-feign
-
第十步 : 测试
依次启动注册中心、服务提供者和 feign 实现服务消费者,然后访问如下地址:
-
Hystrix
Hystrix被称为熔断器,它是一个用于处理分布式系统的延迟和容错的开源库,在分布式系统里,许多服务之间通过远程调用实现信息交互,调用时不可避免会出现调用失败,比如超时、异常等原因导致调用失败,Hystrix能够保证在一个服务出问题的情况下,不会导致整体服务失败,避免级联故障(服务雪崩),以提高分布式系统的弹性;
所以当某个服务单元发生故障之后,通过断路器的故障监控(类似熔断保险丝),向调用方返回一个符合预期的、可处理的备选响应(FallBack),而不是长时间的等待或者抛出调用方无法处理的异常,这样就保证了服务调用方的线程不会被长时间地占用,从而避免了故障在分布式系统中的蔓延,乃至雪崩。
针对上面的问题,hystrix提供了 :熔断降级
服务降级是指当某个微服务响应时间过长,发生异常,或者服务不可用了,我们不能把错误信息返回回来,或者让它一直卡在那里,所以要准备一个对应的策略(一个方法),当发生这种问题时,我们直接调用这个备用的方法来快速返回一个默认的结果,让请求得到快速响应,而不是一直卡在那里;
案例:
-
使用:
-
1、在项目中添加依赖
-
2、在消费者入口类上添加注解
-
3、在调用远程服务的方法上添加注解:@HystrixCommand(fallbackMethod = "m1")
hystrix 默认超时时间是 1000 毫秒,如果生产者的响应超过此时间,就会触发 断路器
-
4、测试
我在生产者中让程序执行时休眠2000毫秒
然后依次启动:注册中心,生产者,消费者
在浏览器进入到消费者的页面
-
超时时间设置
-
1、编写resources下的application.properties,配置文件,设置超时时间:
#内嵌定时tomcat的端口
server.port=8081
#每间隔2s,向服务端发送一次心跳
eureka.instance.lease-renewal-interval-in-seconds=2
#告诉服务端,如果10s之内没有给发出心跳,就表示自己有故障了,可以踢出
eureka.instance.lease-expiration-duration-in-seconds=10
#告诉服务端,服务实例以IP作为链接,而不是取机器名
eureka.instance.prefer-ip-address=true
#告诉服务端,服务实例的名字
eureka.instance.instance-id=01-springcloud-eureka-consumser
#eureka注册中心的连接地址
eureka.client.service-url.defaultZone=http://localhost:8761/eureka,http://localhost:8762/eureka,http://localhost:8763/eureka
#服务名称
spring.application.name=01-springcloud-eureka-consumser-8081


#设置ribbo的读取超时时间
ribbon.ReadTimeout=3000
#设置ribbo的连接超时时间
ribbon.ConnectTimeout=3000

#设置hystrix是否开启
feign.hystrix.enabled=true
#开启hystrix自定义超时(不开启默认1000ms)
hystrix.command.default.execution.timeout.enabled=true
#设置hystrix超时时间
hystrix.command.default.execution.isolation.thread.timeoutInMilliseconds=5000
-
仪表盘
-
1、创建一个普通的springboot项目,按下图进行选择
-
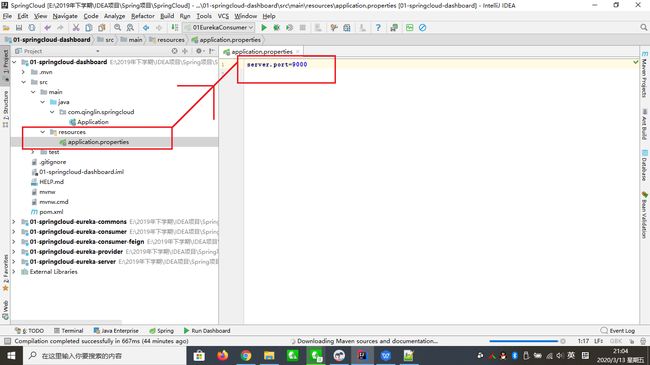
2、根据实际情况修改端口号(不冲突)
server.port=9000
-
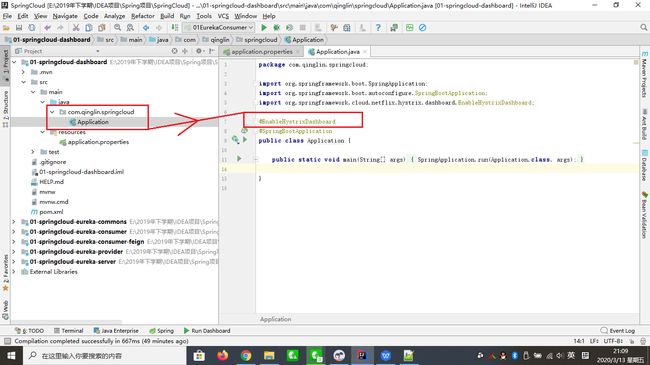
3、在入口类添加注解:
-
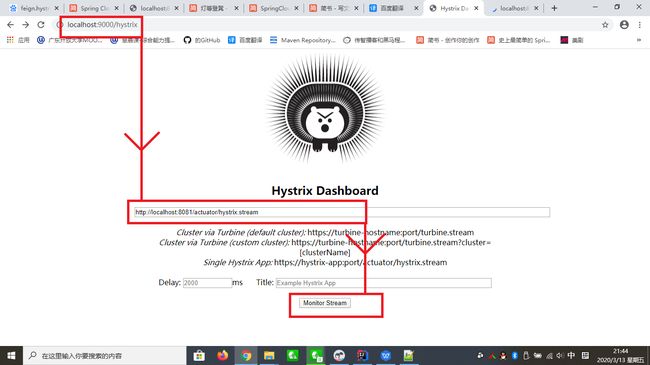
4、启动程序进入仪表盘首页(端口号上面加上:hystrix)
-
Hystrix 仪表盘工程已经创建好了,现在我们需要有一个服务,让这个服务提供 一个路径为/actuator/hystrix.stream 接口,然后就可以使用 Hystrix 仪表盘来对该服务进行监控了;我们需要改造消费者服务,让其能提供/actuator/hystrix.stream 接口,步骤如下:
-
1、消费者项目POM文件需要有 hystrix 的依赖:
    org.springframework.cloud
    spring-cloud-starter-netflix-hystrix
-
2、消费者项目POM文件需要有一个 spring boot 的服务监控依赖:
org.springframework.boot
spring-boot-starter-actuator
-
3、编写resources下的application.properties,配置文件
management.endpoints.web.exposure.include=hystrix.stream
-
4、访问入口 http://localhost:消费者端口/actuator/hystrix.stream
注意:这里有一个细节需要注意,
要访问/hystrix.stream 接口,
首先得访问consumer 工程中的任意一个其他接口,
否则直接访问/hystrix.stream 接口时
会输出出一连串的 ping: ping: …,
先访问 consumer 中的任意一个其他接口,
然后再访问/hystrix.stream 接口即可;
-
Zuul
Zuul包含了对请求的路由和过滤两个最主要的功能:
其中路由功能负责将外部请求转发到具体的微服务实例上,是实现外部访问统一入口的基础,过滤功能则负责对请求的处理过程进行干预,是实现请求校验、服务聚合等功能的基础;
Zuul和Eureka进行整合,将Zuul自身注册为Eureka服务治理下的应用,同时从Eureka中获得其他微服务的信息,也即以后的访问微服务都是通过Zuul跳转后获得。
-
路由功能基本使用步骤:
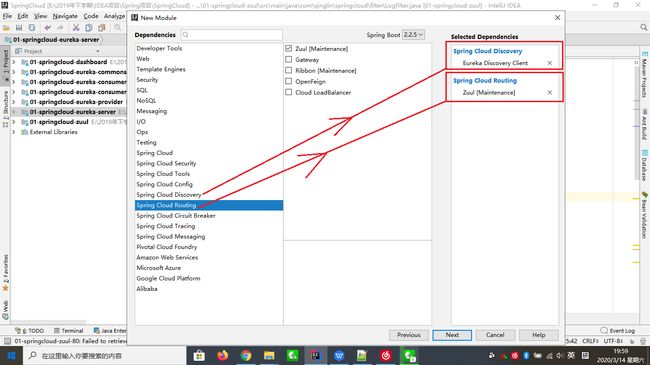
1、创建一个springboot消费者项目
2、检查pom文件依赖
    4.0.0

        org.springframework.boot
        spring-boot-starter-parent
        2.2.5.RELEASE


    com.qinglin
    01-springcloud-zuul
    0.0.1-SNAPSHOT
    01-springcloud-zuul
    网关


        1.8
        Hoxton.SR3


            org.springframework.cloud
            spring-cloud-starter-netflix-eureka-client


            org.springframework.cloud
            spring-cloud-starter-netflix-zuul


            org.springframework.boot
            spring-boot-starter-test
            test


                    org.junit.vintage
                    junit-vintage-engine


                org.springframework.cloud
                spring-cloud-dependencies
                ${spring-cloud.version}
                pom
                import


                org.springframework.boot
                spring-boot-maven-plugin
3、编写resources下的application.properties,配置文件
#内嵌定时tomcat的端口
server.port=80
#是eureka注册中心首页的Application这一栏
spring.application.name=01-springcloud-zuul
#每间隔2s,向服务端发送一次心跳,证明自己依然"存活"
eureka.instance.lease-renewal-interval-in-seconds=2
#告诉服务端,如果我10s之内没有给你发心跳,就代表我故障了,将我踢出掉
eureka.instance.lease-expiration-duration-in-seconds=10
#告诉服务端,服务实例以IP作为链接,而不是取机器名
eureka.instance.prefer-ip-address=true
#告诉服务端,服务实例的id,id必须要唯一,是eureka注册中心首页的Status这一栏
eureka.instance.instance-id=01-springcloud-zuul
#eureka注册中心的连接地址
eureka.client.service-url.defaultZone=http://localhost:8761/eureka
#配置路由规则
zuul.routes.portal1.service-id=01-springcloud-eureka-provider
zuul.routes.portal2.service-id=01-springcloud-eureka-consumser
#   /** 表示 后面可以有多级目录   http://localhost/provider/
zuul.routes.portal1.path=/provider/**
zuul.routes.portal2.path=/consumer/**
#禁止使用服务的名称来访问
zuul.ignored-services=01-springcloud-eureka-provider
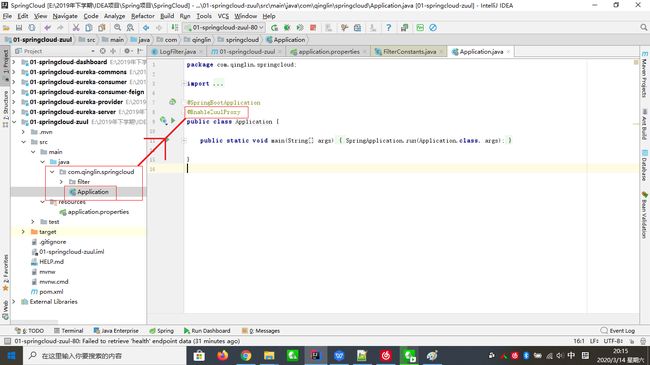
4、在启动类添加注解
package com.qinglin.springcloud;

import org.springframework.boot.SpringApplication;
import org.springframework.boot.autoconfigure.SpringBootApplication;
import org.springframework.cloud.netflix.zuul.EnableZuulProxy;

@SpringBootApplication
@EnableZuulProxy
public class Application {

    public static void main(String[] args) {
        SpringApplication.run(Application.class, args);
    }

}
这样简单的zuul就搭建好了, 启动项目我们即可通过zuul然后加上对应的微服务名字访问微服务,比如:
http://localhost/01-springcloud-eureka-provider/goods/goodsList
对于路径的解释
http://localhost:80/ 这是zuul本身
5、01-springcloud-eureka-provider 这是要调用的服务goods/goodsList 这是被调用controller接口的路径在实际开发当中我们肯定不会通过微服务名去调用,比如我要调用消费者可能只要一个goods/goodsList就好了,而不是01-springcloud-eureka-provider/goods/goodsList在zuul项目中加入以下配置即可:
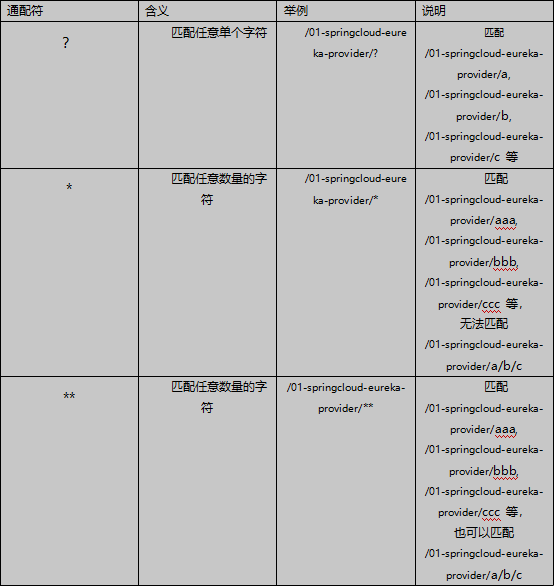
/ **代表是所有(多个)层级 /goods/goodsList/ * 是代表一层;如果是/ * 的话 /goods/goodsList 就不会被路由;此时我们能通过自定义的规则进行访问,但是我们现在依然能用之前的微服务名调用,这是不合理的,第一是有多重地址了, 第二一般微服务名这种最好不要暴露在外,所以我们一般会禁用微服务名方式调用。
如果一个一个通过微服务名来配置难免有点复杂,所以一般这样配置来禁用所有:
6、可能有时候我们的接口调用需要一定的规范,比如调用微服务的API URL前缀需要加上/api 对于这种情况,zuul也考虑到了并给出了解决方案:
zuul.prefix=/api
**比如:http://localhost/api/provider/goods/goodsList
-
过滤器:
限流、权限验证、记录日志
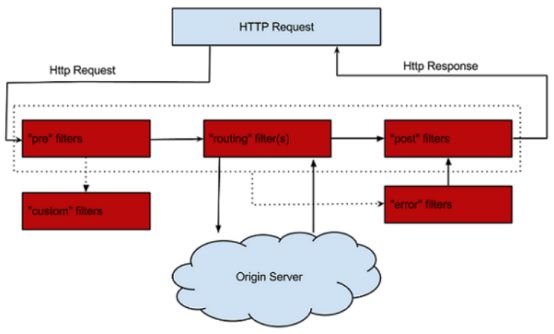
过滤器 (filter) 是zuul的核心组件,zuul大部分功能都是通过过滤器来实现的。 zuul中定义了4种标准过滤器类型,这些过滤器类型对应于请求的典型生命周期。
PRE:这种过滤器在请求被路由之前调用。可利用这种过滤器实现身份验证、在 集群中选择请求的微服务、记录调试信息等。
ROUTING:这种过滤器将请求路由到微服务。这种过滤器用于构建发送给微服 务的请求,并使用 Apache HttpClient或 Netfilx Ribbon请求微服务
POST:这种过滤器在路由到微服务以后执行。这种过滤器可用来为响应添加标准 的 HTTP Header、收集统计信息和指标、将响应从微服务发送给客户端等。 ERROR:在其他阶段发生错误时执行该过滤器。
如果要编写一个过滤器,则需继承ZuulFilter类实现其中的方法:
参考文章:https://www.jianshu.com/p/ff863d532767
https://blog.csdn.net/haha7289/article/details/54312043
-
示例代码
package com.qinglin.springcloud.filter;

import com.netflix.zuul.ZuulFilter;
import com.netflix.zuul.exception.ZuulException;
import org.springframework.cloud.netflix.zuul.filters.support.FilterConstants;
import org.springframework.stereotype.Component;

//要使用过滤器就要加上代码
@Component
public class LogFilter extends ZuulFilter {

    //这个方法用于选择过滤器的类型
    @Override
    public String filterType()
    {
        return FilterConstants.ROUTE_TYPE;
    }

    /***
     *
     * 用于指定过滤器执行的顺序(因为我们可能会使用到多个过滤器)
     * 数值越小,优先级越高
     */

    @Override
    public int filterOrder()
    {
        return 1;
    }

    /***
     * 是否要使用过滤器
     * @return
     */
    @Override
    public boolean shouldFilter()
    {
        return true;
    }


    /***
     * 这里是过滤器要执行的run方法(这里写过滤的代码)
     * @return
     * @throws ZuulException
     */
    @Override
    public Object run() throws ZuulException
    {
        System.out.println("我来自路由的过滤器");
        return null;
    }
}
-
zuul过滤器的禁用
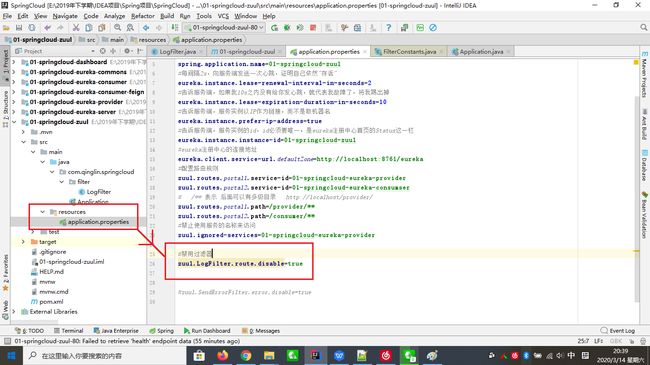
Spring Cloud默认为Zuul编写并启用了一些过滤器,例如DebugFilter、 FormBodyWrapperFilter等,这些过滤器都存放在spring-cloud-netflix-zuul这个jar包里,一些场景下,想要禁用掉部分过滤器,该怎么办呢? 只需在:application/properties里设置zuul...disable=true 例如,要禁用上面我们写的过滤器,这样配置就行了:
#禁用过滤器
zuul.LogFilter.route.disable=true
注意代码中
这里是什么类型则这里就写什么类型
-
Zuul 的异常处理
官方给出的 Zuul 请求的生命周期图:
1、正常情况下所有的请求都是按照 pre、route、post 的顺序来执行,然后由 post 返回 response
2、在 pre 阶段,如果有自定义的过滤器则执行自定义的过滤器
3、pre、routing、post 的任意一个阶段如果抛异常了,则执行 error 过滤器
我们可以统一处理异常:
怎么实现,步骤:
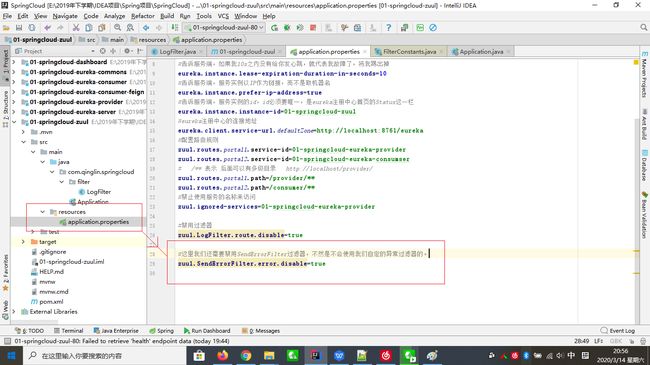
1、禁用 zuul 默认的异常处理 SendErrorFilter 过滤器,然后自定义我们自己的Errorfilter 过滤器
然后我们就可以自己编写自定义过滤器
package com.qinglin.springcloud.filter;

import com.netflix.zuul.ZuulFilter;
import com.netflix.zuul.exception.ZuulException;
import org.springframework.cloud.netflix.zuul.filters.support.FilterConstants;
import org.springframework.stereotype.Component;

//要使用过滤器就要加上注解
@Component
public class LogFilter extends ZuulFilter {

    //这个方法用于选择过滤器的类型
    @Override
    public String filterType()
    {
        return FilterConstants.ERROR_TYPE;
    }

    /***
     *
     * 用于指定过滤器执行的顺序(因为我们可能会使用到多个过滤器)
     * 数值越小,优先级越高
     */

    @Override
    public int filterOrder()
    {
        return 1;
    }

    /***
     * 是否要使用过滤器
     * @return
     */
    @Override
    public boolean shouldFilter()
    {
        return true;
    }


    /***
     * 这里是过滤器要执行的run方法(这里写过滤的代码)
     * @return
     * @throws ZuulException
     */
    @Override
    public Object run() throws ZuulException
    {
        System.out.println("我来自自定义的异常的过滤器");
        return null;
    }
}
-
Zuul的熔断降级
zuul是一个代理服务,但如果被代理的服务突然断了,这个时候zuul上面会有出错信息,例如,停止了被调用的微服务;
一般服务方自己会进行服务的熔断降级,但对于zuul本身,也应该进行zuul的降级处理;
我们需要有一个zuul的降级,实现如下:


