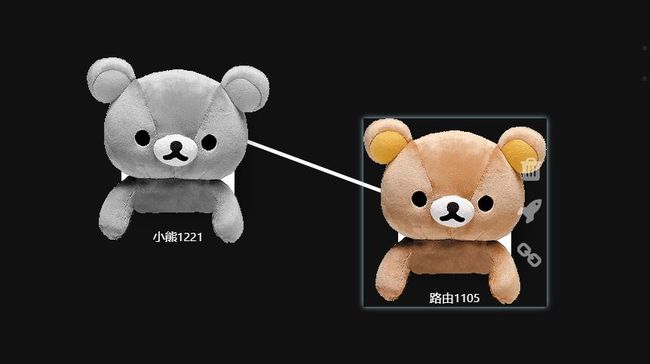
演示:
体验地址:workmates.me
效果1:在网页上随意拖拽。
效果2:鼠标经过时的描边。
效果3:在图片之间连线。
效果1. 随意拖拽。
树型解释:
1.每当鼠标移动时,记录下是否【单击】了某一张图片:
否:什么也不做
是:记录下图片的id;记录下鼠标当下的坐标{x:event.pageX,y:event.pageY} ;设置first_click为True
1.1. 在first_click为True的情况下,判断鼠标是否再次点击:
否:从被【单击】的元素处为出发点,到鼠标“现在的即时位置”为结束点,画一条线。随着鼠标的移动,这条线的末端随鼠标位置移动。
2. 鼠标再次点击了。从被【单击】的元素处为出发点,到鼠标点击结束的位置,画一条线。将这条线的记录存入数据库,并利用socket.io通知前端更新视图。这样就留下了一条线。
2.1.鼠标放开的两种情况:
①移到了另一个元素的位置,并【单击】了该元素。则依照第2条那样做。
②移到了空白处,并【双击】鼠标。则新产生一个图片元素,并将第一次点击的元素与之连线。
// index.js
window.onmousemove=(event)=>{
vm.mousepos={x:event.pageX,y:event.pageY
}};
window.onmouseup=(evt)=>{
vm.now_id=-1
};
window.ondblclick=(evt)=>{
if(vm.first_click){
vm.first_click=false;
//顺序:先创建元素,再连接成线。
socket.emit('addpostit',{text:"小熊"+(Math.random()*1000+1000).toFixed(0),src:"/top_img/bear.jpg",status:1,pos:{x:event.pageX,y:event.pageY}});
socket.emit('addline',{start:vm.postits[vm.first_index],endpos:{x:event.pageX,y:event.pageY}});
}};
图片被点击时执行selectId方法,传入点击事件evt,和元素id。注意其中的分两种情况处理:
// index.js
selectId(evt,pid){
if(this.first_click&&this.first_index!==pid){
//鼠标第二次落地
this.first_click=false;
socket.emit('connectline',{startId:this.postits[this.first_index]._id,endId:this.postits[pid]._id});
$('#img'+pid)[0].removeAttribute('style');//移除特效
}else{
//鼠标第一次点击某张图片。
this.now_id=pid;this.startMousePos={x:evt.offsetX,y:evt.offsetY,}
}}
效果2:描边
首先,我想要的效果是:
效果1:线条末端在图片的中心。 效果2:有好看的“边框”效果。(当我拖着线移动到第二个图片上时) 效果3:悬浮按钮。
1:线条末端在图片的中心。
元素的来源说明:
图片:div(命名postit)嵌套div(命名block)嵌套img
线:canvas画的
首先,将canvas的画布布满整个屏幕,将大小设置为随屏幕大小改变。
// index.js
var c=$("#myCanvas")[0];
var ctx=c.getContext("2d");
var ww,wh;
var center={x:0,y:0};
var deg_to_pi=Math.PI/180;
function getWindowSize(){
ww=$(window).outerWidth();
wh=$(window).outerHeight();
c.width=ww;c.height=wh;center={
x:ww/2,y:wh/2
};
ctx.restore();
ctx.translate(0,0);}
getWindowSize();
$(window).resize(getWindowSize);
style这里也设置一下。
// style.css
html, body{
background-color:#111;
width:100%;
height:100%;
padding:0;
margin:0;
}
canvas{
background-color:#333;
}
OK。下面将边框的悬浮效果赋给div(postit);然后将div(block)的大小设置的很小(直到隐藏在img后面);第三步是将img的大小设置的足够合理,并盖过div(block)。
说明:为什么要多一层div(block)?
答:因为我们要将div(block)作为canvas画线的锚点,也就是坐标点。
但是div天生的属性就是它本身代表自己的坐标是在左上角,也就是说div(block)的坐标是它自身的左上角。所以,我们要让它足够小!小到看起来就像在img元素的中心。
这就是设计的绝妙之处。
// style.css
.postit{
width:150px;
height:150px;
font-size:calc(240px / 4 - 5px);
display:flex;
justify-content:center;
align-items:center;
background-color:#fff;
box-shadow:15px 10px 40pxrgba(0, 0, 0, 0.4);
position:absolute;
transition:background-color 0.5s;
cursor:pointer;
transform-origin:50% 50%;
}
.postit .block{
width:1px;
height:1px;
position:absolute;
background:transparent;
z-index:99;
}
.postit img{
min-width:200px
}
2. 边框效果
// style.css
changeStyle(evt,pid){
if(this.first_click&&this.first_index!==pid){
// 你要的好看的阴影
$('#img'+pid)[0].setAttribute('style','box-shadow: 0px 0px 10px lightblue;');
}},
restoreStyle(evt,pid){
if(this.first_click&&this.first_index!==pid){
$('#img'+pid)[0].removeAttribute('style');
}
},
3. 悬浮按钮
// style.css
.postit .plus{
position:absolute;
bottom:0;r
ight:-40px;
color:white;
opacity:0;
transition:opacity 0.3s;
}
.postit .delete{
position:absolute;
top:0;
right:-40px;
color:white;
opacity:0;
transition:opacity 0.3s;
}
.postit:hover
.delete{
opacity:.5;
}
.postit:hover .plus{
opacity:.5;
}
.postit .delete:hover{
opacity:1;
}
.postit .plus:hover{
opacity:1;
}
效果3:在图片之间连线。
用canvas画图即可搞定,关键要通过socket.io即时更新数据。
// index.js
setInterval(draw,10);
functiondraw(){
ctx.fillStyle="#111";
ctx.beginPath();
ctx.rect(-2000,-2000,4000,4000);
ctx.fill();
ctx.strokeStyle="white";
ctx.lineWidth="5";
if(vm.lines.length){
// 画在画布上的线,从vm.lines里获取。
vm.lines.forEach((line,i)=>{
var start_p=vm.postits.filter((o)=>(o._id===line.startId))[0];
var end_p=vm.postits.filter((o)=>(o._id===line.endId))[0];
ctx.moveTo(start_p.pos.x,start_p.pos.y);
ctx.lineTo(end_p.pos.x,end_p.pos.y);})
;}
ctx.stroke();
if(vm.first_click){
// 画那条随着鼠标移动的线
ctx.beginPath();
ctx.strokeStyle="white";
ctx.lineWidth="5";
ctx.moveTo(vm.postits[vm.first_index].pos.x,vm.postits[vm.first_index].pos.y);
ctx.lineTo(vm.mousepos.x,vm.mousepos.y);
ctx.stroke();
}}
体验地址:workmates.me
