- 今日目标:
- 了解 vue3 初始化渲染流程
我们今天的代码
{{ count }}
const {ref , h } = Vue
Vue.createApp({
  setup(p , c){
    const count = ref(0)
    const add = () => {
      count.value ++
    }
    return {
      count,
      add
    }
  },
}).mount('#app')
开始分析
createApp
入口方法 : runtime-dom -> index
从上面代码我们可以看出,vue3 初始化需要经过 createApp 方法, 之后 mount 到选中的容器上. 所以我们看下 createApp 方法的实现
// 入口方法
export const createApp = ((...args) => {
  // 获取 app 实例
  const app = ensureRenderer().createApp(...args)

  const { mount } = app
  app.mount = (containerOrSelector: Element | ShadowRoot | string): any => {
    // 验证容器合法
    const container = normalizeContainer(containerOrSelector)
    if (!container) return
    const component = app._component
    if (!isFunction(component) && !component.render && !component.template) {
      // 追加属性
      component.template = container.innerHTML
    }
    // 清空容器内容
    container.innerHTML = ''
    // 开始挂载
    const proxy = mount(container, false, container instanceof SVGElement)

    return proxy
  }

  return app
}) as CreateAppFunction
我们可以看出 createApp 方法的核心目的是创建一个 app , 创建之后添加 mount 方法提供给后面链式调用.
我们来看一看 app 的创建过程
ensureRenderer
创建渲染器 : runtime-dom -> index
function ensureRenderer() {
  return renderer || (renderer = createRenderer(rendererOptions))
}
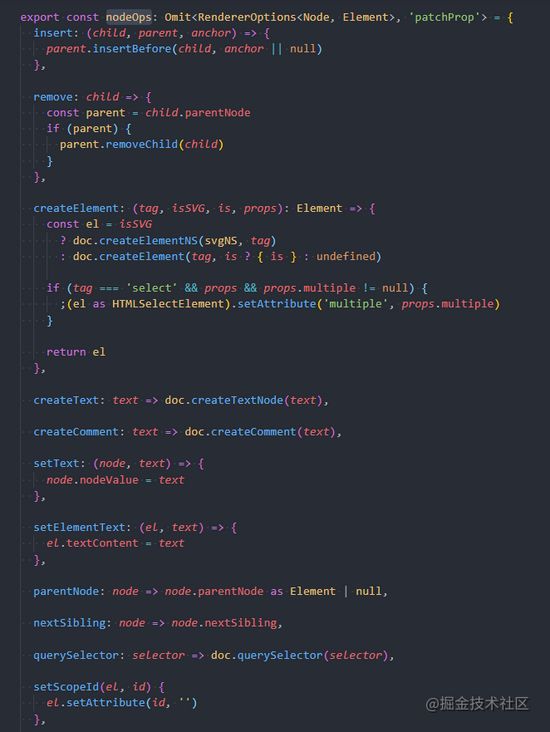
这个方法试图返回一个 renderer .如果 renderer 不存在,他就去创建一个 renderer.看一下创建的时候传入的 rendererOptions
他在这里将 patchProp , forcePatchProp , nodeOps 合并
我们可以看到 nodeOps 为真实 DOM 操作.
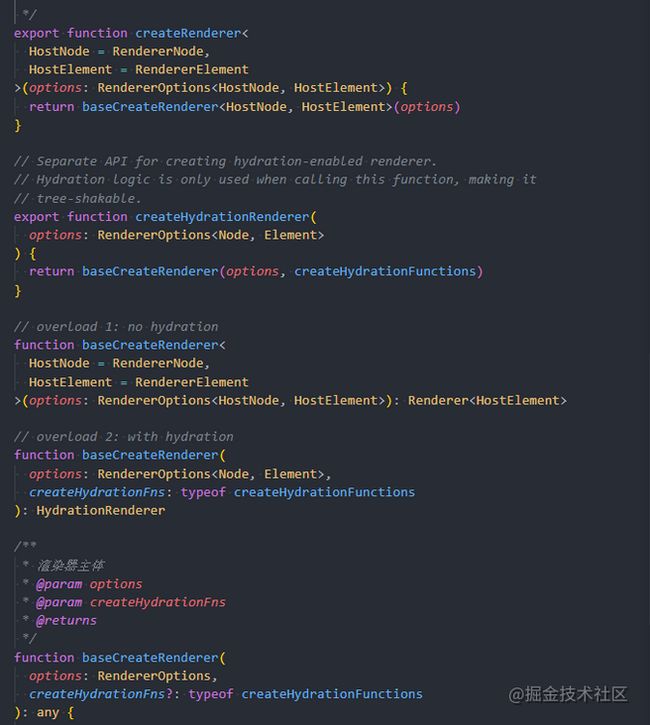
我们看一下 createRenderer 方法
createRenderer
创建渲染器 : runtime-core -> renderer
可以看到, 在这里做了几次重载之后, 最终执行的是 baseCreateRenderer
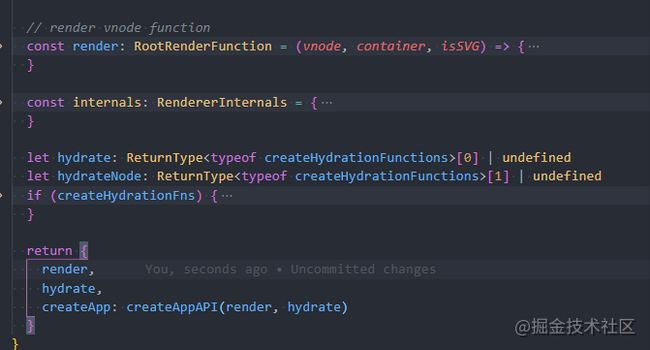
这个方法太长了, 就不全截图了. 总的来说这个方法最终的目的是拿到 render , 和 createAppApi 的执行结果. 我们来看一下 createApp 是做什么的.
createAppApi
生成 app 实例 注册全局 API : runtime-core -> apiCreateApp
- 这个方法先创建了一个 app 的空的上下文
export function createAppContext(): AppContext {
  return {
    app: null as any,
    config: {
      isNativeTag: NO,
      performance: false,
      globalProperties: {},
      optionMergeStrategies: {},
      errorHandler: undefined,
      warnHandler: undefined,
      compilerOptions: {}
    },
    mixins: [],
    components: {},
    directives: {},
    provides: Object.create(null),
    optionsCache: new WeakMap(),
    propsCache: new WeakMap(),
    emitsCache: new WeakMap()
  }
}
这个结构
- 同时会创建一个 管理插件的集合
- 在 app 中, 注册了一些全局相关的东西. (想看全局指令, 全局组件, 插件相关的可以到这个方法里看)
const app: App = (context.app = {
  _uid: uid++,
  _component: rootComponent as ConcreteComponent,
  _props: rootProps,
  _container: null,
  _context: context,
  _instance: null,
  version,
  get config() {
    return context.config
  },
  set config(v) {
    if (__DEV__) {
      warn(
        `app.config cannot be replaced. Modify individual options instead.`
      )
    }
  },
  use(plugin: Plugin, ...options: any[]) {
    // more ...
    return app
  },
  mixin(mixin: ComponentOptions) {
      // more ...
    return app
  },
  component(name: string, component?: Component): any {
    // more ...
    return app
  },
  directive(name: string, directive?: Directive) {
    // more ...
    return app
  },
  mount(
    rootContainer: HostElement,
    isHydrate?: boolean,
    isSVG?: boolean
  ): any {
    // more ...
  },
  unmount() {
    // more ...
  },
  provide(key, value) {
    // more ...
    return app
  }
})
这里面声明了一个 mount 方法 (记住!!!).
之后他就把 app 返回了. 到这里为止, 我们的 app 实例就创建好了. 我们可以看出来, vue3 的设计方式是将平台相关的操作抽离出去, 这样对多平台框架开发者及其友好, 只需要关注对应平台的节点操作, 创建渲染器即可.
我们回到入口方法
暴露挂载方法
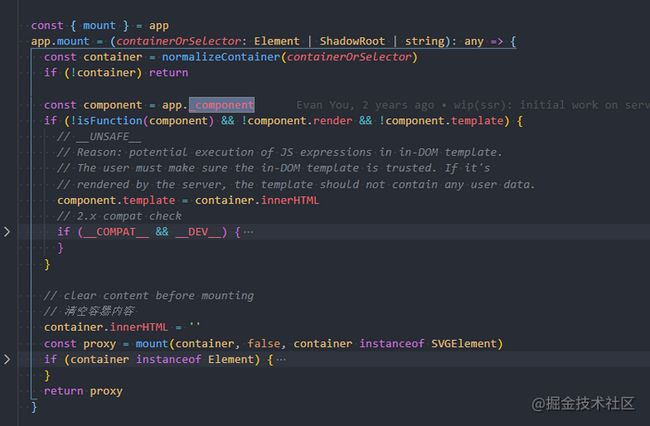
获取到 app 实例之后, vue 把实例中的 mount 方法缓存了一下, 并且重写实例上的 mount 方法. 当我们调用 mount 时(调用的是重写之后的 mount ),
- vue 会先验证你传入的挂载目标是否是合法的目标.
- 他会尝试获取实例上的 \_component (当前的 component 为 createApp 时注册的选项)
- 如果发现我们注册的选项 不是 function || 没有 render 配置 || 没有 template 配置的话 , 他会给 component 增加 template 属性, (这个属性后续会用到 !!!)
- 之后清空容器里的 innerHTML
- 执行之前缓存的(实例中的) mount 方法
mount
挂载方法 : runtime-core -> apiCreateApp -> mount
- 如果当前实例还没被挂载过, 他就会创建一个 vnode . 由于是引用关系,所以我们增加的 template 属性也会在 rootComponent 中
看一下 createVNode 方法
/**
 *  runtime-core -> vnode
 */

function _createVNode(
  type: VNodeTypes | ClassComponent | typeof NULL_DYNAMIC_COMPONENT, // rootComponent
  props: (Data & VNodeProps) | null = null, // null
  children: unknown = null, // null
  patchFlag: number = 0, // 0
  dynamicProps: string[] | null = null, // null
  isBlockNode = false // false
): VNode {
  // 如果传入的参数 已经是个 vnode 了
  // 则不需要转换 克隆一个
  // 检查子元素是否为合法的子元素
  if (isVNode(type)) {
    const cloned = cloneVNode(type, props, true /* mergeRef: true */)
    if (children) {
      normalizeChildren(cloned, children)
    }
    return cloned
  }

  // 如果是类组件
  if (isClassComponent(type)) {
    // more
  }

  // 处理 props 中的 class 和 style
  if (props) {
    // more ...
  }

  // 打标记
  const shapeFlag = isString(type)
    ? ShapeFlags.ELEMENT
    : __FEATURE_SUSPENSE__ && isSuspense(type)
      ? ShapeFlags.SUSPENSE
      : isTeleport(type)
        ? ShapeFlags.TELEPORT
        : isObject(type)
          ? ShapeFlags.STATEFUL_COMPONENT
          : isFunction(type)
            ? ShapeFlags.FUNCTIONAL_COMPONENT
            : 0

  // vnode 主体
  const vnode: VNode = {
    __v_isVNode: true,
    __v_skip: true,
    type,
    props,
    key: props && normalizeKey(props),
    ref: props && normalizeRef(props),
    scopeId: currentScopeId,
    slotScopeIds: null,
    children: null,
    component: null,
    suspense: null,
    ssContent: null,
    ssFallback: null,
    dirs: null,
    transition: null,
    el: null,
    anchor: null,
    target: null,
    targetAnchor: null,
    shapeFlag,
    patchFlag,
    dynamicProps,
    dynamicChildren: null,
    appContext: null
  }

  // 检查子节点是否合法
  normalizeChildren(vnode, children)

  // 检查 suspense 的子节点
  if (__FEATURE_SUSPENSE__ && shapeFlag & ShapeFlags.SUSPENSE) {
    // more ...
  }

  return vnode
}
值得一提的是, vue3 采用 位运算 来给元素类型进行枚举. 个人理解为: 没有使用 number nodeType,而是使用二进制 0000、0010、0100、1000 是为了方便确认节点类型. 只需要比较当前标记的某一位, 即可确定节点类型(欢迎评论区讨论 ~)
- 获取到 vnode 后, 将当前实例上下文添加到 vnode
- 之后判断是否需要融合(否). 调用 render 方法 (此时的 render 方法是通过创建 app 实例 时的形参传入的, 声明是在渲染器中)
- render 结束后将挂载状态置为 true
可以看出 mount 方法只想做两件事
- 创建 vnode
- render vnode
render
渲染方法入口 : runtime-core -> renderer -> render
  const render: RootRenderFunction = (vnode, container, isSVG) => {
    if (vnode == null) {
      if (container._vnode) {
        unmount(container._vnode, null, null, true)
      }
    } else {
      patch(container._vnode || null, vnode, container, null, null, null, isSVG)
    }
    flushPostFlushCbs()
    container._vnode = vnode
  }
render 方法想要做两件事
- patch vnode
- flushPostFlushCbs (这部分后续讲)
今天我们先研究一下 patch 打补丁的过程
 // 记住调用 patch 时的入参
 patch(container._vnode || null, vnode, container, null, null, null, isSVG)
patch
打补丁方法 : runtime-core -> renderer -> patch
const patch: PatchFn = (
    n1, // 老 VNODE
    n2, // 新 VNODE
    container, // 挂载的节点
    anchor = null,
    parentComponent = null,
    parentSuspense = null,
    isSVG = false,
    slotScopeIds = null,
    optimized = false
  ) => {
    // 如果 老节点存在  并且 n1 n2 的类型不同
    // 卸载 老vnode
    if (n1 && !isSameVNodeType(n1, n2)) {
      anchor = getNextHostNode(n1)
      unmount(n1, parentComponent, parentSuspense, true)
      n1 = null
    }

    // 从 新vnode 中获取 type , ref , shapeFlag
    // 先用 type 去匹配
    // 如果 type 没匹配到 就用 shapeFlag 去匹配
    const { type, ref, shapeFlag } = n2
    // 目前我们的 vnode 中的 type 为 用户传入配置 + 挂载容器的innerHTML
    // 所以直接匹配到 shapeFlag 的条件
    switch (type) {
      case Text:
        processText(n1, n2, container, anchor)
        break
      case Comment:
        processCommentNode(n1, n2, container, anchor)
        break
      case Static:
        if (n1 == null) {
          mountStaticNode(n2, container, anchor, isSVG)
        } else if (__DEV__) {
          patchStaticNode(n1, n2, container, isSVG)
        }
        break
      case Fragment:
        processFragment(
          n1,
          n2,
          container,
          anchor,
          parentComponent,
          parentSuspense,
          isSVG,
          slotScopeIds,
          optimized
        )
        break
      default:
        if (shapeFlag & ShapeFlags.ELEMENT) {
          // match element
          processElement(
            n1,
            n2,
            container,
            anchor,
            parentComponent,
            parentSuspense,
            isSVG,
            slotScopeIds,
            optimized
          )
        } else if (shapeFlag & ShapeFlags.COMPONENT) {
          // match component
          // 此时的 shapeFlag 会进入这个条件
          processComponent(
            n1,
            n2,
            container,
            anchor,
            parentComponent,
            parentSuspense,
            isSVG,
            slotScopeIds,
            optimized
          )
        } else if (shapeFlag & ShapeFlags.TELEPORT) {
          // match teleport
          // more
        } else if (__FEATURE_SUSPENSE__ && shapeFlag & ShapeFlags.SUSPENSE) {
          // match suspense
          // more
        }
    }

    // 处理 ref
    if (ref != null && parentComponent) {
      setRef(ref, n1 && n1.ref, parentSuspense, n2 || n1, !n2)
    }
  }
可以看到, patch 方法核心目标就是 比较 新老 vnode 节点 并对其进行差异的操作. 在初始化渲染时 , 会先 patch 我们的根组件 . 于是会走到 processComponent 这个逻辑分支, 看一下他具体的实现
processComponent
处理 component : runtime-core -> renderer -> processComponent
const processComponent = (
  n1: VNode | null,
  n2: VNode,
  container: RendererElement,
  anchor: RendererNode | null,
  parentComponent: ComponentInternalInstance | null,
  parentSuspense: SuspenseBoundary | null,
  isSVG: boolean,
  slotScopeIds: string[] | null,
  optimized: boolean
) => {
  n2.slotScopeIds = slotScopeIds
  // 如果 老vnode 是空的
  if (n1 == null) {
    // 如果 新vnode 是 KEPT_ALIVE
    if (n2.shapeFlag & ShapeFlags.COMPONENT_KEPT_ALIVE) {
      // more
    } else {
      // 挂载节点
      mountComponent(
        n2,
        container,
        anchor,
        parentComponent,
        parentSuspense,
        isSVG,
        optimized
      )
    }
  }
  // 对比更新
  else {
    updateComponent(n1, n2, optimized)
  }
}
mountComponent
初始化渲染用 : runtime-core -> renderer -> mountComponent
 const mountComponent: MountComponentFn = (
    initialVNode, // 初始化的 vnode
    container, // 挂载目标
    anchor,
    parentComponent,
    parentSuspense,
    isSVG,
    optimized
  ) => {
    // 创建组件实例
    // createComponentInstance 初始化一个组件实例模型
    const compatMountInstance =
      __COMPAT__ && initialVNode.isCompatRoot && initialVNode.component
    const instance: ComponentInternalInstance =
      compatMountInstance ||
      (initialVNode.component = createComponentInstance(
        initialVNode,
        parentComponent,
        parentSuspense
      ))

    // !!!!!!!!!!!!!!!!!!!!!!!!!!!!
    // 处理 prop slot 和 setup
    // 先分析
    if (!(__COMPAT__ && compatMountInstance)) {
      setupComponent(instance)
    }

    // 后分析
    setupRenderEffect(
      instance,
      initialVNode,
      container,
      anchor,
      parentSuspense,
      isSVG,
      optimized
    )
  }
setupComponent
处理注册的 setup : runtime-core -> component -> setupComponent
这个方法中初始化了插槽 和 props , 结束之后会先判断这个 component 是否是 stateful 的(根据 component 的 shapeFlag)
我们重点看后面, 他试图获取 setup 的执行结果, 从而通过调用 setupStatefulComponent 方法开始解析 setup
setupStatefulComponent
开始处理注册的 setup : runtime-core -> component -> setupStatefulComponent
function setupStatefulComponent(
  instance: ComponentInternalInstance,
  isSSR: boolean
) {
  // 此时 instance.type === 用户注册的 setup + 容器下面的 innerHTML
  const Component = instance.type as ComponentOptions

  // 0. 给实例添加一个缓存对象
  instance.accessCache = Object.create(null)
  // 1. 呈现全局代理
  instance.proxy = markRaw(new Proxy(instance.ctx, PublicInstanceProxyHandlers))
  // 2.调用 setup 获得return的东西
  const { setup } = Component
  // 解析 setup
  if (setup) {
    // 解析 setup 中的参数
    // function.length 是获取 function 中参数的个数
    // 如果用到了 setup 中的形参数量 > 1 的话
    // 创建 setup 上下文
    const setupContext = (instance.setupContext =
      setup.length > 1 ? createSetupContext(instance) : null)

    currentInstance = instance

    // 在这执行了 setup 拿到 setup 执行完的返回值
    // 值得一提的是
    // 在 setup 执行时 , 我们注册的 ref reactive 同时会被执行
    // 比如在 const count = ref(0) 中
    // 我们拿到的 count 已经是被 ref 包装过得数据了
    const setupResult = callWithErrorHandling(
      setup,
      instance,
      ErrorCodes.SETUP_FUNCTION,
      [__DEV__ ? shallowReadonly(instance.props) : instance.props, setupContext]
    )

    currentInstance = null

    // 如果返回 promise
    if (isPromise(setupResult)) {
      // 通过这个函数将 promise 结果保存到外部
      const unsetInstance = () => {
        currentInstance = null
      }
      setupResult.then(unsetInstance, unsetInstance)
    } else {
      // 走入处理结果方法
      handleSetupResult(instance, setupResult, isSSR)
    }
  } else {
    finishComponentSetup(instance, isSSR)
  }
}
handleSetupResult
处理 setup 的执行结果 : runtime-core -> component -> handleSetupResult
export function handleSetupResult(
  instance: ComponentInternalInstance,
  setupResult: unknown,
  isSSR: boolean
) {
  // setup 中 返回用户自定义 render function
  if (isFunction(setupResult)) {
    // 如果当前运行时是 node
    if (__NODE_JS__ && (instance.type as ComponentOptions).__ssrInlineRender) {
      instance.ssrRender = setupResult
    } else {
      // 在实例上挂载 renderFunction
      instance.render = setupResult as InternalRenderFunction
    }
  }
  // composition api
  else if (isObject(setupResult)) {
    // 把结果添加到 实例的 setupState 中
    instance.setupState = proxyRefs(setupResult)
  }
  // 如果没返回值
  else if (__DEV__ && setupResult !== undefined) {
   // 警告 ...
  }
  // 结束处理 setup
  finishComponentSetup(instance, isSSR)
}
finishComponentSetup
获取 render function && 兼容 vue2.x optionAPI : runtime-core -> component -> finishComponentSetup
export function finishComponentSetup(
  instance: ComponentInternalInstance,
  isSSR: boolean,
  skipOptions?: boolean
) {
  // Component = 用户注册配置 + 挂载目标下的innerHTML
  const Component = instance.type as ComponentOptions

  // 判断 runtime
  if (__NODE_JS__ && isSSR) {
    // more
  }
  // 如果实例没有 render 函数
  // 即
  // setup 没有 return function
  else if (!instance.render) {
    // 检查 用户如果没在 其他位置注册 render function
    if (compile && !Component.render) {
      // 拿到 Component.template
      // 即
      // 容器下的 innerHTML
      const template =
        (__COMPAT__ &&
          instance.vnode.props &&
          instance.vnode.props['inline-template']) ||
        Component.template

      if (template) {
        // ...more
        const finalCompilerOptions: CompilerOptions = extend(
         // ...more
        )
        // 执行 compile 方法 (compile 方法后续分析 compiler 的时候一起分析)
        // 获得 render function 挂载在component上
        // 目标是通过执行 compile 方法
        // 获取 render function
        Component.render = compile(template, finalCompilerOptions)
      }
    }
    // 拿到 render function 之后
    // 给 整个实例挂载 render
    instance.render = (Component.render || NOOP) as InternalRenderFunction
  }

  // 开始兼容 2.x的API
  // 所以 setup 解析完成才开始兼容2.x的API
  // support for 2.x options
  if (__FEATURE_OPTIONS_API__ && !(__COMPAT__ && skipOptions)) {
    currentInstance = instance
    applyOptions(instance)
    currentInstance = null
  }
}
在这个方法中, 我们可以得到一个很重要的信息. setup 的处理时机在生命周期中是在非常非常靠前的位置. 为什么 vue3 可以兼容 vue2 的 optionAPI 呢, 是因为他先处理的 setup 之后又初始化其他 optionAPI. 因为调用时机早, 所以可以向下兼容(秒啊~)
兼容的过程 和 编译的过程后续会一起整理. 先明白整体运转过程, 再去扣细节.
当我们执行完这个方法后, 我们回到 mountComponent 这个方法. 他执行了 setupRenderEffect
setupRenderEffect
核心方法 , 依赖收集 , 初始化渲染 , 后续的更新 , 都是通过这个方法进行的 . : runtime-core -> renderer -> setupRenderEffect
  const setupRenderEffect: SetupRenderEffectFn = (
    instance,
    initialVNode,
    container,
    anchor,
    parentSuspense,
    isSVG,
    optimized
  ) => {
    // 添加 update 方法
    // 值为 effect 的执行结果
    // effect 在后续分析 reactive 包(响应式系统)的时候统一分析
    // 暂且我们理解成 在初始化渲染时 他会收到一次通知 执行里面传入的 componentEffect 方法
    instance.update = effect(function componentEffect() {
      // 初始化渲染
      if (!instance.isMounted) {
        // ssr 相关
        if (el && hydrateNode) {
          // more ...
        } else {
          // !!!!!!!!!!!!!!!!
          // 构建 subTree
          // subTree 是 Vnode
          // 在此时收集依赖 (后续讨论)
          const subTree = (instance.subTree = renderComponentRoot(instance))
          // !!!!!!!!!!!!!!!!
          // 给 subTree 打补丁
          patch(
            null,
            subTree,
            container,
            anchor,
            instance,
            parentSuspense,
            isSVG
          )
        }
        // 更改挂载状态
        instance.isMounted = true
      }
      // 更新 后续分析
      else {
        // more ...
      }
    }, __DEV__ ? createDevEffectOptions(instance) : prodEffectOptions)
  }
我们可以看出, 这个方法想要构建 subTree , 之后给 subTree 打补丁. 我们来分析一下, 构建 subTree 的过程.
renderComponentRoot
构建 subTree : runtime-core -> componentRenderUtils -> renderComponentRoot
export function renderComponentRoot(
  instance: ComponentInternalInstance
): VNode {
  const {
    type: Component,
    vnode,
    proxy,
    withProxy,
    props,
    propsOptions: [propsOptions],
    slots,
    attrs,
    emit,
    render, // 通过 compile 获取的 render function
    renderCache,
    data,
    setupState,
    ctx,
    inheritAttrs
  } = instance

  let result

  try {
    let fallthroughAttrs
    if (vnode.shapeFlag & ShapeFlags.STATEFUL_COMPONENT) {
      // 这里调用了 先调用 render
      // 调用之后我们会拿到 容器下 节点的 vnode tree
      // 之后校验 vnode tree 是否是合法的 vnode
      // 如果拿到的是合法的 vnode 就赋值给 result
      // 在这里进行的依赖收集
      result = normalizeVNode(
        render!.call(
          proxyToUse,
          proxyToUse!,
          renderCache,
          props,
          setupState,
          data,
          ctx
        )
      )
      fallthroughAttrs = attrs
    } else {
      // 如果是无状态组件
      // more ...
    }

    let root = result
    let setRoot: ((root: VNode) => void) | undefined = undefined

    if (vnode.dirs) {
      // 合并指令
      root.dirs = root.dirs ? root.dirs.concat(vnode.dirs) : vnode.dirs
    }
    if (vnode.transition) {
      // 继承 transition
      root.transition = vnode.transition
    }

    if (__DEV__ && setRoot) {
      setRoot(root)
    } else {
      result = root
    }
  } catch (err) {
    blockStack.length = 0
    handleError(err, instance, ErrorCodes.RENDER_FUNCTION)
    result = createVNode(Comment)
  }

  return result
}
可以看到这个方法把我们容器下的所有节点变成了 vnode .验证完 vnode 的合法性之后, 会合并和继承一些属性. 最终把 vnode 返回.
我们回到 setupRenderEffect 这个方法, subTree 的含义就是挂载容器的 vnodeTree , 我们要给这个 vnodeTree 打补丁
我们又回到了 patch 方法.
const patch: PatchFn = (
    n1, // null
    n2, // subTree
    container, // 挂载的节点
    anchor = null,
    parentComponent = null,
    parentSuspense = null,
    isSVG = false,
    slotScopeIds = null,
    optimized = false
  ) => {
    // 如果 老节点存在  并且 n1 n2 的类型不同
    // 卸载 老vnode
    if (n1 && !isSameVNodeType(n1, n2)) {
      anchor = getNextHostNode(n1)
      unmount(n1, parentComponent, parentSuspense, true)
      n1 = null
    }
    // 此时
    // type 为子元素类型 我们这个例子 type 是 div
    // shapeFlag 依然是组件类型标记
    const { type, ref, shapeFlag } = n2
    switch (type) {
      case Text:
        // more ...
        break
      case Comment:
        // more ...
        break
      case Static:
        // more ...
        break
      case Fragment:
        // more ...
        break
      default:
        if (shapeFlag & ShapeFlags.ELEMENT) {
          // 此时我们会进入这个条件
          processElement(
            n1,
            n2,
            container,
            anchor,
            parentComponent,
            parentSuspense,
            isSVG,
            slotScopeIds,
            optimized
          )
        } else if (shapeFlag & ShapeFlags.COMPONENT) {
          // more
        } else if (shapeFlag & ShapeFlags.TELEPORT) {
          // match teleport
          // more
        } else if (__FEATURE_SUSPENSE__ && shapeFlag & ShapeFlags.SUSPENSE) {
          // match suspense
          // more
        }
    }

    // 处理 ref
    if (ref != null && parentComponent) {
      setRef(ref, n1 && n1.ref, parentSuspense, n2 || n1, !n2)
    }
  }
processElement
处理 element : runtime-core -> renderer -> processElement
 const processElement = (
    n1: VNode | null,
    n2: VNode,
    container: RendererElement,
    anchor: RendererNode | null,
    parentComponent: ComponentInternalInstance | null,
    parentSuspense: SuspenseBoundary | null,
    isSVG: boolean,
    slotScopeIds: string[] | null,
    optimized: boolean
  ) => {
    isSVG = isSVG || (n2.type as string) === 'svg'
    // 老节点不存在 直接挂载
    if (n1 == null) {
      mountElement(
        n2,
        container,
        anchor,
        parentComponent,
        parentSuspense,
        isSVG,
        slotScopeIds,
        optimized
      )
    }
    // 存在 对比更新
    else {
      patchElement(
        n1,
        n2,
        parentComponent,
        parentSuspense,
        isSVG,
        slotScopeIds,
        optimized
      )
    }
mountElement
处理子元素 插入到目标节点 : runtime-core -> renderer -> mountElement
  const mountElement = (
    vnode: VNode,
    container: RendererElement,
    anchor: RendererNode | null,
    parentComponent: ComponentInternalInstance | null,
    parentSuspense: SuspenseBoundary | null,
    isSVG: boolean,
    slotScopeIds: string[] | null,
    optimized: boolean
  ) => {
    let el: RendererElement
    let vnodeHook: VNodeHook | undefined | null
    const { type, props, shapeFlag, transition, patchFlag, dirs } = vnode
    // 走这里 !
    // 调用 hostCreateElement 创建真实 DOM
    el = vnode.el = hostCreateElement(
      vnode.type as string,
      isSVG,
      props && props.is,
      props
    )
    // 子节点如果是 文本
    if (shapeFlag & ShapeFlags.TEXT_CHILDREN) {
      // 操作 dom 赋值 text
      hostSetElementText(el, vnode.children as string)
    }
    // 子节点如果是 数组
    else if (shapeFlag & ShapeFlags.ARRAY_CHILDREN) {
      // 挂载子节点
      mountChildren(
        vnode.children as VNodeArrayChildren,
        el, // !!!!
        null,
        parentComponent,
        parentSuspense,
        isSVG && type !== 'foreignObject',
        slotScopeIds,
        optimized || !!vnode.dynamicChildren
      )
    }

    // 如果当前元素有 props
    if (props) {
      // 遍历 props
      for (const key in props) {
        if (!isReservedProp(key)) {
          // 给元素打 属性补丁
          hostPatchProp(
            el,
            key,
            null,
            props[key],
            isSVG,
            vnode.children as VNode[],
            parentComponent,
            parentSuspense,
            unmountChildren
          )
        }
      }
    }
    // 将当前操作节点 插入到对应容器下
    hostInsert(el, container, anchor)
  }
mountChildren
挂载子节点 : runtime-core -> renderer -> mountChildren
 const mountChildren: MountChildrenFn = (
    children,
    container,
    anchor,
    parentComponent,
    parentSuspense,
    isSVG,
    slotScopeIds,
    optimized,
    start = 0
  ) => {
    for (let i = start; i < children.length; i++) {
      const child = (children[i] = optimized
        ? cloneIfMounted(children[i] as VNode)
        : normalizeVNode(children[i]))
      // 递归 patch 子元素
      patch(
        null,
        child,
        container,
        anchor,
        parentComponent,
        parentSuspense,
        isSVG,
        slotScopeIds,
        optimized
      )
    }
  }
这里我们可以看到一个细节. 他每次在 mount 的时候, 挂载的容器是根据父节点的 type 生成的真实 DOM. 在 mountChildren 结束后, 他会将对应的节点, 插入到父元素下. 由于是递归, 所以先分析的节点后被挂载. 当最外层节点被挂载时. 所有的节点就都被挂载了(秒啊~)
到这里, 初始化渲染的流程大致就已经结束了.
总结一下 初始化渲染流程
创建渲染器 --> 创建 app 实例 --> 调用 mount 方法 --> 创建 vnode (基于初始化时传入的 option) --> 调用 render --> patch --> processComponent --> mountComponent --> 调用 setup 获取他的结果 -> 调用 compile 获取容器下 innerHTML 的 render function -> 兼容 vue2.x 的 API --> setupRenderEffect --> 构建 subTree --> processElement --> mountElement --> 递归 patch 子元素 --> 添加 props --> 插入到对应父节点下
总体来说这个过程还是比较复杂的. 如果过程中哪里存在争议, 望大家在评论区指出. 我会及时更新文章. 同时码字不易, 望多多点赞关注支持 ~
目前需要补充的分析
- compile
- 向下兼容细节
- reactive 相关
- 更新相关


