1. pytest的介绍
pytest是一个非常成熟的全功能的python测试工具,它主要有以下特征:
简单灵活,容易上手;
支持简单的单元测试和复杂的功能测试
显示详细的断言失败信息
能自动识别测试模块和测试功能
有测试会话、测试模块、测试类、测试函数级别的fixture
可用于selenium/Appium等自动化测试和接口自动化测试(pytest+requests);
拥有丰富的第三方插件,还可自定义扩展;
可与持续集成工具进行很好的集成,如:Jenkins。
…
2. pytest的安装
1. 使用以下命令进行安装
pip install -U pytest
参数说明:
-U: 将指定的软件包升级至当前最新的可用版本
其他说明:
官网安装说明有加上-U参数,不加上-U参数亦可
2. 检查是否成功安装正确版本
$ pytest --version
pytest 6.2.4
3. pytest识别测试的条件
1.若无指定参数,pytest会从testpath(如果配置)或当前目录下递归查找与 norecursedirs不匹配的目录。
2.查找目录中所有符合test_*.py和*_test.py的文件
3.从匹配到的测试文件中,搜集满足以下条件的测试用例:
- 在类之外的所有
test_*方法 Test*类中包含的所有test_*方法(Test*类中不能含有__init__()方法)
4. pytest的运行
pytest的运行分为以下方式:
1. Pycharm中进行调用
2. Python代码中调用
3. 使用命令行进行调用
4.1 Pycharm中调用
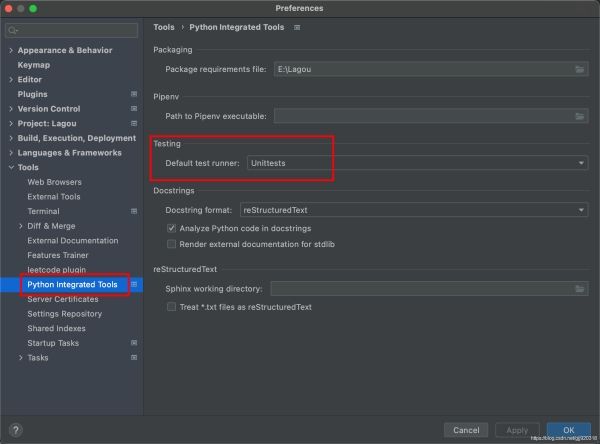
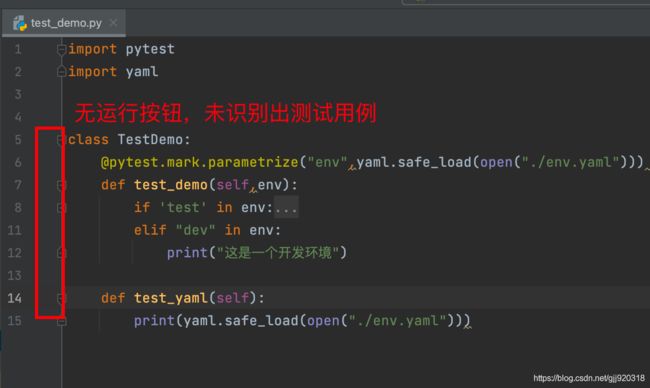
Pycharm中默认的test runner是Unittest,无法识别使用pytest编写的测试文件和测试用例
进入Preferences-->Tools-->Python Integrted Tools,
修改Testing下的Default test runner,改成pytest后,
则可以直接使用Pycharm中的Run按钮无参数的调用pytest。
4.2 Python代码中调用
在代码中添加入口函数—pytest.main(),即可在Python代码中调用pytest。
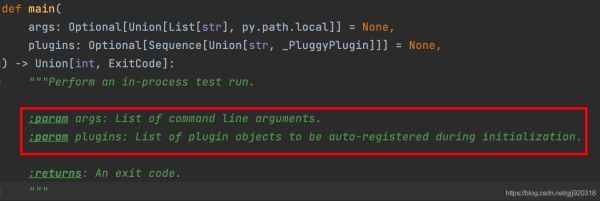
pytest.main()的参数:
1. args:命令行指令列表集
示例代码sample1:
import pytest
class TestDemo:
    def test_demo1(self):
    	print("test_demo1")
    def test_demo2(self):
    	print("test_demo2")
    if  __name__=='__main__':
     pytest.main(['test_sample.py::TestDemo::test_demo1','-v'])
pytest.main(['test_sample.py::test_demo1','-v'])的参数说明:
''test_sample.py::TestDemo::test_demo1'':表示运行test_sample.py中的TestDemo类里面名为test_demo1的测试方式
-v:表示打印详细运行日志信息
运行结果:
2. plugins:在初始化过程中可自动注册的插件对象列表
示例代码sample2:
import pytest
import sys
class TestDemo:
    def test_demo1(self):
        print("test_demo1")
    def test_demo2(self):
        print("test_demo2")

class MyPlugin:
    def pytest_sessionfinish(self):
        print("*** test run reporting finishing")
if __name__ == '__main__':
    sys.exit(pytest.main(['-v','test_sample.py::TestDemo::test_demo1'], plugins=[MyPlugin()]))
pytest.main(['-v','test_sample.py::TestDemo::test_demo1'], plugins=[MyPlugin()])参数说明:
plugins=[MyPlugin()])):传入自定义的MyPlugin()函数
运行结果:
4.3 使用命令行调用
1. 使用python调用
当代码中我们添加入口函数后,可以使用python来调用pytest。
以sample2的代码为例,在终端输入一下命令:
python test_sample.py
运行结果:
2. 使用pytest调用
常用参数列表
以下列举了一些常用的pytest的执行参数,其他参数可使用pytest --help查看。
| 参数 | 说明 |
|---|---|
| pytest 目录路径 | 运行指定目录下可收集到的测试,为空则默认执行当前目录下收集到的测试 |
| pytest 文件名.py | 执行单独一个pytest模块 |
| pytest 文件名.py::类名 | 运行某个模块中的某个类 |
| pytest 文件名.py::类名::方法名 | 运行某个模块中的某个类的某个方法 |
| pytest -v | 打印详细运行日志信息 |
| pytest -v -s 文件名.py | 带控制台输出结果,也输出运行详细日志信息 |
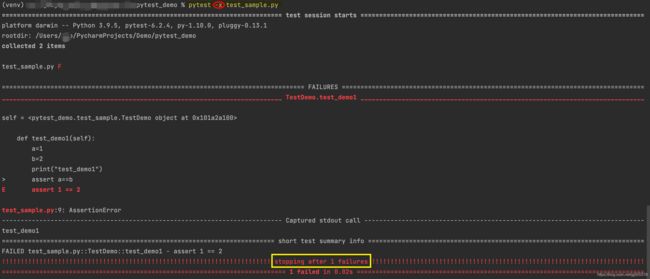
| pytest -x 文件名.py | 一旦运行到报错,就停止运行 |
| pytest -k "类名 and not 方法名" | 执行某个关键字的用例 |
| pytest -m [标记名] | @pytest.mark.[标记名]将运行这个标记的测试用例 |
| pytest –maxfail=[num] | 当运行错误到达num时候就停止运行 |
| pytest –colection-only | 只收集测试用例 |
| pytest –junitxml=./result.xml | 生成执行结果文件 |
| pytest –setup-show | 回溯fixture的执行过程 |
参数演示示例:
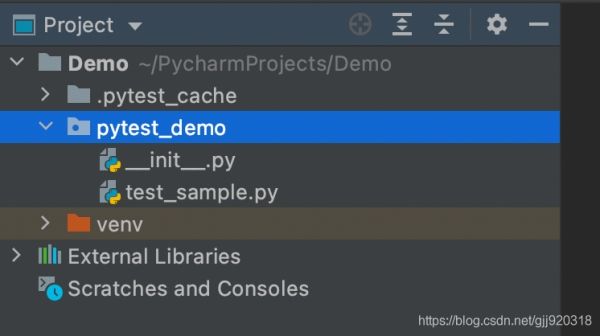
demo目录如下
1.pytest目录路径:运行指定目录下可收集到的测试
2.pytest文件名.py:执行单独一个pytest模块
3.pytest 文件名.py::类名:运行某个模块中的某个类
4.pytest 文件名.py::类名::方法名:运行某个模块中的某个类的某个方法
5.pytest -v: 打印详细运行日志信息
6.pytest -v -s 文件名.py:带控制台输出结果,也输出运行详细日志信息
7.pytest -x 文件名.py:一旦运行到报错,就停止运行
8.pytest -k "类名 and not 方法名":执行某个关键字的用例
注意:示例中,测试用例名称中包含“test_c”和“test_d”的都会被执行
9.pytest -m [标记名]:@pytest.mark.[标记名]将运行这个标记的测试用例
对两个测试方法进行@pytest.mark.[标记]的标记。
运行结果:
只运行了被标记的两个测试方法。
10. pytest --maxfail=[num]:当运行错误到达num时候就停止运行
对代码进行修改,模拟两条运行失败测试用例。
运行结果:
11. pytest --colection-only:只收集测试用例
12. pytest --junitxml=./result.xml:生成执行结果文件
执行结束后,对应目录下会生成一个结果文件。
13.pytest --setup-show:回溯fixture的执行过程
对原有代码进行修改。新增一个fixture修饰的函数,并对test_demo1测试方法进行修改。
运行结果:
文末说明:
以上内容是我在阅读pytest官方文档后,依照个人理解进行整理。内容可能会有理解错误之处,欢迎大家留言指正。谢谢!
以上就是Python自动化测试框架pytest介绍安装与运行的详细内容,更多关于Python自动化测试框架pytest的资料请关注脚本之家其它相关文章!
