随机森林原始论文_机器学习第一步,这是一篇手把手的随机森林入门实战
选自TowardsDataScience
 上图是乳腺癌 DataFrame 的一部分。每行是一个患者的观察结果。最后一列名为「cancer」是我们要预测的目标变量。0 表示「无癌症」,1 表示「癌症」。
训练集/测试集分割 现在,我们使用 Scikit-learn 的「train_test_split」函数拆分数据。我们想让模型有尽可能多的数据进行训练。但是,我们也要确保有足够的数据来测试模型。通常数据集中行数越多,我们可以提供给训练集的数据越多。 例如,如果我们有数百万行,那么我们可以将其中的 90%用作训练,10%用作测试。但是,我们的数据集只有 569 行,数据量并不大。因此,为了匹配这种小型数据集,我们会将数据分为 50%的训练和 50%的测试。我们设置 stratify = y 以确保训练集和测试集与原始数据集的 0 和 1 的比例一致。
 主成分分析(PCA) 现在,我们如何改进基线模型呢?使用降维,我们可以用更少的变量来拟合原始数据集,同时降低运行模型的计算花销。使用 PCA,我们可以研究这些特征的累积方差比,以了解哪些特征代表数据中的最大方差。 我们实例化 PCA 函数并设置我们要考虑的成分(特征)数量。此处我们设置为 30,以查看所有生成成分的方差,并决定在何处切割。然后,我们将缩放后的 X_train 数据「拟合」到 PCA 函数中。
 该图显示,在超过 10 个特征之后,我们并未获得太多的解释方差。此 DataFrame 显示了累积方差比(解释了数据的总方差)和解释方差比(每个 PCA 成分说明了多少数据的总方差)。
 从上面的 DataFrame 可以看出,当我们使用 PCA 将 30 个预测变量减少到 10 个分量时,我们仍然可以解释 95%以上的方差。其他 20 个分量仅解释了不到 5%的方差,因此 我们可以减少他们的权重。按此逻辑,我们将使用 PCA 将 X_train 和 X_test 的成分数量从 30 个减少到 10 个。我们将这些重新创建的「降维」数据集分配给「X_train_scaled_pca」和「X_test_scaled_pca」。
 PCA 后拟合「基线」随机森林模型 现在,我们可以将 X_train_scaled_pca 和 y_train 数据拟合到另一个「基线」随机森林模型中,测试我们对该模型的预测是否有所改进。
 现在,让我们在 x 轴上创建每个超参数的柱状图,并针对每个值制作模型的平均得分,查看平均而言最优的值:
 通过上面的图,我们可以了解每个超参数的值的平均执行情况。
 我们将召回率作为性能指标,因为我们处理的是癌症诊断,我们最关心的是将模型中的假阴性预测误差最小。 考虑到这一点,看起来我们的基线随机森林模型表现最好,召回得分为 94.97%。根据我们的测试数据集,基线模型可以正确预测 179 名癌症患者中的 170 名。 这个案例研究提出了一个重要的注意事项:有时,在 PCA 之后,甚至在进行大量的超参数调整之后,调整的模型性能可能不如普通的「原始」模型。但是尝试很重要,你不尝试,就永远都不知道哪种模型最好。在预测癌症方面,模型越好,可以挽救的生命就更多。
原文链接:
https://towardsdatascience.com/machine-learning-step-by-step-6fbde95c455a
本文为机器之心编译,转载请联系本公众号获得授权。 ✄------------------------------------------------
加入机器之心(全职记者 / 实习生):
[email protected]
投稿或寻求报道:content
@jiqizhixin.com
广告 & 商务合作:
[email protected]
作者:Alexander Cheng
机器之心编译
参与:高璇、思
到了 2020 年,我们已经能找到很多好玩的机器学习教程。本文则从最流行的随机森林出发,手把手教你构建一个模型,它的完整流程到底是什么样的。作为数据科学家,我们可以通过很多方法来创建分类模型。最受欢迎的方法之一是随机森林。我们可以在随机森林上调整超参数来优化模型的性能。 在用模型拟合之前,尝试主成分分析(PCA)也是常见的做法。但是,为什么还要增加这一步呢?难道随机森林的目的不是帮助我们更轻松地理解特征重要性吗? 当我们分析随机森林模型的「特征重要性」时,PCA 会使每个「特征」的解释变得更加困难。但是 PCA 会进行降维操作,这可以减少随机森林要处理的特征数量,因此 PCA 可能有助于加快随机森林模型的训练速度。 请注意,计算成本高是随机森林的最大缺点之一(运行模型可能需要很长时间)。尤其是当你使用数百甚至上千个预测特征时,PCA 就变得非常重要。因此,如果只想简单地拥有最佳性能的模型,并且可以牺牲解释特征的重要性,那么 PCA 可能会很有用。 现在让我们举个例子。我们将使用 Scikit-learn 的「乳腺癌」数据集,并创建 3 个模型,比较它们的性能: 1. 随机森林 2. 具有 PCA 降维的随机森林 3. 具有 PCA 降维和超参数调整的随机森林 导入数据 首先,我们加载数据并创建一个 DataFrame。这是 Scikit-learn 预先清理的「toy」数据集,因此我们可以继续快速建模。但是,作为最佳实践,我们应该执行以下操作:
使用 df.head()查看新的 DataFrame,以确保它符合预期。
使用 df.info()可以了解每一列中的数据类型和数据量。可能需要根据需要转换数据类型。
使用 df.isna()确保没有 NaN 值。可能需要根据需要处理缺失值或删除行。
使用 df.describe()可以了解每列的最小值、最大值、均值、中位数、标准差和四分位数范围。
import pandas as pdfrom sklearn.datasets import load_breast_cancercolumns = ['mean radius', 'mean texture', 'mean perimeter', 'mean area', 'mean smoothness', 'mean compactness', 'mean concavity', 'mean concave points', 'mean symmetry', 'mean fractal dimension', 'radius error', 'texture error', 'perimeter error', 'area error', 'smoothness error', 'compactness error', 'concavity error', 'concave points error', 'symmetry error', 'fractal dimension error', 'worst radius', 'worst texture', 'worst perimeter', 'worst area', 'worst smoothness', 'worst compactness', 'worst concavity', 'worst concave points', 'worst symmetry', 'worst fractal dimension']dataset = load_breast_cancer()data = pd.DataFrame(dataset['data'], columns=columns)data['cancer'] = dataset['target']display(data.head())display(data.info())display(data.isna().sum())display(data.describe()) 上图是乳腺癌 DataFrame 的一部分。每行是一个患者的观察结果。最后一列名为「cancer」是我们要预测的目标变量。0 表示「无癌症」,1 表示「癌症」。
训练集/测试集分割 现在,我们使用 Scikit-learn 的「train_test_split」函数拆分数据。我们想让模型有尽可能多的数据进行训练。但是,我们也要确保有足够的数据来测试模型。通常数据集中行数越多,我们可以提供给训练集的数据越多。 例如,如果我们有数百万行,那么我们可以将其中的 90%用作训练,10%用作测试。但是,我们的数据集只有 569 行,数据量并不大。因此,为了匹配这种小型数据集,我们会将数据分为 50%的训练和 50%的测试。我们设置 stratify = y 以确保训练集和测试集与原始数据集的 0 和 1 的比例一致。
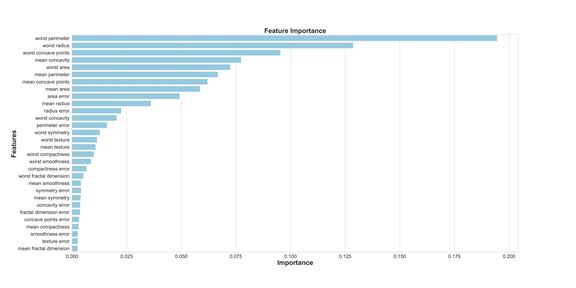
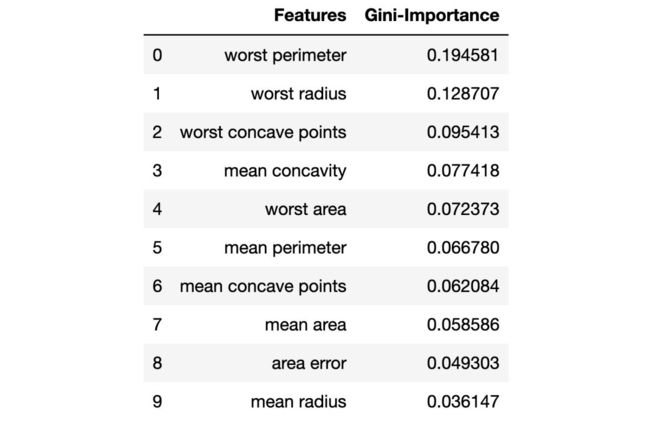
from sklearn.model_selection import train_test_splitX = data.drop('cancer', axis=1) y = data['cancer'] X_train, X_test, y_train, y_test = train_test_split(X, y, test_size=0.50, random_state = 2020, stratify=y)import numpy as npfrom sklearn.preprocessing import StandardScalerss = StandardScaler()X_train_scaled = ss.fit_transform(X_train)X_test_scaled = ss.transform(X_test)y_train = np.array(y_train)from sklearn.ensemble import RandomForestClassifierfrom sklearn.metrics import recall_scorerfc = RandomForestClassifier()rfc.fit(X_train_scaled, y_train)display(rfc.score(X_train_scaled, y_train))# 1.0feats = {}for feature, importance in zip(data.columns, rfc_1.feature_importances_):feats[feature] = importanceimportances = pd.DataFrame.from_dict(feats, orient='index').rename(columns={
0: 'Gini-Importance'})importances = importances.sort_values(by='Gini-Importance', ascending=False)importances = importances.reset_index()importances = importances.rename(columns={
'index': 'Features'})sns.set(font_scale = 5)sns.set(style="whitegrid", color_codes=True, font_scale = 1.7)fig, ax = plt.subplots()fig.set_size_inches(30,15)sns.barplot(x=importances['Gini-Importance'], y=importances['Features'], data=importances, color='skyblue')plt.xlabel('Importance', fontsize=25, weight = 'bold')plt.ylabel('Features', fontsize=25, weight = 'bold')plt.title('Feature Importance', fontsize=25, weight = 'bold')display(plt.show())display(importances)
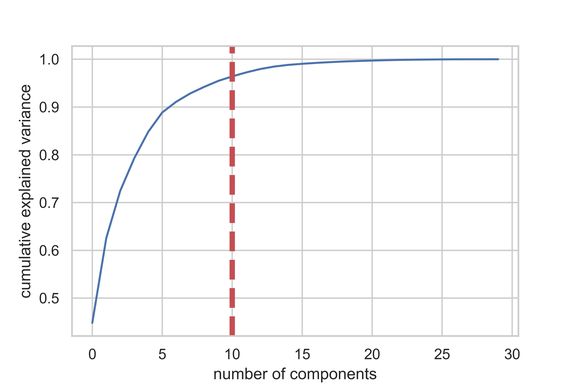
 主成分分析(PCA) 现在,我们如何改进基线模型呢?使用降维,我们可以用更少的变量来拟合原始数据集,同时降低运行模型的计算花销。使用 PCA,我们可以研究这些特征的累积方差比,以了解哪些特征代表数据中的最大方差。 我们实例化 PCA 函数并设置我们要考虑的成分(特征)数量。此处我们设置为 30,以查看所有生成成分的方差,并决定在何处切割。然后,我们将缩放后的 X_train 数据「拟合」到 PCA 函数中。
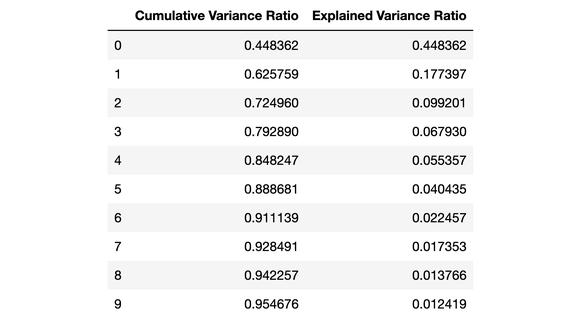
import matplotlib.pyplot as pltimport seaborn as snsfrom sklearn.decomposition import PCApca_test = PCA(n_components=30)pca_test.fit(X_train_scaled)sns.set(style='whitegrid')plt.plot(np.cumsum(pca_test.explained_variance_ratio_))plt.xlabel('number of components')plt.ylabel('cumulative explained variance')plt.axvline(linewidth=4, color='r', linestyle = '--', x=10, ymin=0, ymax=1)display(plt.show())evr = pca_test.explained_variance_ratio_cvr = np.cumsum(pca_test.explained_variance_ratio_)pca_df = pd.DataFrame()pca_df['Cumulative Variance Ratio'] = cvrpca_df['Explained Variance Ratio'] = evrdisplay(pca_df.head(10)) 该图显示,在超过 10 个特征之后,我们并未获得太多的解释方差。此 DataFrame 显示了累积方差比(解释了数据的总方差)和解释方差比(每个 PCA 成分说明了多少数据的总方差)。
 从上面的 DataFrame 可以看出,当我们使用 PCA 将 30 个预测变量减少到 10 个分量时,我们仍然可以解释 95%以上的方差。其他 20 个分量仅解释了不到 5%的方差,因此 我们可以减少他们的权重。按此逻辑,我们将使用 PCA 将 X_train 和 X_test 的成分数量从 30 个减少到 10 个。我们将这些重新创建的「降维」数据集分配给「X_train_scaled_pca」和「X_test_scaled_pca」。
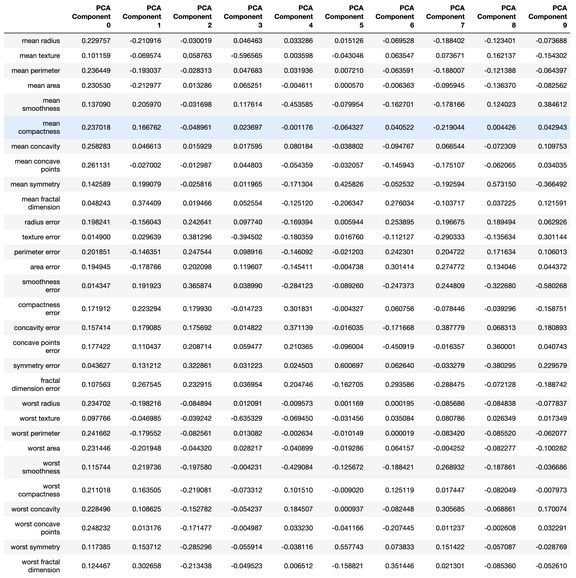
pca = PCA(n_components=10)pca.fit(X_train_scaled)X_train_scaled_pca = pca.transform(X_train_scaled)X_test_scaled_pca = pca.transform(X_test_scaled)pca_dims = []for x in range(0, len(pca_df)):pca_dims.append('PCA Component {}'.format(x))pca_test_df = pd.DataFrame(pca_test.components_, columns=columns, index=pca_dims)pca_test_df.head(10).T PCA 后拟合「基线」随机森林模型 现在,我们可以将 X_train_scaled_pca 和 y_train 数据拟合到另一个「基线」随机森林模型中,测试我们对该模型的预测是否有所改进。
rfc = RandomForestClassifier()rfc.fit(X_train_scaled_pca, y_train)display(rfc.score(X_train_scaled_pca, y_train))# 1.0n_estimators:随机森林中「树」的数量。
max_features:每个分割处的特征数。
max_depth:每棵树可以拥有的最大「分裂」数。
min_samples_split:在树的节点分裂前所需的最少观察数。
min_samples_leaf:每棵树末端的叶节点所需的最少观察数。
bootstrap:是否使用 bootstrapping 来为随机林中的每棵树提供数据。(bootstrapping 是从数据集中进行替换的随机抽样。)
from sklearn.model_selection import RandomizedSearchCVn_estimators = [int(x) for x in np.linspace(start = 100, stop = 1000, num = 10)]max_features = ['log2', 'sqrt']max_depth = [int(x) for x in np.linspace(start = 1, stop = 15, num = 15)]min_samples_split = [int(x) for x in np.linspace(start = 2, stop = 50, num = 10)]min_samples_leaf = [int(x) for x in np.linspace(start = 2, stop = 50, num = 10)]bootstrap = [True, False]param_dist = {'n_estimators': n_estimators,'max_features': max_features,'max_depth': max_depth,'min_samples_split': min_samples_split,'min_samples_leaf': min_samples_leaf,'bootstrap': bootstrap}rs = RandomizedSearchCV(rfc_2, param_dist, n_iter = 100, cv = 3, verbose = 1, n_jobs=-1, random_state=0)rs.fit(X_train_scaled_pca, y_train)rs.best_params_————————————————————————————————————————————# {'n_estimators': 700,# 'min_samples_split': 2,# 'min_samples_leaf': 2,# 'max_features': 'log2',# 'max_depth': 11,# 'bootstrap': True}rs_df = pd.DataFrame(rs.cv_results_).sort_values('rank_test_score').reset_index(drop=True)rs_df = rs_df.drop(['mean_fit_time', 'std_fit_time', 'mean_score_time','std_score_time', 'params', 'split0_test_score', 'split1_test_score', 'split2_test_score', 'std_test_score'],axis=1)rs_df.head(10) 现在,让我们在 x 轴上创建每个超参数的柱状图,并针对每个值制作模型的平均得分,查看平均而言最优的值:
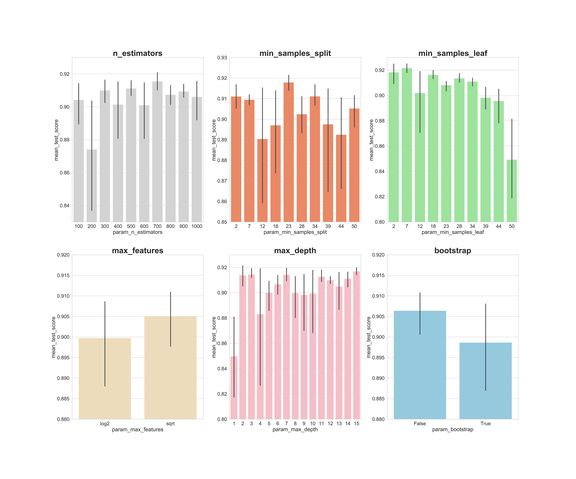
fig, axs = plt.subplots(ncols=3, nrows=2)sns.set(style="whitegrid", color_codes=True, font_scale = 2)fig.set_size_inches(30,25)sns.barplot(x='param_n_estimators', y='mean_test_score', data=rs_df, ax=axs[0,0], color='lightgrey')axs[0,0].set_ylim([.83,.93])axs[0,0].set_title(label = 'n_estimators', size=30, weight='bold')sns.barplot(x='param_min_samples_split', y='mean_test_score', data=rs_df, ax=axs[0,1], color='coral')axs[0,1].set_ylim([.85,.93])axs[0,1].set_title(label = 'min_samples_split', size=30, weight='bold')sns.barplot(x='param_min_samples_leaf', y='mean_test_score', data=rs_df, ax=axs[0,2], color='lightgreen')axs[0,2].set_ylim([.80,.93])axs[0,2].set_title(label = 'min_samples_leaf', size=30, weight='bold')sns.barplot(x='param_max_features', y='mean_test_score', data=rs_df, ax=axs[1,0], color='wheat')axs[1,0].set_ylim([.88,.92])axs[1,0].set_title(label = 'max_features', size=30, weight='bold')sns.barplot(x='param_max_depth', y='mean_test_score', data=rs_df, ax=axs[1,1], color='lightpink')axs[1,1].set_ylim([.80,.93])axs[1,1].set_title(label = 'max_depth', size=30, weight='bold')sns.barplot(x='param_bootstrap',y='mean_test_score', data=rs_df, ax=axs[1,2], color='skyblue')axs[1,2].set_ylim([.88,.92]) 通过上面的图,我们可以了解每个超参数的值的平均执行情况。
n_estimators:300、500、700 的平均分数几乎最高;
min_samples_split:较小的值(如 2 和 7)得分较高。23 处得分也很高。我们可以尝试一些大于 2 的值,以及 23 附近的值;
min_samples_leaf:较小的值可能得到更高的分,我们可以尝试使用 2–7 之间的值;
max_features:「sqrt」具有最高平均分;
max_depth:没有明确的结果,但是 2、3、7、11、15 的效果很好;
bootstrap:「False」具有最高平均分。
from sklearn.model_selection import GridSearchCVn_estimators = [300,500,700]max_features = ['sqrt']max_depth = [2,3,7,11,15]min_samples_split = [2,3,4,22,23,24]min_samples_leaf = [2,3,4,5,6,7]bootstrap = [False]param_grid = {'n_estimators': n_estimators,'max_features': max_features,'max_depth': max_depth,'min_samples_split': min_samples_split,'min_samples_leaf': min_samples_leaf,'bootstrap': bootstrap}gs = GridSearchCV(rfc_2, param_grid, cv = 3, verbose = 1, n_jobs=-1)gs.fit(X_train_scaled_pca, y_train)rfc_3 = gs.best_estimator_gs.best_params_————————————————————————————————————————————# {'bootstrap': False,# 'max_depth': 7,# 'max_features': 'sqrt',# 'min_samples_leaf': 3,# 'min_samples_split': 2,# 'n_estimators': 500}基线随机森林
具有 PCA 降维的基线随机森林
具有 PCA 降维和超参数调优的基线随机森林
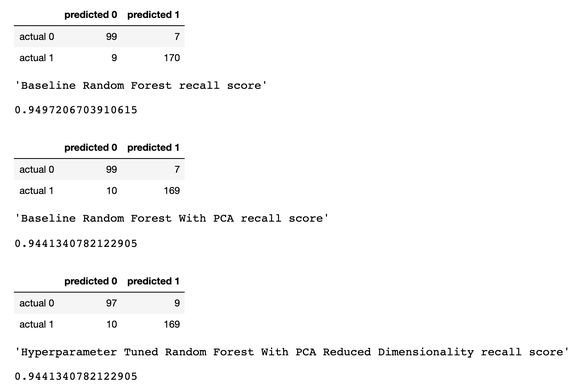
y_pred = rfc.predict(X_test_scaled)y_pred_pca = rfc.predict(X_test_scaled_pca)y_pred_gs = gs.best_estimator_.predict(X_test_scaled_pca)from sklearn.metrics import confusion_matrixconf_matrix_baseline = pd.DataFrame(confusion_matrix(y_test, y_pred), index = ['actual 0', 'actual 1'], columns = ['predicted 0', 'predicted 1'])conf_matrix_baseline_pca = pd.DataFrame(confusion_matrix(y_test, y_pred_pca), index = ['actual 0', 'actual 1'], columns = ['predicted 0', 'predicted 1'])conf_matrix_tuned_pca = pd.DataFrame(confusion_matrix(y_test, y_pred_gs), index = ['actual 0', 'actual 1'], columns = ['predicted 0', 'predicted 1'])display(conf_matrix_baseline)display('Baseline Random Forest recall score', recall_score(y_test, y_pred))display(conf_matrix_baseline_pca)display('Baseline Random Forest With PCA recall score', recall_score(y_test, y_pred_pca))display(conf_matrix_tuned_pca)display('Hyperparameter Tuned Random Forest With PCA Reduced Dimensionality recall score', recall_score(y_test, y_pred_gs)) 我们将召回率作为性能指标,因为我们处理的是癌症诊断,我们最关心的是将模型中的假阴性预测误差最小。 考虑到这一点,看起来我们的基线随机森林模型表现最好,召回得分为 94.97%。根据我们的测试数据集,基线模型可以正确预测 179 名癌症患者中的 170 名。 这个案例研究提出了一个重要的注意事项:有时,在 PCA 之后,甚至在进行大量的超参数调整之后,调整的模型性能可能不如普通的「原始」模型。但是尝试很重要,你不尝试,就永远都不知道哪种模型最好。在预测癌症方面,模型越好,可以挽救的生命就更多。
原文链接:
https://towardsdatascience.com/machine-learning-step-by-step-6fbde95c455a
本文为机器之心编译,转载请联系本公众号获得授权。 ✄------------------------------------------------
加入机器之心(全职记者 / 实习生):
[email protected]
投稿或寻求报道:content
@jiqizhixin.com
广告 & 商务合作:
[email protected]
