基于OpenCV的路面质量检测
点击上方“小白学视觉”,选择加"星标"或“置顶”
重磅干货,第一时间送达![]()
本期我们将展示一种对路面类型和质量进行分类的方法及其步骤。为了测试这种方法,我们使用了我们制作的RTK数据集。
路面分类
该数据集[1]包含用低成本相机拍摄的图像,以及新兴国家常见的场景,其中包含未铺砌的道路和坑洼。路面类型是有关人或自动驾驶车辆应如何驾驶的重要信息。除了乘客舒适度和车辆维护以外,它还涉及每个人的安全。我们可以通过[2]中的简单卷积神经网络(CNN)结构来实现。
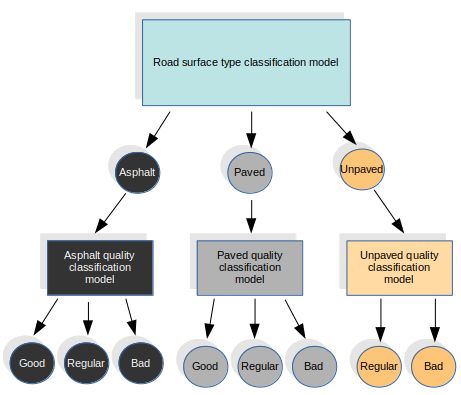
在这种方法中,我们对表面类型分类任务使用特定的模型,我们将其定义为以下类别:沥青,已铺设(用于所有其他类型的路面)和未铺设。对于表面质量,我们使用其他三种不同的模型,每种类型的表面都使用一种。这四个模型都具有相同的结构。我们从第一个模型中得出结果,并称为特定质量模型。
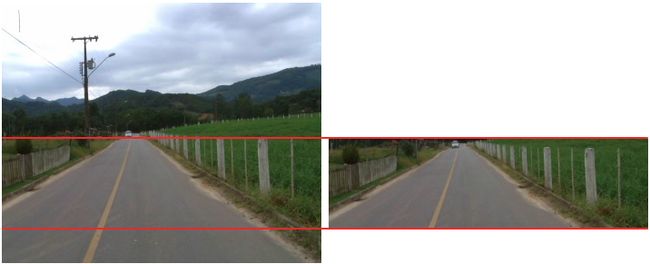
在CNN结构之前,将感兴趣区域(ROI)定义为每个输入帧的预处理步骤。毕竟,我们不需要整个图像来对道路进行分类。ROI旨在仅保留图像中实际包含道路像素的部分。图像的上半部分以及图像底部的一小部分都将被丢弃,因为在某些帧中,它可能包含负责捕获图像的部分车辆。ROI采用硬编码,因为如果我们使用自适应ROI,它可能会导致失败并损害模型训练。
在此预处理之后执行数据扩充步骤。数据增强包括增加和减少每帧的亮度。这样,我们可以改进训练输入集,并帮助我们的系统学习识别具有不同照明条件的相同类型和质量的道路。
最后,将输入图像传递到包含三个卷积层和两个完全连接层的CNN结构。
01.RTK数据集
数据集包含具有不同类型的表面和质量的图像。
可从以下位置下载RTK数据集:
http://www.lapix.ufsc.br/pesquisas/projeto-veiculo-autonomo/datasets/?lang=zh-CN
02.路面类型分类
我们使用了Python,TensorFlow和OpenCV。
让我们逐步分析一下…
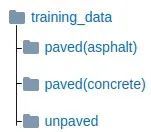
首先,我们需要建立表面类型分类模型。为此,您将需要准备数据以训练模型。您可以使用RTK数据集中的图像或制作自己的图像。图像需要按地面道路类型进行组织。
训练数据文件夹结构
在我们的实验中,我们使用了6264帧:
l铺砌(沥青):4344,用于柏油马路。
l铺砌的(混凝土的):1337用于不同的人行道,例如鹅卵石。
l未铺砌:585用于未铺砌,土路,越野。
接下来,在train.py中,定义从何处收集训练数据。我们应该将20%的数据分开以自动用于验证。我们还定义了batch_size为32。
classes = os.listdir('training_data')
num_classes = len(classes)


batch_size = 32
validation_size = 0.2
img_size = 128
num_channels = 3
train_path='training_data'
在train.py上设置的参数将在dataset.py类上读取。
data = dataset.read_train_sets(train_path, img_size, classes, validation_size=validation_size)
在dataset.py类中,我们定义了ROI和数据扩充。带有数据解释功能的两个函数,Adjust_gamma可以降低亮度,而Adjust_gammaness可以提高亮度。
def adjust_gamma(image):
  gamma = 0.5
  invGamma = 1.0 / gamma
  table = np.array([((i / 255.0) ** invGamma) * 255
    for i in np.arange(0, 256)]).astype("uint8")


  return cv2.LUT(image, table)


def increase_brightness(img, value):
  hsv = cv2.cvtColor(img, cv2.COLOR_BGR2HSV)
  h, s, v = cv2.split(hsv)


  lim = 255 - value
  v[v > lim] = 255
  v[v <= lim] += value


  final_hsv = cv2.merge((h, s, v))
  img = cv2.cvtColor(final_hsv, cv2.COLOR_HSV2BGR)


  return img
加载输入数据时,将为每个图像定义ROI。
for fields in classes:
  index = classes.index(fields)
  print('Now going to read {} files (Index: {})'.format(fields, index))
  path = os.path.join(train_path, fields, '*g')
  files = glob.glob(path)
  for fl in files:
    image = cv2.imread(fl)


    # Region Of Interest (ROI)
    height, width = image.shape[:2]
    newHeight = int(round(height/2))
    image = image[newHeight-5:height-50, 0:width]


    brght_img = increase_brightness(image, value=150)


    shaded_img = adjust_gamma(image)


    image = cv2.resize(image, (image_size, image_size),0,0, cv2.INTER_LINEAR)
    image = image.astype(np.float32)
    image = np.multiply(image, 1.0 / 255.0)


    brght_img = cv2.resize(brght_img, (image_size, image_size),0,0, cv2.INTER_LINEAR)
    brght_img = brght_img.astype(np.float32)
    brght_img = np.multiply(brght_img, 1.0 / 255.0)


    shaded_img = cv2.resize(shaded_img, (image_size, image_size),0,0, cv2.INTER_LINEAR)
    shaded_img = shaded_img.astype(np.float32)
    shaded_img = np.multiply(brght_img, 1.0 / 255.0)
我们还会平衡输入图像,因为沥青的图像更多,而未铺砌和未铺砌的道路更少。
if index == 0: #asphalt
  images.append(image)
  images.append(brght_img)
  images.append(shaded_img)
elif index == 1: #paved
  for i in range(3):
    images.append(image)
    images.append(brght_img)
    images.append(shaded_img)
elif index == 2: #unpaved
  for i in range(6):
    images.append(image)
    images.append(brght_img)
    images.append(shaded_img)
回到train.py,让我们定义TensorFlow教程[2]中所示的CNN层。所有选择到训练步骤的图像都将传递到第一卷积层,其中包含有关通道的宽度,高度和数量的信息。前两层包含32个大小为3x3的滤镜。紧接着是一个具有3x3大小的64个滤镜的图层。所有的步幅都定义为1,填充的定义为0。正态分布用于权重初始化。为了在尺寸上减少输入,这有助于分析输入子区域中的特征信息,在所有卷积层中应用了最大池。在每个卷积层的末尾,在最大合并功能之后,将ReLU用作激活功能。
def create_convolutional_layer(input,
               num_input_channels,
               conv_filter_size,
               num_filters):


  weights = create_weights(shape=[conv_filter_size, conv_filter_size, num_input_channels, num_filters])
  biases = create_biases(num_filters)


  layer = tf.nn.conv2d(input=input,
                     filter=weights,
                     strides=[1, 1, 1, 1],
                     padding='SAME')


  layer += biases


  layer = tf.nn.max_pool(value=layer,
                            ksize=[1, 2, 2, 1],
                            strides=[1, 2, 2, 1],
                            padding='SAME')


  layer = tf.nn.relu(layer)
在卷积层之后,平坦层用于将卷积多维张量转换为一维张量。
def create_flatten_layer(layer):
    layer_shape = layer.get_shape()


    num_features = layer_shape[1:4].num_elements()


    layer = tf.reshape(layer, [-1, num_features])


    return layer
最后添加两个完全连接的层。在第一个完全连接的层中,应用了ReLU激活功能。第二个完全连接的层具有可能的输出,所需的类别。
def create_fc_layer(input,
             num_inputs,
             num_outputs,
             use_relu=True):


  weights = create_weights(shape=[num_inputs, num_outputs])
  biases = create_biases(num_outputs)


  layer = tf.matmul(input, weights) + biases
  if use_relu:
    layer = tf.nn.relu(layer)


  return layer
我们使用softmax函数来实现每个类的概率。最后,我们还使用Adam优化器,该优化器根据训练中使用的输入数据更新网络权重。
layer_conv1 = create_convolutional_layer(input=x,
               num_input_channels=num_channels,
               conv_filter_size=filter_size_conv1,
               num_filters=num_filters_conv1)


layer_conv2 = create_convolutional_layer(input=layer_conv1,
               num_input_channels=num_filters_conv1,
               conv_filter_size=filter_size_conv2,
               num_filters=num_filters_conv2)


layer_conv3= create_convolutional_layer(input=layer_conv2,
               num_input_channels=num_filters_conv2,
               conv_filter_size=filter_size_conv3,
               num_filters=num_filters_conv3)


layer_flat = create_flatten_layer(layer_conv3)


layer_fc1 = create_fc_layer(input=layer_flat,
                     num_inputs=layer_flat.get_shape()[1:4].num_elements(),
                     num_outputs=fc_layer_size,
                     use_relu=True)


layer_fc2 = create_fc_layer(input=layer_fc1,
                     num_inputs=fc_layer_size,
                     num_outputs=num_classes,
                     use_relu=False)


y_pred = tf.nn.softmax(layer_fc2,name='y_pred')


y_pred_cls = tf.argmax(y_pred, dimension=1)
session.run(tf.global_variables_initializer())
cross_entropy = tf.nn.softmax_cross_entropy_with_logits(logits=layer_fc2,
                                                    labels=y_true)
cost = tf.reduce_mean(cross_entropy)
optimizer = tf.train.AdamOptimizer(learning_rate=1e-4).minimize(cost)
correct_prediction = tf.equal(y_pred_cls, y_true_cls)
accuracy = tf.reduce_mean(tf.cast(correct_prediction, tf.float32))
可以python train.py 在终端中训练模型的运行:
现在,有了经过训练的模型,我们就可以测试。首先,让我们准备好接收输入测试帧和输出文件名。
outputFile = sys.argv[2]


# Opening frames
cap = cv.VideoCapture(sys.argv[1])


vid_writer = cv.VideoWriter(outputFile, cv.VideoWriter_fourcc('M','J','P','G'), 15, (round(cap.get(cv.CAP_PROP_FRAME_WIDTH)),round(cap.get(cv.CAP_PROP_FRAME_HEIGHT))))
检索训练好的模型并访问图形。
sess = tf.Session()
saver = tf.train.import_meta_graph('roadsurface-model.meta')
saver.restore(sess, tf.train.latest_checkpoint('./'))


graph = tf.get_default_graph()


y_pred = graph.get_tensor_by_name("y_pred:0")


x = graph.get_tensor_by_name("x:0")
y_true = graph.get_tensor_by_name("y_true:0")
y_test_images = np.zeros((1, len(os.listdir('training_data'))))
请记住,我们不需要整个图像,我们的培训着重于使用ROI,在这里我们也使用它。
width = int(round(cap.get(cv.CAP_PROP_FRAME_WIDTH)))
height = int(round(cap.get(cv.CAP_PROP_FRAME_HEIGHT)))


newHeight = int(round(height/2))


while cv.waitKey(1) < 0:


    hasFrame, images = cap.read()


    finalimg = images


    images = images[newHeight-5:height-50, 0:width]
    images = cv.resize(images, (image_size, image_size), 0, 0, cv.INTER_LINEAR)
    images = np.array(images, dtype=np.uint8)
    images = images.astype('float32')
    images = np.multiply(images, 1.0/255.0)
最后,基于输出预测,我们可以在每帧中打印分类的表面类型。
x_batch = images.reshape(1, image_size, image_size, num_channels)


feed_dict_testing = {x: x_batch, y_true: y_test_images}
result = sess.run(y_pred, feed_dict=feed_dict_testing)


outputs = [result[0,0], result[0,1], result[0,2]]


value = max(outputs)
index = np.argmax(outputs)


if index == 0:
  label = 'Asphalt'
  prob = str("{0:.2f}".format(value))
  color = (0, 0, 0)
elif index == 1:
  label = 'Paved'
  prob = str("{0:.2f}".format(value))
  color = (153, 102, 102)
elif index == 2:
  label = 'Unpaved'
  prob = str("{0:.2f}".format(value))
  color = (0, 153, 255)


cv.rectangle(finalimg, (0, 0), (145, 40), (255, 255, 255), cv.FILLED)
cv.putText(finalimg, 'Class: ', (5,15), cv.FONT_HERSHEY_SIMPLEX, 0.5, (0,0,0), 1)
cv.putText(finalimg, label, (70,15), cv.FONT_HERSHEY_SIMPLEX, 0.5, color, 1)
cv.putText(finalimg, prob, (5,35), cv.FONT_HERSHEY_SIMPLEX, 0.5, (0,0,0), 1)


vid_writer.write(finalimg.astype(np.uint8))
可以测试在终端中运行的模型:python test.py PATH_TO_YOUR_FRAMES_SEQUENCE NAME_YOUR_VIDEO_FILE.avi。
03.路面质量分类
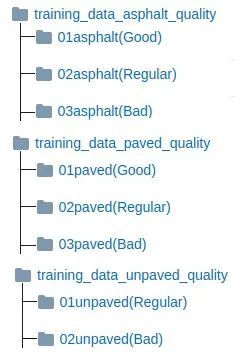
现在让我们包括质量分类。我们仅使用用于训练表面类型分类模型的相同CNN架构,并分别在每个表面类别上应用每个质量类别。因此,除了现有模型外,我们还培训了3种新模型。为此,大家将需要准备用于训练每个表面类别的模型的数据。在RTK数据集页面中,我们已经给出了按班级组织的框架。
用于质量课程的培训数据文件夹结构
要训练每种模型,小伙伴们可以在终端中运行:
python trainAsphaltQuality.py
python trainPavedQuality.py
python trainUnpavedQuality.py
现在,预测部分发生了什么变化。我们使用四个不同的图,每个训练模型一个。
graph = tf.Graph()
graphAQ = tf.Graph()
graphPQ = tf.Graph()
graphUQ = tf.Graph()
04.模型恢复
恢复类型模型
with graph.as_default():
    saver = tf.train.import_meta_graph('roadsurfaceType-model.meta')


    y_pred = graph.get_tensor_by_name("y_pred:0")


    x = graph.get_tensor_by_name("x:0")
    y_true = graph.get_tensor_by_name("y_true:0")
    y_test_images = np.zeros((1, len(os.listdir('training_data_type'))))


sess = tf.Session(graph = graph)
saver.restore(sess, tf.train.latest_checkpoint('typeCheckpoint/'))
恢复沥青质量模型
with graphAQ.as_default():
    saverAQ = tf.train.import_meta_graph('roadsurfaceAsphaltQuality-model.meta')


    y_predAQ = graphAQ.get_tensor_by_name("y_pred:0")


    xAQ = graphAQ.get_tensor_by_name("x:0")
    y_trueAQ = graphAQ.get_tensor_by_name("y_true:0")
    y_test_imagesAQ = np.zeros((1, len(os.listdir('training_data_asphalt_quality'))))


sessAQ = tf.Session(graph = graphAQ)
saverAQ.restore(sessAQ, tf.train.latest_checkpoint('asphaltCheckpoint/'))
恢复铺砌的质量模型
with graphPQ.as_default():
    saverPQ = tf.train.import_meta_graph('roadsurfacePavedQuality-model.meta')


    y_predPQ = graphPQ.get_tensor_by_name("y_pred:0")


    xPQ = graphPQ.get_tensor_by_name("x:0")
    y_truePQ = graphPQ.get_tensor_by_name("y_true:0")
    y_test_imagesPQ = np.zeros((1, len(os.listdir('training_data_paved_quality'))))


sessPQ = tf.Session(graph = graphPQ)
saverPQ.restore(sessPQ, tf.train.latest_checkpoint('pavedCheckpoint/'))
恢复未铺砌的质量模型
with graphUQ.as_default():
    saverUQ = tf.train.import_meta_graph('roadsurfaceUnpavedQuality-model.meta')


    y_predUQ = graphUQ.get_tensor_by_name("y_pred:0")


    xUQ = graphUQ.get_tensor_by_name("x:0")
    y_trueUQ = graphUQ.get_tensor_by_name("y_true:0")
    y_test_imagesUQ = np.zeros((1, len(os.listdir('training_data_unpaved_quality'))))


sessUQ = tf.Session(graph = graphUQ)
saverUQ.restore(sessUQ, tf.train.latest_checkpoint('unpavedCheckpoint/'))
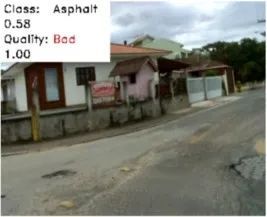
此时,输出预测也要考虑质量模型,我们可以在每个帧中打印分类的表面类型以及该表面的质量。
if index == 0: #Asphalt
        label = 'Asphalt'
        prob = str("{0:.2f}".format(value))
        color = (0, 0, 0)
        x_batchAQ = images.reshape(1, image_size, image_size, num_channels)


        feed_dict_testingAQ = {xAQ: x_batchAQ, y_trueAQ: y_test_imagesAQ}
        resultAQ = sessAQ.run(y_predAQ, feed_dict=feed_dict_testingAQ)
        outputsQ = [resultAQ[0,0], resultAQ[0,1], resultAQ[0,2]]
        valueQ = max(outputsQ)
        indexQ = np.argmax(outputsQ)
        if indexQ == 0: #Asphalt - Good
            quality = 'Good'
            colorQ = (0, 255, 0)
            probQ =  str("{0:.2f}".format(valueQ))
        elif indexQ == 1: #Asphalt - Regular
            quality = 'Regular'
            colorQ = (0, 204, 255)
            probQ =  str("{0:.2f}".format(valueQ))
        elif indexQ == 2: #Asphalt - Bad
            quality = 'Bad'
            colorQ = (0, 0, 255)
            probQ =  str("{0:.2f}".format(valueQ))
    elif index == 1: #Paved
        label = 'Paved'
        prob = str("{0:.2f}".format(value))
        color = (153, 102, 102)
        x_batchPQ = images.reshape(1, image_size, image_size, num_channels)


        feed_dict_testingPQ = {xPQ: x_batchPQ, y_truePQ: y_test_imagesPQ}
        resultPQ = sessPQ.run(y_predPQ, feed_dict=feed_dict_testingPQ)
        outputsQ = [resultPQ[0,0], resultPQ[0,1], resultPQ[0,2]]
        valueQ = max(outputsQ)
        indexQ = np.argmax(outputsQ)
        if indexQ == 0: #Paved - Good
            quality = 'Good'
            colorQ = (0, 255, 0)
            probQ =  str("{0:.2f}".format(valueQ))
        elif indexQ == 1: #Paved - Regular
            quality = 'Regular'
            colorQ = (0, 204, 255)
            probQ =  str("{0:.2f}".format(valueQ))
        elif indexQ == 2: #Paved - Bad
            quality = 'Bad'
            colorQ = (0, 0, 255)
            probQ =  str("{0:.2f}".format(valueQ))
    elif index == 2: #Unpaved
        label = 'Unpaved'
        prob = str("{0:.2f}".format(value))
        color = (0, 153, 255)
        x_batchUQ = images.reshape(1, image_size, image_size, num_channels)


        feed_dict_testingUQ = {xUQ: x_batchUQ, y_trueUQ: y_test_imagesUQ}
        resultUQ = sessUQ.run(y_predUQ, feed_dict=feed_dict_testingUQ)
        outputsQ = [resultUQ[0,0], resultUQ[0,1]]
        valueQ = max(outputsQ)
        indexQ = np.argmax(outputsQ)
        if indexQ == 0: #Unpaved - Regular
            quality = 'Regular'
            colorQ = (0, 204, 255)
            probQ =  str("{0:.2f}".format(valueQ))
        elif indexQ == 1: #Unpaved - Bad
            quality = 'Bad'
            colorQ = (0, 0, 255)
            probQ =  str("{0:.2f}".format(valueQ))
打印结果
cv.rectangle(finalimg, (0, 0), (145, 80), (255, 255, 255), cv.FILLED)
cv.putText(finalimg, 'Class: ', (5,15), cv.FONT_HERSHEY_DUPLEX, 0.5, (0,0,0))
cv.putText(finalimg, label, (70,15), cv.FONT_HERSHEY_DUPLEX, 0.5, color)
cv.putText(finalimg, prob, (5,35), cv.FONT_HERSHEY_DUPLEX, 0.5, (0,0,0))
cv.putText(finalimg, 'Quality: ', (5,55), cv.FONT_HERSHEY_DUPLEX, 0.5, (0,0,0))
cv.putText(finalimg, quality, (70,55), cv.FONT_HERSHEY_DUPLEX, 0.5, colorQ)
cv.putText(finalimg, probQ, (5,75), cv.FONT_HERSHEY_DUPLEX, 0.5, (0,0,0))
大家可以在终端中测试运行情况:python testRTK.py PATH_TO_YOUR_FRAMES_SEQUENCE NAME_YOUR_VIDEO_FILE.avi。
一些结果样本:
致谢
lThiago Rateke << span="">rateke.thiago@gmail.com>
lKarla Aparecida Justen << span="">justen.karla@gmail.com>
lAldo von Wangenheim << span="">aldo.vw@ufsc.br>
参考文献
[1] T. Rateke, K. A. Justen and A. von Wangenheim, Road Surface Classification with Images Captured From Low-cost Cameras — Road Traversing Knowledge (RTK) Dataset, (2019), Revista de Informática Teórica e Aplicada (RITA)
[2] A. Sachan, Tensorflow Tutorial 2: image classifier using convolutional neural network, (2017), CV-Tricks.com
交流群
欢迎加入公众号读者群一起和同行交流,目前有SLAM、三维视觉、传感器、自动驾驶、计算摄影、检测、分割、识别、医学影像、GAN、算法竞赛等微信群(以后会逐渐细分),请扫描下面微信号加群,备注:”昵称+学校/公司+研究方向“,例如:”张三 + 上海交大 + 视觉SLAM“。请按照格式备注,否则不予通过。添加成功后会根据研究方向邀请进入相关微信群。请勿在群内发送广告,否则会请出群,谢谢理解~
![]()
![]()
