毕设:基于CNN卷积神经网络的猫狗识别、狗品种识别(Tensorflow、Keras、Kaggle竞赛)
相关文章:
(最全、最新)查看python安装、路径以及pip安装的包列表及路径、查看Python所有虚拟环境
python操作mysql数据库(详解1)
python操作mysql数据库(详解2)
python批量爬取古诗词并保存之Excel或数据库mysql
Python提取MySQL数据,并批量保存到Excel文件,生成报表
Python半分钟内处理分析128张Excel表格,是种怎么样的体验
Python提取MySQL数据,并批量保存到Excel文件,生成报表
Python+谷歌浏览器–淘宝秒杀器Selenium自动化爬取
(一)SQL基础三步曲(小白必会,别问我为什么,问了就是出门左转)
(二)SQL基础三步曲(小白必会,别问我为什么,问了就是出门左转)
基于卷积神经网络的图像识别算法及其应用研究
毕业快一年了,拿出来分享给大家,我和网上唯一的区别就是,我能够同时实现两个方案(猫狗识别和狗品种识别),我当时也是网上各种查,花了2,3个月的时间,一个萝卜一个坑走过来的,深度学习真的是深似海呀,不过结果还好,知道过程和原理是怎么来的了。
希望这篇文章能帮助你,加油,祝你好运!!!
文章目录
- 基于卷积神经网络的图像识别算法及其应用研究
- 前言
- 一、卷积神经网络是什么?
- 二、卷积神经网络结构及工作原理
-
- 1.卷积神经网络的结构
- 2 卷积神经网络的工作原理
- 3 池化层的工作原理
- 3 全连接层的工作原理
- 2.代码(猫狗识别和狗品种识别)
-
- 1 猫狗识别
-
- 猫狗识别代码
- 2 狗品种识别
-
- 狗品种识别代码
- 3 训练数据集
- 总结
前言
随着图像识别以及机器视觉的不断发展,卷积神经网络(Convolutional Neural Network, CNN)逐渐成为一个热门的研究课题。
本文研究了基于卷积神经网络的图像识别的算法及其应用,实现了猫狗和狗品种的鉴别,主要的研究工作如下:
(1)首先,介绍了CNN的组成和工作原理,在此基础上对基于卷积神经网络的图像识别算法进行了深入研究。通过手动采集对Kaggle数据集和斯坦福大学犬类图像数据集进行预处理,作为输入网络的数据。
(2)其次,利用之前预处理好的图像数据来构建卷积神经网络模型,设计卷积神经网络算法,加入卷积层,采样层,池化层和全连接层等网络层,微调图像数据参数,优化模型,分别解决二分类模型和多分类模型的图像识别问题。
(3)最后,利用卷积神经网络训练好的模型预测图像结果,以网络模型作为区分预测猫狗和狗品种的鉴别标准,进行图像预测,验证实验结果。利用卷积神经网络技术对大量的复杂图像进行自我学习,提取图像的特征值,生成模型。再用此模型来判断图像,得出类别和准确率。
提示:以下是本篇文章正文内容,下面案例可供参考
一、卷积神经网络是什么?
卷积神经网络(Convolutional Neural Network, CNN)是一种前馈神经网络,处理图像数据。第一个卷积神经网络是由Alexander Waibel得出的时间延迟网络(TDNN),是一种用于语音识别的卷积神经网络,用FFT预处理的语音信号当作输入,两种一维卷积构成的隐含层,提取频率域上面的平移不变特征。当时语音识别的隐马尔可夫模型,在同等条件下的表现是落后于TDNN。
1988年,Wei Zhang推出了第一个二维卷积神经网络:平移不变人工神经网络(SIANN),并应用在医学影像检测领域。1989年,Yann LeCun也创建了图像分类的卷积神经网络领域,也就是LeNet的第一个版本。网络结构和当今的卷积神经网络十分接近。LeCun随机初始化权重,随后用随机梯度下降进行自我学习,这一方法被后来的深度学习研究进行广泛应用。“卷积”和“卷积神经网络”等词,最先在这网络结构中描述。LeNet-5往原先的网络模型中加入了池化层对输入特征进行筛选,现代卷积神经网络的基本结构就是这种模型,采用交替叠加卷积层-池化层结构,能有效提取出输入图像的平移不变特征。如人像识别、手势识别等基于卷积神经网络的应用研究也逐渐深入。
CNN前馈过程为往前传播输出计算,该过程只向前传播输出计算,后一层的输入当作前一层的输出,持续到最后一层输出最终结果。传播过程不会调整网络参数。反向传播过程为,计算损失函数,修改每层参数,使误差向前传播,从最后一层开始,调整全部网络参数权重。CNN的特点在于其每一层的特征都由上一层的局部区域通过共享权值的卷积核激励得到。总的来说CNN有两大特点:
(1)可以将超大的数据量图像有效的降维成小的数据量。
(2)较为可靠的保留特征图像,图像较为符合处理原则。
CNN是终端到终端的一种学习研究模型,模型参数的训练方法为,通过传统的梯度进行下降,训练后的卷积神经网络,可以学习提取图像特征和图像分类。
二、卷积神经网络结构及工作原理
1.卷积神经网络的结构
卷积神经网络的结构第一部分为输入层,第二部分是若干卷积层和采样层,采样层也称为池化层,第三部分为全连接层。
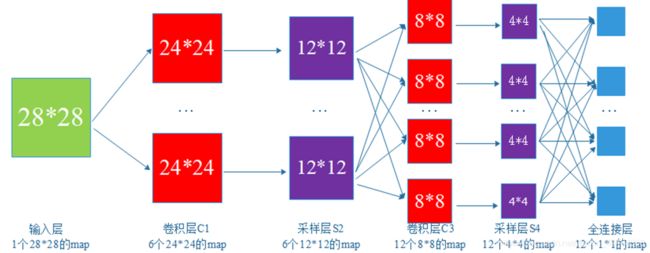
2 卷积神经网络的工作原理
CNN的工作原理为以下三个步骤:
1.卷积层的运算;2.池化层的下采样;3.全连接层的分类。池化层的下采样,大幅降低参数量级(降维);全连接层的分类,类似传统神经网络部分,输出预测结果。
1、 卷积层的工作原理
卷积层,负责运算和提取图像中的局部特征;比如使用一个Filter(过滤器,也叫卷积核)来过滤图像的各个小区域,从而得到这些小区域的特征值。多个二维平面类型的卷积核可以当作每个卷积层,多个神经元组成一个卷积核。CNN中的n个卷积核为每种卷积层,共享权重在特征图里,这样就可以大大减少神经网络的参数数目,加快运算速率。卷积神经网络[17]的每个神经元,在接收输入、执行点积和非线性跟随时,使得深度学习面临着数据过拟合的问题[18]。在无法获取更多训练数据的情况下,防止神经网络过拟合的常用方法有添加网络容量、添加权重正则化[19]、dropout处理[20]、数据增强[21]等。卷积核扫完整张图像(Image),得出卷积特征(Convolved Feature)。运算过程为对应相乘,再相加,卷积层的运算过程如下图所示:

在实际应用中,一般为有多个卷积核,每个图像特征代表每种卷积核。
当图像特征与卷积核卷积出的较大的值时,则图像特征非常接近于这个卷积核,如下图所示:
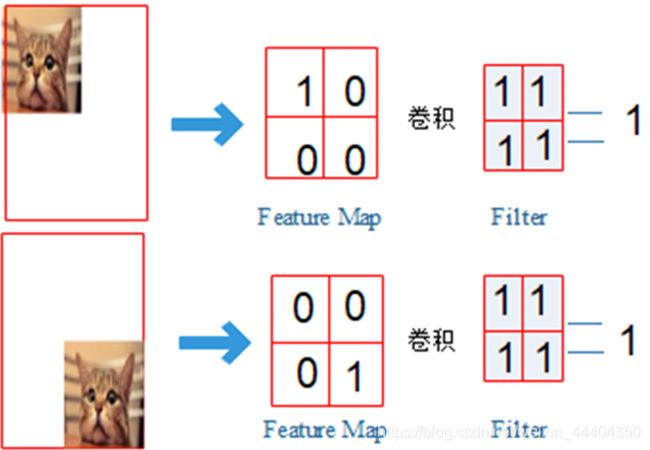
卷积核(kernel convolution)不止用于CNN,也是在其他许多视觉算法领域的关键纽带。卷积核相当于一个小小的数字矩阵(滤波器,英文叫法为kernel或filter)在图像上进行滚动,依据kernel的值,并转换图像矩阵的值。通过卷积操作后得到的图像输出为特征映射(feature map)。特征映射值的公式计算如下:

式中, f为输入图像, h为滤波器。矩阵结果行数为 n,列数为 n。
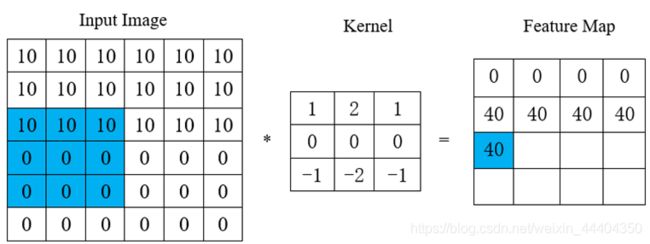

把kernel固定在像素上后,在kernel中依次拿出每一个值,并成对地与图像中的值相乘。最后将每种核运算后的最终元素结果相加,把求和结果放到特征图输出的合适位置中。假设想用多种kernel在同种图像上,可以分别对每种kernel执行卷积,然后将结果来叠加,最后组成一个整体。
卷积层为创建CNN的一种层,已经不是使用单一的矩阵乘法,而是用卷积计算。前向传播为一下两个步骤。
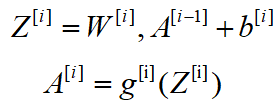
首先是计算中间值Z:将输入数据与张量W(包括滤波器)进行卷积计算,再把结果和偏差 加上。其次把中间值Z传输到非线性激活函数中(使用g表示该激活函数)。
卷积优化图像处理计算过程:将2D卷积可视化操作——把数字1-9标记为神经元构成的输入层,用来接收像素亮度的输入图像,字母A-D为通过卷积运算得到的特征映射。I-IV 为来自kernel的后续值,可以理解为拿来学习网络的值。
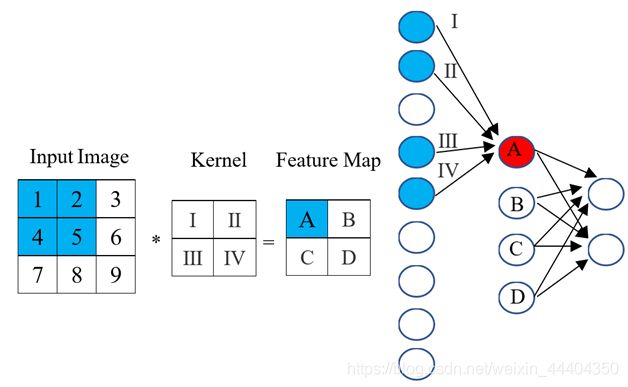
卷积层有两个关键的属性。可以从图中看出,并不是相邻层的全部神经元都应该互相连接。如A的值是受神经元1影响。还有我们可以看出有些神经元用相同的权重。这样我们需要学习的参数,在CNN中我们要少得多。所以任何的kernel值都将影响每一个元素的特征映射输出,是反向传播中是较为关键的过程。
如果卷积层的输入向量是 ,那么输出向量是 , 参数向量(卷积算子)就是 。从输入向量到输出向量的过程为:

3 池化层的工作原理
即便是完成了卷积,图像依然较大,直接原因是卷积核比较小,采用直接的方法进行下采样来降低数据维度。池化层可以是下采样,因为极大地降低数据维度,减小数据量的大小空间并加快运算速度。如下图所示:

从图中可以看出,原始图像为10×10,开始进行下采样,采样窗口为3×3,下采样后的特征图为一个2×2的大小。池化层是较为可靠的下降数据维度比起卷积层来说,极大减少运算量,来避免过拟合。
池化层(Pooling)和卷积层的数学计算原理是一样的,先压缩来对输入的Feature Map。选一个极值输出到下一层Feature Map 邻域内的值,称为Max-Pooling。最后2N×2N的Feature Map,可以压缩为N×N。
CNN较为基本的两个层为卷积层和池化层,一般情况下为一起使用,池化层紧挨着卷积层之后。包含三个级联函数,前向传播和后向传播如下图所示:
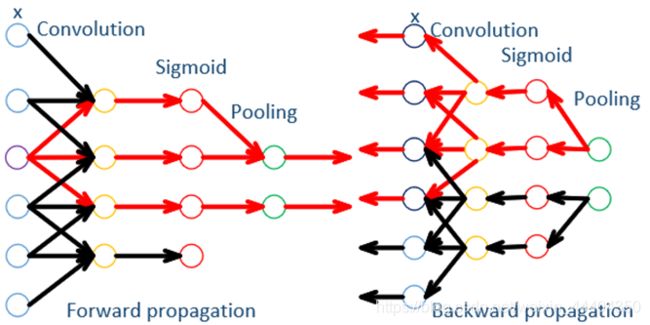
3 全连接层的工作原理
全连接层,在整个卷积神经网络中起到“分类器”的作用。
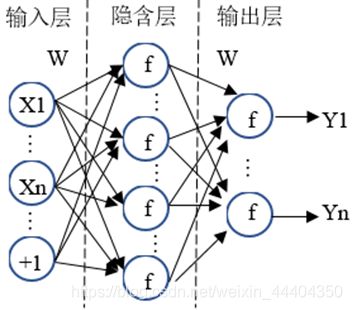
神经网络模型训练完成后,得出全连接层。它的每节点与上层每节点相互连接,全部综合起来前一层的输出特征,因此这层权值参数是极多的。可以用一个简单的网络模型数学原理来推导一下过程:
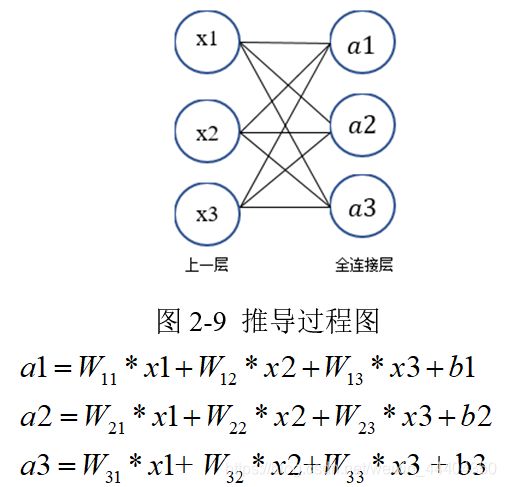
其中,x1、x2、x3 为全连接层的输入, a1、a 2、 a3为输出。
当池化层和卷积层处理后的数据,输入给全连接层,得出想要的效果。通过降维后,卷积层和池化层数据,全连接层才能“跑起来”,否则数据量大,计算成本高,效率低下。
全连接层模拟过程如下图所示:
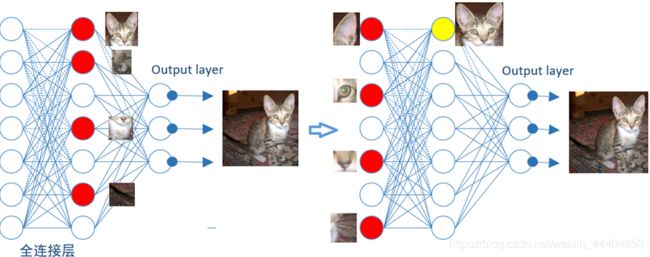
先是从局部特征的图像片段进行分类、搜寻和对比。由小局部特征图像到大局部特征图像逐渐演进,最后找到整个猫的图像。如对猫头、猫尾巴、猫腿等进行分类,红色圆形表示这个特征被找到的神经元,已经激活了,当寻找到合适的特征图像时,确定为猫。再往前走一层,对子特征图像分类,如猫头有眼睛、耳朵等这些特征进行分类。直到发现最符合要求的图像,把这些找到的特征组合在一起,最后确定为猫。
啊啊啊啊啊说了这多,代码类勒?
嘿嘿,不急,安排
2.代码(猫狗识别和狗品种识别)
1 猫狗识别
猫狗识别代码
restore.py模块代码:
import tensorflow as tf
import numpy as np
import tensorflow.contrib.slim as slim
from PIL import Image,ImageFont, ImageDraw
__global_times = 0
# 创建一个新的python程序并导入相关numpy、tensorflow等基础科学软件包。
#一共定义了4个类,
# def build_graph(top_k):
# 在这个类中,主要就是创建大量的权重和偏置项,进行卷积和池化。定义一个解析输入参数的函数,
# build_graph()来构建图表。创建大量的权重和偏置项,进行卷积和池化。
#调用tf.placeholder函数操作,定义传入图表中的shape参数,后续还会将实际的训练用例传入图表。在训练循环(train_op)的后续步骤中,传入的整个图像和标签数据集会被切片,以符合每一个操作所设置的shape参数值,占位符操作将会填补以符合这个shape参数值。然后使用feed_dict参数,将数据传入sess1.run()函数。
#构建好图表,满足促使神经网络向前反馈并做出预测的要求。往,图表中添加生成损失(loss)所需要的操作,往损失图表中添加计算并应用梯度,所需的操作。定义Weight变量、biase变量、卷积层、池化层。
#定义卷积,传入x和参数,slim..conv2d(input, filter, strides, padding, use_cudnn_on_gpu=None, name=None)
#定义池化,传入x, pooling, slim..max_pool(value, ksize, strides, padding, name=None)
#loss()函数通过添加所需的损失操作,进一步构建图表。
# def predictPrepare():
#将build_graph()函数构建好的图层,就是图表。进行加工,然后保存在当前文件夹checkpoint中。
# def imagePrepare(image_path):
#这个函数是对图像数据,进行统一处理,深加工。
# def Recognize(__test_image_file):
#这个函数主要是对处理好的测试图像,进行识别、分类和预测。
def build_graph(top_k):
    keep_prob = tf.placeholder(dtype=tf.float32, shape=[], name='keep_prob')
    images = tf.placeholder(dtype=tf.float32, shape=[None, 64, 64, 3], name='image_batch')
    labels = tf.placeholder(dtype=tf.int64, shape=[None], name='label_batch')
    conv_1 = slim.conv2d(images, 64, [3, 3], 3, padding='SAME', scope='conv1')
    max_pool_1 = slim.max_pool2d(conv_1, [2, 2], [2, 2], padding='SAME')
    conv_2 = slim.conv2d(max_pool_1, 128, [3, 3], padding='SAME', scope='conv2')
    max_pool_2 = slim.max_pool2d(conv_2, [2, 2], [2, 2], padding='SAME')
    conv_3 = slim.conv2d(max_pool_2, 256, [3, 3], padding='SAME', scope='conv3')
    max_pool_3 = slim.max_pool2d(conv_3, [2, 2], [2, 2], padding='SAME')

    conv_4 = slim.conv2d(max_pool_3, 512, [3, 3], padding='SAME', scope='conv4')
    conv_5 = slim.conv2d(conv_4, 512, [3, 3], padding='SAME', scope='conv5')
    max_pool_4 = slim.max_pool2d(conv_5, [2, 2], [2, 2], padding='SAME')

    flatten = slim.flatten(max_pool_4)

    fc1 = slim.fully_connected(slim.dropout(flatten, keep_prob), 1024, activation_fn=tf.nn.tanh, scope='fc1')
    logits = slim.fully_connected(slim.dropout(fc1, keep_prob), 2, activation_fn=None, scope='fc2')
    loss = tf.reduce_mean(tf.nn.sparse_softmax_cross_entropy_with_logits(logits=logits, labels=labels))
    accuracy = tf.reduce_mean(tf.cast(tf.equal(tf.argmax(logits, 1), labels), tf.float32))
    global_step = tf.get_variable("step", [], initializer=tf.constant_initializer(0.0), trainable=False)
    rate = tf.train.exponential_decay(2e-4, global_step, decay_steps=2000, decay_rate=0.97, staircase=True)
    train_op = tf.train.AdamOptimizer(learning_rate=rate).minimize(loss, global_step=global_step)
    probabilities = tf.nn.softmax(logits)
    tf.summary.scalar('loss', loss)
    tf.summary.scalar('accuracy', accuracy)
    merged_summary_op = tf.summary.merge_all()
    predicted_val_top_k, predicted_index_top_k = tf.nn.top_k(probabilities, k=top_k)
    accuracy_in_top_k = tf.reduce_mean(tf.cast(tf.nn.in_top_k(probabilities, labels, top_k), tf.float32))

    return {
     'images': images,
            'labels': labels,
            'keep_prob': keep_prob,
            'top_k': top_k,
            'global_step': global_step,
            'train_op': train_op,
            'loss': loss,
            'accuracy': accuracy,
            'accuracy_top_k': accuracy_in_top_k,
            'merged_summary_op': merged_summary_op,
            'predicted_distribution': probabilities,
            'predicted_index_top_k': predicted_index_top_k,
            'predicted_val_top_k': predicted_val_top_k}

def predictPrepare():
    sess = tf.Session()
    graph = build_graph(top_k=2)
    saver = tf.train.Saver()
    ckpt = tf.train.latest_checkpoint('./checkpoint')
    if ckpt:
        saver.restore(sess, ckpt)
    return graph, sess

def imagePrepare(image_path):
    temp_image = Image.open(image_path)
    temp_image = temp_image.resize((64, 64), Image.ANTIALIAS)
    temp_image = np.asarray(temp_image) / 255.0
    temp_image = temp_image.reshape([-1, 64, 64, 3])
    return temp_image

def Recognize(__test_image_file):

    global __global_times
    if __global_times == 0:
        global __graph1, __sess1
        __graph1, __sess1 = predictPrepare()
        temp_image = imagePrepare(__test_image_file)
        predict_val, predict_index = __sess1.run([__graph1['predicted_val_top_k'], __graph1['predicted_index_top_k']],
        feed_dict={
     __graph1['images']: temp_image,
        __graph1['keep_prob']: 1.0})
        __global_times = 1
        return predict_val, predict_index
    else:
        temp_image = imagePrepare(__test_image_file)
        predict_val, predict_index = __sess1.run([__graph1['predicted_val_top_k'], __graph1['predicted_index_top_k']],
                                                 feed_dict={
     __graph1['images']: temp_image, __graph1['keep_prob']: 1.0})
        return predict_val, predict_index

train.py模块代码:
import tensorflow.contrib.slim as slim
import matplotlib.pyplot as plt
import tensorflow as tf
import random
import os
# x = [] --- 初始化存放步数的列表
# y_1 = [] --- 初始化步存准确率的列表
# y_2 = [] --- 初始化存放loss的列表
x = []
y_1 = []
y_2 = []
# class DataIterator: --- 数据迭代器
# __init__()方法是所谓的对象的“构造函数”。self是指向该对象本身的一个引用。self代表实例。
class DataIterator:
    def __init__(self, data_dir):
        # Set FLAGS.charset_size to a small value if available computation power is limited.
        # 如果可用计算能力有限,请将FLAGS.charset_size设置为较小的值。
        # 选择的第一个`charset_size`字符来进行实验
        # Python 文件 truncate() 方法用于截断文件并返回截断的字节长度。
        # 指定长度的话,就从文件的开头开始截断指定长度,其余内容删除;
        # 不指定长度的话,就从文件开头开始截断到当前位置,其余内容删除
        truncate_path = data_dir + ('%05d' % 2)
        print(truncate_path)
        self.image_names = []
        # root为根目录。sub_folder为子文件夹。
        # os.walk() 方法是一个简单易用的文件、目录遍历器。data_dir---数据目录。
        # os.walk() 只产生文件路径。os.path.walk() 产生目录树下的目录路径和文件路径。
        # self.image_names += [os.path.join(root, file_path) for file_path in file_list]
        # os.path.join(root,file_path) 根目录与文件路径组合,形成绝对路径。
        # random.shuffle(self.image_names) --- 将序列的所有元素随机排序,返回随机排序后的序列。
              for root, sub_folder, file_list in os.walk(data_dir):
            if root < truncate_path:
                self.image_names = self.image_names+[os.path.join(root, file_path) for file_path in file_list]
                print(self.image_names)
        random.shuffle(self.image_names)
        # 遍历 --- os.sep 使得写的代码可以跨操作系统
        # split() 通过指定分隔符对字符串进行切片,如果参数 num 有指定值,则仅分隔 num 个子字符串。 返回分割后的字符串列表。
        self.labels = [int(file_name[len(data_dir):].split(os.sep)[0]) for file_name in self.image_names]
        print(self.labels)
    # @property --- 属性
    # len() 方法返回对象(字符、列表、元组等)长度或项目个数
      @property
    def size(self):
        return len(self.labels)
    # @staticmethod --- 静态方法
    # 人工增加训练集的大小. 通过加噪声等方法从已有数据中创造出一批"新"的数据.也就是Data Augmentation
    # tf.image.random_brightness(images, max_delta=0.3) --- 随机改变亮度
    # tf.image.random_contrast(images, 0.8, 1.2) --- 随机改变对比度
       @staticmethod
    def data_augmentation(images):
        images = tf.image.random_brightness(images, max_delta=0.3)
        images = tf.image.random_contrast(images, 0.8, 1.2)
        return images
    # batch_size --- 批尺寸    num_epochs --- 指把所有训练数据完整的过一遍的波数   aug --- 是否增大
    # tf.convert_to_tensor 将给定值转换为张量
    # tf.train.slice_input_producer 在tensor_list中生成一个张量片段。
    # num_epochs:一个整数(可选)。如果指定,slice_input_producer 在生成之前产生每个片段num_epochs次
    # tf.read_file 读取并输出输入文件名的全部内容。
    # tf.image.convert_image_dtype 将图像转换为dtype,并根据需要缩放其值。
    # tf.image.decode_png将PNG编码的图像解码为uint8或uint16张量。channels:解码图像的颜色通道数量为1。images_content:字符串类型的张量。0-d。 PNG编码的图像。
    # tf.image.resize_images使用指定的方法将图像调整为大小。
    # tf.train.shuffle_batch 通过随机混洗张量来创建批次。
    # [images, labels]要排队的张量或词典。batch_size:从队列中提取的新批量大小。
    # capacity:队列中元素的最大数量。min_after_dequeue出队后队列中的最小数量元素,用于确保元素的混合级别。
    def input_pipeline(self, batch_size, num_epochs=None, aug=False):
        images_tensor = tf.convert_to_tensor(self.image_names, dtype=tf.string)
        labels_tensor = tf.convert_to_tensor(self.labels, dtype=tf.int64)
        input_queue = tf.train.slice_input_producer([images_tensor, labels_tensor], num_epochs=num_epochs)
        labels = input_queue[1]
        images_content = tf.read_file(input_queue[0])
        images = tf.image.convert_image_dtype(tf.image.decode_png(images_content, channels=3), tf.float32)
        if aug:
            images = self.data_augmentation(images)
        new_size = tf.constant([64, 64], dtype=tf.int32)
        images = tf.image.resize_images(images, new_size)
        image_batch, label_batch = tf.train.shuffle_batch([images, labels], batch_size=batch_size, capacity=5000,min_after_dequeue=1000)
        return image_batch, label_batch
# 搭建神经网络
# tf.placeholder --- 设置一个容器,用于接下来存放数据
# keep_prob --- dropout的概率,也就是在训练的时候有多少比例的神经元之间的联系断开
# images --- 喂入神经网络的图像,labels --- 喂入神经网络图像的标签
# slim.conv2d --- 卷积层 --- (images, 64, [3, 3], 1, padding='SAME', scope='conv3_1')
# 第一个参数表示输入的训练图像,第二个参数表示滤波器的个数,原来的数据是宽64高64维度1,处理后的数据是维度64,
# 第三个参数是滤波器的大小,宽3高3的矩形,第四个参数是表示输入的维度,第五个参数padding表示加边的方式,第六个参数表示层的名称
# slim.max_pool2d --- 表示池化层 --- 池化就是减小卷积神经网络提取的特征,将比较明显的特征提取了,不明显的特征就略掉
# slim.flatten(max_pool_4) --- 表示将数据压缩
# slim.fully_connected --- 全连接层 --- 也就是一个个的神经元
# slim.dropout(flatten, keep_prob) --- dropout层,在训练的时候随机的断掉神经元之间的连接,keep_prob就是断掉的比例
# tf.reduce_mean --- 得到平均值
# tf.nn.sparse_softmax_cross_entropy_with_logits --- 求得交叉熵
# tf.argmax(logits, 1) --- 得到较大的值
# tf.equal() --- 两个数据相等为True,不等为False --- 用于得到预测准确的个数
# tf.cast() --- 将True和False转为1和0,
# global_step --- 训练的步数 --- initializer=tf.constant_initializer(0.0) --- 步数初始化
# tf.train.AdamOptimizer(learning_rate=0.1) --- 优化器的选择,这个训练使用的Adam优化器
# learning_rate=0.1 --- 学习率 --- 训练的过程也就是神经网络学习的过程
# tf.nn.softmax(logits) --- 得到可能性
# tf.summary.scalar / merged_summary_op --- 用于显示训练过程的数据
# predicted_val_top_k --- 喂入图像得到的可能性,也就是识别得到是哪一个汉字的可能性,top_k表示可能性最大的K个数据
# predicted_index_top_k --- 这个表示识别最大K个可能性汉字的索引 --- 也就是汉字对应的数字
# return 表示这个函数的返回值
def build_graph(top_k):
    keep_prob = tf.placeholder(dtype=tf.float32, shape=[], name='keep_prob')
    images = tf.placeholder(dtype=tf.float32, shape=[None, 64, 64, 3], name='image_batch')
    labels = tf.placeholder(dtype=tf.int64, shape=[None], name='label_batch')
    conv_1 = slim.conv2d(images, 64, [3, 3], 3, padding='SAME', scope='conv1')
    max_pool_1 = slim.max_pool2d(conv_1, [2, 2], [2, 2], padding='SAME')
    conv_2 = slim.conv2d(max_pool_1, 128, [3, 3], padding='SAME', scope='conv2')
    max_pool_2 = slim.max_pool2d(conv_2, [2, 2], [2, 2], padding='SAME')
    conv_3 = slim.conv2d(max_pool_2, 256, [3, 3], padding='SAME', scope='conv3')
    max_pool_3 = slim.max_pool2d(conv_3, [2, 2], [2, 2], padding='SAME')

    conv_4 = slim.conv2d(max_pool_3, 512, [3, 3], padding='SAME', scope='conv4')
    conv_5 = slim.conv2d(conv_4, 512, [3, 3], padding='SAME', scope='conv5')
    max_pool_4 = slim.max_pool2d(conv_5, [2, 2], [2, 2], padding='SAME')

    flatten = slim.flatten(max_pool_4)

    fc1 = slim.fully_connected(slim.dropout(flatten, keep_prob), 1024, activation_fn=tf.nn.tanh, scope='fc1')
    logits = slim.fully_connected(slim.dropout(fc1, keep_prob), 2, activation_fn=None, scope='fc2')
    loss = tf.reduce_mean(tf.nn.sparse_softmax_cross_entropy_with_logits(logits=logits, labels=labels))
    accuracy = tf.reduce_mean(tf.cast(tf.equal(tf.argmax(logits, 1), labels), tf.float32))
    global_step = tf.get_variable("step", [], initializer=tf.constant_initializer(0.0), trainable=False)
    rate = tf.train.exponential_decay(2e-4, global_step, decay_steps=2000, decay_rate=0.97, staircase=True)
    train_op = tf.train.AdamOptimizer(learning_rate=rate).minimize(loss, global_step=global_step)
    probabilities = tf.nn.softmax(logits)
    tf.summary.scalar('loss', loss)
    tf.summary.scalar('accuracy', accuracy)
    merged_summary_op = tf.summary.merge_all()
    predicted_val_top_k, predicted_index_top_k = tf.nn.top_k(probabilities, k=top_k)
    accuracy_in_top_k = tf.reduce_mean(tf.cast(tf.nn.in_top_k(probabilities, labels, top_k), tf.float32))

    return {
     'images': images,
            'labels': labels,
            'keep_prob': keep_prob,
            'top_k': top_k,
            'global_step': global_step,
            'train_op': train_op,
            'loss': loss,
            'accuracy': accuracy,
            'accuracy_top_k': accuracy_in_top_k,
            'merged_summary_op': merged_summary_op,
            'predicted_distribution': probabilities,
            'predicted_index_top_k': predicted_index_top_k,
            'predicted_val_top_k': predicted_val_top_k}
# def train(): --- 训练神经网络
# DataIterator(data_dir='./data/train/') --- 调用函数 --- 得到训练数据集
# DataIterator(data_dir='./data/test/') --- 调用函数 --- 得到测试数据集
# with tf.Session() as sess: --- 新建一个会话
# train_feeder.input_pipeline(batch_size=128, aug=True) --- 得到训练数据集和训练数据集标签
# test_feeder.input_pipeline(batch_size=128) --- 得到测试数据集和测试数据集标签, 个数为128
# build_graph(top_k=1) --- 声明一个网络,参数为1,
# sess.run(tf.global_variables_initializer()) --- 初始化全部的参数
# tf.train.Coordinator() --- 线程的协调者。这个类实现了一个简单的机制来协调一组线程的终止。
# tf.train.start_queue_runners(sess=sess, coord=coord) --- 开始在图表中收集的所有队列运行者。为图中收集的所有队列运行者启动线程。
# coord:可选协调器,用于协调启动的线程
# tf.train.Saver() --- 保存并恢复变量
def train():
    train_feeder = DataIterator(data_dir='./data/train/')
    test_feeder = DataIterator(data_dir='./data/test/')

    with tf.Session() as sess:
        train_images, train_labels = train_feeder.input_pipeline(batch_size=28, aug=True)
        test_images, test_labels = test_feeder.input_pipeline(batch_size=28)

        graph = build_graph(top_k=1)
        sess.run(tf.global_variables_initializer())
        coord = tf.train.Coordinator()
        tf.train.start_queue_runners(sess=sess, coord=coord)
        saver = tf.train.Saver()
        # for i in range(5000) --- 循环5000次
        # sess.run([train_images, train_labels]) --- 得到一组大小为128的训练数据以及标签
        # sess.run([test_images, test_labels]) --- 得到一组大小为128的测试数据以及标签
        # feed_dict --- 用feed_dict喂数据 --- 训练数据
        # sess.run(graph['train_op'], feed_dict=feed_dict) --- 训练神经网络
               for i in range(5000):
            train_images_batch, train_labels_batch = sess.run([train_images, train_labels])
            test_images_batch, test_labels_batch = sess.run([test_images, test_labels])

            feed_dict = {
     graph['images']: train_images_batch, graph['labels']: train_labels_batch, graph['keep_prob']: 0.8}
            sess.run(graph['train_op'], feed_dict=feed_dict)
            # if i % 10 == 0 --- 没进行10次循环,进入下面的代码
            # feed_dict --- 喂入数据 --- 测试数据
            # loss, accuracy = sess.run() --- 喂入神经网络,得到loss以及准确率
            # print("---the step {0} ---loss {1} ---accuracy {2}".format(i, loss, accuracy)) --- 输出相关信息
            # x.append(i) --- 将步数加入列表中
            # y_1.append(accuracy) --- 将准确率加入列表
            # y_2.append(loss) --- 将loss加入列表
            if i % 10 == 0:
                feed_dict = {
     graph['images']: test_images_batch, graph['labels']: test_labels_batch, graph['keep_prob']: 0.8}
                _, loss, accuracy = sess.run([graph['train_op'], graph['loss'], graph['accuracy']], feed_dict=feed_dict)
                print("---the step {0} ---loss {1} ---accuracy {2}".format(i, loss, accuracy))
                x.append(i)
                y_1.append(accuracy)
                y_2.append(loss)

            if i % 100 == 0 and i > 0:
                saver.save(sess, './checkpoint/model.ckpt')
# if __name__ == "__main__": --- 主函数 --- 程序的入口
# train() --- 训练神经网络
# plt.plot(x, y_1) --- plt.plot(x, y_2) --- 绘制accuracy, loss和步数之间的图像
# plt.show() --- 显示图像
if __name__ == "__main__":
    train()
    plt.plot(x, y_1)
    plt.plot(x, y_2)
    plt.show()
opencv.py模块代码:
import cv2
import os
import restore
animals = ['cat', 'dog']
l = os.listdir("./test/")
length = len(l)
for i in range(0, length):
    if l[i].endswith(".jpg"):
        image_path = "./test/" + l[i]
        probabilities, animal = restore.Recognize(image_path)
        image = cv2.imread(image_path)
        text = str(animals[animal[0][0]]) + ' --> ' + str(probabilities[0][0])
        cv2.putText(image, text, (10, 50), cv2.FONT_HERSHEY_DUPLEX, 1.0, (255, 255, 255), 1)
        cv2.imshow('', image)
        cv2.waitKey(0)
        cv2.imwrite('./out/' + str(i) + '.jpg', image)
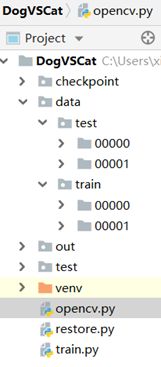
文件结构如下图所示:
猫狗识别数据训练过程:
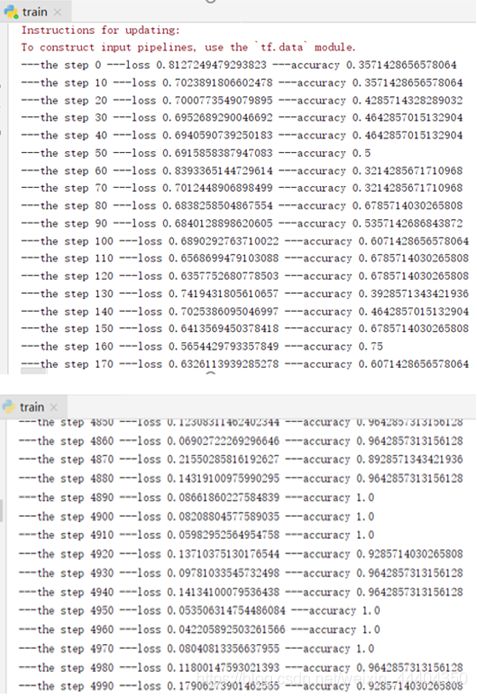
当步数(step)为0时,损失率(loss)约为0.8127249479293823,准确率(accuracy)约为0.3571428656578064。随着步数的增加,损失率逐渐下降,趋近于0。准确率逐渐上升,趋近于1。
准确率为通过数据量训练后的label评估来评估模型的预测结果。损失率(loss)为预测之前设计计算后的损失函数的损失值。在模型accuracy里衡量模型的效果为准确分类的样本数与总样本数之比。也就是度量模型的效果。
为了减少优化误差,我们可以计算损失函数,来更新模型参数。所以在优化算法和损失函数的推动下,来减少模型误差风险。比如损失率是我们的课本和考试题知识盲区等内容,让我们去不断消化和学习,来减少我们对知识的盲区,来降低答错率。而准确率就是我们最终的考试成绩。
猫狗识别模型训练的结果可视化:
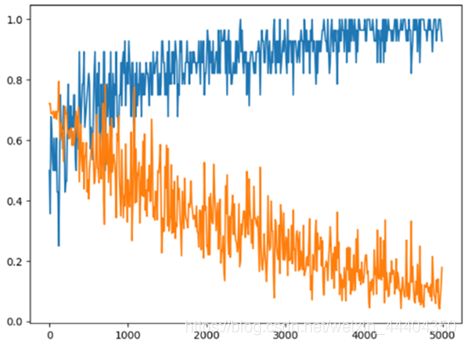
由图可知,纵轴表示训练的步长,横轴表示概率大小,蓝色表示准确率(accuracy),黄色表示损失率(loss),随着步长的增加,准确率逐渐趋近于1,损失率逐渐趋近于0,模型则越完美。
猫狗识别预测分析:
将任意部分测试图像放入test文件夹中,运行代码模块opencv.py中进行验证实验。程序输出图像,并在图像上显示该图像的特征和准确率大小(数值范围0~1)。
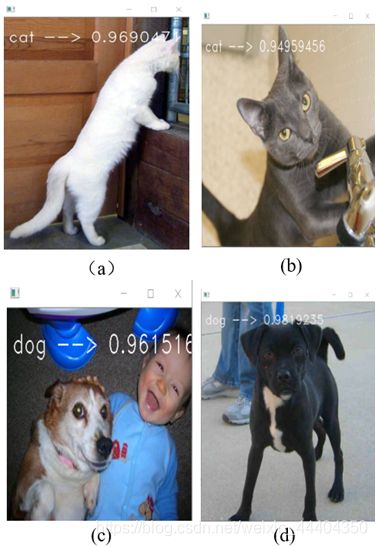
由图可知,在每张图片的头部,显示该图片的特征(猫或狗)和准确率大小(0~1),准确率计算公式在4.3节公式(4-1)中。(a)和(b),特征为猫(cat),准确率大小分别为0.969047(约为97%)、0.94959456(约为95%),©和(d),特征为狗(dog),准确率大小分别为0.961516(约为96%)、0.9819235(约为98%)。(a)到(d),已符合之前的设想。由此可知,已验证了基于卷积神经网络的图像识别算法的可行性。
2 狗品种识别
狗品种识别代码
Rm_DSstore.py模块代码:
import os
for file in os.listdir('train_img'):
    if file=='.DS_Store':
        print (file)
        print (os.remove('train_img/'+file))

Random_Name_Test.py模块代码:
import random
import os
import numpy as np
seed='abcdefghighklmnopqrsiuvwxyzABCDEFGHIGKLMNOKPRSTXYZ1234567890'

#第一种自定义名字办法
ran_name1 = []
for i in range(7):
    choice = random.choice(seed)
    ran_name1.append(choice)
#print '第一种方法:-》》' ,''.join(ran_name1)

#第二种自定义名字办法
ran_name2 = ''.join([name2 for name2 in random.sample(seed,6)])
# print ran_name2
ran = [i for i in range(101)]
print (np.min(ran))

#第三种自定义名字办法
ran_name3 = random.randint(100000,999999)
# print ran_name3

#获取路径中的文件名
path = '/mike/teacher/logo.jpg'
print (os.path.basename(path))

#文件名分割办法

file = 'dog_jpg_jpg_jpg'
print (file.split('_'))

PreDataProcess.py模块代码:
import os
import numpy as np
from PIL import Image

#重新命名
def FileReName(DogType,FilePath):
    type_counter = 0
    for type in DogType:
        file_counter = 0
        subfolder = os.listdir(FilePath+type)
        for subclass in subfolder:
            file_counter +=1
            print (file_counter)
            print ('Type_counter',type_counter)
            print (subclass)
            os.rename(FilePath+type+'/'+subclass, FilePath+type+'/'+str(type_counter)+'_'+str(file_counter)+'_'+subclass.split('.')[0]+'.jpg')
        type_counter += 1
#重新图像尺寸

def FileResize(Output_folder,DogType,FilePath,Width=100, Height=100):
    for type in DogType:
        for i in os.listdir(FilePath+type):
            img_open = Image.open(FilePath+type+'/'+i)
            conv_RGB = img_open.convert('RGB')
            Resized_img = conv_RGB.resize((Width,Height),Image.BILINEAR)
            Resized_img.save(os.path.join(Output_folder,os.path.basename(i)))

#读取图像返回array数组 numpy array
def ReadImage(filename,train_folder):
    img = Image.open (train_folder+filename)
    return np.array(img)

#图像加载到列表 图像 和 标签
def DataSet(train_folder):
    Train_list_img = []
    Train_list_label = []

    for file_1 in os.listdir(train_folder):
        file_img_to_array = ReadImage(filename=file_1,train_folder=train_folder)
        #添加图像数组到主list里
        Train_list_img.append(file_img_to_array)
        # 添加标签数组到主list里
        Train_list_label.append(int(file_1.split('_')[0]))

    Train_list_img = np.array(Train_list_img)
    Train_list_label = np.array(Train_list_label)

    print (Train_list_img.shape)   #X_train minst
    print (Train_list_label.shape) #Y_train minst


if __name__ == "__main__":

    DogType = ['哈士奇','德国牧羊犬','拉布拉多','萨摩耶犬']
    #修改名字

    FileReName(DogType=DogType,FilePath='train_data/')

    #修改尺寸
    FileResize(DogType=DogType, FilePath='train_data/',Output_folder='train_img/')

    #准备好的数据
    #DataSet(train_folder='train_img/')

    # FileReName(DogType=DogType,FilePath='Raw_Img/')

    #修改尺寸
    # FileResize(DogType=DogType, FilePath='Raw_Img/',Output_folder='train_img/')

    #准备好的数据
    DataSet(train_folder='train_img/')

FullTraining.py模块代码:
import os
import numpy as np
from PIL import Image
from keras.models import Sequential
from keras.layers import Convolution2D, Flatten, Dropout, MaxPooling2D,Dense,Activation
from keras.optimizers import Adam
from keras.utils import np_utils

#Pre process images
class PreFile(object):
    def __init__(self,FilePath,Dogtype):
        self.FilePath = FilePath
        # Main dog folder is shared path can be submit to param of this class
        self.DogType = Dogtype
        #the dogtype list is shared list between rename and resize fucntion

    def FileReName(self):
        count = 0
        for type in self.DogType: #For dog type output each dog foler name
            subfolder = os.listdir(self.FilePath+type)  # list up all folder
            for subclass in subfolder:  #output name of folder
                print ('count_classese:->>' , count)
                print (subclass)
                print (self.FilePath+type+'/'+subclass)
                os.rename(self.FilePath+type+'/'+subclass, self.FilePath+type+'/'+str(count)+'_'+subclass.split('.')[0]+".jpg")
            count+=1

    def FileResize(self,Width,Height,Output_folder):
        for type in self.DogType:
            print (type)
            files = os.listdir(self.FilePath+type)
            for i in files:
                img_open = Image.open(self.FilePath + type+'/' + i)
                conv_RGB = img_open.convert('RGB') #统一转换一下RGB格式 统一化
                new_img = conv_RGB.resize((Width,Height),Image.BILINEAR)
                new_img.save(os.path.join(Output_folder,os.path.basename(i)))

#main Training program
class Training(object):
    def __init__(self,batch_size,number_batch,categories,train_folder):
        self.batch_size = batch_size
        self.number_batch = number_batch
        self.categories = categories
        self.train_folder = train_folder

    #Read image and return Numpy array
    def read_train_images(self,filename):
        img = Image.open(self.train_folder+filename)
        return np.array(img)

    def train(self):
        train_img_list = []
        train_label_list = []
        for file in os.listdir(self.train_folder):
            files_img_in_array =  self.read_train_images(filename=file)
            train_img_list.append(files_img_in_array) #Image list add up
            train_label_list.append(int(file.split('_')[0])) #lable list addup

        train_img_list = np.array(train_img_list)
        train_label_list = np.array(train_label_list)

        train_label_list = np_utils.to_categorical(train_label_list,self.categories) #format into binary [0,0,0,0,1,0,0]

        train_img_list = train_img_list.astype('float32')
        train_img_list /= 255

        #-- setup Neural network CNN
        model = Sequential()
        #CNN Layer - 1
        model.add(Convolution2D(
            filters=32, #Output for next later layer output (100,100,32)
            kernel_size= (5,5) , #size of each filter in pixel
            padding= 'same', #边距处理方法 padding method
            input_shape=(100,100,3) , #input shape ** channel last(TensorFlow)
        ))
        model.add(Activation('relu'))
        model.add(MaxPooling2D(
            pool_size=(2,2), #Output for next layer (50,50,32)
            strides=(2,2),
            padding='same',
        ))

        #CNN Layer - 2
        model.add(Convolution2D(
            filters=64,  #Output for next layer (50,50,64)
            kernel_size=(2,2),
            padding='same',
        ))
        model.add(Activation('relu'))
        model.add(MaxPooling2D(  #Output for next layer (25,25,64)
            pool_size=(2,2),
            strides=(2,2),
            padding='same',
        ))

    #Fully connected Layer -1
        model.add(Flatten())
        model.add(Dense(1024))
        model.add(Activation('relu'))
    # Fully connected Layer -2
        model.add(Dense(512))
        model.add(Activation('relu'))
    # Fully connected Layer -3
        model.add(Dense(256))
        model.add(Activation('relu'))
    # Fully connected Layer -4
        model.add(Dense(self.categories))
        model.add(Activation('softmax'))
    # Define Optimizer
        adam = Adam(lr = 0.0001)
    #Compile the model
        model.compile(optimizer=adam,
                      loss="categorical_crossentropy",
                      metrics=['accuracy']
                      )
    # Fire up the network
        model.fit(
            train_img_list,
            train_label_list,
            epochs=self.number_batch,
            batch_size=self.batch_size,
            verbose=1,
        )
        #SAVE your work -model
        model.save('./dogfinder.h5')

def MAIN():
    DogType = ['哈士奇','德国牧羊犬','拉布拉多','萨摩耶犬']

    #****FILE Pre processing****
    #FILE = PreFile(FilePath='Raw_Img/',Dogtype=DogType)

    #****FILE Rename and Resize****
    #FILE.FileReName()
    #FILE.FileResize(Height=100,Width=100,Output_folder='train_img/')

    #Trainning Neural Network   //categories=分4类,number_batch步数30,每步batch_size(批量128个),共680个图像
    Train = Training(batch_size=128,number_batch=30,categories=4,train_folder='train_img/')
    Train.train()


if __name__ == "__main__":
    MAIN()

Predict_Dog.py模块代码:
from keras.models import load_model
import matplotlib.image as processimage
import matplotlib.pyplot as plt
import numpy as np
from PIL import Image
class Prediction(object):
    def __init__(self,ModelFile,PredictFile,DogType,Width=100,Height=100):
        self.modelfile = ModelFile
        self.predict_file = PredictFile
        self.Width = Width
        self.Height = Height
        self.DogType = DogType
    def Predict(self):
        model = load_model(self.modelfile)
        img_open = Image.open(self.predict_file)
        conv_RGB = img_open.convert('RGB')
        new_img = conv_RGB.resize((self.Width,self.Height),Image.BILINEAR)
        new_img.save(self.predict_file)
        print ('Image Processed')
        image = processimage.imread(self.predict_file)
        image_to_array = np.array(image)/255.0
        image_to_array = image_to_array.reshape(-1,100,100,3)
        print ('Image reshaped')
        prediction = model.predict(image_to_array)
        print (prediction)
        Final_prediction = [result.argmax() for result in prediction][0]
        print (Final_prediction)
        count = 0
        for i in prediction[0]:
            print (i)
            percentage = '%.2f%%' % (i * 100)
            print (self.DogType[count],'概率:' ,percentage)
            count +=1
    def ShowPredImg(self):
        image = processimage.imread(self.predict_file)
        plt.imshow(image)
        plt.show()


DogType = ['哈士奇','德国牧羊犬','拉布拉多','萨摩耶犬']
Pred = Prediction(PredictFile='./test_data/德国牧羊犬/11_11_N_11_德国牧羊犬169.jpg',ModelFile='dogfinder.h5',Width=100,Height=100,DogType=DogType)
Pred.Predict()
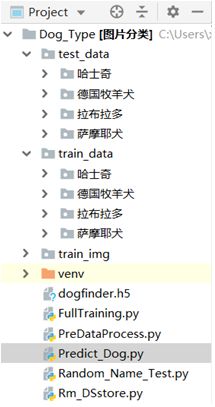
文件结构如下图所示:
狗品种识别数据训练过程和结果:

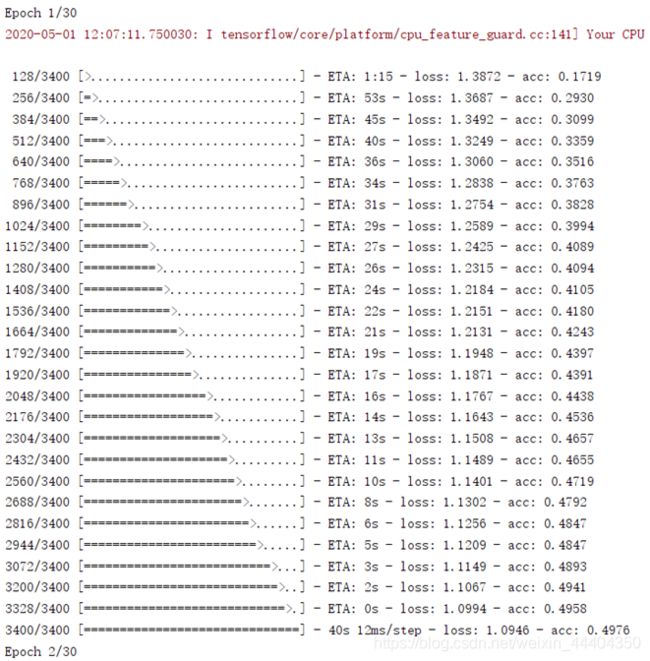
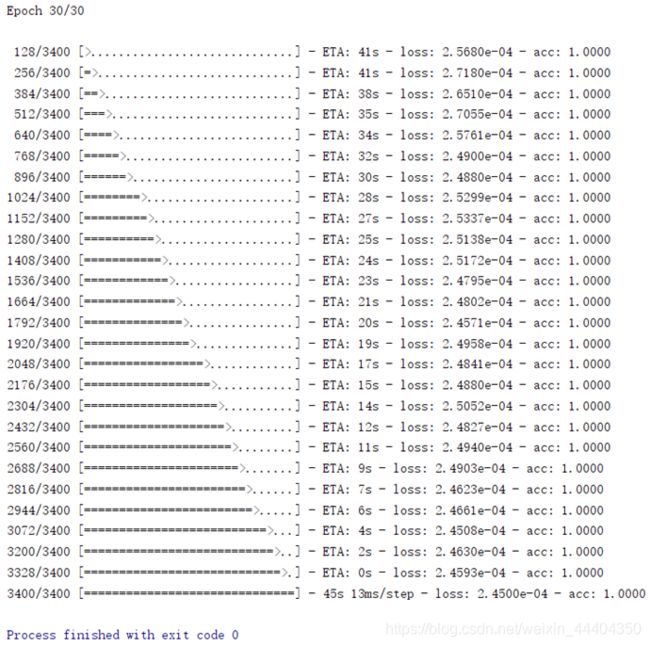
该模型中设置参数categories为4类,number_batch参数步数为30,每步batch_size参数批量128个,共680个图像。当步数Epoch为1/30时,损失率(loss)约为1.0946,准确率(acc)为0.4976。随着步数的增加至30/30,损失率逐渐下降,逐渐趋近于0。准确率逐渐上升,逐渐趋近于1。
狗品种识别预测分析:
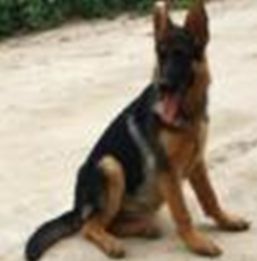
指定单独的图像路径后,将图像放入模型中进行预测。执行Predict_Dog.py模块程序文件,对指定测试的图像进行预测,得出结果。狗的类别,分别是0,1,2,3(哈士奇,德国牧羊犬,拉布拉多,萨摩耶犬),准确率大小为0~1(100%)。
程序的结果展示:

由图可知,图像的类别为1(德国牧羊犬),德国牧羊犬的准确率最大,为0.9999982,约为100%,哈士奇、拉布拉多和萨摩耶犬的准确率趋近于零。
通过程序运行的结果,得出程序判断图像类型和概率大小基本一致,验证了基于卷积神经网络的图像识别算法的可行性。
3 训练数据集
总结
猫狗数据集:https://www.kaggle.com/c/dogs-vs-cats
猫狗数据集,来自Cat vs Dogs Kaggle竞赛,这份数据集包含了大量狗和猫的带有标签的图片。 和每一个Kaggle比赛一样,这份数据集也包含两个文件夹
欢迎各位转载,但是未经作者本人同意,转载文章之后必须在文章页面明显位置给出作者和原文连接,否则保留追究法律责任的权利!

