OpenCV——几何变换原理(python实现和c++实现)

OpenCV图像处理——几何变换原理(python实现和c++实现)

2.1 简介

学习基本的几何变换,几何变换的原理大多都是相似,只是变换矩阵不同,因此,我们以最常用的平移、旋转和翻转为例进行学习。在深度学习领域,我们常用平移、旋转、镜像等操作进行数据增广;在传统CV领域,由于某些拍摄角度的问题,我们需要对图像进行矫正处理,而几何变换正是这个处理过程的基础,因此了解和学习几何变换也是有必要的。

2.2 学习目标

  • 了解几何变换的概念与应用

  • 理解平移、旋转、翻转的原理

  • 掌握在OpenCV框架下实现几何变换操作

2.3 内容介绍

1、平移、旋转、翻转的原理

  • 平移
  • 旋转
  • 翻转
  • 复杂的仿射变换

2、OpenCV代码实践

  • c++实现

    • 常用函数解析
    • 进阶实现(根据原理自己实现)
  • python实现

2.4 算法理论介绍

2.4.1 平移

图像平移就是将图像中所有的点按照平移量水平或者垂直移动。
假设要水平向右侧移动100个像素,向下移动50个像素,则原图像与目标图像的对应关系为:
d s t ( x , y ) = s r c ( x + 100 , y + 50 ) dst(x,y)=src(x+100,y+50) dst(x,y)=src(x+100,y+50)可以转换为:
d s t ( x , y ) = s r c ( x ∗ 1 + y ∗ 0 + 100 , x ∗ 0 + y ∗ 1 + 50 ) dst(x,y)=src(x*1+y*0+100,x*0+y*1+50) dst(x,y)=src(x1+y0+100,x0+y1+50)

对应的矩阵变换为:
[ x ′ y ′ 1 ] = [ x y 1 ] [ 1 0 0 0 1 0 100 50 1 ] \begin{bmatrix} x^{'} & y^{'} &1\\ \end{bmatrix} =\begin{bmatrix} x & y & 1 \end{bmatrix} \begin{bmatrix} 1 & 0 & 0 \\ 0 & 1 & 0\\ 100 & 50 &1 \end{bmatrix} [xy1]=[xy1]101000150001
t x t_{x} tx t y t_{y} ty分别为水平方向和垂直方向偏移量,水平向右为正,垂直向下为正。
所以平移的转换矩阵格式为:
M = [ 1 0 0 0 1 0 t x t y 1 ] M= \begin{bmatrix} 1 & 0 & 0 \\ 0 & 1 & 0\\ t_{x} & t_{y} & 1 \end{bmatrix} M=10tx01ty001

实际上,在openCV中,只需要传入如下转换矩阵作为参数即可。

M = [ 1 0 t x 0 1 t y ] M= \begin{bmatrix} 1 & 0 & t_{x} \\ 0 & 1 & t_{y} \end{bmatrix} M=[1001txty]

2.4.2 旋转

图像旋转是指图像绕着中心转动一定角度的过程,旋转中图像仍保持原始尺寸。图像旋转后图像的水平对称轴、垂直对称轴及中心坐标原点都可能发生变换,因此需要对图像旋转中的坐标进行相应转换。

对于平移,缩放而言,进行变换时以图像的坐标原点(左上角)为基准进行变换即可,但是旋转需要以图像中心为原点,这就需要将图像的坐标进行转换,转换成以中心点为原点的笛卡尔坐标系。

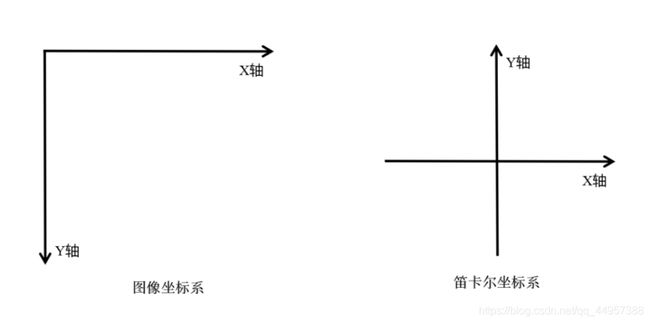
我们知道,图像坐标的原点在图像左上角,水平向右为 X 轴,垂直向下为 Y 轴。数学课本中常见的坐标系是以图像中心为原点,水平向右为 X 轴,垂直向上为 Y 轴,称为笛卡尔坐标系。

图像坐标系与笛卡尔坐标系:

图像坐标系沿 x x x向右为正方向,沿 y y y向下为正方向。
笛卡尔坐标系沿 x x x向右为正方向,沿 y y y向上为正方向。
OpenCV——几何变换原理(python实现和c++实现)_第1张图片

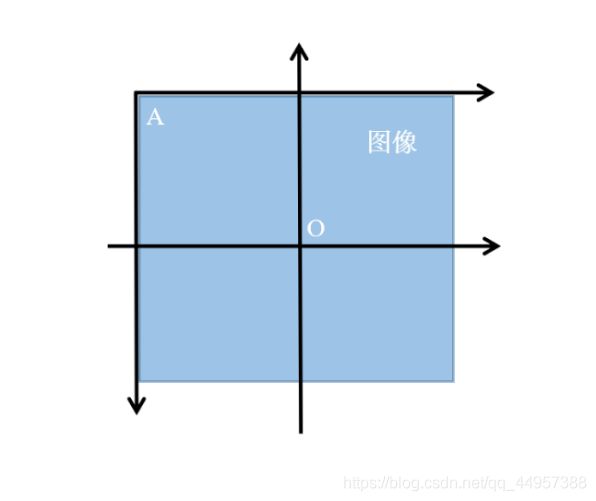
图像坐标系与笛卡尔坐标系转换关系:

图像坐标系的原点为 A A A,而笛卡尔直角坐标系的原点是 O O O
OpenCV——几何变换原理(python实现和c++实现)_第2张图片

把一张图像旋转,整个过程可以分为三步:
  • 图像坐标系转换为数学坐标系
  • 在数学坐标系上进行旋转变换
  • 数学坐标系转换为图像坐标系

图像坐标系转换为数学坐标系:

设原图像的为 w i d t h ∗ h e i g h t width*height widthheight的矩阵。

图像的原点坐标 ( 0 , 0 ) (0,0) (0,0)在数学坐标系下变为 ( − w i d t h 2 , h e i g h t 2 ) (-\frac{width}{2},\frac{height}{2}) (2width,2height)

所以坐标变换可以表示为:
x ′ = x − w i d t h 2 y ′ = − y + h e i g h t 2 x^{'} = x-\frac{width}{2}\\ y^{'} = -y+\frac{height}{2} x=x2widthy=y+2height
可以对应平移的变换矩阵形式:
M = [ 1 0 0 0 − 1 0 − w i d t h 2 h e i g h t 2 1 ] M= \begin{bmatrix} 1 & 0 & 0 \\ 0 & -1 & 0\\ -\frac{width}{2} & \frac{height}{2} & 1 \end{bmatrix} M=102width012height001

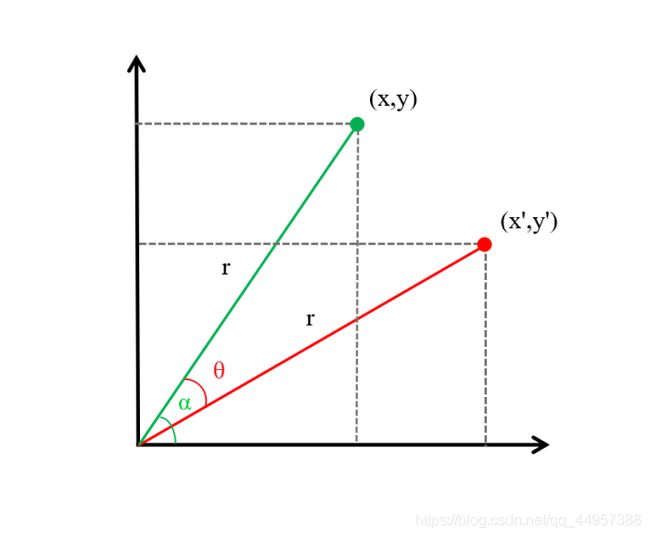
在数学坐标系上进行旋转的坐标变换:

OpenCV——几何变换原理(python实现和c++实现)_第3张图片

如图,旋转前的坐标为 ( x , y ) (x,y) (x,y),与原点的连线长度为 r r r,与 x x x轴夹角为 α \alpha α
x = r c o s α y = r s i n α x=rcos\alpha\\ y=rsin\alpha x=rcosαy=rsinα
顺时针旋转 θ \theta θ角度后,变为
x ′ = r c o s ( α − θ ) = r ( c o s α c o s θ + s i n α s i n θ ) = x c o s θ + y s i n θ y ′ = r s i n ( α − θ ) = r ( s i n α c o s θ − c o s α s i n θ ) = − x s i n θ + y c o s θ x^{'}=rcos(\alpha-\theta)=r(cos\alpha cos\theta+sin\alpha sin\theta)=xcos\theta+ysin\theta\\ y^{'}=rsin(\alpha-\theta)=r(sin\alpha cos\theta-cos\alpha sin\theta)=-xsin\theta+ycos\theta x=rcos(αθ)=r(cosαcosθ+sinαsinθ)=xcosθ+ysinθy=rsin(αθ)=r(sinαcosθcosαsinθ)=xsinθ+ycosθ
可以写成以下形式:
[ x ′ y ′ 1 ] = [ x y 1 ] [ c o s θ − s i n θ 0 s i n θ c o s θ 0 0 0 1 ] \begin{bmatrix} x^{'} & y^{'} & 1 \end{bmatrix} =\begin{bmatrix} x & y & 1 \end{bmatrix} \begin{bmatrix} cos\theta & -sin\theta & 0\\ sin\theta & cos\theta &0\\ 0 & 0 & 1 \end{bmatrix} [xy1]=[xy1]cosθsinθ0sinθcosθ0001

数学坐标系转换为图像坐标系:

旋转变换后的坐标是数学坐标系,想表示在图像上,还要转换回图像坐标系。转换为数学坐标系的时候,加上的偏移量再减去就可以了。
x = x − w i d t h 2 + w i d t h 2 = x ′ + w i d t h 2 y = − ( − y + h e i g h t 2 ) + h e i g h t 2 = − y ′ + h e i g h t 2 x = x-\frac{width}{2}+\frac{width}{2}=x^{'}+\frac{width}{2}\\ y = -(-y+\frac{height}{2})+\frac{height}{2}=-y^{'}+\frac{height}{2} x=x2width+2width=x+2widthy=(y+2height)+2height=y+2height
转换矩阵为:
M = [ 1 0 0 0 − 1 0 w i d t h 2 h e i g h t 2 1 ] M= \begin{bmatrix} 1 & 0 & 0 \\ 0 & -1 & 0\\ \frac{width}{2} & \frac{height}{2} & 1 \end{bmatrix} M=102width012height001

将这三步结合起来,一个完整的旋转变换过程可以表示为:

M = [ 1 0 0 0 − 1 0 − w i d t h 2 h e i g h t 2 1 ] [ c o s θ − s i n θ 0 s i n θ c o s θ 0 0 0 1 ] [ 1 0 0 0 − 1 0 w i d t h 2 h e i g h t 2 1 ] M=\begin{bmatrix} 1 & 0 & 0 \\ 0 & -1 & 0\\ -\frac{width}{2} & \frac{height}{2} & 1 \end{bmatrix} \begin{bmatrix} cos\theta & -sin\theta & 0\\ sin\theta & cos\theta &0\\ 0 & 0 & 1 \end{bmatrix} \begin{bmatrix} 1 & 0 & 0 \\ 0 & -1 & 0\\ \frac{width}{2} & \frac{height}{2} & 1 \end{bmatrix} M=102width012height001cosθsinθ0sinθcosθ0001102width012height001

[ x ′ y ′ 1 ] = [ x y 1 ] M \begin{bmatrix} x^{'} & y^{'} & 1 \end{bmatrix} =\begin{bmatrix} x & y & 1 \end{bmatrix} M [xy1]=[xy1]M

2.4.3 翻转(镜像)

翻转也称为镜像变换,翻转后的图像与原图像是对称的。
翻转分为绕x轴翻转翻转,绕y轴翻转翻转,绕x轴和y轴同时翻转三种情况。
绕x轴翻转,是将图像以x轴为对称轴进行对称变换;
绕y轴翻转,是将图像以y轴为对称轴进行对称变换。
绕x轴和y轴翻转,是将图像以原点为对称中心进行对称变换。

几种翻转情况,目标图像和原图像的坐标关系可以表示如下:
d s t ( x , y ) = { s r c ( w i d t h − x − 1 , y ) 绕 x 轴 翻 转 s r c ( x , h e i g h t − y − 1 ) 绕 y 轴 翻 转 s r c ( w i d t h − x − 1 , h e i g h t − y − 1 ) 绕 x 轴 和 y 轴 翻 转 dst(x,y)=\left\{ \begin{array}{rcl} &src(width-x-1,y) & {绕x轴翻转}\\ &src(x,height-y-1) &{绕y轴翻转}\\ &src(width-x-1,height-y-1) &{绕x轴和y轴翻转}\\ \end{array} \right. dst(x,y)=src(widthx1,y)src(x,heighty1)src(widthx1,heighty1)xyxy

对应的变换矩阵分别为:
M 0 = [ − 1 0 0 0 1 0 w i d t h − 1 0 1 ] (绕x轴翻转) M_{0}= \begin{bmatrix} -1 & 0 & 0 \\ 0 & 1 & 0 \\ width-1 & 0 & 1 \end{bmatrix}\tag{绕x轴翻转} M0=10width1010001(x)
M + = [ 1 0 0 0 − 1 0 0 h e i g h t − 1 1 ] (绕y轴翻转) M_{+}= \begin{bmatrix} 1 & 0 & 0 \\ 0 & -1 & 0 \\ 0 & height-1 & 1 \end{bmatrix}\tag{绕y轴翻转} M+=10001height1001(y)
M − = [ − 1 0 0 0 − 1 0 w i d t h − 1 h e i g h t − 1 1 ] (绕x轴和y轴翻转) M_{-}= \begin{bmatrix} -1 & 0 & 0 \\ 0 & -1 & 0 \\ width-1 & height-1 & 1 \end{bmatrix}\tag{绕x轴和y轴翻转} M=10width101height1001(xy)

2.4.4 复杂的仿射变换

仿射变换能保持二维图形的“平直性”和“平行性”。平直性是指图象经过仿射变换后,直线仍然是直线;平行性是指图像在完成仿射变换后,平行线仍然是平行线。但是仿射变换不能保证原来的线段长度不变,也不能保证原来的夹角角度不变。平移、旋转可以看成简单的仿射变换,他们的角度和线段的相对长度都没变。下面介绍更复杂的仿射变换。

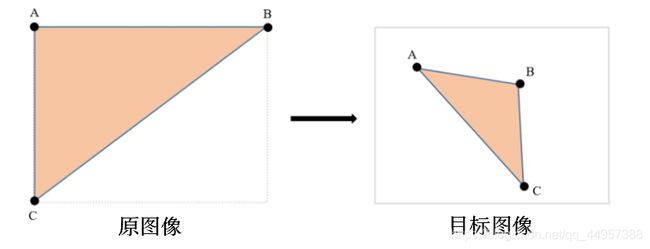
举个例子,下面两个矩形表示两个图像,在原图像和目标图像中分别确定三个点,三个点可以确定一个三角形,也就确定了一个平行四边形。将原图像的三个点仿射到目标图像中的三个点,其余点的映射关系按照指定点的关系计算即可,这样就能确定一个仿射变换。

OpenCV——几何变换原理(python实现和c++实现)_第4张图片

2.5 基于OpenCV的实现

openCV实现几何变换相关的函数:

  • 函数 warpAffine 实现一些简单的变换,如平移,旋转。
  • 函数 getRotationMatrix2D 生成转换矩阵。
  • 函数 flip 实现图像翻转。
  • 函数 getAffineTransform 生成转换矩阵。

2.5.1 c++实现

1、warpAffined函数详解

void cv::warpAffine ( InputArray src,
        	      OutputArray dst,
        	      InputArray M,
          	      Size dsize,
        	      int flags = INTER_LINEAR,
      		      int borderMode = BORDER_CONSTANT,
            	      const Scalar & borderValue = Scalar());
            	      
  • src 输入图像,即原图像。
  • dst 函数调用后的运算结果存在这里,需和源图片有一样的尺寸和类型。
  • M 2×3的变换矩阵。
  • dsize 表示输出图像的尺寸。
  • flags 插值方式。此参数默认值为INTER_LINEAR(双线性插值)。
    可选的插值方式:
    INTER_NEAREST - 最近邻插值
    INTER_LINEAR - 线性插值(默认值)
    INTER_AREA - 区域插值
    INTER_CUBIC –三次样条插值
    INTER_LANCZOS4 -Lanczos插值
    CV_WARP_FILL_OUTLIERS - 填充所有输出图像的像素。如果部分像素落在输入图像的边界外,那么它们的值设定为 0。
    CV_WARP_INVERSE_MAP –表示M为输出图像到输入图像的反变换。因此可以直接用来做像素插值。否则, warpAffine函数从M矩阵得到反变换。
  • borderMode 边界像素模式,默认值为BORDER_CONSTANT。
  • borderValue 边界取值,默认值为0。

注:前面原理部分,转换矩阵为3×3,这里为2×3。

2、getRotationMatrix2D函数详解

C++: Mat getRotationMatrix2D( Point2f center, 
			      double angle, 
			      double scale );
  • center 原图像的旋转中心。
  • angle 旋转角度。正数表示逆时针旋转,负数表示顺时针旋转。
  • scale 缩放系数。

3、flip函数详解

void cv::flip( InputArray src
               OutputArray dst,
               int flipCode );
               
  • src 原始图像
  • dst 是和原始图像大小,类型相同的目标图像
  • flipCode 是旋转类型,0代表绕x轴翻转,任意正数代表绕y轴翻转,任意负数代表x和y轴同时翻转

4、getAffineTransform函数详解

C++:Mat getAffineTransform( const CvPoint2D32f* src,
			      const CvPoint2D32f*  dst, 
			      CvMat*  map_matrix );
  • src 原始图像的三个点坐标
  • dst 输出图像的三个点坐标
    该函数中,参数srcdst都是包含三个二维数组 ( x , y ) (x,y) (x,y)的数组,它们定义了两个平行四边形。srcdst中的三个点分别对应平行四边形的左上角、右上角、左下角三个点。由函数getAffineTransform得到的转换矩阵 M M M作为函数warpAffine的参数,将src中的点仿射到dst中。选择三个点,是因为三角形可以表现出变换的尺度和角度。

代码示例(c++)

1、旋转

#include 
#include 
using namespace cv;
using namespace std;

int main(int argc, char** argv)
{
     
    Mat src_img = imread("C:\\Users\\94890\\Desktop\\pictures2\\the_eight_dimensions.jpg");//读取原图像
    if (src_img.empty())
    {
     
        fprintf(stderr, "Can not load image\n");//如果读取图像失败,返回错误信息
        return -1;
    }
    Mat dst;//目标图像
    //设置目标图像的大小和类型与源图像一致,初始像素值都为0
    dst = Mat::zeros(src_img.rows, src_img.cols, src_img.type());
    
    // 计算绕图像中点顺时针旋转45度缩放因子为0.6的旋转矩阵
    Point center = Point(src_img.cols / 2, src_img.rows / 2);
    double angle = -45.0;
    double scale = 0.6;
    // 通过上面的信息求得旋转矩阵
    Mat trans_mat = getRotationMatrix2D(center, angle, scale);
    // 旋转图像
    warpAffine(src_img, dst, trans_mat, src_img.size());
    
    //显示结果
    imshow("origin_image", src_img);
    imshow("dst_image", dst);
    
    //储存图像
    imwrite("C:\\Users\\94890\\Desktop\\pictures2\\rotation1.jpg", dst);
    waitKey(0);
    return 0;
}

效果:以图像中心为旋转中心,顺时针旋转45°并缩小为原图像的0.6倍

OpenCV——几何变换原理(python实现和c++实现)_第5张图片

2、平移

#include 
#include 
using namespace cv;
using namespace std;

int main(int argc, char** argv)
{
     
    Mat src_img = imread("C:\\Users\\94890\\Desktop\\pictures2\\the_eight_dimensions.jpg");//读取原图像
    if (src_img.empty())
    {
     
        fprintf(stderr, "Can not load image\n");//如果读取图像失败,返回错误信息
        return -1;
    }
    Mat dst;//目标图像
    //定义平移的转换矩阵
    Mat t_mat = Mat::zeros(2, 3, CV_32FC1);
    //CV_32FC1表示这个矩阵里的是32位浮点数,C1表示是单通道的
    t_mat.at<float>(0, 0) = 1;
    t_mat.at<float>(0, 2) = 100; //水平平移量
    t_mat.at<float>(1, 1) = 1;
    t_mat.at<float>(1, 2) = 200; //竖直平移量
    //根据平移矩阵进行变换,目标图像和原图像大小相同
    warpAffine(src_img, dst, t_mat, src_img.size());
    
    //显示结果
    imshow("origin_image", src_img);
    imshow("trans_image", dst);
    
    //储存图像
    imwrite("C:\\Users\\94890\\Desktop\\pictures2\\move1.jpg", dst);
    waitKey(0);
    return 0;
}

效果:向右移动100个像素,向下移动200个像素

OpenCV——几何变换原理(python实现和c++实现)_第6张图片

3、翻转

#include 
#include 

using namespace cv;
using namespace std;

int main()
{
     
    Mat src_img = imread("C:\\Users\\94890\\Desktop\\pictures2\\Jay.jpg");//读入图像
    if (src_img.empty())
    {
     
        fprintf(stderr, "Can not load image\n");//如果读入图像失败,返回错误信息
        return -1;
    }
    Mat flipx_img,flipy_img,flipxy_img;
    flip(src_img, flipx_img, 0);//0代表绕x轴方向旋转180度
    flip(src_img, flipy_img,1);//1代表绕y轴方向旋转180度
    flip(src_img, flipxy_img,-1);//-1代表x轴和y轴方向同时旋转
    
    //显示图像
    imshow("origin_img", src_img);//
    imshow("flipx_img", flipx_img);//
    imshow("flipy_img", flipy_img);//
    imshow("flipxy_img", flipxy_img);//
    
    //储存图像
    imwrite("C:\\Users\\94890\\Desktop\\pictures2\\flipx.jpg", flipx_img);
    imwrite("C:\\Users\\94890\\Desktop\\pictures2\\flipy.jpg", flipy_img);
    imwrite("C:\\Users\\94890\\Desktop\\pictures2\\flipxy.jpg", flipxy_img);
    
    waitKey(0);
    return 0;
}

效果:

OpenCV——几何变换原理(python实现和c++实现)_第7张图片

4、复杂的仿射变换

#include 
#include 
using namespace cv;
using namespace std;

int main(int argc, char** argv)
{
     
    Mat src_img = imread("C:\\Users\\94890\\Desktop\\pictures2\\the_eight_dimensions.jpg");//读取原图像
    if (src_img.empty())
    {
     
        fprintf(stderr, "Can not load image\n");//如果读取图像失败,返回错误信息
        return -1;
    }
    
    //分别在原图像和目标图像上定义三个点
    Point2f srcTri[3];
    Point2f dstTri[3];
    
    srcTri[0] = Point2f(0, 0);
    srcTri[1] = Point2f(src_img.cols - 1, 0);
    srcTri[2] = Point2f(0, src_img.rows - 1);
    
    dstTri[0] = Point2f(src_img.cols * 0.0, src_img.rows * 0.33);
    dstTri[1] = Point2f(src_img.cols * 0.85, src_img.rows * 0.25);
    dstTri[2] = Point2f(src_img.cols * 0.15, src_img.rows * 0.7);
    
    Mat dst;//目标图像
    //设置目标图像的大小和类型与原图像一致,初始像素值都为0
    dst = Mat::zeros(src_img.rows, src_img.cols, src_img.type());
    //计算仿射变换矩阵
     Mat trans_mat = getAffineTransform(srcTri, dstTri);
    //对原图像应用上面求得的仿射变换
    warpAffine(src_img, dst, trans_mat, src_img.size());
    
    //显示结果
    imshow("origin_image", src_img);
    imshow("dst_image", dst);
    
    //储存图像
    imwrite("C:\\Users\\94890\\Desktop\\pictures2\\dst1.jpg", dst);
    waitKey(0);
    return 0;
}

效果:

OpenCV——几何变换原理(python实现和c++实现)_第8张图片

进阶实现(根据原理自己实现)

1、旋转(不能放缩,能调整输出图像大小,使原图像不被截断)

/*图像旋转(以图像中心为旋转中心)*/
#include 
#include 
using namespace cv;
using namespace std;

void affine_trans_rotate(Mat& src, Mat& dst, double Angle) 
{
     
 	double angle = Angle * CV_PI / 180.0;
 	//构造输出图像
 	int dst_rows = round(fabs(src.rows * cos(angle)) + fabs(src.cols * sin(angle)));//图像高度
 	int dst_cols = round(fabs(src.cols * cos(angle)) + fabs(src.rows * sin(angle)));//图像宽度
 	if (src.channels() == 1) 
 	{
     
  		//灰度图,初始像素都设为0;CV_8UC1中的8U表示8位无符号整数,C1表示单通道。
  		dst = Mat::zeros(dst_rows, dst_cols, CV_8UC1);
 	}
 	else 
 	{
     
  		//RGB图,初始像素都设为0,CV_8UC3中的C3表示三通道
  		dst = Mat::zeros(dst_rows, dst_cols, CV_8UC3);
 	}
 	
 	//构造转换矩阵
 	// 将原图像坐标映射到数学笛卡尔坐标
 	Mat T1 = (Mat_<double>(3, 3) << 1.0, 0.0, 0.0, 0.0, -1.0, 0.0, -0.5 * src.cols, 0.5 * src.rows, 1.0);
 	//数学笛卡尔坐标下顺时针旋转的变换矩阵
 	Mat T2 = (Mat_<double>(3, 3) << cos(angle), -sin(angle), 0.0, sin(angle), cos(angle), 0.0, 0.0, 0.0, 1.0);
 	// 将数学笛卡尔坐标映射到旋转后的图像坐标
 	double t3[3][3] = {
      {
      1.0, 0.0, 0.0 }, {
      0.0, -1.0, 0.0 }, {
      0.5 * dst.cols, 0.5 * dst.rows ,1.0} }; 
 	Mat T3 = Mat(3.0, 3.0, CV_64FC1, t3);
 	Mat T = T1 * T2 * T3;
 	Mat T_inv = T.inv(); //求逆矩阵
 
 	//遍历输出图像的像素点
 	for (double i = 0.0; i < dst.rows; i++)
 	{
     
  		for (double j = 0.0; j < dst.cols; j++)
  		{
     
   			Mat dst_coordinate = (Mat_<double>(1, 3) << j, i, 1.0);//在输出图像的坐标
   			Mat src_coordinate = dst_coordinate * T_inv;//在原图像的坐标
   			//at方法用于获取图像矩阵中某点的值或对某点赋值。此处为获取某点处的值。double表示矩阵中的数据类型。
   			double v = src_coordinate.at<double>(0, 0); // 原图像的横坐标
   			double w = src_coordinate.at<double>(0, 1); // 原图像的纵坐标
   			if (int(Angle) % 90 == 0) 
   			{
     
    				if (v < 0) v = 0; if (v > src.cols - 1) v = src.cols - 1;
    				if (w < 0) w = 0; if (w > src.rows - 1) w = src.rows - 1; //必须要加上,否则会出现边界问题
   			}
   			
   			//双线性插值
   			// 判断是否越界
   			if (v >= 0 && w >= 0 && v <= src.cols - 1 && w <= src.rows - 1)
   			{
     
    				//对坐标点向上和向下取整。就可以得到原图像中与坐标相邻的四个像素点的坐标
    				//floor向下取整,ceil向上取整
    				int top = floor(w), bottom = ceil(w), left = floor(v), right = ceil(v);
    				double pw = w - top; //与x0的横坐标偏差
    				double pv = v - left; //与y0的纵坐标偏差
    				if (src.channels() == 1)
    				{
     
     					//灰度图像
     					//at方法在这里用于设置点(i,j)的像素值
     					dst.at<uchar>(i, j) = (1 - pw) * (1 - pv) * src.at<uchar>(top, left) + (1 - pw) * pv * src.at<uchar>(top, right) + pw * (1 - pv) * src.at<uchar>(bottom, left) + pw * pv * src.at<uchar>(bottom, right);
    				}
    				else
    				{
     
     					//彩色图像
     					//Vec3b表示向量模板类,是opencv的一种数据类型。每一个Vec3b对象中,可以存储3个char(字符型)数据,可以用来表示一个像素点。
     					//下面分别设置三个通道的点(i,j)的像素值,右端为双线性插值计算公式
     					dst.at<Vec3b>(i, j)[0] = (1 - pw) * (1 - pv) * src.at<Vec3b>(top, left)[0] + (1 - pw) * pv * src.at<Vec3b>(top, right)[0] + pw * (1 - pv) * src.at<Vec3b>(bottom, left)[0] + pw * pv * src.at<Vec3b>(bottom, right)[0];
     					dst.at<Vec3b>(i, j)[1] = (1 - pw) * (1 - pv) * src.at<Vec3b>(top, left)[1] + (1 - pw) * pv * src.at<Vec3b>(top, right)[1] + pw * (1 - pv) * src.at<Vec3b>(bottom, left)[1] + pw * pv * src.at<Vec3b>(bottom, right)[1];
     					dst.at<Vec3b>(i, j)[2] = (1 - pw) * (1 - pv) * src.at<Vec3b>(top, left)[2] + (1 - pw) * pv * src.at<Vec3b>(top, right)[2] + pw * (1 - pv) * src.at<Vec3b>(bottom, left)[2] + pw * pv * src.at<Vec3b>(bottom, right)[2];
    				}
   			}
  		}
 	}
}
int main(int argc, char** argv)
{
     
 	Mat src_img = imread("D:\\yt\\pictures2\\dog.jpg");//读取原图像
 	if (src_img.empty())
 	{
     
  		fprintf(stderr, "Can not load image\n");//如果读取图像失败,返回错误信息
  		return -1;
 	}
 	double angle = 90;
 	Mat dst;
	affine_trans_rotate(src_img, dst, angle);
 	imshow("image", dst);
 	waitKey(0);
 	return 0;
}

2、平移

/*平移变换(以图像左顶点为原点)
tx: 水平平移距离 正数向右移动 负数向左移动
ty: 垂直平移距离 正数向下移动 负数向上移动*/
#include 
#include 
using namespace cv;
using namespace std;

void affine_trans_translation(Mat& src, Mat& dst, double tx, double ty) 
{
     
 	//构造输出图像
 	int dst_rows = src.rows;//图像高度
 	int dst_cols = src.cols;//图像宽度
 	if (src.channels() == 1) 
 	{
     
  		//灰度图,初始像素都设为0;
  		dst = Mat::zeros(dst_rows, dst_cols, CV_8UC1); 
 	}
 	else 
 	{
     
  		//RGB图,初始像素都设为0
  		dst = Mat::zeros(dst_rows, dst_cols, CV_8UC3); 
 	}
 	Mat T = (Mat_<double>(3, 3) << 1, 0, 0, 0, 1, 0, tx, ty, 1); //转换矩阵
 	Mat T_inv = T.inv(); // 求逆矩阵
 	
 	//遍历输出图像的像素点
 	for (int i = 0; i < dst.rows; i++) 
 	{
     
  		for (int j = 0; j < dst.cols; j++) 
  		{
     
   			Mat dst_coordinate = (Mat_<double>(1, 3) << j, i, 1);//在输出图像的坐标
   			Mat src_coordinate = dst_coordinate * T_inv;//在原图像的坐标
   			//at方法用于获取图像矩阵中某点的值或对某点赋值。此处为获取某点处的值。double表示矩阵中的数据类型。
   			double v = src_coordinate.at<double>(0, 0); // 原图像的横坐标
   			double w = src_coordinate.at<double>(0, 1); // 原图像的纵坐标
   			
   			//双线性插值
   			// 判断是否越界
   			if (v >= 0 && w >= 0 && v <= src.cols - 1 && w <= src.rows - 1) 
   			{
     
    				//对坐标点向上和向下取整。就可以得到原图像中与坐标相邻的四个像素点的坐标
    				//floor向下取整,ceil向上取整
    				int top = floor(w), bottom = ceil(w), left = floor(v), right = ceil(v); 
    				double pw = w - top; //与x0的横坐标偏差
    				double pv = v - left; //与y0的纵坐标偏差
    				if (src.channels() == 1) 
    				{
     
     					//灰度图像
     					//at方法在这里用于设置点(i,j)的像素值
     					dst.at<uchar>(i, j) = (1 - pw) * (1 - pv) * src.at<uchar>(top, left) + (1 - pw) * pv * src.at<uchar>(top, right) + pw * (1 - pv) * src.at<uchar>(bottom, left) + pw * pv * src.at<uchar>(bottom, right);
    				}
    				else 
    				{
     
     					//彩色图像
     					//Vec3b表示向量模板类,是opencv的一种数据类型。每一个Vec3b对象中,可以存储3个char(字符型)数据,可以用来表示一个像素点。
     					//下面分别设置三个通道的点(i,j)的像素值,右端为双线性插值计算公式
     					dst.at<Vec3b>(i, j)[0] = (1 - pw) * (1 - pv) * src.at<cv::Vec3b>(top, left)[0] + (1 - pw) * pv * src.at<cv::Vec3b>(top, right)[0] + pw * (1 - pv) * src.at<cv::Vec3b>(bottom, left)[0] + pw * pv * src.at<cv::Vec3b>(bottom, right)[0];
     					dst.at<Vec3b>(i, j)[1] = (1 - pw) * (1 - pv) * src.at<cv::Vec3b>(top, left)[1] + (1 - pw) * pv * src.at<cv::Vec3b>(top, right)[1] + pw * (1 - pv) * src.at<cv::Vec3b>(bottom, left)[1] + pw * pv * src.at<cv::Vec3b>(bottom, right)[1];
     					dst.at<Vec3b>(i, j)[2] = (1 - pw) * (1 - pv) * src.at<cv::Vec3b>(top, left)[2] + (1 - pw) * pv * src.at<cv::Vec3b>(top, right)[2] + pw * (1 - pv) * src.at<cv::Vec3b>(bottom, left)[2] + pw * pv * src.at<cv::Vec3b>(bottom, right)[2];
    				}
   			}
  		}
 	}
}
int main(int argc, char** argv)
{
     
 	Mat src_img = imread("D:\\yt\\pictures2\\yehuimei.jpg");//读取原图像
 	if (src_img.empty())
 	{
     
  		fprintf(stderr, "Can not load image\n");//如果读取图像失败,返回错误信息
  		return -1;
 	}
 	double tx(100);
 	double ty(200);
 	Mat dst;
 	affine_trans_translation(src_img, dst, tx,ty);
 	imshow("image", dst);//显示图像,与函数warpAffine的结果相同
 	waitKey(0);
 	return 0;
}

2.5.2 python实现

python中这几个函数和c++的用法和参数几乎一样,只是语法不同

代码示例(python)

1、平移

import cv2
import numpy as np

if __name__ == "__main__":
    img = cv2.imread('C:/Users/94890/Desktop/pictures2/yehuimei.jpg', cv2.IMREAD_UNCHANGED)
    width,height=img.shape[:2] #记录原图像的行数,列数
    trans_mat = np.float32([[1,0,100],[0,1,200]]) #变换矩阵
    dst = cv2.warpAffine(img, trans_mat, (width, height)) #平移图像,输出图像为原图像大小
    
    #显示图像
    cv2.imshow("origin image", img)
    cv2.imshow("move image", dst)

    #保存图像
    cv2.imwrite("C:/Users/94890/Desktop/pictures2/move.jpg", dst)

    cv2.waitKey(0)
    cv2.destroyAllWindows()

效果:向右移动100个像素,向下移动200个像素

OpenCV——几何变换原理(python实现和c++实现)_第9张图片

2、旋转

import cv2
import numpy as np

if __name__ == "__main__":
    img = cv2.imread('C:/Users/94890/Desktop/pictures2/yehuimei.jpg', cv2.IMREAD_UNCHANGED)
    width,height=img.shape[:2] #记录原图像的行数,列数
    #变换矩阵,以图像中心为旋转中心,逆时针旋转45°,并将目标图像缩小为原始图像的0.6倍
    trans_mat = cv2.getRotationMatrix2D((width/2,height/2),45,0.6)
    dst = cv2.warpAffine(img, trans_mat, (width, height)) #输出图像为原图像大小
    
    #显示图像
    cv2.imshow("origin image", img)
    cv2.imshow("rotation image", dst)
    
    #保存图像
    cv2.imwrite("C:/Users/94890/Desktop/pictures2/rotation.jpg", dst)
    cv2.waitKey(0)
    cv2.destroyAllWindows()

效果:以图像中心为旋转中心,逆时针旋转45°并缩小为原图像的0.6倍

OpenCV——几何变换原理(python实现和c++实现)_第10张图片

3、镜像

import cv2

if __name__ == "__main__":
    img = cv2.imread('C:/Users/94890/Desktop/pictures2/Jay.jpg', cv2.IMREAD_UNCHANGED)
    width,height=img.shape[:2] #记录原图像的行数,列数
    flipx = cv2.flip(img,0)
    flipy = cv2.flip(img, 1)
    flipxy = cv2.flip(img, -1)
    
    #显示图像
    cv2.imshow("origin image", img)
    cv2.imshow("flipx", flipx)
    cv2.imshow("flipy", flipy)
    cv2.imshow("flipxy", flipxy)
    
    #保存图像
    cv2.imwrite("C:/Users/94890/Desktop/pictures2/flipx.jpg", flipx)
    cv2.imwrite("C:/Users/94890/Desktop/pictures2/flipy.jpg", flipy)
    cv2.imwrite("C:/Users/94890/Desktop/pictures2/flipxy.jpg", flipxy)
    
    cv2.waitKey(0)
    cv2.destroyAllWindows()

效果:

和c++的一样
OpenCV——几何变换原理(python实现和c++实现)_第11张图片

4、复杂的仿射变换

import cv2
import numpy as np

if __name__ == "__main__":
    img = cv2.imread('C:/Users/94890/Desktop/pictures2/yehuimei.jpg', cv2.IMREAD_UNCHANGED)
    width,height=img.shape[:2] #记录原图像的行数,列数
    #分别给定原图像和目标图像中的三个点
    p1 = np.float32([[0,0],[width-1,0],[0,height-1]])
    p2 = np.float32([[0,height*0.33],[width*0.85,height*0.25],[width*0.15,height*0.7]])
    M = cv2.getAffineTransform(p1,p2)#生成转换矩阵
    dst = cv2.warpAffine(img,M,(width,height))#生成仿射变换图像
    
    #显示图像
    cv2.imshow("origin image", img)
    cv2.imshow("dst image", dst)
    
    #保存图像
    cv2.imwrite("C:/Users/94890/Desktop/pictures2/dst.jpg", dst)
    cv2.waitKey(0)
    cv2.destroyAllWindows()

效果:

OpenCV——几何变换原理(python实现和c++实现)_第12张图片


By: 胖虎


关于Datawhale

Datawhale是一个专注于数据科学与AI领域的开源组织,汇集了众多领域院校和知名企业的优秀学习者,聚合了一群有开源精神和探索精神的团队成员。Datawhale以“for the learner,和学习者一起成长”为愿景,鼓励真实地展现自我、开放包容、互信互助、敢于试错和勇于担当。同时Datawhale 用开源的理念去探索开源内容、开源学习和开源方案,赋能人才培养,助力人才成长,建立起人与人,人与知识,人与企业和人与未来的联结。
你可能感兴趣的:(opencv,opencv,几何变换)