Spring WebFlux 源码分析(1)-服务启动流程
文章目录
- 1. WebFlux 介绍
-
-
- 1.1 简述
- 1.2 Reactor中的Mono和Flux
- 1.3 两种开发模式
-
- 2. WebFlux 服务启动流程
1. WebFlux 介绍
1.1 简述
Spring WebFlux 是 Spring Framework 5.0 中引入的新的反应式Web框架。 与 Spring MVC 不同,它不基于 Servlet,完全异步和非阻塞,并通过 Reactor 模块实现 Reactive Streams 规范,可以在诸如 Netty,Undertow和Servlet 3.1+ 容器的服务器上运行
1.2 Reactor中的Mono和Flux
Flux 和 Mono 是 Reactor 中的两个基本概念,其大致含义如下:
Flux表示的是包含 0 到 N 个元素的异步序列。在该序列中可以包含三种不同类型的消息通知:正常的包含元素的消息、序列结束的消息和序列出错的消息。 当消息通知产生时,订阅者中对应的方法 onNext(), onComplete()和 onError()会被调用Mono表示的是包含 0 或者 1 个元素的异步序列。 该序列中同样可以包含与 Flux 相同的三种类型的消息通知
Flux 和 Mono 之间可以进行转换。 对一个 Flux 序列进行计数操作,得到的结果是一个 Mono对象,把两个 Mono 序列合并在一起,得到的是一个 Flux 对象。
1.3 两种开发模式
-
注解驱动
该模式与 SpringMVC 的开发模式几乎完全相同,基于注解@RequestMapping 来完成外部请求与内部处理方法的配置路由 -
函数式
基于 Java 8 之后的 lambda 表达式,RouterFunction注入代替@RequestMapping注解用于请求路由和处理
Spring WebFlux 使用HttpMessageReader和HttpMessageWriter接口来转换HTTP请求和响应,具体可参考 官方文档传送门
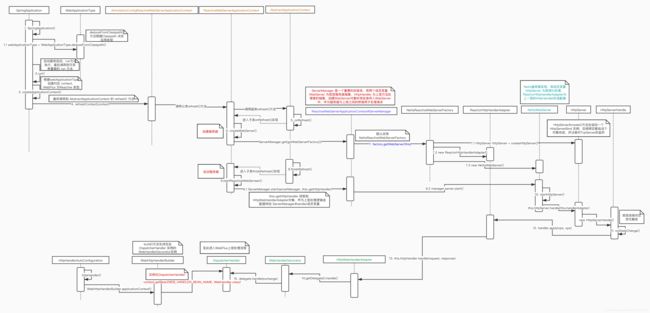
2. WebFlux 服务启动流程
-
SpringApplication的静态 run() 方法会调用其构造方法,再调用其对象 run()方法,此处需要注意 SpringBoot 中重点组件的初始化顺序:- 首先调用
SpringApplication#prepareEnvironment()准备 Spring 的 Environment 执行环境,这个过程包括了一些属性配置的解析,并将广播环境准备事件,从而回调EnvironmentPostProcessor#postProcessEnvironment()方法 SpringApplication#createApplicationContext()方法创建上下文SpringApplication#prepareContext()进行上下文准备工作,这一步所有ApplicationContextInitializer#initialize()方法将被调用,并将托管给 Spring 的类解析为BeanDefinitionSpringApplication#refreshContext()刷新容器,开始创建类对象。这个过程中大致分为以下几步:- 首先调用
AbstractApplicationContext#prepareBeanFactory()提前注册 BeanFactory 必须的组件,其中包括了特殊的BeanPostProcessor对象ApplicationContextAwareProcessor。ApplicationContextAwareProcessor会在创建任何对象时发挥作用,会回调EnvironmentAware#setEnvironment()/ApplicationContextAware#setApplicationContext()等接口方法,将必须的属性注入 - 接下来会依次回调
BeanDefinitionRegistryPostProcessor#postProcessBeanDefinitionRegistry()和BeanFactoryPostProcessor#postProcessBeanFactory()接口方法 - 创建所有
BeanPostProcessor对象用于创建 Bean 对象的后置处理,BeanPostProcessor的接口方法将在创建对象的时候被回调
需注意,一般来说BeanFactoryPostProcessor是作用于 BeanFactory 对象的后置处理器,回调时机早于作用于 Bean 的BeanPostProcessor,但是ApplicationContextAwareProcessor是个例外- 首先调用
// 静态 run() 方法 public static ConfigurableApplicationContext run(Class<?>[] primarySources, String[] args) { return new SpringApplication(primarySources).run(args); } // 构造方法 public SpringApplication(ResourceLoader resourceLoader, Class<?>... primarySources) { ...... // 注意 webApplicationType 属性,决定了应用的类型 this.webApplicationType = WebApplicationType.deduceFromClasspath(); // 此处加载 spring.factories 文件中配置的 ApplicationContextInitializer 和 ApplicationListener 实现类 setInitializers((Collection) getSpringFactoriesInstances(ApplicationContextInitializer.class)); setListeners((Collection) getSpringFactoriesInstances(ApplicationListener.class)); } // 对象 run 方法 public ConfigurableApplicationContext run(String... args) { StopWatch stopWatch = new StopWatch(); stopWatch.start(); ConfigurableApplicationContext context = null; Collection<SpringBootExceptionReporter> exceptionReporters = new ArrayList<>(); configureHeadlessProperty(); SpringApplicationRunListeners listeners = getRunListeners(args); listeners.starting(); try { ApplicationArguments applicationArguments = new DefaultApplicationArguments(args); ConfigurableEnvironment environment = prepareEnvironment(listeners, applicationArguments); configureIgnoreBeanInfo(environment); Banner printedBanner = printBanner(environment); // 根据 webApplicationType 属性选择对应的 ApplicationContext 初始化 context = createApplicationContext(); exceptionReporters = getSpringFactoriesInstances(SpringBootExceptionReporter.class, new Class[] { ConfigurableApplicationContext.class }, context); prepareContext(context, environment, listeners, applicationArguments, printedBanner); // 调用 AbstractApplicationContext#refresh() 方法创建 Bean refreshContext(context); afterRefresh(context, applicationArguments); stopWatch.stop(); if (this.logStartupInfo) { new StartupInfoLogger(this.mainApplicationClass).logStarted(getApplicationLog(), stopWatch); } listeners.started(context); callRunners(context, applicationArguments); } catch (Throwable ex) { handleRunFailure(context, ex, exceptionReporters, listeners); throw new IllegalStateException(ex); } try { listeners.running(context); } catch (Throwable ex) { handleRunFailure(context, ex, exceptionReporters, null); throw new IllegalStateException(ex); } return context; } - 首先调用
-
SpringApplication#createApplicationContext()方法根据 webApplicationType 属性选择对应的 ApplicationContext 进行初始化。WebFlux 是REACTIVE类型的应用,则初始化AnnotationConfigReactiveWebServerApplicationContextprotected ConfigurableApplicationContext createApplicationContext() { Class<?> contextClass = this.applicationContextClass; if (contextClass == null) { try { switch (this.webApplicationType) { case SERVLET: contextClass = Class.forName(DEFAULT_SERVLET_WEB_CONTEXT_CLASS); break; case REACTIVE: contextClass = Class.forName(DEFAULT_REACTIVE_WEB_CONTEXT_CLASS); break; default: contextClass = Class.forName(DEFAULT_CONTEXT_CLASS); } } catch (ClassNotFoundException ex) { throw new IllegalStateException( "Unable create a default ApplicationContext, " + "please specify an ApplicationContextClass", ex); } } return (ConfigurableApplicationContext) BeanUtils.instantiateClass(contextClass); } -
SpringApplication#refreshContext()方法刷新AnnotationConfigReactiveWebServerApplicationContext。该类的继承结构向上可追溯到AbstractApplicationContext,而Spring 框架中所有的容器初始化都将调用到 AbstractApplicationContext#refresh() 方法,这部分可参考 Spring 启动流程源码解析,此处不深入解析,主要关注其中的两个子类实现方法onRefresh()和finishRefresh()public void refresh() throws BeansException, IllegalStateException { synchronized (this.startupShutdownMonitor) { ...... try { ...... // Initialize other special beans in specific context subclasses. onRefresh(); ...... // Last step: publish corresponding event. finishRefresh(); } ...... } -
已知实例化的 ApplicationContext 为
AnnotationConfigReactiveWebServerApplicationContext,追溯其方法重写,可发现onRefresh()是在其父类ReactiveWebServerApplicationContext中实现的protected void onRefresh() { super.onRefresh(); try { createWebServer(); } catch (Throwable ex) { throw new ApplicationContextException("Unable to start reactive web server", ex); } } -
createWebServer()方法将在容器初始化的过程中创建ServerManager实例,该类是一个重要的封装类,其两个成员变量 WebServer 为底层服务器抽象,HttpHandler 为上层方法处理者的抽象,创建WebServer对象时将自身传入WebServer中,作为服务器与上层之间的桥接用于处理请求。此步骤之后具体服务器的创建不做分析,因为不同的服务器可能有不同的实现,以上流程图以NettyWebServer为例子理解。总结来说,ReactiveWebServerApplicationContext#onRefresh()方法主要是完成了服务器创建的工作,需注意此时上层的方法处理者(HttpHandler)还没有实质注入到 ServerManager中private void createWebServer() { ServerManager serverManager = this.serverManager; if (serverManager == null) { // getWebServerFactory() 默认为 NettyReactiveWebServerFactory this.serverManager = ServerManager.get(getWebServerFactory()); } initPropertySources(); } // 创建 ServerManager,其内部根据 WebServerFactory 的不同,创建不同的服务器实例 public static ServerManager get(ReactiveWebServerFactory factory) { return new ServerManager(factory); } -
创建服务器之后,下一步自然是启动服务器。该动作在
ReactiveWebServerApplicationContext#finishRefresh()方法中触发,关键方法为startReactiveWebServer()@Override protected void finishRefresh() { super.finishRefresh(); WebServer webServer = startReactiveWebServer(); if (webServer != null) { publishEvent(new ReactiveWebServerInitializedEvent(webServer, this)); } } -
startReactiveWebServer()通过ServerManager实例启动服务器,并将上层的方法处理者(HttpHandler,实例为 HttpWebHandlerAdapter 对象)实际注入到 ServerManager中,便于服务器底层接收到网络请求后将其转化为 HttpRequest,并将请求丢入上层的处理方法。不同服务器实现可能不一样,此处不作具体分析,请参考以上流程图private WebServer startReactiveWebServer() { ServerManager serverManager = this.serverManager; ServerManager.start(serverManager, this::getHttpHandler); return ServerManager.getWebServer(serverManager); } // ServerManager 的 start() 方法 public static void start(ServerManager manager, Supplier<HttpHandler> handlerSupplier) { if (manager != null && manager.server != null) { manager.handler = handlerSupplier.get(); // 启动服务器实例 manager.server.start(); } } -
服务器启动之后,实际的处理过程为服务器接收到网络请求,通知状态变化生成上层能识别的 HttpRequest 和 HttpResponse后,将二者在
HttpWebHandlerAdapter中进一步包装为ServerWebExchange对象,最终将其入参调用DispatcherHandler#handle(),真正完成请求处理读者如对
DispatcherHandler注入到 Netty 服务端的流程感兴趣,可参考 Spring WebFlux 源码分析(2)-Netty 服务器启动服务流程
