vue异步更新源码中会有涉及事件循环、宏任务、微任务的概念,所以先了解一下这几个概念。
一、事件循环、宏任务、微任务
1.事件循环Event Loop:浏览器为了协调事件处理、脚本执行、网络请求和渲染等任务而定制的工作机制。
2.宏任务Task: 代表一个个离散的、独立的工作单位。浏览器完成一个宏任务,在下一个宏任务开始执行之前,会对页面重新渲染。主要包括创建文档对象、解析HTML、执行主线JS代码以及各种事件如页面加载、输入、网络事件和定时器等。
3.微任务:微任务是更小的任务,是在当前宏任务执行结束后立即执行的任务。如果存在微任务,浏览器会在完成微任务之后再重新渲染。微任务的例子有Promise回调函数、DOM变化等。
执行过程:执行完宏任务 => 执行微任务 => 页面重新渲染 => 再执行新一轮宏任务
任务执行顺序例子:
//第一个宏任务进入主线程
console.log('1');
//丢到宏事件队列中
setTimeout(function() {
    console.log('2');
    process.nextTick(function() {
        console.log('3');
    })
    new Promise(function(resolve) {
        console.log('4');
        resolve();
    }).then(function() {
        console.log('5')
    })
})
//微事件1
process.nextTick(function() {
    console.log('6');
})
//主线程直接执行
new Promise(function(resolve) {
    console.log('7');
    resolve();
}).then(function() {
    //微事件2
    console.log('8')
})
//丢到宏事件队列中
setTimeout(function() {
    console.log('9');
    process.nextTick(function() {
        console.log('10');
    })
    new Promise(function(resolve) {
        console.log('11');
        resolve();
    }).then(function() {
        console.log('12')
    })
})

// 1,7,6,8,2,4,3,5,9,11,10,12
解析:
第一个宏任务
- 第一个宏任务进入主线程,打印1
- setTimeout丢到宏任务队列
- process.nextTick丢到微任务队列
- new Promise直接执行,打印7
- Promise then事件丢到微任务队列
- setTimeout丢到宏任务队列
第一个宏任务执行完,开始执行微任务
- 执行process.nextTick,打印6
- 执行Promise then事件,打印8
微任务执行完,清空微任务队列,页面渲染,进入下一个宏任务setTimeout
- 执行打印2
- process.nextTick丢到微任务队列
- new Promise直接执行,打印4
- Promise then事件丢到微任务队列
第二个宏任务执行完,开始执行微任务
- 执行process.nextTick,打印3
- 执行Promise then事件,打印5
微任务执行完,清空微任务队列,页面渲染,进入下一个宏任务setTimeout,重复上述类似流程,打印出9,11,10,12
二、Vue异步批量更新过程
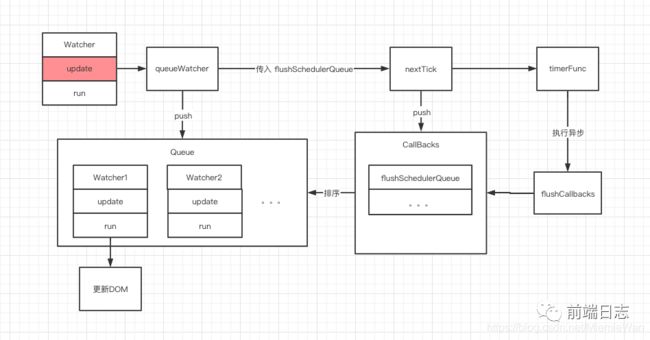
1.解析:当侦测到数据变化,vue会开启一个队列,将相关的watcher存入队列,将回调函数存入callbacks队列,异步执行回调函数,遍历watcher队列进行渲染。
异步:Vue 在更新 DOM 时是异步执行的,只要侦听到数据变化,vue将开启一个队列,并缓冲 在同一事件循环中发生的所有数据 的变更。
批量:如果同一个watcher被多次触发,只会被推入到队列中一次。去重可以避免不必要的计算和DOM操作。然后在下一个的事件循环“tick”中,vue刷新队列执行实际工作。
异步策略:Vue的内部对异步队列尝试使用原生的Promise.then、MutationObserver和 setImmediate,如果执行环境不支持,则会采用 setTimeout(fn, 0) 代替。即会先尝试使用微任务方式,不行再用宏任务方式。
异步批量更新流程图:
三、vue批量异步更新源码
异步更新:整个过程相当于将臭袜子放到盆子里,最后一起洗。
1.当一个Data更新时,会依次执行以下代码:
(1)触发Data.set()
(2)调用dep.notify():遍历所有相关的Watcher,调用watcher.update()。
core/oberver/index.js:
notify () {
    const subs = this.subs.slice()
    // 如果未运行异步,则不会在调度程序中对sub进行排序
    if (process.env.NODE_ENV !== 'production' && !config.async) {
      // 排序,确保它们按正确的顺序执行
      subs.sort((a, b) => a.id - b.id)
    }
    // 遍历相关watcher,并调用watcher更新
    for (let i = 0, l = subs.length; i < l; i++) {
      subs[i].update()
    }
}
(3)执行watcher.update(): 判断是立即更新还是异步更新。若为异步更新,调用queueWatcher(this),将watcher入队,放到后面一起更新。
core/oberver/watcher.js:
update () {
    /* istanbul ignore else */
    if (this.lazy) {
      this.dirty = true
    } else if (this.sync) {
      //立即执行渲染
      this.run()
    } else {
      // watcher入队操作,后面一起执行渲染
      queueWatcher(this)
    }
}
(4)执行queueWatcher(this): watcher进行去重等操作后,添加到队列中,调用nextTick(flushSchedulerQueue)执行异步队列,传入回调函数flushSchedulerQueue。
core/oberver/scheduler.js:
function queueWatcher (watcher: Watcher) {
  // has 标识,判断该watcher是否已在,避免在一个队列中添加相同的 Watcher
  const id = watcher.id
  if (has[id] == null) {
    has[id] = true
    // flushing 标识,处理 Watcher 渲染时,可能产生的新 Watcher。
    if (!flushing) {
      // 将当前 Watcher 添加到异步队列
      queue.push(watcher)
    } else {
      // 产生新的watcher就添加到排序的位置
      let i = queue.length - 1
      while (i > index && queue[i].id > watcher.id) {
        i--
      }
      queue.splice(i + 1, 0, watcher)
    }
    // queue the flush
    // waiting 标识,让所有的 Watcher 都在一个 tick 内进行更新。
    if (!waiting) {
      waiting = true

      if (process.env.NODE_ENV !== 'production' && !config.async) {
        flushSchedulerQueue()
        return
      }
      // 执行异步队列,并传入回调
      nextTick(flushSchedulerQueue)
    }
  }
}
(5)执行nextTick(cb): 将传进去的 flushSchedulerQueue 函数处理后添加到callbacks队列中,调用timerFunc启动异步执行任务。
core/util/next-tick.js:
function nextTick (cb?: Function, ctx?: Object) {
  let _resolve
  // 此处的callbacks就是队列(回调数组),将传入的 flushSchedulerQueue 方法处理后添加到回调数组
  callbacks.push(() => {
    if (cb) {
      try {
        cb.call(ctx)
      } catch (e) {
        handleError(e, ctx, 'nextTick')
      }
    } else if (_resolve) {
      _resolve(ctx)
    }
  })
  if (!pending) {
    pending = true
    // 启动异步执行任务,此方法会根据浏览器兼容性,选用不同的异步策略
    timerFunc()
  }
  // $flow-disable-line
  if (!cb && typeof Promise !== 'undefined') {
    return new Promise(resolve => {
      _resolve = resolve
    })
  }
}
(6)timerFunc():根据浏览器兼容性,选用不同的异步方式去执行flushCallbacks。由于宏任务耗费的时间是大于微任务的,所以先选用微任务的方式,都不行时再使用宏任务的方式,
core/util/next-tick.js:
let timerFunc

// 支持Promise则使用Promise异步的方式执行flushCallbacks
if (typeof Promise !== 'undefined' && isNative(Promise)) {
  const p = Promise.resolve()
  timerFunc = () => {
    p.then(flushCallbacks)
    if (isIOS) setTimeout(noop)
  }
  isUsingMicroTask = true
} else if (!isIE && typeof MutationObserver !== 'undefined' && (
  isNative(MutationObserver) ||
  MutationObserver.toString() === '[object MutationObserverConstructor]'
)) {
  let counter = 1
  const observer = new MutationObserver(flushCallbacks)
  const textNode = document.createTextNode(String(counter))
  observer.observe(textNode, {
    characterData: true
  })
  timerFunc = () => {
    counter = (counter + 1) % 2
    textNode.data = String(counter)
  }
  isUsingMicroTask = true
} else if (typeof setImmediate !== 'undefined' && isNative(setImmediate)) {
  timerFunc = () => {
    setImmediate(flushCallbacks)
  }
} else {
  // 实在不行再使用setTimeout的异步方式
  timerFunc = () => {
    setTimeout(flushCallbacks, 0)
  }
}
(7)flushCallbacks:异步执行callbacks队列中所有函数
core/util/next-tick.js:
// 循环callbacks队列,执行里面所有函数flushSchedulerQueue,并清空队列
function flushCallbacks () {
  pending = false
  const copies = callbacks.slice(0)
  callbacks.length = 0
  for (let i = 0; i < copies.length; i++) {
    copies[i]()
  }
}
(8)flushSchedulerQueue():遍历watcher队列,执行watcher.run()
watcher.run():真正的渲染
function flushSchedulerQueue() {
  currentFlushTimestamp = getNow();
  flushing = true;
  let watcher, id;

  // 排序,先渲染父节点,再渲染子节点
  // 这样可以避免不必要的子节点渲染,如:父节点中 v -if 为 false 的子节点,就不用渲染了
  queue.sort((a, b) => a.id - b.id);

  // do not cache length because more watchers might be pushed
  // as we run existing watchers
  // 遍历所有 Watcher 进行批量更新。
  for (index = 0; index < queue.length; index++) {
    watcher = queue[index];
    if (watcher.before) {
      watcher.before();
    }
    id = watcher.id;
    has[id] = null;
    // 真正的更新函数
    watcher.run();
    // in dev build, check and stop circular updates.
    if (process.env.NODE_ENV !== "production" && has[id] != null) {
      circular[id] = (circular[id] || 0) + 1;
      if (circular[id] > MAX_UPDATE_COUNT) {
        warn(
          "You may have an infinite update loop " +
            (watcher.user
              ? `in watcher with expression "${watcher.expression}"`
              : `in a component render function.`),
          watcher.vm
        );
        break;
      }
    }
  }

  // keep copies of post queues before resetting state
  const activatedQueue = activatedChildren.slice();
  const updatedQueue = queue.slice();

  resetSchedulerState();

  // call component updated and activated hooks
  callActivatedHooks(activatedQueue);
  callUpdatedHooks(updatedQueue);

  // devtool hook
  /* istanbul ignore if */
  if (devtools && config.devtools) {
    devtools.emit("flush");
  }
}
(9)updateComponent():watcher.run()经过一系列的转圈,执行updateComponent,updateComponent中执行render(),让组件重新渲染, 再执行_update(vnode) ,再执行 patch()更新界面。
(10)_update():根据是否有vnode分别执行不同的patch。
四、Vue.nextTick(callback)
1.Vue.nextTick(callback)作用:获取更新后的真正的 DOM 元素。
由于Vue 在更新 DOM 时是异步执行的,所以在修改data之后,并不能立刻获取到修改后的DOM元素。为了获取到修改后的 DOM元素,可以在数据变化之后立即使用 Vue.nextTick(callback)。
2.为什么 Vue.$nextTick 能够获取更新后的 DOM?
因为Vue.$nextTick其实就是调用 nextTick 方法,在异步队列中执行回调函数。
Vue.prototype.$nextTick = function (fn: Function) {
  return nextTick(fn, this);
};
3.使用 Vue.$nextTick
例子1:
{{foo}}
执行结果: test.innerHTML:foo nextTick:test.innerHTML:foo1
例子2:
{{foo}}
执行结果: 1.test.innerHTML:foo 2.test.innerHTML:foo nextTick:test.innerHTML:foo2
例子3:
{{foo}}
执行结果: 1.test.innerHTML:foo 2.test.innerHTML:foo nextTick:test.innerHTML:foo
4、 nextTick与其他异步方法
nextTick是模拟的异步任务,所以可以用 Promise 和 setTimeout 来实现和 this.$nextTick 相似的效果。
例子1:
{{foo}}
执行结果: 1.test.innerHTML:foo 2.test.innerHTML:foo nextTick:test.innerHTML:foo Promise:test.innerHTML:foo2 setTimeout:test.innerHTML:foo2
例子2:
{{foo}}
执行结果: 1.test.innerHTML:foo 2.test.innerHTML:foo nextTick:test.innerHTML:foo Promise:test.innerHTML:foo2 setTimeout:test.innerHTML:foo2
总结
到此这篇关于vue源码之批量异步更新策略的文章就介绍到这了,更多相关vue批量异步更新策略内容请搜索脚本之家以前的文章或继续浏览下面的相关文章希望大家以后多多支持脚本之家!

