Tensorflow2手写数字识别
说下废话:帮一个刚学tensorflow2的同学写的手写数字识别基本流程代码,写完顺便整理成博客。
文章目录
-
- 1.导包
- 2.构建数据集
- 3.构建模型
-
- 第一个模型
- 第二个模型
- 4.模型训练并测试
-
- 一个训练步
- 开始训练
- 5.预测
1.导包
原始代码如下,可根据实际情况进行修改。
import  os
os.environ["TF_MIN_CPP_LOG_LEVEL"]="2"  #屏蔽一些警告
#os.environ["CUDA_VISIBLE_DEVICES"]='-1' #设置当前程序可见的设备范围,-1直接使用CPU
import  tensorflow as tf
from    tensorflow.keras import layers, optimizers, datasets, Sequential
print(tf.config.experimental.list_physical_devices(device_type='GPU'))#打印看看GPU设备
physical_devices = tf.config.experimental.list_physical_devices('GPU')#所有可用GPU
assert len(physical_devices) > 0, "Not enough GPU hardware devices available"
tf.config.experimental.set_memory_growth(physical_devices[0], True)#设置第一个张卡仅在需要时申请显存空间
如果使用CPU的话,就可以设置os.environ[“CUDA_VISIBLE_DEVICES”]=’-1’,然后把打印下面的代码删掉,否则会报错没有可用GPU。
隐藏了GPU,打印的GPU设备就为空了:
![]()
2.构建数据集
# 预处理函数
@tf.autograph.experimental.do_not_convert
def preprocess(x, y):

    x = tf.cast(x, dtype=tf.float32) / 255.
    y = tf.cast(y, dtype=tf.int32)
    x=tf.expand_dims(x,-1)

    return x, y
除以255将像素压缩到0~1.0,转为浮点数做运算。然后将x最后一个维度添加一维,因为只有四维你后面的卷积才能运算。
(x,y), (x_test, y_test) = datasets.mnist.load_data()
print(x.shape, y.shape, x_test.shape, y_test.shape)
train_db = tf.data.Dataset.from_tensor_slices((x,y))
train_db = train_db.shuffle(buffer_size=500).map(preprocess).batch(128)

test_db = tf.data.Dataset.from_tensor_slices((x_test,y_test))
test_db = test_db.map(preprocess).batch(64)

sample = next(iter(train_db))
print('sample:', sample[0].shape, sample[1].shape,
      tf.reduce_min(sample[0]), tf.reduce_max(sample[0]))
加载Mnist直接使用 datasets.mnist.load_data() 加载
然后将把整个数据集切片,比如训练集有60000张图捆绑在一块,就把它切成60000个一张的图片的集合。
shuffle的作用:
从数据集中按顺序抽取buffer_size个样本放在buffer中,然后打乱buffer中的样本,
buffer中样本个数不足buffer_size,继续从data数据集中按顺序填充至buffer_size,并再次打乱。
map的作用:
往里面放一个函数,数据就会被做输入喂进函数进行处理,然后返回新的数据。
batch的作用:
从buffer中抽batch_size个数据出来打包在一块。
看看结果(训练集batch_size为128,这种东西可以随便设置,就看你电脑带得动不)
训练集60000张图,大小为28*28,标签为60000个数字(0~9)
测试集10000张图。
打印经过上述处理过的一个batch数据(代码中的sample),
可以看见第一维度为128,即batch_size ,二,三维为图片宽高,最后一维是经过preprocess后增加的,图片中像素值也已经压缩到0~1.0。
![]()
3.构建模型
下面写了俩模型(推荐使用自定义的模型类),一个大的,用GPU跑好点,另一个适用于用CPU跑的同学
第一个模型
5个卷积块,3层全连接。
输入:128,28,28,1
unit1:128,14,14,64
你padding=same只是确保stride=1时图片大小不变,stride=2就仍会对图片进行下采样。
unit2:128,7,7,128
unit3:128,4,4,256
unit4:128,2,2,512
unit5:128,1,1,512
reshape 后:128,512
fc1:128,256
fc2:128,128
fc3:128,10
预测10个数字,到时候将10个输出取概率最大的作为最终预测结果就行了
解释一下流程,要将图片从(batch_size,28,28,1)变到最终的(batch_size,10),卷积层部分完成的功能是提取feature map,然后经过reshape将特征图拉成一行,在这里就是(batch_size,512),最后再经过全连接层(分类器)得到输出(batch_size,10)。
class CnnModel(tf.keras.Model):
    def __init__(self):
        super(CnnModel, self).__init__()
        # unit 1
        self.unit1=Sequential([
        layers.Conv2D(64, kernel_size=[3, 3], padding="same", activation=tf.nn.relu),
        layers.Conv2D(64, kernel_size=[3, 3], padding="same", activation=tf.nn.relu),
        layers.MaxPool2D(pool_size=[2, 2], strides=2, padding='same'),],name='unit1')

        # unit 2
        self.unit2=Sequential([
        layers.Conv2D(128, kernel_size=[3, 3], padding="same", activation=tf.nn.relu),
        layers.Conv2D(128, kernel_size=[3, 3], padding="same", activation=tf.nn.relu),
        layers.MaxPool2D(pool_size=[2, 2], strides=2, padding='same'),],name='unit2')

        # unit 3
        self.unit3=Sequential([
        layers.Conv2D(256, kernel_size=[3, 3], padding="same", activation=tf.nn.relu),
        layers.Conv2D(256, kernel_size=[3, 3], padding="same", activation=tf.nn.relu),
        layers.MaxPool2D(pool_size=[2, 2], strides=2, padding='same'),],name='unit3')

        # unit 4
        self.unit4=Sequential([
        layers.Conv2D(512, kernel_size=[3, 3], padding="same", activation=tf.nn.relu),
        layers.Conv2D(512, kernel_size=[3, 3], padding="same", activation=tf.nn.relu),
        layers.MaxPool2D(pool_size=[2, 2], strides=2, padding='same'),],name='unit4')

        # unit 5
        self.unit5=Sequential([
        layers.Conv2D(512, kernel_size=[3, 3], padding="same", activation=tf.nn.relu),
        layers.Conv2D(512, kernel_size=[3, 3], padding="same", activation=tf.nn.relu),
        layers.MaxPool2D(pool_size=[2, 2], strides=2, padding='same'),],name='unit5')

        #fc
        self.fc_net = Sequential([
            layers.Dense(256, activation=tf.nn.relu),
            layers.Dense(128, activation=tf.nn.relu),
            layers.Dense(10, activation=None),
        ],name='fc')

    def call(self, x):
        x1=self.unit1(x)

        x2=self.unit2(x1)

        x3=self.unit3(x2)

        x4=self.unit4(x3)

        x5=self.unit5(x4)

        x5_ = tf.reshape(x5, [-1, 512]) #其他维度给出固定值,-1会根据实际形状进行计算
        out=self.fc_net(x5_)
        return out
下面创建一个模型:
build:建立模型,并指明输入的维度及其形状.之后就可以用summary看看你的模型。
之后设置的optimizer 是优化器,variables是模型中所有可训练的参数,checkpoint是为了等等保存自定义模型的信息(可以用来继续中断的训练),下面是我保存的是模型,优化器,以及epochs。
tf.train.CheckpointManager 可以用于管理checkpoint,比如我下面设置的保存checkpoint,保存路径为 ./model_data/ ,最大的保存个数为4。
cnnmodel=CnnModel()
cnnmodel.build(input_shape=(None, 28, 28, 1))
cnnmodel.summary()
optimizer = optimizers.Adam(lr=1e-4)
checkpoint_path='./model_data/'
variables = cnnmodel.trainable_variables
checkpoint = tf.train.Checkpoint(model=cnnmodel, optimizer=optimizer,epochs=tf.Variable(0))
manager = tf.train.CheckpointManager(checkpoint,checkpoint_path , max_to_keep=4)
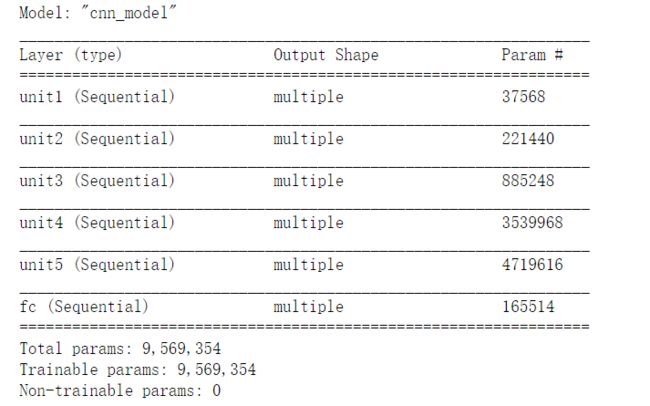
在这个数据集里,几百万参数算多了 ,下面一个epoch就97准确度了。。
第二个模型
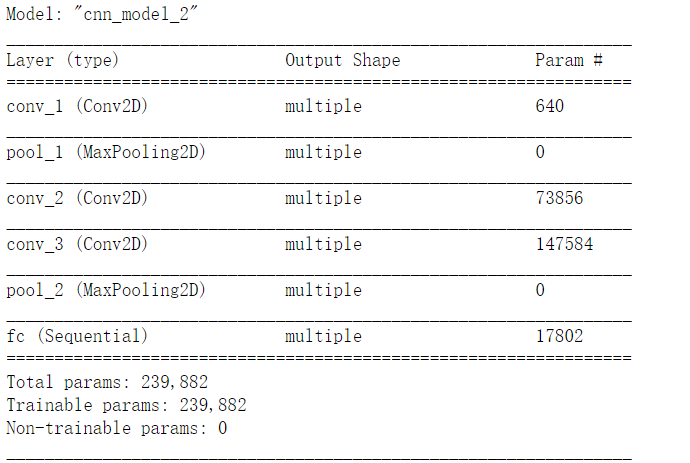
只要确保卷积层后feature map 大小变为1*1就行了,也就是要5个stride=2。
class CnnModel(tf.keras.Model):
    def __init__(self):
        super(CnnModel, self).__init__()

        self.conv_1=layers.Conv2D(64, kernel_size=[3, 3], strides=2, padding="same", activation=tf.nn.relu,name="conv_1")
        self.pool_1=layers.MaxPool2D(pool_size=[2, 2], strides=2, padding='same',name='pool_1')

        self.conv_2=layers.Conv2D(128, kernel_size=[3, 3],strides=2, padding="same", activation=tf.nn.relu,name='conv_2')
        self.conv_3=layers.Conv2D(128, kernel_size=[3, 3],strides=2, padding="same", activation=tf.nn.relu,name='conv_3')
        self.pool_2=layers.MaxPool2D(pool_size=[2, 2], strides=2, padding='same',name='pool_2')

        self.fc_net = Sequential([
            layers.Dense(128, activation=tf.nn.relu),
            layers.Dense(10, activation=None),
        ],name='fc')

    def call(self, x):
        x1=self.conv_1(x)
        x1_=self.pool_1(x1)
        x2=self.conv_2(x1_)
        x3=self.conv_3(x2)
        x4=self.pool_2(x3)

        x4_ = tf.reshape(x4, [-1, 128])
        out=self.fc_net(x4_)
        return out
4.模型训练并测试
使用的是GradientTape梯度带来计算梯度,好处在于自定义程度高,可以对损失的计算过程、计算方式进行深度定制,而不是用model.train这种高级API(傻白甜)去进行单纯的训练。
一个训练步
def train_step():
    for step, (x,y) in enumerate(train_db):
            with tf.GradientTape() as tape:
                logits = cnnmodel(x)
                y = tf.one_hot(y, depth=10)
                # compute loss
                loss = tf.losses.categorical_crossentropy(y, logits, from_logits=True)
                loss = tf.reduce_mean(loss)

            grads = tape.gradient(loss, variables)
            optimizer.apply_gradients(zip(grads, variables))

            if step %100 == 0:
                print(f"epoch:{int(checkpoint.epochs)+1}  ,step:{step}", 'loss:', float(loss))


    total_num = 0
    total_correct = 0
    for x,y in test_db:

        logits= cnnmodel(x)
        prob = tf.nn.softmax(logits, axis=1)
        pred = tf.argmax(prob, axis=1)
        pred = tf.cast(pred, dtype=tf.int32)
        y=tf.cast(y, dtype=tf.int32)
        correct = tf.cast(tf.equal(pred, y), dtype=tf.int32)
        correct = tf.reduce_sum(correct)

        total_num += x.shape[0]
        total_correct += int(correct)
    print("*"*60)
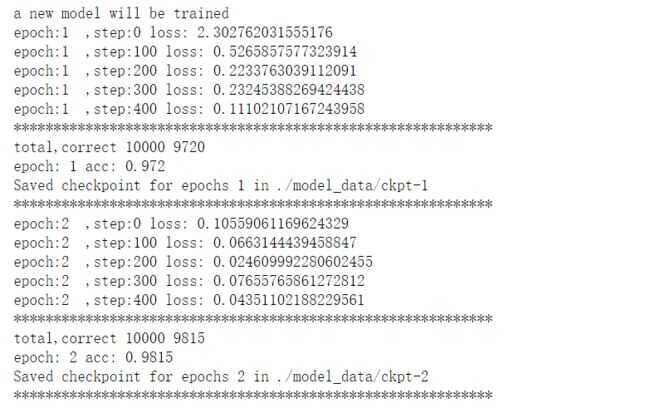
    print("total,correct",total_num,total_correct,)
    acc = total_correct / total_num

    print("epoch:",int(checkpoint.epochs)+1, 'acc:', acc)
    checkpoint.epochs.assign_add(1)
    save_path = manager.save()
    print(f"Saved checkpoint for epochs {int(checkpoint.epochs)} in {save_path}")

    print("*"*60)
使用模型计算得到结果后,由于输出是10个,因此我们把真实标签y进行深度为10的one-hot编码,然后使用交叉熵计算误差。得到误差后,使用tape.gradient计算梯度,使用optimizer.apply_gradients来将梯度应用于参数更新。
接着取测试集数据进行测试, logits为预测结果(为(64,10)测试集我batch_size取了64)。
每个样本的形状为(1,10),用softmax转为将输出概率,axis=1是让它在第二个维度10上进行转概率,也就是对每个样本都进行概率。
接着用argmax函数对每个样本取概率值最大的索引作为输出(因为一个样本10个输出,索引为0~9,刚好对应10个数字标签)
再用tf.cast将输出转为int型,与真实标签进行比较,并统计一个step中正确的个数。
后面的是对checkpoint的保存。
保存后,用checkpoint.epochs.assign_add(1),将epochs的数值+1
开始训练
设置了是否加载继续训练,如果是的话就加载最新的checkpoint,没有的话就新训练一个。
def main(resume_from_file=False):


    if resume_from_file is True:
         checkpoint.restore(manager.latest_checkpoint)
         if manager.latest_checkpoint:
                print("Restored from {}".format(manager.latest_checkpoint))
    else:
        print("a new model will be trained")
    for epoch in range(2):
            train_step()
if __name__ == '__main__':
    main()
if __name__ == '__main__':
    main(True)
5.预测
首先,用np.array(np.array(img)/255).reshape((1, 28, 28, 1)) 将图片格式改成模型输入的格式,并压缩到0~1.0.
然后,用checkpoint.restore(manager.latest_checkpoint) 加载最新的checkpoint.
接着,按着上面提到做测试的方法进行操作,得到最终的预测数字。
import numpy as np
import matplotlib.pyplot as plt
from PIL import Image
import cv2
@tf.autograph.experimental.do_not_convert
def predict(image_path):

    img= Image.open(image_path).convert("L")
    img=np.array(np.array(img)/255).reshape((1, 28, 28, 1))
    img=tf.cast(img,dtype=tf.float64)
    #print(img)
    checkpoint.restore(manager.latest_checkpoint)
    logits=cnnmodel.predict(img)
    prob = tf.nn.softmax(logits, axis=1)
    pred = tf.argmax(prob, axis=1)
    pred = tf.cast(pred, dtype=tf.int32)
    print("the number is",int(pred[0]))
下面,到了最开心的预测环节了。
请拿出画图,大小设为28*28像素,然后背景填黑,用白笔写个数字。像这样
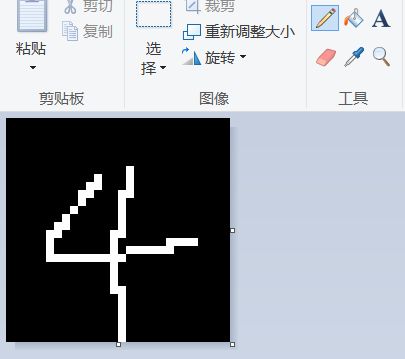
保存为 4.png,然后运行:
predict("4.png")
img=cv2.imread("4.png")
plt.imshow(img)
plt.show()
最后,你将得到这个
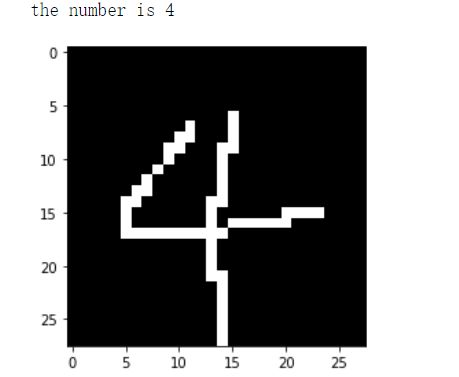
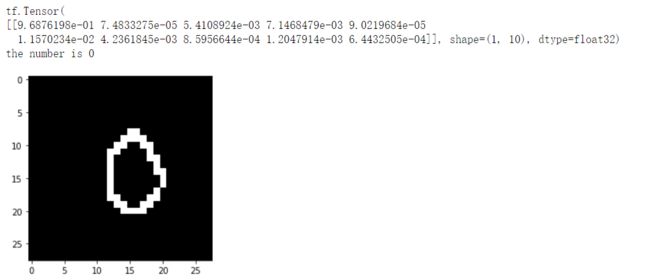
你还可以用函数里加个**print(prob)**看看概率。0.96是0,这模型还挺自信的。。
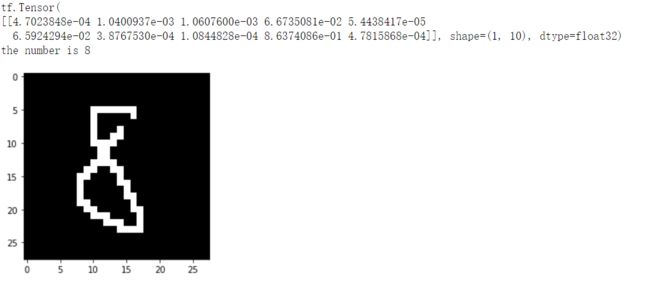
8:0.86
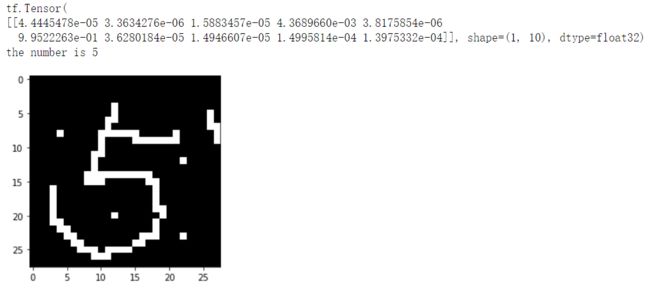
接下来玩点花的试试吧。
5: 0.99
7:0.99
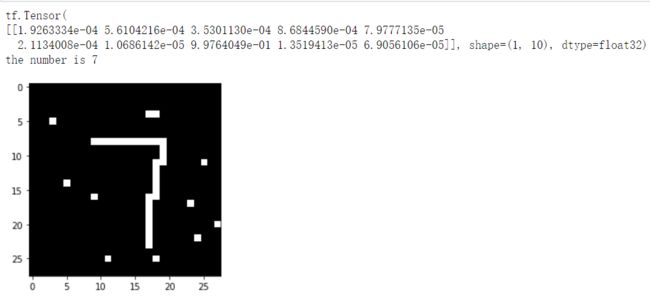
旋转一下:
2:0.49 好的,这宝儿开始不自信了。。。
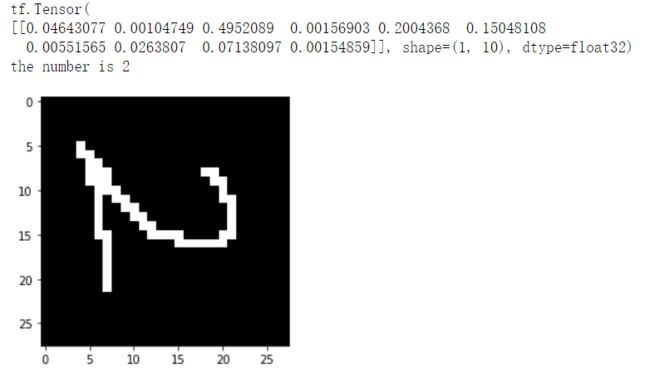
如果我把4写成这样,二愣子模型就不知道了。。。

后记:
谨以此篇献给刚学tensorflow2的小伙伴们或为实验报告发愁的同学。
代码一段一段粘贴到jupyter或者整合在一块就能直接跑了。
