2021.03.11更新 c++下使用opencv部署yolov5模型(一)
------2021.11.01更新说明
由于yolov5在6.0版本增加了对opencv的支持,所以模型部署1-3适用于4.0和5.0版本的修改,6.0版本的可以看这里:
2021.09.02更新说明 c++下使用opencv部署yolov5模型 (三)_爱晚乏客游的博客-CSDN博客
2021.11.01 c++下 opencv部署yolov5-6.0版本 (四)_爱晚乏客游的博客-CSDN博客
建议直接走6.0的版本,省事
opencv 读取YOLOV5导出模型失败的原因及其修改方法
首先感谢下这位大佬的文章:用opencv的dnn模块做yolov5目标检测_nihate的专栏-CSDN博客_opencv yolov5,详细的解释了为什么yolov5导出的onnx模型不能被opencv读取的原因以及后面的修改方法。
如果直接事用opencv的dnn模块读取yolov5自带转出的onnx模型,则会有一大堆的报错:
[ERROR:0] global C:\build\master_winpack-build-win64-vc14\opencv\modules\dnn\src\onnx\onnx_importer.cpp (1788) cv::dnn::dnn4_v20200908::ONNXImporter::handleNode DNN/ONNX: ERROR during processing node with 5 inputs and 1 outputs: [Slice]:(131)
Exception: OpenCV(4.5.0) C:\build\master_winpack-build-win64-vc14\opencv\modules\dnn\src\onnx\onnx_importer.cpp:1797: error: (-2:Unspecified error) in function 'cv::dnn::dnn4_v20200908::ONNXImporter::handleNode'
> Node [Slice]:(131) parse error: OpenCV(4.5.0) C:\build\master_winpack-build-win64-vc14\opencv\modules\dnn\src\onnx\onnx_importer.cpp:697: error: (-2:Unspecified error) in function 'void __cdecl cv::dnn::dnn4_v20200908::ONNXImporter::handleNode(const class opencv_onnx::NodeProto &)'
> > Slice layer only supports steps = 1 (expected: 'countNonZero(step_blob != 1) == 0'), where
> >     'countNonZero(step_blob != 1)' is 1
> > must be equal to
> >     '0' is 0
>
Can't load network by using the following files:
请按任意键继续. . .
首先找到yolov5的focus模块,
#models/comment.py
class Focus(nn.Module):
    # Focus wh information into c-space
    def __init__(self, c1, c2, k=1, s=1, p=None, g=1, act=True):  # ch_in, ch_out, kernel, stride, padding, groups
        super(Focus, self).__init__()
        self.conv = Conv(c1 * 4, c2, k, s, p, g, act)
        #self.contract = Contract(gain=2)

    def forward(self, x):  # x(b,c,w,h) -> y(b,4c,w/2,h/2)
        return self.conv(torch.cat([x[..., ::2, ::2], x[..., 1::2, ::2], x[..., ::2, 1::2], x[..., 1::2, 1::2]], dim=1))
        #return self.conv(self.contract(x))
看到在foward里面做了切片的操作。同时看到了被注释掉的两行代码。
#self.contract = Contract(gain=2)
#return self.conv(self.contract(x))
那么我们把这两行代码替换点原本的return会发生什么?
class Focus(nn.Module):
    # Focus wh information into c-space
    def __init__(self, c1, c2, k=1, s=1, p=None, g=1, act=True):  # ch_in, ch_out, kernel, stride, padding, groups
        super(Focus, self).__init__()
        self.conv = Conv(c1 * 4, c2, k, s, p, g, act)
        self.contract = Contract(gain=2)

    def forward(self, x):  # x(b,c,w,h) -> y(b,4c,w/2,h/2)
        #return self.conv(torch.cat([x[..., ::2, ::2], x[..., 1::2, ::2], x[..., ::2, 1::2], x[..., 1::2, 1::2]], dim=1))
        return self.conv(self.contract(x))
然后运行export.py:喜提报错一个,提示为没有这个属性
继续扒拉下Contract(x),找到Contract模块(就在focus下面)
#models/comment.py
class Contract(nn.Module):
    # Contract width-height into channels, i.e. x(1,64,80,80) to x(1,256,40,40)
    def __init__(self, gain=2):
        super().__init__()
        self.gain = gain

    def forward(self, x):
        N, C, H, W = x.size()  # assert (H / s == 0) and (W / s == 0), 'Indivisible gain'
        s = self.gain
        x = x.view(N, C, H // s, s, W // s, s)  # x(1,64,40,2,40,2)
        x = x.permute(0, 3, 5, 1, 2, 4).contiguous()  # x(1,2,2,64,40,40)
        return x.view(N, C * s * s, H // s, W // s)  # x(1,256,40,40)
可以看到在forward中进行的维度变换,发现起功能类似上面的切片操作。有兴趣的同学可以和上面的切片操作的输出对比下,看下维度是不是一样的。
所以修改了下focus模块:
class Focus(nn.Module):
    # Focus wh information into c-space
    def __init__(self, c1, c2, k=1, s=1, p=None, g=1, act=True):  # ch_in, ch_out, kernel, stride, padding, groups
        super(Focus, self).__init__()
        #self.contract=Conv(c1 * 4, c2, k, s, p, g, act)
        self.conv = Conv(c1 * 4, c2, k, s, p, g, act)
    def forward(self, x):  # x(b,c,w,h) -> y(b,4c,w/2,h/2)
        #return self.conv(torch.cat([x[..., ::2, ::2], x[..., 1::2, ::2], x[..., ::2, 1::2], x[..., 1::2, 1::2]], 1))
        N, C, H, W = x.size()  # assert (H / s == 0) and (W / s == 0), 'Indivisible gain'
        s = 2
        x = x.view(N, C, H // s, s, W // s, s)  # x(1,64,40,2,40,2)
        x = x.permute(0, 3, 5, 1, 2, 4).contiguous()  # x(1,2,2,64,40,40)
        y=x.view(N, C * s * s, H // s, W // s)  # x(1,256,40,40)
        return self.conv(y)

################################################################
##############       另外一种比较简单的方法         ##############
################################################################
class Focus(nn.Module):
    # Focus wh information into c-space
    def __init__(self, c1, c2, k=1, s=1, p=None, g=1, act=True):  # ch_in, ch_out, kernel, stride, padding, groups
        super().__init__()
        self.conv = Conv(c1 * 4, c2, k, s, p, g, act)

    def forward(self, x):  # x(b,c,w,h) -> y(b,4c,w/2,h/2)
        contract = Contract(gain=2)
        #return self.conv(torch.cat([x[..., ::2, ::2], x[..., 1::2, ::2], x[..., ::2, 1::2], x[..., 1::2, 1::2]], 1))
        return self.conv(contract(x))
接着运行下export.py
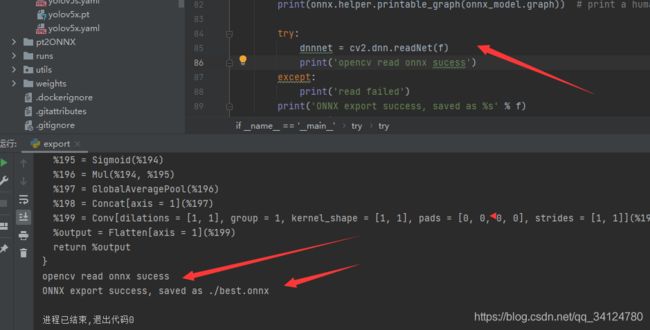
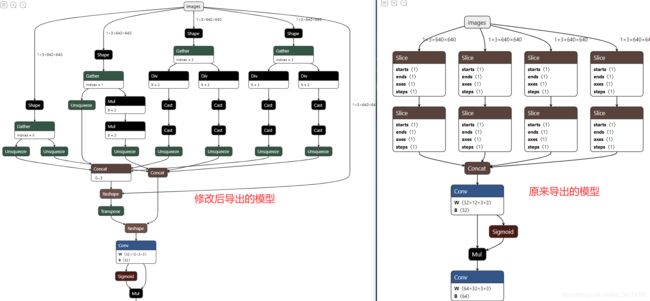
可以看到已经读取成功了,使用netron(Netron)看下导出的模型。对比下两个模型,发现opencv不支持的slice层已经修改成可以支持的网络层了,且输入输出一样!


