2021.04.15更新 c++下使用opencv部署yolov5模型 (二)
------2021.11.01更新说明
由于yolov5在6.0版本增加了对opencv的支持,所以模型部署1-3适用于4.0和5.0版本的修改,6.0版本的可以看这里:
2021.09.02更新说明 c++下使用opencv部署yolov5模型 (三)_爱晚乏客游的博客-CSDN博客
建议直接走6.0的版本,省事。
前段时间在部署yolov5的模型时遇到的各种问题,最后成功的部署,写个博客记录下。
目录
一、opencv直接读取通过U神的yolov5/model/export.py导出onnx模型失败原因。
二、yolov5的onnx模型的输出格式含义。
三、yolov5网络三个输出口作用,以及三个输出下的获取检测结果的过程。
四、三个输出合并成为一个输出,并且获取检测结果。
五、c++下使用opencv部署。
一、opencv直接读取通过U神的yolov5/model/export.py导出onnx模型失败原因。
一句话总结就是:opencv读取失败的原因就是Pytorch2ONNX不支持对slice对象赋值。
通过netron(https://netron.app,神器,看网络结构必备)可以看到网络入口处的slice操作。
仔细扒一扒focus的源码,可以看到,网络入口处进行的切片操作。同时可以看到被作者注释掉的两句话。
class Focus(nn.Module):
    # Focus wh information into c-space
    def __init__(self, c1, c2, k=1, s=1, p=None, g=1, act=True):  # ch_in, ch_out, kernel, stride, padding, groups
        super(Focus, self).__init__()
        self.conv = Conv(c1 * 4, c2, k, s, p, g, act)
        # self.contract = Contract(gain=2)

    def forward(self, x):  # x(b,c,w,h) -> y(b,4c,w/2,h/2)
        return self.conv(torch.cat([x[..., ::2, ::2], x[..., 1::2, ::2], x[..., ::2, 1::2], x[..., 1::2, 1::2]], 1))
        # return self.conv(self.contract(x))
然后扒一扒这两句话的含义(focus模块下面的contract()模块),发现都是一样的切片操作。那么我们就可以通过替换改掉这个不支持的切片操作详情看上一篇(c++下使用opencv部署yolov5模型(一)_爱晚乏客游的博客-CSDN博客)。通过这个修改,现在可以使用opencv来读取ONNX模型了。
二、yolov5的onnx模型的输出格式含义。
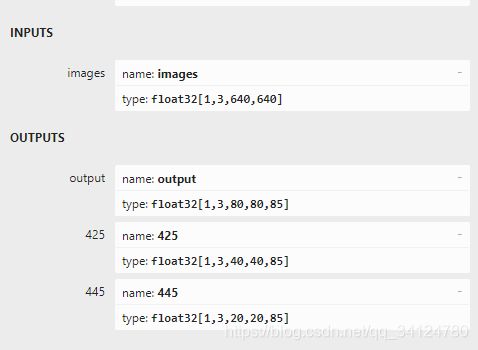
修改之后,再次打开onnx模型的结构,拖到最后,点击最后一个网络出口,在左边可以看到整个onnx模型的输入输出信息。
一个输入,IMPUTS:[1,3,640,640],含义分别是【batch_size,channel,h,w】
三个输出(此处是name的错误,三个都是网络输出)OUTPUTS:[1,3,80,80,85],[1,3,40,40,85],[1,3,20,20,85].含义是【batch_size,anchors,h,w,class_num+box】.详细说下80个类为什么结果shape是85.
| anchors_box.x | anchors_box_y | anchors_box_w | anchors_bos_h | box_probability | class1 | class2 | ... |
| 锚框的x | y | w | h | 锚框内有物体的概率 | 锚框内物体为1的概率 | ... | ... |
所以85=4个锚框点+1概率+80类概率。所以想要得到结果,就是要去遍历每一个85长度数组,先判断锚框内物体概率,然后遍历后面的class得到锚框内物体属于某个类的最高概率。这样子遍历完3*80*80维度的每个85长度的数组,就可以得到第一个output的输出,再做一次nms筛选,就得到了最后的结果。
三、yolov5网络三个输出口作用,以及三个输出下的获取检测结果的过程。
从上面可以知道网络有三个出口:OUTPUTS:[1,3,80,80,85],[1,3,40,40,85],[1,3,20,20,85].
扒一扒yolov5s的模型结构文件(/models/yolov5s.yaml),可以看到作者已经给出来,P3/8用来检测小目标,P4/16用来检测中型目标,P5/32用来检测大目标的。所以如果想针对的话,可以只遍历单独某个output,就可以提高效率。
#models/yolov5s.yaml

head:
   [[-1, 1, Conv, [512, 1, 1]],
   [-1, 1, nn.Upsample, [None, 2, 'nearest']],
   [[-1, 6], 1, Concat, [1]],  # cat backbone P4
   [-1, 3, C3, [512, False]],  # 13

   [-1, 1, Conv, [256, 1, 1]],
   [-1, 1, nn.Upsample, [None, 2, 'nearest']],
   [[-1, 4], 1, Concat, [1]],  # cat backbone P3
   [-1, 3, C3, [256, False]],  # 17 (P3/8-small)

   [-1, 1, Conv, [256, 3, 2]],
   [[-1, 14], 1, Concat, [1]],  # cat head P4
   [-1, 3, C3, [512, False]],  # 20 (P4/16-medium)

   [-1, 1, Conv, [512, 3, 2]],
   [[-1, 10], 1, Concat, [1]],  # cat head P5
   [-1, 3, C3, [1024, False]],  # 23 (P5/32-large)

   [[17, 20, 23], 1, Detect, [nc, anchors]],  # Detect(P3, P4, P5)
四、三个输出合并成为一个输出,并且获取检测结果。
修改此处也是我部署的过程中花费时间最多的地方。绕了一大段的弯路,最后发现只要修改下yolo.py中的detect模块就可以达到修改网络输出格式的效果。先看下/models/yolo.py里面的detect模块
class Detect(nn.Module):
    stride = None  # strides computed during build
    export = False  # onnx export

    def __init__(self, nc=80, anchors=(), ch=()):  # detection layer
        super(Detect, self).__init__()
        self.nc = nc  # number of classes
        self.no = nc + 5  # number of outputs per anchor
        self.nl = len(anchors)  # number of detection layers
        self.na = len(anchors[0]) // 2  # number of anchors
        self.grid = [torch.zeros(1)] * self.nl  # init grid
        a = torch.tensor(anchors).float().view(self.nl, -1, 2)
        self.register_buffer('anchors', a)  # shape(nl,na,2)
        self.register_buffer('anchor_grid', a.clone().view(self.nl, 1, -1, 1, 1, 2))  # shape(nl,1,na,1,1,2)
        self.m = nn.ModuleList(nn.Conv2d(x, self.no * self.na, 1) for x in ch)  # output conv

    def forward(self, x):
        # x = x.copy()  # for profiling
        z = []  # inference output
        self.training |= self.export
        for i in range(self.nl):
            x[i] = self.m[i](x[i])  # conv
            bs, _, ny, nx = x[i].shape  # x(bs,255,20,20) to x(bs,3,20,20,85)
            x[i] = x[i].view(bs, self.na, self.no, ny, nx).permute(0, 1, 3, 4, 2).contiguous()

            if not self.training:  # inference
                if self.grid[i].shape[2:4] != x[i].shape[2:4]:
                    self.grid[i] = self._make_grid(nx, ny).to(x[i].device)

                y = x[i].sigmoid()
                y[..., 0:2] = (y[..., 0:2] * 2. - 0.5 + self.grid[i]) * self.stride[i]  # xy
                y[..., 2:4] = (y[..., 2:4] * 2) ** 2 * self.anchor_grid[i]  # wh
                z.append(y.view(bs, -1, self.no))

        return x if self.training else (torch.cat(z, 1), x)
可以看到在forward里面,作者写了个# x(bs,255,20,20) to x(bs,3,20,20,85)。在这里交换并且变换输出格式。所以就可以修改x的格式已达到修改输出的结果。比如在x下面添加一句话:
    def forward(self, x):
        # x = x.copy()  # for profiling
        z = []  # inference output
        self.training |= self.export
        for i in range(self.nl):
            x[i] = self.m[i](x[i])  # conv
            bs, _, ny, nx = x[i].shape  # x(bs,255,20,20) to x(bs,3,20,20,85)
            x[i] = x[i].view(bs, self.na, self.no, ny, nx).permute(0, 1, 3, 4, 2).contiguous()
            x[i] = x[i].view(bs * self.na * ny * nx, self.no).contiguous()
然后运行export导出onnx看下output,可以看到已经变成了二维数组了。为了将yolov5可以使用yolv4(一个二维格式的输出)一样的部署方式,还需要将三个输出合并成为一个输出。
合并输出的方法也很简单,使用torch.cat()将之连接起来。这里需要注意的是,这边是导出onnx的改动,如果你要训练模型或者使用detect.py来验证模型,这边需要改回原来的样子,不然会报错!!!这里特别注意(有人遇到改完之后重新训练报错,之前忘记说了)
class Detect(nn.Module):
    stride = None  # strides computed during build
    export = False  # onnx export

    def __init__(self, nc=80, anchors=(), ch=()):  # detection layer
        super(Detect, self).__init__()
        self.nc = nc  # number of classes
        self.no = nc + 5  # number of outputs per anchor
        self.nl = len(anchors)  # number of detection layers
        self.na = len(anchors[0]) // 2  # number of anchors
        self.grid = [torch.zeros(1)] * self.nl  # init grid
        a = torch.tensor(anchors).float().view(self.nl, -1, 2)
        self.register_buffer('anchors', a)  # shape(nl,na,2)
        self.register_buffer('anchor_grid', a.clone().view(self.nl, 1, -1, 1, 1, 2))  # shape(nl,1,na,1,1,2)
        self.m = nn.ModuleList(nn.Conv2d(x, self.no * self.na, 1) for x in ch)  # output conv

    def forward(self, x):
        # x = x.copy()  # for profiling
        z = []  # inference output
        self.training |= self.export
        for i in range(self.nl):
            x[i] = self.m[i](x[i])  # conv
            bs, _, ny, nx = x[i].shape  # x(bs,255,20,20) to x(bs,3,20,20,85)
            x[i] = x[i].view(bs, self.na, self.no, ny, nx).permute(0, 1, 3, 4, 2).contiguous()
            x[i] = x[i].view(bs * self.na * ny * nx, self.no).contiguous() #这里需要注意,训练和使用原来代码推理的时候要改原来的样子!!!
        return torch.cat(x)
        #     if not self.training:  # inference
        #         if self.grid[i].shape[2:4] != x[i].shape[2:4]:
        #             self.grid[i] = self._make_grid(nx, ny).to(x[i].device)
        #
        #         y = x[i].sigmoid()
        #         y[..., 0:2] = (y[..., 0:2] * 2. - 0.5 + self.grid[i]) * self.stride[i]  # xy
        #         y[..., 2:4] = (y[..., 2:4] * 2) ** 2 * self.anchor_grid[i]  # wh
        #         z.append(y.view(bs, -1, self.no))
        #
        # return x if self.training else (torch.cat(z, 1), x)
看下结果:
这样,就可以将三个输出合并成为一个输出,格式类似yolov4的格式,所以下面的部署就可以参考yolov4的部署了,读取和处理方法一样。
五、c++下使用opencv部署。
部署有点长,再开一篇文章,详细见:2021.09.02更新说明 c++下使用opencv部署yolov5模型 (三)_爱晚乏客游的博客-CSDN博客

