基于Tensorflow+CNN自动识别验证码
基于Tensorflow+CNN自动识别验证码
文章目录
-
-
- 0、简介:
- 1、Tensorflow、captcha的安装
- 2、准备训练样本及测试样本
-
-
- 2.1、导入相应的库及定义全局变量
- 2.2、生成训练用到的验证码图片
-
- 3、执行训练
-
-
- 3.1、定义全局变量
- 3.2、构建CNN卷积神经网络
- 3.3、执行训练
- 3.4、用测试数据集进行测试
-
- 4、总结
- 5、参考链接
-
0、简介:
这个项目在Tensorflow框架下实现用CNN自动识别验证码。
Tensorflow是一个由Google开发的用于机器学习和深度神经网络方面研究的框架。
本博客的目的主要是为了熟练tensorflow+CNN用法,并了解CNN网络的参数含义。
识别率可以达到95%~97%。
实现这个项目过程中参考了很多前辈的讲解,有tensorflow的用法及CNN原理的讲解等。在此就不一一列举,文末将主要的一些参考链接贴附,根据参考的资料对代码中的每一行进行必要说明
1、Tensorflow、captcha的安装
pip install tensorflow
pip install captcha
2、准备训练样本及测试样本
使用Python的库captcha来生成我们需要训练的验证码样本。生成验证码图片,且图片的文件名即为验证码本身。
2.1、导入相应的库及定义全局变量
from captcha.image import ImageCaptcha
import tensorflow as tf
from PIL import Image
import numpy as np
import random
import os

## 用于生成验证码的字符集
CHAR_SET = ['0','1','2','3','4','5','6','7','8','9']

CHAR_SET_LEN = len(CHAR_SET) ## 字符集的长度

MAX_CAPTCHA = 4              ## 验证码的长度,每个验证码由4个数字组成

img_height = 60              ## 图片高
img_width  = 160             ## 图片宽
2.2、生成训练用到的验证码图片
这个地方挖了一个坑:之前的做法是生成10^4张验证码图片并保存到本地,训练时再拿出来进行训练;这种做法有个很大的问题就是,训练时只能从这10000张图片中随机抽出batch_size张,换过来换过去就这么多,样本不够。修改后做法,每次训练需要获取batch_size张图片时,都随机生成,这样样本量就无限大,训练结果也会比较好。
## 把彩色图像转为灰度图像(色彩对识别验证码没有什么用)
def convert2gray(img):
    if len(img.shape) > 2:
        gray = np.mean(img, -1)
        return gray
    else:
        return img

## 随机生成字符
def random_captcha_text(char_set=CHAR_SET, captcha_size=MAX_CAPTCHA):
    captcha_text = []
    for i in range(captcha_size):
        c = random.choice(char_set)
        captcha_text.append(c)
    return captcha_text

## 生成字符对应的验证码
def gen_captcha_text_and_image():
    image = ImageCaptcha()

    captcha_text = random_captcha_text()
    captcha_text = ''.join(captcha_text)

    captcha = image.generate(captcha_text)
    #image.write(captcha_text, captcha_text + '.jpg')  # 写到文件

    captcha_image = Image.open(captcha)
    captcha_image_np = np.array(captcha_image)
    captcha_image_np = convert2gray(captcha_image_np)

    return captcha_text, captcha_image_np

##################################
## 描述:生成一个batch数量的训练数据集
## batch_size:一次生成的batch的数量
## return:
##     x_data:图片数据集  x_data.shape = (64, 60, 160, 1)
##     y_data:标签集      y_data.shape = (64, 4)
##################################
def gen_one_batch(batch_size=32):

    x_data = []
    y_data = []

    for i in range(batch_size):
        captcha_text, captcha_image_np = gen_captcha_text_and_image() ## captcha_image_np.shape = (60,160)
        assert captcha_image_np.shape == (60, 160)
        captcha_image_np = np.expand_dims(captcha_image_np, 2)
        x_data.append(captcha_image_np)
        y_data.append(np.array(list(captcha_text)).astype(np.int32))
    x_data = np.array(x_data).astype(np.float) ## x_data.shape = (64, 60, 160, 1)
    y_data = np.array(list(y_data))            ## y_data.shape = (64, 4)
    return x_data, y_data
3、执行训练
3.1、定义全局变量
这些全局变量都只是定义了,只是在内存中有了place
X = tf.placeholder(tf.float32, name="input") ## 亦即 X = x_data , so X.shape = (64, 24, 60, 1)
Y = tf.placeholder(tf.int32)                 ## 亦即 Y = y_data , so Y.shape = (64, 4)
keep_prob = tf.placeholder(tf.float32)
y_one_hot = tf.one_hot(Y, 10, 1, 0)          ## y_one_hot.shape = (batch_size , 4 , 10)
y_one_hot = tf.cast(y_one_hot, tf.float32)   ## tf.cast()类型转换
代码说明:
①L1:X = tf.placeholder(tf.float32, name=“input”)
定义变量X,下边会用到,其实就是把x_data赋给X
Tensorflow的设计理念称之为计算流图,在编写程序时,首先构筑整个系统的graph,代码并不会直接生效,这一点和python的其他数值计算库(如Numpy等)不同,graph为静态的,类似于docker中的镜像。然后,在实际的运行时,启动一个session,程序才会真正的运行。这样做的好处就是:避免反复地切换底层程序实际运行的上下文,tensorflow帮你优化整个系统的代码。我们知道,很多python程序的底层为C语言或者其他语言,执行一行脚本,就要切换一次,是有成本的,tensorflow通过计算流图的方式,帮你优化整个session需要执行的代码。
所以placeholder()函数是在神经网络构建graph的时候在模型中的占位,此时并没有把要输入的数据传入模型,它只会分配必要的内存。等建立session,在会话中,运行模型的时候通过feed_dict()函数向占位符喂入数据。
②L2:Y = tf.placeholder(tf.int32)
定义变量Y,下边会用到,其实就是把y_data赋给Y
③L4:y_one_hot = tf.one_hot(Y, 10, 1, 0)
将Y转换成独热编码
在函数gen_one_batch()返回的y_data,print(y_data)为
[[4 ,8 ,8 ,8],
[5 ,0 ,0 ,2],
[7 ,9 ,2 ,7],
[0 ,6 ,0 ,8],
[9 ,3 ,6 ,4],
[3 ,2 ,6 ,5]]
可以理解为Y的数据格式,经tf.one_hot后
import tensorflow as tf
CLASS = 10
label2 = tf.constant(
[[4 ,8 ,8 ,8],
 [5 ,0 ,0 ,2],
 [7 ,9 ,2 ,7],
 [0 ,6 ,0 ,8],
 [9 ,3 ,6 ,4],
 [3 ,2 ,6 ,5]])
sess1=tf.Session()
print('label2:',sess1.run(label2))
b = tf.one_hot(label2,CLASS,1,0)
with tf.Session() as sess:
    sess.run(tf.global_variables_initializer())
    sess.run(b)
    print('after one_hot\n',sess.run(b))
    print('after one_hot\n',sess.run(b).shape)
输出============>
label2: [[4 8 8 8]
 [5 0 0 2]
 [7 9 2 7]
 [0 6 0 8]
 [9 3 6 4]
 [3 2 6 5]]
after one_hot
 [[[0 0 0 0 1 0 0 0 0 0]
  [0 0 0 0 0 0 0 0 1 0]
  [0 0 0 0 0 0 0 0 1 0]
  [0 0 0 0 0 0 0 0 1 0]]

 [[0 0 0 0 0 1 0 0 0 0]
  [1 0 0 0 0 0 0 0 0 0]
  [1 0 0 0 0 0 0 0 0 0]
  [0 0 1 0 0 0 0 0 0 0]]

 [[0 0 0 0 0 0 0 1 0 0]
  [0 0 0 0 0 0 0 0 0 1]
  [0 0 1 0 0 0 0 0 0 0]
  [0 0 0 0 0 0 0 1 0 0]]

 [[1 0 0 0 0 0 0 0 0 0]
  [0 0 0 0 0 0 1 0 0 0]
  [1 0 0 0 0 0 0 0 0 0]
  [0 0 0 0 0 0 0 0 1 0]]

 [[0 0 0 0 0 0 0 0 0 1]
  [0 0 0 1 0 0 0 0 0 0]
  [0 0 0 0 0 0 1 0 0 0]
  [0 0 0 0 1 0 0 0 0 0]]

 [[0 0 0 1 0 0 0 0 0 0]
  [0 0 1 0 0 0 0 0 0 0]
  [0 0 0 0 0 0 1 0 0 0]
  [0 0 0 0 0 1 0 0 0 0]]]
after one_hot
 (6, 4, 10)
3.2、构建CNN卷积神经网络
接下来部分是此项目的重头戏CNN卷积网络,此次使用了三层卷积层,一个全连接层,关于CNN的原理详解,网上已有很多前辈讲解的很详细到位,此处就不再赘述。重点是介绍以下代码中每个函数的使用及作用
def net(w_alpha=0.01, b_alpha=0.1):
    conv2d_size = 3      ## 卷积核大小
    featuremap_num1 = 32 ## 卷积层1输出的featuremap的数量
    featuremap_num2 = 64 ## 卷积层2输出的featuremap的数量
    featuremap_num3 = 64 ## 卷积层3输出的featuremap的数量

    strides_conv2d1 = [1, 1, 1, 1] ##卷积层1的卷积步长
    strides_conv2d2 = [1, 1, 1, 1] ##卷积层2的卷积步长
    strides_conv2d3 = [1, 1, 1, 1] ##卷积层3的卷积步长

    strides_pool1   = [1, 2, 2, 1] ## 卷积层1的池化步长
    strides_pool2   = [1, 2, 2, 1] ## 卷积层2的池化步长
    strides_pool3   = [1, 2, 2, 1] ## 卷积层3的池化步长

    ksize_pool1     = [1, 2, 2, 1] ## 卷积层1的池化size
    ksize_pool2     = [1, 2, 2, 1] ## 卷积层2的池化size
    ksize_pool3     = [1, 2, 2, 1] ## 卷积层3的池化size

    neuron_num      = 1024         ## 神经元数量

    FC_dim1         = float(img_height)/(strides_pool1[1]*strides_pool2[1]*strides_pool3[1])
    FC_dim2         = float(img_width) /(strides_pool1[2]*strides_pool2[2]*strides_pool3[2])
    FC_dim          = int(round(FC_dim1) * round(FC_dim2) * featuremap_num3)

    ## -1代表先不考虑输入的图片有多少张,1是channel的数量
    x_reshape = tf.reshape(X,shape = [-1, img_height, img_width, 1])

    ## 构建卷积层1
    w_c1 = tf.Variable(w_alpha * tf.random_normal([conv2d_size, conv2d_size, 1, featuremap_num1])) # 卷积核3*3,1个channel,32个卷积核,形成32个featuremap
    b_c1 = tf.Variable(b_alpha * tf.random_normal([featuremap_num1])) # 16个featuremap的偏置
    conv1 = tf.nn.relu(tf.nn.bias_add(tf.nn.conv2d(x_reshape, w_c1, strides=strides_conv2d1, padding='SAME'), b_c1))
    conv1 = tf.nn.max_pool(conv1, ksize=ksize_pool1, strides=strides_pool1, padding='SAME')
    conv1 = tf.nn.dropout(conv1, keep_prob)

    ## 构建卷积层2
    w_c2 = tf.Variable(w_alpha * tf.random_normal([conv2d_size, conv2d_size, featuremap_num1, featuremap_num2])) # 注意这里channel值是32
    b_c2 = tf.Variable(b_alpha * tf.random_normal([featuremap_num2]))
    conv2 = tf.nn.relu(tf.nn.bias_add(tf.nn.conv2d(conv1, w_c2, strides=strides_conv2d1, padding='SAME'), b_c2))
    conv2 = tf.nn.max_pool(conv2, ksize=ksize_pool2, strides=strides_pool2, padding='SAME')
    conv2 = tf.nn.dropout(conv2, keep_prob)

    ## 构建卷积层3
    w_c3 = tf.Variable(w_alpha * tf.random_normal([conv2d_size, conv2d_size, featuremap_num2, featuremap_num3]))
    b_c3 = tf.Variable(b_alpha * tf.random_normal([featuremap_num3]))
    conv3 = tf.nn.relu(tf.nn.bias_add(tf.nn.conv2d(conv2, w_c3, strides=strides_conv2d1, padding='SAME'), b_c3))
    conv3 = tf.nn.max_pool(conv3, ksize=ksize_pool3, strides=strides_pool3, padding='SAME')
    conv3 = tf.nn.dropout(conv3, keep_prob)

    ## 构建全连接层,这个全连接层的输出才是最后要提取的特征
    w_d = tf.Variable(w_alpha * tf.random_normal([FC_dim, neuron_num]))   # 1024个神经元
    b_d = tf.Variable(b_alpha * tf.random_normal([neuron_num]))
    dense = tf.reshape(conv3, [-1, w_d.get_shape().as_list()[0]])
    dense = tf.nn.relu(tf.add(tf.matmul(dense, w_d), b_d))

    ## 输出层
    w_out = tf.Variable(w_alpha * tf.random_normal([neuron_num, 4 * 10]))  # 40个神经元
    b_out = tf.Variable(b_alpha * tf.random_normal([4 * 10]))
    out = tf.add(tf.matmul(dense, w_out), b_out)
    out = tf.reshape(out, (-1, 4, 10))
    return out
代码说明:
①L2~L19:定义卷积用到的参数,每个参数的含义–别急–往下看
②L21~L23:原图片在经过卷积后,其size会有变化,那么三层卷积前后图片size的变化是怎样的???
答案在后边
③L26:x_reshape = tf.reshape(X,shape = [-1, img_height, img_width, 1])
tf.reshape(),将X reshape,-1代表先不考虑输入的图片有多少张,1是channel的数量(如果是RGB图片,则channel为3) 。经过gen_one_batch()返回的x_data(X),其shape=(64, 24, 60, 1)
⑤L29:w_c1 = tf.Variable(w_alpha * tf.random_normal([conv2d_size, conv2d_size, 1, featuremap_num1]))
⑤-1其中在前边定义了
conv2d_size = 3 ## 卷积核大小
featuremap_num1 = 32 ## 卷积层1输出的featuremap的数量
因此卷积核size为3*3,1个channel,32个卷积核,形成32个featuremap(一个卷积核生成一个featuremap)
⑤-2:tf.random_normal(shape, mean=0.0, stddev=1.0, dtype=tf.float32, seed=None, name=None)函数用于从服从指定正太分布的数值中取出指定个数的值· shape: 输出张量的形状,必选
· mean: 正态分布的均值,默认为0
· stddev: 正态分布的标准差,默认为1.0
· dtype: 输出的类型,默认为tf.float32
· seed: 随机数种子,是一个整数,当设置之后,每次生成的随机数都一样
· name: 操作的名称
⑤-3:tf.Variable(initializer,name)定义图变量
- initializer是初始化参数
- name是可自定义的变量名称
tf.Variable(w_alpha * tf.random_normal([5, 5, 1, 32]))定义的图变量的属性:卷积核5*5,1个channel,32个卷积核,形成32个featuremap(32个输出)
⑥L30:b_c1 = tf.Variable(b_alpha * tf.random_normal([featuremap_num1]))
生成偏执,要和w_c1相加
⑦L31:tf.nn.relu(tf.nn.bias_add(tf.nn.conv2d(x_reshape, w_c1, strides=[1, 1, 1, 1], padding=‘SAME’), b_c1))
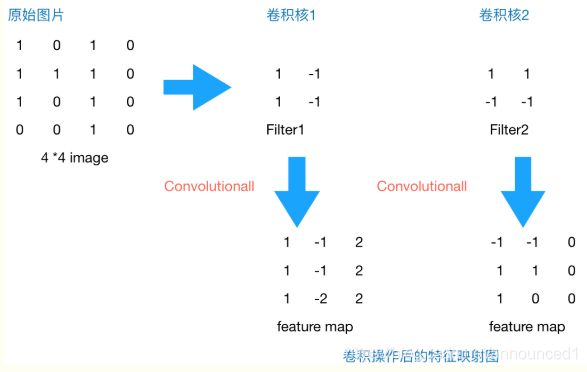
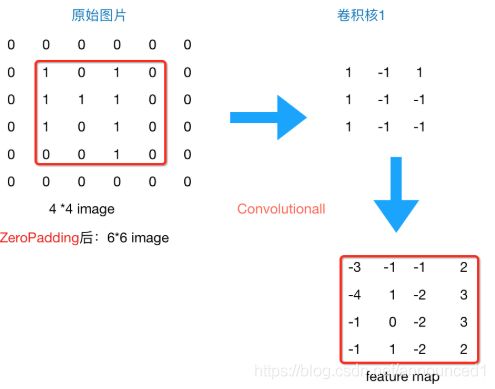
⑦-1:tf.nn.conv2d是TensorFlow的2维卷积函数,x_reshape和w_c1都是4-D的tensors。x_reshape是输入input,shape=[batch,in_height, in_width, in_channels];w_c1是卷积的参数filter / kernel,shape=[filter_height, filter_width, in_channels,out_channels]。strides参数是长度为4的1-D参数,代表了卷积核(滑动窗口)移动的步长,其中对于图片strides[0]和strides[3]必须是1,都是1表示不遗漏地划过图片的每一个点。padding参数中SAME代表给边界加上Padding让卷积的输出和输入保持相同的尺寸。
假如原图片为4x4,经过2x2卷积后输出的featuremap为3x3,如下图过程

padding='SAME’表示在原图片周围补0,卷积后featuremap与原图像具有相同size

通常情况下,我们希望图片做完卷积操作后保持图片大小不变(strides=[1, 1, 1, 1]),所以我们一般会选择尺寸为3x3的卷积核和1的补0,或者5x5的卷积核与2的补零,这样通过计算后,可以保留图片的原始尺寸。那么补零后的feature_map尺寸 =( image_width + 2 * 补零的size - 卷积核size)/stride + 1
⑦-2:tf.nn.bias_add()将偏执加到卷积后的输出上,其实也有博主做法是不用这个函数,直接相加就可以
⑦-3:tf.nn.relu(features, name=None)线性整流激活函数,一般features会是(卷积核,图像)的卷积后加上bias

relu函数的作用就是增加了神经网络各层之间的非线性关系,否则,如果没有激活函数,输出层与输入层之间是简单的线性关系,每层都相当于矩阵相乘,这样就不能够完成我们需要神经网络完成的复杂任务。
⑧L32:conv1 = tf.nn.max_pool(conv1, ksize=ksize_pool1, strides=strides_pool1, padding=‘SAME’)
⑧-1 tf.nn.max_pool()
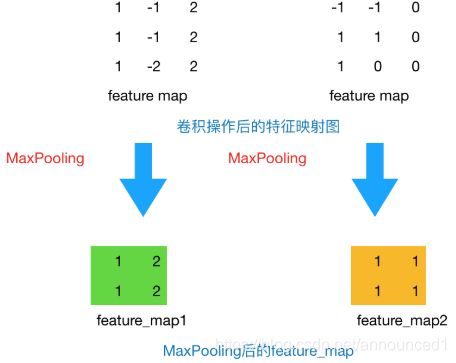
池化方法一般有一下两种,此项目选择第一种
ksize_pool1 = [1, 2, 2, 1] ## 卷积层1的池化size
strides_pool1 = [1, 2, 2, 1] ## 卷积层1的池化步长
conv1是4-D的输入tensor,shape=[batch, height, width, channels],ksize参数表示池化窗口的大小,取一个4维向量,一般是[1, height, width, 1],因为我们不想在batch和channels上做池化,所以这两个维度设为了1,strides与tf.nn.conv2d相同,strides=[1, 2, 2, 1]可以缩小图片尺寸。padding参数也参见tf.nn.conv2d。
⑨L33:tf.nn.dropout(conv1, keep_prob)
为了减轻过拟合,使用一个Dropout层,在训练时随机(keep_prob)丢弃部分节点的数据减轻过拟合,在预测的时候保留全部数据来追求最好的测试性能。
⑩L50:w_d = tf.Variable(w_alpha * tf.random_normal([FC_dim, neuron_num]))全连接层
现在解释FC_dim的计算方法,在本项目中原图片大小为60x160,经过三层卷积后,由于其步长strides_conv2d= [1, 1, 1, 1],因此卷积计算不会改变原图片的size,但是池化计算时的步长strides_pool = [1, 2, 2, 1],也就是是说经过池化后,图片size 输出 = 输入/2 ,因此三成池化后图片height = 60 / 2^3 = 8 , 图片宽 width = 160/2^3 = 20 , 每次取64张图片用于训练(batch_size) , 因此就有了上边计算方法
FC_dim1         = float(img_height)/(strides_pool1[1]*strides_pool2[1]*strides_pool3[1])
FC_dim2         = float(img_width) /(strides_pool1[2]*strides_pool2[2]*strides_pool3[2])
FC_dim          = int(round(FC_dim1) * round(FC_dim2) * featuremap_num3)
至此,CNN的核心部分,卷积网络层计算完毕!!!
3.3、执行训练
def train():

    batch_size_train = 64  ## 一个训练batch的数量
    batch_size_test  = 100 ## 一个测试batch的数量

    print('开始执行训练')

    cnn = net()
    # loss = tf.reduce_mean(tf.nn.softmax_cross_entropy_with_logits(logits=cnn, labels=y_one_hot))
    loss = tf.reduce_mean(tf.nn.sigmoid_cross_entropy_with_logits(logits=cnn, labels=y_one_hot))
    # optimizer 为了加快训练 learning_rate应该开始大,然后慢慢衰
    optimizer = tf.train.AdamOptimizer(learning_rate=0.001).minimize(loss)

    predict = net()
    max_idx_p = tf.argmax(predict, 2)  ## 通过argmax返回的index可得出识别的图片的字符值
    max_idx_l = tf.argmax(tf.reshape(y_one_hot, [-1, MAX_CAPTCHA, CHAR_SET_LEN]), 2)
    correct_pred = tf.equal(max_idx_p, max_idx_l)
    accuracy = tf.reduce_mean(tf.cast(correct_pred, tf.float32))

    saver = tf.train.Saver()
    with tf.Session() as sess:
        step = 0
        sess.run(tf.global_variables_initializer())
        saver = tf.train.import_meta_graph('pandas10000/-5000.meta')
        saver.restore(sess,tf.train.latest_checkpoint('./pandas10000'))
        while True:
            x_data, y_data = gen_one_batch(batch_size_train)
            loss_, cnn_, y_one_hot_, optimizer_ = sess.run([loss, cnn, y_one_hot, optimizer],
                                                           feed_dict={Y: y_data, X: x_data, keep_prob: 0.75})
            print('step: %4d, loss: %.4f' % (step, loss_))

            ## 每1w步保存一次
            if step % 10000 == 0:
            	saver.save(sess, "pandas10000/", global_step=step)

            # 每100 step计算一次准确率
            if 0 == (step % 100):
                x_data, y_data = gen_one_batch(batch_size_test)
                acc = sess.run(accuracy, feed_dict={X: x_data, Y: y_data, keep_prob: 1.0})
                print('准确率计算:step: %4d, accuracy: %.4f' % (step, acc))
                if acc > 0.99:
                    saver.save(sess, "tmp/", global_step=step)
                    print("训练完成,模型保存成功!")
                    break
            step += 1
3.4、用测试数据集进行测试
## 获取最新的训练结果
def get_latest_meta():
    import re
    import os
    import numpy as np
    pattern = re.compile('-(\d+).meta')
    temp = []
    meta_list = os.listdir('./pandas10000')
    for file in meta_list:
        tar = pattern.findall(file)
        if len(tar) == 0:
            tar = [0]
        temp.append(int(tar[0]))
    print(meta_list[np.argmax(temp)])
    return meta_list[np.argmax(temp)]

def train():

    batch_size_train = 64  ## 一个训练batch的数量
    batch_size_test  = 100 ## 一个测试batch的数量

    print('开始执行训练')

    cnn = net()
    # loss = tf.reduce_mean(tf.nn.softmax_cross_entropy_with_logits(logits=cnn, labels=y_one_hot))
    loss = tf.reduce_mean(tf.nn.sigmoid_cross_entropy_with_logits(logits=cnn, labels=y_one_hot))
    # optimizer 为了加快训练 learning_rate应该开始大,然后慢慢衰
    optimizer = tf.train.AdamOptimizer(learning_rate=0.001).minimize(loss)

    predict = net()
    max_idx_p = tf.argmax(predict, 2)  ## 通过argmax返回的index可得出识别的图片的字符值
    max_idx_l = tf.argmax(tf.reshape(y_one_hot, [-1, MAX_CAPTCHA, CHAR_SET_LEN]), 2)
    correct_pred = tf.equal(max_idx_p, max_idx_l)
    accuracy = tf.reduce_mean(tf.cast(correct_pred, tf.float32))
	latest_meta = get_latest_meta()
    saver = tf.train.Saver()
    with tf.Session() as sess:
        step = 0
        tf.global_variables_initializer().run()
        sess.run(tf.global_variables_initializer())
        saver = tf.train.import_meta_graph('pandas10000/'+latest_meta)
        saver.restore(sess,tf.train.latest_checkpoint('./pandas10000'))

        while True:
            x_data, y_data = gen_one_batch(batch_size_train)
            loss_, cnn_, y_one_hot_, optimizer_ = sess.run([loss, cnn, y_one_hot, optimizer],
                                                           feed_dict={Y: y_data, X: x_data, keep_prob: 0.75})
            print('step: %4d, loss: %.4f' % (step, loss_))

            ## 每1w步保存一次
			if step % 10000 == 0:
				saver.save(sess, "pandas10000/", global_step=step)

            # 每100 step计算一次准确率
            if 0 == (step % 100):
                x_data, y_data = gen_one_batch(batch_size_test)
                acc = sess.run(accuracy, feed_dict={X: x_data, Y: y_data, keep_prob: 1.0})
                print('准确率计算:step: %4d, accuracy: %.4f' % (step, acc))
                if acc > 0.99:
                    saver.save(sess, "tmp/", global_step=step)
                    print("训练完成,模型保存成功!")
                    break
            step += 1
代码说明:
①L26:loss = tf.reduce_mean(tf.nn.sigmoid_cross_entropy_with_logits(logits=cnn, labels=y_one_hot))
对于给定的logits计算sigmoid的交叉熵,sigmoid_cross_entropy_with_logits适用于分类的类别之间不是相互排斥的场景,即多个标签。
②L28:optimizer = tf.train.AdamOptimizer(learning_rate=0.001).minimize(loss)
optimizer 为了加快训练 learning_rate应该开始大,然后慢慢衰减。
③L31:max_idx_p = tf.argmax(predict, 2)
CNN的返回值predict,shape = = (batch_size , 4 , 10),通过tf.argmax()返回独热编码中on_value的index,该index即为预测的结果.

④L32:max_idx_l = tf.argmax(tf.reshape(y_one_hot, [-1, MAX_CAPTCHA, CHAR_SET_LEN]), 2)
处理思想和L15相同
⑤L33:correct_pred = tf.equal(max_idx_p, max_idx_l)
max_idx_p:预测结果
max_idx_l:标签
判断max_idx_p和max_idx_l对应元素是否相等,相等返回True,不等返回False
⑥L34:accuracy = tf.reduce_mean(tf.cast(correct_pred, tf.float32))
由L17算出的correct_pred,相等为1,不等为0,则均值即为正确率。
⑦L35:找到最后一次训练的meta文件,用于恢复并继续上次的训练
latest_meta = get_latest_meta()
⑧L36:saver = tf.train.Saver()
实例化一个saver,用于保存训练model
⑧L23:tf.global_variables_initializer().run()
初期化所有tensorfolw定义的变量
⑨L39:loss_, cnn_, y_one_hot_, optimizer_ = sess.run([loss, cnn, y_one_hot, optimizer],feed_dict={Y: y_data, X: x_data, keep_prob: 0.75})
计算loss,cnn,y_one_hot,optimizer
实际计算中遇到的变量,用feed_dict中的值替换。
⑩L50:每1w步保存一次
切记切记切记!!!一定要及时保存训练结果。
深度学习的训练过程都会很长时间,如果不及时保存,中间遇到任何情况需要重新跑时,都需要从头开始。这种情况不知道会有多少根大肠够悔青。
及时保存中间训练结果,可以在断开的地方接着跑
4、总结
此项目的目的主要是练习Tensorflow框架的用法及CNN的训练方法。通过学习前辈们的讲解,自己慢慢摸索,中间遇到很多坑,也有很多不懂的地方,查了很多资料,现在总算搞出来了,凌晨3:30 。
结果测试:
在训练数据集上
1、达到50%以上成功率需要6100个批次,大约610K张图片
2、达到98%以上成功率需要320000个批次,大约3.2kw张图片
源码URL:
自动生成验证码:https://github.com/announce1/captcha_recognize/tree/master/capth_recog.py
训练CNN,验证码识别:https://github.com/announce1/captcha_recognize/tree/master/genyzm.py
5、参考链接
参考了很多前辈的优秀博文,在此列举几位比较帮助的博文
【1】https://blog.csdn.net/huplion/article/details/72490467
【2】https://blog.csdn.net/sushiqian/article/details/78305340
【3】https://www.cnblogs.com/qggg/p/6832342.html
【4】http://www.mamicode.com/info-detail-1666278.html
【5】https://www.jb51.net/article/136131.htm
【6】https://www.cnblogs.com/charlotte77/p/7759802.html
【7】https://zhuanlan.zhihu.com/p/34354086
【8】http://caffecn.cn/?/question/158
