SSM整合
SSM整合
经过一段时间的学习,MyBatis、Spring、SpringMVC已经告一段落,下面将根据学习的内容,进行整合,制作一个最基础的SSM网站后端结构
下面是构建其的步骤:
一、构建数据库表
二、建立项目,导入所需依赖
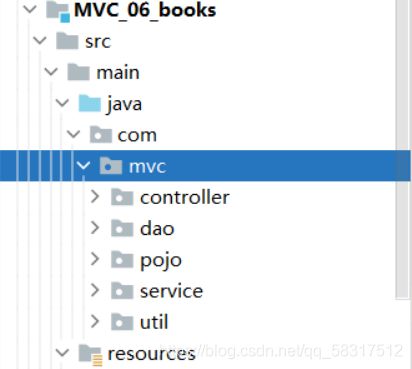
三、建立MVC层次结构
- dao层——操作数据库
- service层——业务逻辑层,调用dao层,被controller调用,用于书写业务
- controller层——控制层,负责页面跳转,数据传输
- pojo——存放表的实体类
- util——工具层
- 。。。。。。
四、建立数据库表对应的实体类
五、配置文件
1.web.xml
作用:
(1)用于拦截前端发来的请求,转发至前端控制器——DispatcherServlet,并配置其加载优先级、关联的配置文件
(2)设置spring内置的过滤器
<web-app xmlns="http://xmlns.jcp.org/xml/ns/javaee"
         xmlns:xsi="http://www.w3.org/2001/XMLSchema-instance"
         xsi:schemaLocation="http://xmlns.jcp.org/xml/ns/javaee http://xmlns.jcp.org/xml/ns/javaee/web-app_4_0.xsd"
         version="4.0">
    <servlet>
        <servlet-name>springmvcservlet-name>
        <servlet-class>org.springframework.web.servlet.DispatcherServletservlet-class>
        <init-param>
            <param-name>contextConfigLocationparam-name>
            <param-value>classpath:applicationContext.xmlparam-value>
        init-param>
        <load-on-startup>1load-on-startup>
    servlet>
    <servlet-mapping>
        <servlet-name>springmvcservlet-name>
        <url-pattern>/url-pattern>
    servlet-mapping>


    <filter>
        <filter-name>encodingfilter-name>
        <filter-class>org.springframework.web.filter.CharacterEncodingFilterfilter-class>
        <init-param>
            <param-name>encodingparam-name>
            <param-value>utf-8param-value>
        init-param>
    filter>
    <filter-mapping>
        <filter-name>encodingfilter-name>
        <url-pattern>/*url-pattern>
    filter-mapping>
web-app>
2.applicationContext.xml
作用:
- mvc:annotation-driven默认会帮我们注册两个类:DefaultAnnotationHandlerMapping 和
AnnotationMethodHandlerAdapter,分别为HandlerMapping的实现类和HandlerAdapter的实现类
HandlerMapping:手动注册bean:识别id;扫描包注册:识别@RequestMapping 注解;并注册到请求映射表
HandlerAdapter:处理请求的适配器,确定调用哪个类的哪个方法,并且构造方法参数,返回值
- mvc:default-servlet-handler:对于所有对静态资源的请求全部不进行处理
- context:component-scan:扫描包,将扫描到的组件注册到spring容器中
- InternalResourceViewResolver: 视图解析器,跳转加前缀和后缀(重定向和请求转发不走试图解析器)
<beans xmlns="http://www.springframework.org/schema/beans"
       xmlns:xsi="http://www.w3.org/2001/XMLSchema-instance"
       xmlns:context="http://www.springframework.org/schema/context"
       xmlns:mvc="http://www.springframework.org/schema/mvc"
       xsi:schemaLocation="http://www.springframework.org/schema/beans
        http://www.springframework.org/schema/beans/spring-beans.xsd
        http://www.springframework.org/schema/context
        http://www.springframework.org/schema/context/spring-context.xsd
        http://www.springframework.org/schema/mvc
        http://www.springframework.org/schema/mvc/spring-mvc.xsd">

    <context:component-scan base-package="com.mvc.controller"/>

    <mvc:annotation-driven/>

    <mvc:default-servlet-handler/>

    <bean id="viewResolver" class="org.springframework.web.servlet.view.InternalResourceViewResolver">
        <property name="prefix" value="/WEB-INF/jsp/"/>
        <property name="suffix" value=".jsp"/>
    bean>
beans>
3.db.properties、spring-dao.xml
(1)数据库连接配置文件
jdbc.driver=com.mysql.jdbc.Driver
jdbc.url=jdbc:mysql://localhost:3306/mvcbooks?useSSL=true&userUnicode=true&characterEncoding=utf-8
jdbc.username=root
jdbc.password=123456
(2)dao层配置文件
引入外部资源文件、加载c3p0连接池(也可用JDBC)生成SqlSessionFactory,通过自动注入的方式,动态注入到dao层的指定Mapper文件中
<beans xmlns="http://www.springframework.org/schema/beans"
       xmlns:xsi="http://www.w3.org/2001/XMLSchema-instance"
       xmlns:context="http://www.springframework.org/schema/context"
       xmlns:mvc="http://www.springframework.org/schema/mvc"
       xsi:schemaLocation="http://www.springframework.org/schema/beans
        http://www.springframework.org/schema/beans/spring-beans.xsd
        http://www.springframework.org/schema/context
        http://www.springframework.org/schema/context/spring-context.xsd
        http://www.springframework.org/schema/mvc
        http://www.springframework.org/schema/mvc/spring-mvc.xsd">

    <context:property-placeholder location="db.properties"/>

    <bean id="dataSource" class="com.mchange.v2.c3p0.ComboPooledDataSource">
        <property name="driverClass" value="jdbc.driver"/>
        <property name="jdbcUrl" value="jdbc.url"/>
        <property name="user" value="jdbc.username"/>
        <property name="password" value="jdbc.password"/>

        <property name="maxPoolSize" value="50"/>
        <property name="minPoolSize" value="5"/>
    bean>

    <bean id="bean" class="org.mybatis.spring.SqlSessionFactoryBean">

        <property name="dataSource" ref="dataSource"/>

        <property name="configLocation" value="classpath:mybatis-config.xml"/>
    bean>


    <bean id="mapperScannerConfigurer" class="org.mybatis.spring.mapper.MapperScannerConfigurer">

        <property name="sqlSessionFactoryBeanName" value="bean">property>

        <property name="basePackage" value="com.mvc.dao"/>
    bean>
beans>
4.mybatis-config.xml
可使用spring配置文件完全替代,但为使其层次分明,在此配置这几项专用配置
DOCTYPE configuration
        PUBLIC "-//mybatis.org//DTD Config 3.0//EN"
        "http://mybatis.org/dtd/mybatis-3-config.dtd">
<configuration>

    <settings>

        <setting name="cacheEnabled" value="true"/>
    settings>

    <typeAliases>
        <package name="com.mvc.pojo"/>
    typeAliases>

    <mappers>
        <mapper class="com.mvc.dao.UserMapper"/>
    mappers>
configuration>
5.spring-service.xml
<beans xmlns="http://www.springframework.org/schema/beans"
       xmlns:xsi="http://www.w3.org/2001/XMLSchema-instance"
       xmlns:context="http://www.springframework.org/schema/context"
       xsi:schemaLocation="http://www.springframework.org/schema/beans
        http://www.springframework.org/schema/beans/spring-beans.xsd
        http://www.springframework.org/schema/context
        http://www.springframework.org/schema/context/spring-context.xsd">


    <context:component-scan base-package="com.mvc.service"/>
beans>
六、后端业务建立
顺序:从底层忘高层进行编写
1.Dao层:Mapper接口、Mapper查询语句
DOCTYPE mapper
        PUBLIC "-//mybatis.org//DTD Config 3.0//EN"
        "http://mybatis.org/dtd/mybatis-3-mapper.dtd">
<mapper namespace="com.mvc.dao.UserMapper">
    <select id="selectAll" resultType="user">
        select * from `user`;
    select>

    <select id="selectOne" resultType="user">
        select `user_name`,`password` from `user` where `user_name`=#{userName};
    select>
mapper>
public interface UserMapper {

    //查询单个用户
    User selectOne(@Param("userName") String name);
}
2.service层,编写业务逻辑
@Service
public class UserServiceImpl implements UserService {

    @Autowired
    UserMapper userMapper;
    @Override
    public User selectOne(String name) {

        return userMapper.selectOne(name);
    }
}
3.controller层/测试
controller层可以使用注解@autowird,自动注入UserServiceImpl进行使用
@Controller
public class Test {

    @Autowired
    UserService userService;
    @RequestMapping("/test")
    public String test(@RequestParam("username") String name,Model model){

        ......
    }
}
测试类使用ApplicationContext从容器中取出对象
public class Testt {

    @Test
    public void test01(){

        ApplicationContext ioc = new ClassPathXmlApplicationContext("applicationContext.xml");
        BooksService bean = ioc.getBean("booksServiceImpl", BooksService.class);
		......
    }
}
至此,整合完成
总结:SSM框架极大的简化了我们开发一个网站的流程,其建立的基础,Mybatis、Spring、SpringMVC
优点:简化开发
