Docker + Webhook 从零实现前端自动化部署
作者:yeyan1996
https://juejin.im/post/5ef4c7eff265da230b52dfc5
前言
得益于 node 的横空出世以及前端工程化的兴起,无论是开发模式,还是开发框架,前端生态链都产生了翻天覆地的变化,与此同时前端慢慢开始向其他领域探索,项目部署就是其中一个领域
在刀耕火种的时代,当执行 npm run build 将生成产物交给运维后,前端的任务就算完成了,运维同学在生产服务器上将产物的路径写入 nginx 配置文件,至此完成了“简单”的部署
随着项目的不断迭代,前端开始发现问题的严重性,每次都需要耗费大量的时间在打包上,开发5分钟,打包半小时的情况屡见不鲜,另外开发者自身环境的差异会导致最终的产物也有不同
但办法总比困难多,例如可以将打包操作放到远端服务器上,又比如可以将上述流程结合 git 仓库实现自动部署
本着不设边界的“字节范”,本文将从零开始,实现前端自动化部署流程,打开项目部署的“黑盒”
涉及技术栈如下:
docker
node
pm2
shell
webhook
文章中的命令大部分为 linux 命令,本地是 windows 系统的读者请使用 git bash
介绍 docker
着手开发前,先介绍这次的主角 docker

什么是 docker
简而言之,docker 可以灵活的创建/销毁/管理多个“服务器”,这些“服务器”被称为 容器 (container)
在容器中你可以做任何服务器可以做的事,例如在有 node 环境的容器中运行 npm run build 打包项目,在有 nginx 环境的容器中部署项目,在有 mysql 环境的容器中做数据存储等等
一旦服务器安装了 docker ,就可以自由创建任意多的容器,上图中 docker 的 logo 形象的展示了它们之间的关系,????就是 docker,上面的一个个集装箱就是容器
安装 docker
为了方便本地调试,可以先在本地安装 docker
Mac:https://download.docker.com/mac/stable/Docker.dmg
Windows:https://download.docker.com/win/stable/Docker%20for%20Windows%20Installer.exe
Linux:https://get.docker.com/
下载安装完毕后,点击 docker 图标启动 docker,此时在终端中就可以使用 docker 相关的操作

出现以下情况,检查 docker 应用程序是否正常启动
docker: Cannot connect to the Docker daemon at unix:///var/run/docker.sock. Is the docker daemon running?.
基本概念
docker 有三个重要的概念
镜像(image)
容器(container)
仓库(repository)
如果把容器比作轻量的服务器,那么镜像就是创建它的模版,一个 docker 镜像可以创建多个容器,它们的关系好比 JavaScript 中类和实例的关系
有两种方式获取镜像
Dockerfile 文件创建而成
直接使用 dockerHub 或者其他仓库上现有的镜像

Dockerfile
Dockerfile 是一个配置文件,类似 .gitlab-ci.yml/package.json,定义了如何生成镜像
尝试用 Dockerfile 创建 docker 镜像
创建文件
首先创建一个 hello-docker 目录,在目录中创建 index.html 和 Dockerfile 文件
Hello docker
# Dockerfile
FROM nginx
COPY index.html /usr/share/nginx/html/index.html
EXPOSE 80
FROM nginx:基于官方 nginx 镜像
COPY index.html /usr/share/nginx/html/index.html:将当前目录下 index.html 替换容器中 /usr/share/nginx/html/index.html 文件,
/usr/share/nginx/html是容器中 nginx 默认存放网页文件的目录,访问容器 80 端口会展示该目录下 index.html 文件EXPOSE 80:容器对外暴露 80 端口,主要起声明作用,真实端口映射还需要在创建容器时定义
其他 Dockerfile 配置参考官方文档
此时,你的文件结构应该是
hello-docker
  |____index.html
  |____Dockerfile
创建镜像
在创建 Dockerfile 文件后,在当前目录运行以下命令可以创建一个 docker 镜像
docker build . -t test-image:latest
build:创建 docker 镜像
.:使用当前目录下的 dockerfile 文件
-t:使用 tag 标记版本
test-image:latest:创建名为
test-image的镜像,并标记为 latest(最新)版本
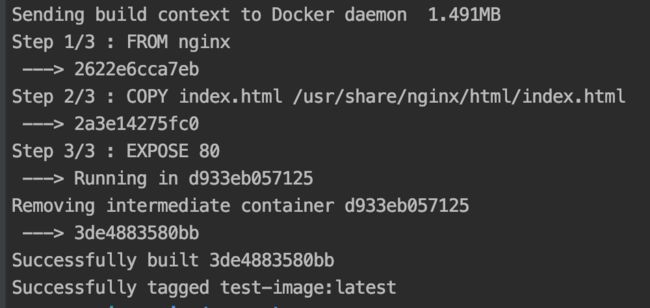
通过 docker images 命令查看所有镜像

创建容器
镜像成功创建后,运行以下命令可以创建一个 docker 容器
docker run -d -p 80:80 --name test-container test-image:latest
run:创建并运行 docker 容器
-d:后台运行容器
80:80:将当前服务器的 80 端口(冒号前的 80),映射到容器的 80 端口(冒号后的 80)
--name:给容器命名,便于之后定位容器
test-image:latest:基于
test-image最新版本的镜像创建容器
通过 docker ps -a 命令查看所有容器
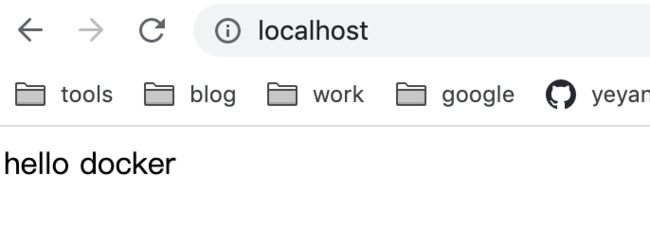
由于本地 80 端口映射到了容器的 80 端口,所以当输入 localhost 时,会显示 index.html 文件内容
dockerHub
如果说 github 是存储代码的仓库,那么 dockerhub 就是存储镜像的仓库
开发者可以将 Dockerfile 生成的镜像上传到 dockerhub 来存储自定义镜像,也可以直接使用官方提供的镜像
docker pull nginx
docker run -d -p 81:80  --name nginx-container nginx
第一步拉取了官方的 nginx 镜像,第二步用基于官方 nginx 镜像创建名为 nginx-container 的容器
由于上一步操作本地 80 端口已经被占用了,这里使用 81 端口映射到容器的 80 端口,访问 localhost:81 可以看到 nginx 启动页面

为什么要用 docker
了解了 docker 的概念和使用方法,接着讲讲为什么要用 docker
有人会问,环境我都可以装在自己的服务器上,为什么还要放在一个个容器里呢?这里列举使用 docker 的几个优点
环境统一
docker 的出现解决了一个世纪难题:在我电脑上明明是好的 :)
开发者可以将开发环境用 docker 镜像上传到 docker 仓库,在生产环境拉取并运行相同的镜像,保持环境一致
docker push yeyan1996/docker-test-image:latest
本地提交名为 docker-test-image 的镜像,镜像名需要加上 dockerhub 账号作为前缀
docker pull yeyan1996/docker-test-image:latest
服务器拉取账号 yeyan1996 下的 docker-test-image 镜像
便于回滚
类似 git,docker 也有版本控制
在创建镜像时可以使用 tag 标记版本,如果某个版本的环境有问题,可以快速回滚到之前版本
环境隔离
使用 docker 可以使你的服务器更干净,构建用到的环境可以都放在容器中
高效并节省资源
相比于真实服务器/虚拟机,容器不包含操作系统,这意味着创建/销毁容器都十分高效
前端自动化部署
介绍完 docker,接着我们从零开始实现前端自动化部署
在没迁移 Docker 之前,若我想更新线上网站中内容时,需要:
本地运行
npm run build生成构建产物将产物通过 ftp 等形式上传到服务器
git push提交代码到仓库
在实现前端自动化部署后:
git push提交代码到仓库服务器自动更新镜像
镜像中自动运行
npm run build生成构建产物服务器自动创建容器
可以发现,实现前端自动化部署后开发者需要做的只是把代码推到仓库,其余的事都可以通过服务器上的自动化脚本完成
云服务器
首先你得有一台服务器吧-。-
由于是个人项目,对云服务器的要求不高,大部分供应商会给新用户白嫖免费试用 1-2 周,这里我选择腾讯云 CentOS 7.6 64位 的操作系统,当然阿里云或其他云服务器也完全 ok
登陆云服务器
熟悉云服务器配置或者不是腾讯云的读者可以跳过这章
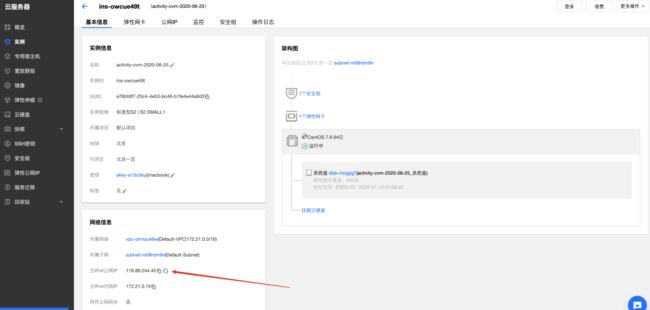
注册相关的操作不细说了,参考供应商教程,随后登陆控制台可以看到当前云服务器的公网 IP,例如下图中服务器的公网 IP 是:118.89.244.45
公网 IP 用于之后 webhook 发送请求的地址
然后我们需要登陆云服务器,本地登陆云服务器的方式一般有两种,密码登陆和 ssh 登陆(或者用 ssh 工具,windows 系统可以用 xhell,macOS 可以用 putty)
前者无需配置,但每次登陆都需要输入账号密码,后者需要注册 ssh 密钥,但之后可以免密登陆云服务器。个人比较喜欢后者,所以先在控制台注册 ssh 密钥
生成密钥的方式同 git,之前生成过的话本地执行以下命令就能查看
less ~/.ssh/id_rsa.pub
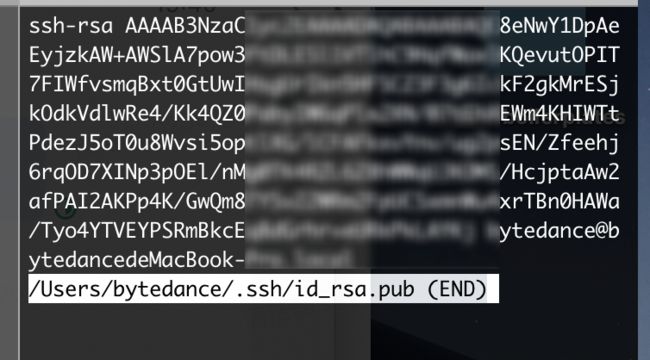
没有生成过密钥本地运行以下命令即可,参考 服务器上的 Git - 生成 SSH 公钥
$ ssh-keygen -o
Generating public/private rsa key pair.
Enter file in which to save the key (/home/schacon/.ssh/id_rsa):
Created directory '/home/schacon/.ssh'.
Enter passphrase (empty for no passphrase):
Enter same passphrase again:
Your identification has been saved in /home/schacon/.ssh/id_rsa.
Your public key has been saved in /home/schacon/.ssh/id_rsa.pub.
The key fingerprint is:
d0:82:24:8e:d7:f1:bb:9b:33:53:96:93:49:da:9b:e3 [email protected]
$ cat ~/.ssh/id_rsa.pub
ssh-rsa AAAAB3NzaCxxxxxxxxxxxxxxxxxxxxxxxxBWDSU
GPl+nafzlHDTYxxxxxxxxxxxxxxxxxxxxxxxxxxxxxxxxxxxPppSwg0cda3
Pbv7kOdJ/MxxxxxxxxxxxxxxxxxxxxxxxxxxxQwdsdMFvSlVK/7XA
t3FaoJoxxxxxxxxxxxxxxxxxxxxx88XypNDvjYNby6vw/Pb0rwert/En
mZ+AW4OZPnTxxxxxxxxxxxxxxxxxxo1d01QraTlMqVSsbx
NrRFi9wrf+M7Q== [email protected]
将生成的公钥放在云服务器控制台图示部分,点击确定
除了注册公钥,还需要将它绑定实例,将实例关机并进行绑定

绑定完成后重新开机,至此就可以在本地通过 ssh 命令登陆云服务器啦
ssh @

安装环境
接着给云服务器安装基础的环境
docker
之前在本地安装了 docker,但云服务器上默认也是没有的,所以需要给它也安装 docker 环境
云服务器安装和本地有些区别,根据 docker 官网 的安装教程,运行以下命令
# Step 1: 安装必要的一些系统工具
sudo yum install -y yum-utils
# Step 2: 添加软件源信息,使用阿里云镜像
sudo yum-config-manager --add-repo http://mirrors.aliyun.com/docker-ce/linux/centos/docker-ce.repo
# Step 3: 安装 docker-ce
sudo yum install docker-ce docker-ce-cli containerd.io
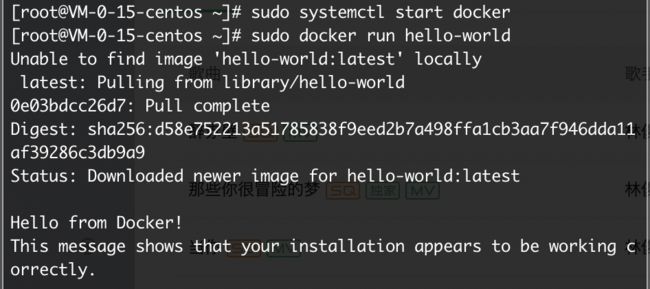
# Step 4: 开启 docker服务
sudo systemctl start docker
# Step 5: 运行 hello-world 项目
sudo docker run hello-world
弹出 Hello from Docker! 证明 Docker 已经成功安装啦~
git
自动化部署涉及到拉取最新的代码,所以需要安装 git 环境
yum install git
由于 SSH 方式还需要在 github 上注册公钥,方便起见,之后会选择 HTTPS 的方式克隆仓库
 image-20200630125450964
node
既然是前端自动化部署,云服务器上相关处理逻辑用 js 编写,所以需要安装 node 环境,这里用 nvm 来管理 node 版本
curl -o- https://raw.githubusercontent.com/nvm-sh/nvm/v0.34.0/install.sh | bash
接着需要将 nvm 作为环境变量
export NVM_DIR="$HOME/.nvm"
[ -s "$NVM_DIR/nvm.sh" ] && \. "$NVM_DIR/nvm.sh"  # This loads nvm
[ -s "$NVM_DIR/bash_completion" ] && \. "$NVM_DIR/bash_completion"  # This loads nvm bash_completion
通过 nvm 安装最新版 node
nvm install node
node 安装完成后,还需要安装 pm2,它能使你的 js 脚本能在云服务器的后台运行

npm i pm2 -g
创建 demo 项目
简单使用 vue-cli 在本地创建项目
vue create docker-test
并将 demo 项目上传到 github,准备配置 webhook
webhook
hook 翻译为“钩子”,还可以理解为“回调”
参考 Vue 生命周期,当组件挂载完成时会触发 mounted 钩子,在钩子中可以编写拉取后端数据,或者渲染页面等回调逻辑,而 github 的 webhook 会在当前仓库触发某些事件时,发送一个 post 形式的 http 请求
当仓库有提交代码时,通过将 webhook 请求地址指向云服务器 IP 地址,云服务器就能知道项目有更新,之后运行相关代码实现自动化部署
配置 webhook
打开 github 的仓库主页,点击右侧 settings


Payload URL:填写云服务器公网 IP,记得添加 http(s) 前缀
Content type:选择 application/json 即发送 json 格式的 post 请求
触发时机:Just the push event,即仓库 push 事件,根据不同的需求还可以选择其他事件,例如 PR,提交 Commit,提交 issues 等
webhook 还可以设置一些鉴权相关的 token,由于是个人项目这里不详细展开了
点击 Add webhook 为当前项目添加一个 webhook,至此,当 docker-test 项目有代码提交时,就会往 http://118.89.244.45:3000 发送一个 post 请求
测试 webhook
配置完成后,可以向仓库提交一个 commit,然后点击最下方可以看到 post 请求参数
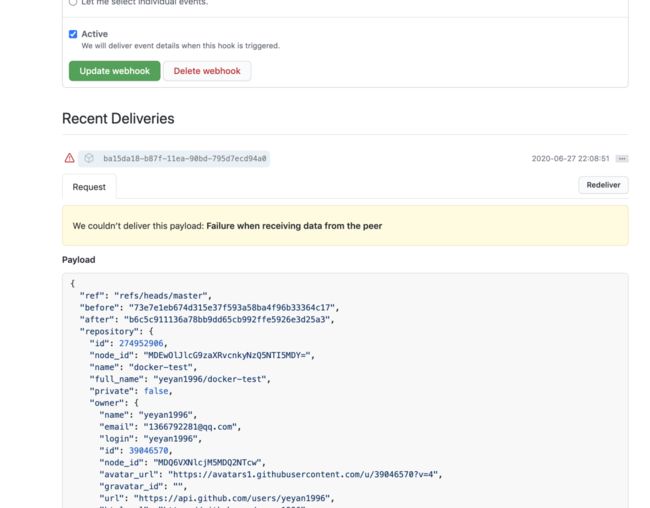
参数主要涉及当前仓库和本地提交的信息,这里我们只用 repository.name 获取更新的仓库名即可
处理项目更新的请求
当云服务器接收到项目更新后发送的 post 请求后,需要创建/更新镜像来实现自动化部署
创建 Dockerfile
先在本地项目里新建一个 Dockerfile 用于之后创建镜像
# dockerfile
# build stage
FROM node:lts-alpine as build-stage
WORKDIR /app
COPY package*.json ./
RUN npm install
COPY . .
RUN npm run build


# production stage
FROM nginx:stable-alpine as production-stage
COPY --from=build-stage /app/dist /usr/share/nginx/html
EXPOSE 80
CMD ["nginx", "-g", "daemon off;"]
逐行解析配置:
FROM node:lts-alpine as build-stage:基于 node
lts-alpine版本镜像,并通过构建阶段命名,将有 node 环境的阶段命名为build-stage(包含 alpine 的镜像版本相比于 latest 版本更加小巧,更适合作为 docker 镜像使用)WORKDIR /app:将工作区设为 /app,和其他系统文件隔离
COPY package*.json ./:拷贝 package.json/package-lock.json 到容器的 /app 目录
RUN npm install:运行
npm install在容器中安装依赖COPY . .:拷贝其他文件到容器 /app 目录,分两次拷贝是因为保持 node_modules 一致
RUN npm run build:运行
npm run build在容器中构建
这里用到了 docker 一个技巧:多阶段构建
将构建分为两个阶段,第一阶段基于 node 镜像,第二阶段基于 nginx 镜像
FROM nginx:lts-alpine as production-stage:基于 nginx
stable-alpine版本镜像,并将有 nginx 环境的阶段命名为production-stageCOPY --from=build-stage /app/dist /usr/share/nginx/html:通过 --form 参数可以引用
build-stage阶段生成的产物,将其复制到 /usr/share/nginx/htmlEXPOSE 80:容器对外暴露 80 端口
CMD ["nginx", "-g", "daemon off;"]:容器创建时运行
nginx -g daemon off命令,一旦 CMD 对应的命令结束,容器就会被销毁,所以通过 daemon off 让 nginx 一直在前台运行
最后通过 scp 命令,将 Dockerfile 文件复制到云服务器上
scp ./Dockerfile [email protected]:/root
创建 .dockerignore
类似 .gitignore,.dockerignore 可以在创建镜像复制文件时忽略复制某些文件
本地项目里新建 .dockerignore
# .dockerignore
node_modules
由于需要保持本地和容器中 node_module 依赖包一致,在创建 Dockerfile 时用了两次 COPY 命令
第一次只复制 package.json 和 package-lock.json,并安装依赖
第二次复制除 node_modules的所有文件
接着将 .dockerignore 文件也复制到云服务器上
scp ./.dockerignore [email protected]:/root
创建 http 服务器
由于我们是前端开发,这里使用 node 开启一个简单的 http 服务器处理 webhook 发送的 post 请求
本地项目里新建 index.js
const http = require("http")


http.createServer((req, res) => {
    console.log('receive request')
    console.log(req.url)
    if (req.method === 'POST' && req.url === '/') {
        //...
    }
    res.end('ok')
}).listen(3000,()=>{
    console.log('server is ready')
})
拉取仓库代码
当项目更新后,云服务器需要先拉取仓库最新代码
const http = require("http")
+ const {execSync} = require("child_process")
+ const path = require("path")
+ const fs = require("fs")


+ // 递归删除目录
+ function deleteFolderRecursive(path) {
+    if( fs.existsSync(path) ) {
+        fs.readdirSync(path).forEach(function(file) {
+            const curPath = path + "/" + file;
+            if(fs.statSync(curPath).isDirectory()) { // recurse
+                deleteFolderRecursive(curPath);
+            } else { // delete file
+                fs.unlinkSync(curPath);
+            }
+        });
+        fs.rmdirSync(path);
+    }
+ }


+ const resolvePost = req =>
+    new Promise(resolve => {
+     let chunk = "";
+        req.on("data", data => {
+            chunk += data;
+        });
+        req.on("end", () => {
+         resolve(JSON.parse(chunk));
+     });
+    });


http.createServer(async (req, res) => {
    console.log('receive request')
    console.log(req.url)
    if (req.method === 'POST' && req.url === '/') {
+     const data = await resolvePost(req);
+     const projectDir = path.resolve(`./${data.repository.name}`)
+     deleteFolderRecursive(projectDir)


+  // 拉取仓库最新代码
+    execSync(`git clone https://github.com/yeyan1996/${data.repository.name}.git ${projectDir}`,{
+       stdio:'inherit',
+   })
}
    res.end('ok')
}).listen(3000, () => {
    console.log('server is ready')
})
data.repository.name 即 webhook 中记录仓库名的属性
创建镜像和容器
在创建新容器前,需要先把旧容器销毁,这里先介绍几个用到的 docker 命令:
docker ps -a -f "name=^docker" --format="{ {.Names}}"
查看所有 name 以 docker 开头的 docker 容器,并只输出容器名
docker stop docker-container
停止 name 为 docker-container 的容器
docker rm docker-container
删除 name 为 docker-container 的容器(停止状态的容器才能被删除)
然后给 index.js 添加 docker 相关逻辑
const http = require("http")
const {execSync} = require("child_process")
const fs = require("fs")
const path = require("path")


// 递归删除目录
function deleteFolderRecursive(path) {
    if( fs.existsSync(path) ) {
        fs.readdirSync(path).forEach(function(file) {
            const curPath = path + "/" + file;
            if(fs.statSync(curPath).isDirectory()) { // recurse
                deleteFolderRecursive(curPath);
            } else { // delete file
                fs.unlinkSync(curPath);
            }
        });
        fs.rmdirSync(path);
    }
}


const resolvePost = req =>
    new Promise(resolve => {
        let chunk = "";
        req.on("data", data => {
            chunk += data;
        });
        req.on("end", () => {
            resolve(JSON.parse(chunk));
        });
    });


http.createServer(async (req, res) => {
    console.log('receive request')
    console.log(req.url)
    if (req.method === 'POST' && req.url === '/') {
      const data = await resolvePost(req);
      const projectDir = path.resolve(`./${data.repository.name}`)
     deleteFolderRecursive(projectDir)

      // 拉取仓库最新代码
      execSync(`git clone https://github.com/yeyan1996/${data.repository.name}.git ${projectDir}`,{
        stdio:'inherit',
    })

+     // 复制 Dockerfile 到项目目录
+     fs.copyFileSync(path.resolve(`./Dockerfile`), path.resolve(projectDir,'./Dockerfile'))


+     // 复制 .dockerignore 到项目目录
+     fs.copyFileSync(path.resolve(__dirname,`./.dockerignore`), path.resolve(projectDir, './.dockerignore'))


+      // 创建 docker 镜像
+     execSync(`docker build . -t ${data.repository.name}-image:latest `,{
+       stdio:'inherit',
+       cwd: projectDir
+   })


+      // 销毁 docker 容器
+      execSync(`docker ps -a -f "name=^${data.repository.name}-container" --format="{
     {.Names}}" | xargs -r docker stop | xargs -r docker rm`, {
+       stdio: 'inherit',
+   })


+      // 创建 docker 容器
+      execSync(`docker run -d -p 8888:80 --name ${data.repository.name}-container  ${data.repository.name}-image:latest`, {
+       stdio:'inherit',
+   })


+   console.log('deploy success')
    res.end('ok')
}
}).listen(3000, () => {
    console.log('server is ready')
})
在销毁 docker 容器部分用到了 linux 的管道运算符和 xargs 命令,过滤出以 docker-test 开头容器(用 docker-test 仓库的代码制作的镜像创建的容器),停止,删除并重新创建它们
同样通过 scp 复制到云服务器上
scp ./index.js [email protected]:/root
运行 node 脚本
通过之前安装的 pm2 将 index.js 作为后台脚本在云服务器上运行
pm2 start index.js

启动成功后,访问云服务器 8888 端口看到部署的 demo 项目(访问前确保服务器已开放 8888 端口)

try it
来试试自动化部署的流程是否能正常运行
首先在云服务器上运行 pm2 logs 查看 index.js 输出的日志,随后本地添加 hello docker 文案,并推送至 github

不出意外,pm2 会输出克隆项目的日志

克隆完毕后将 Dockerfile 和 .dockerignore 放入项目文件中,并更新镜像
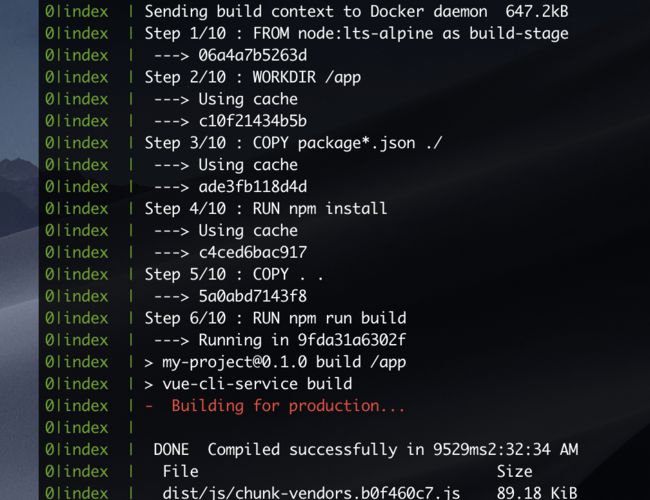
接着销毁旧容器,并使用更新后的镜像创建容器

最后访问 8888 端口可以看到更新后的文案

大功告成~
源码
Docker-test
关注 Dockerfile ,.dockerignore, index.js 文件
写在后面
上述 demo 只创建了单个 docker 容器,当项目更新时,由于容器需要经过销毁和创建的过程,会存在一段时间页面无法访问情况
而实际投入生产时一般会创建多个容器,并逐步更新每个容器,配合负载均衡将用户的请求映射到不同端口的容器上,确保线上的服务不会因为容器的更新而宕机
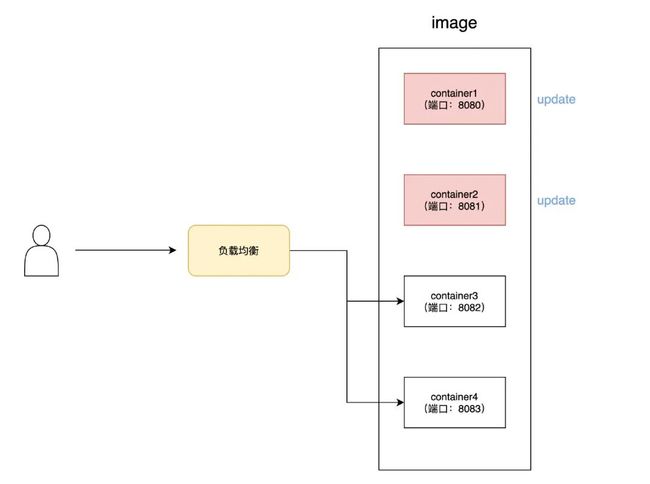 image-20200701210630305
另外基于 github 平台也有非常成熟的 CI/CD 工具,例如
travis-ci
circleci
通过 yml 配置文件,简化上文中注册 webhook 和编写更新容器的 index.js 脚本的步骤


# .travis.yml
language: node_js
node_js:
  - 8
branchs:
  only:
    - master
cache:
  directories:
    - node_modules
install:
  - yarn install
scripts:
  - yarn test
  - yarn build
另外随着环境的增多,容器也会逐渐增加,docker 也推出了更好管理多个容器的方式 docker-compose
但本文的宗旨还是探索其中的原理,维护成熟的开源项目还是推荐使用上述平台
感谢你能看到这里,希望对各位有帮助~
参考资料
写给前端的Docker实战教程
山月的琐碎博客记录
Dockerize Vue.js App
Best practices for writing Dockerfiles
❤️ 看完三件事如果你觉得这篇内容对你挺有启发,我想邀请你帮我三个小忙:
点赞,让更多的人也能看到这篇内容(收藏不点赞,都是耍流氓 -_-)关注公众号「前端劝退师」,不定期分享原创知识。也看看其它文章劝退师个人微信:huab119

也可以来我的GitHub博客里拿所有文章的源文件:
前端劝退指南:https://github.com/roger-hiro/BlogFN 一起玩耍呀。~

