重新认识Git——抽丝剥茧说Git
从七八年前开始使用Git,这么多年了,虽然无论是自己的开源项目,还是公司里团队使用,自己都能熟练地使用Git完成日常的版本管理需求。
但是,即便如此,还是偶尔会遇到一些自己不理解的异常情况(参见关于Git的rebase操作与cherry-pick操作的建议一文),再加上团队里有一些刚毕业不久的小伙伴,对Git的操作也还云里雾里没有那么数量,所以就抽空写了这么一篇文章,从版本控制的本质和Git底层的设计来抽丝剥茧地分析,当我们执行那些常用的git命令时,Git内部都发生了哪些事情,以帮助我们更好地理解Git,更恰当地运用Git.
当然,在写作本文的过程中,有些知识点是我都未曾注意过的,可以说是真正的温故而知新了。
本文大约4000字,嫌长不看版
渊源
什么是版本控制
对于任何类型的文件,在持续不断的变化中,在任意一个时刻,都能将其当时的状态和内容作为一个版本保存在数据库里,然后在需要的时候,能随时读取到指定版本,这就是版本控制。
为什么要进行版本控制

图片来源
无论是写文档,还是做设计,或者是开发程序,都不是能一蹴而就的,都要经过一次次的修改和完善才能达到最终想要的结果。而且如果过程中又涉及多个人共同来完成,又会引入协作流程。在这整个过程中,我们就难免会有以下需求:
- 回溯。比如你的文件最近两天的变动部分不想要了,那你可以选择回退到两天前的某个版本,又比如你回退到两天前的版本后,又觉得一天前的某些变动还是需要的,那你可以将这些变动再还原回来。
- 溯源。当文件内容出现问题时,可以对比版本间的差异,看到某个版本是由谁修改了哪些部分,可以帮助我们更快地定位和解决问题。
- 恢复。即使整个项目文件被人恶意改的改,删的删,弄得乱七八糟,我们也能轻松将其恢复到它最后一个正常的版本。
这就是为什么要进行版本控制的原因——它提供给我们一种对文件修改历史精确掌握的能力和一种允许我们随时“后悔”的机制。
版本控制的演进史
1. 本地版本控制系统
由于它是本地的,意味着它没有网络,所有数据都是存放在本地的。
这种系统经历过两个阶段。
源代码控制系统——SCCS(source code control system)
这套系统由贝尔实验室开发,旨在解决源文件修订跟踪的问题
它的基本原理是:
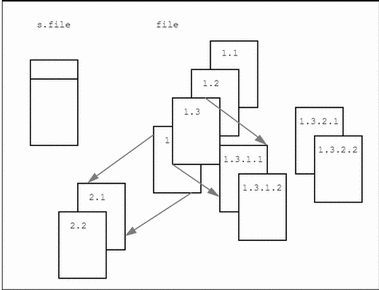
- 比如有一个名为
test.txt的源文件 - 我们可以使用一个命令将其加入到SCCS系统的跟踪列表。
- SCCS系统会创建一个名为SCCS的子目录,然后在该目录下创建一个类似
s.test.txt这样的s文件, 这个s文件就是历史记录文件。 s文件里包含了- 增量表——用以存储以后每次修改源文件后的增量内容
- 元数据—— 用以帮助进行版本跟踪。(比如版本号,修改日期,修改人,当前版本是基于哪一个版本修改的等等)
- 文件校验和(一个使用原始内容和其它信息计算出的散列值)—— 用以验证内容是否遭到篡改
- 增量内容——比上一个版本增加或减少的内容
- 访问和跟踪标志,包括
- 权限——指定哪些员工会可以编辑这个文件,哪些版本禁止编辑,是否允许多人共同编辑文件等等
- 正文——源文件加入跟踪时的初始内容。
- 增量表——用以存储以后每次修改源文件后的增量内容
- 这之后每一次对源文件
test.txt的修改,都可以检入到s文件中,但不是每次都存储整个文件内容,而是仅存储增量内容或文件更改。 - 这些增量内容存储在
s文件中的【增量表】中。 - 在需要用到历史版本的时候,可以使用命令将
s文件中记录的指定历史版本检出到工作目录替换源文件。 - 可以在某个版本的基础上创建分支,从分支构建的文件版本在分离点之后不会使用放置在主干上的任何增量。
s文件 内容示例1:
SCCS系统作为最早的版本控制探索者为后来的版本控制系统提供了最原始的一些思想和概念,包括但不限于:
- 版本
- 分支
- 文件校验和
- 增量表
- 历史文件的检入检出
- 协同编辑
- ……
但由于时代的局限性,它也有显而易见的缺点:
- 没有网络。意味着只能在本地机器上进行变化跟踪,多人协同也用户通过自己的帐户登录到同一共享 Unix 主机方式实现。
- 单点故障。如果本地硬盘损坏,文件就彻底损坏了。
- 单文件跟踪。这个系统的修订跟踪是针对单个文件的,意味着无法将对多个文件的更改作为一个原子版本检入和检出。
- 锁机制。当检出文件进行编辑时,为了防止更改被其它用户覆盖,文件将加一个锁,意味着这会限制多用户同时编辑而降低开发效率。
- 不开源。由于没有开源,所以如果需要使用这套系统,就必须购买授权。
修订控制系统——RCS(Revision Control System)
由于SCCS的不开源,所以Walter Tichy 编写了 RCS系统。
相对于SCCS系统,它进行了如下改进:
- 更简单的用户界面
- 改进的版本存储机制,加快了检出新版本的速度(反向增量)
它的工作原理基本上继承自SCCS,但又有不同:
- 它的历史文件在与源文件同级的
RCS目录下,它的历史记录文件加了后缀.v而非前缀s. - 采用反向增量机制:
- SCCS保存的是文件初次被加入跟踪系统时的完整内容,而RCS则保存的是文件最新版本的完整内容
- SCCS的增量表的每一个版本保存的是那个版本与前一个版本之间的增量内容,而RCS则保存的是那个版本与它的下一个版本之间的增量内容
- 这种机制提高了RCS的检出新版本的速度,却使得检出旧版本要花费更多的时间(因为它是由新到旧逐个计算差异的)。
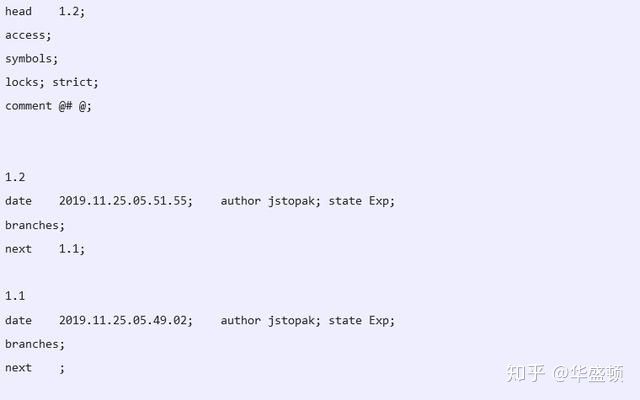
RCS的历史记录文件示例1
由于它是基于SCCS系统的,所以SCCS系统有的缺点它也都有。
2. 集中式版本控制系统
它也经过了两个阶段
并发式版本系统 ——CVS(Concurrent Versions System)
由于第一代版本控制系统都是无网络的,造成了协作的不便,所以 Dick Grune 创建了CVS系统,主要是加入了网络,使得协作可以通过网络进行。
相比于第一代本地版本控制系统,CVS系统具有以下特点:
- 可执行脚本。可以提供日志CVS操作或强制执行特定于站点的策略
- C/S架构。 使分散在不同地理位置或速度较慢的调制解调器上的开发人员能够作为一个团队工作。
- 版本记录存在中央服务器上,客户机拥有开发人员正在处理的所有文件的副本。
- 更灵活的分支策略。
- 没有锁。允许多人同时编辑同一个文件。采用“先允许修改,再处理冲突”的策略。
- 历史文件存储在【模块】中,开发人员可一次性检出一个【模块】中的所有历史记录文件。
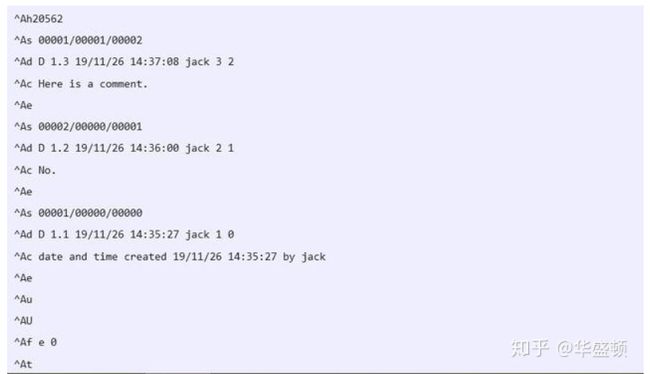
CVS历史记录文件示例1

subversion系统——SVN
CVS相较于第一代的本地版本控制系统,已经解决了网络、锁机制与不开源的问题,但却没有解决单点故障和单文件追踪的缺点。
于是Collabnet 公司开发了 SVN,用以解决之前的版本控制系统只能进行单文件追踪的缺点。
相较于CVS,SVN系统具有以下特性:
- 引入了原子提交的功能,确保提交要么完全成功,要么失败后完全放弃(回滚机制)。原子提交中可以是对多个文件的修改。这是它与CVS最本质的不同。
- CVS与之前的版本控制系统,其用来记录历史版本的都是普通的文本文件,格式与源文件一致,最终CVS目录的树结构也与项目源文件所在目录的树结构一致,这种结构不必担心数据丢失。而SVN则使用了一组类似于关系型数据库的二进制文件来记录历史文件,正是这样的设计产出了原子提交的特性,但同时也使得数据的存储对用户变得不透明。
- 由于采用了新的设计,并且使用了压缩算法,其检入检出速度和网络传输速度都比CVS提升了一个层级。
- 引入了标签(tag)机制,重新设计了分支的逻辑。
- 更广泛地支持所有文件类型(CVS对二进制文件支持很繁琐)
- 更强的扩展性。
- 引入了三路合并机制。CVS前都是二路合并。假设有两个文件都是从某个文件某个版本检出,而它们进行了不同的修改,二路合并在合并时对两个文件进行逐行对比,如果【行内容不同】就报冲突。而三路合并则以那个检出的版本作为基础版本,然后逐行对比哪个版本是与基础版本一致的,哪个是和基础版本不一致的,最后将采用这个不一致的,如果两个都与基础版本不一致,就报冲突。
- SVN以文件夹为基本管理单位,可以在SVN中提交空文件夹,而在其它VCS中(包括Git),无法管理空文件夹
- 没有采取CVS那样的文件内部用不同标记来区分不同功能的设计,而是根据功能分了三个文件夹来存储:
-
trank:用于应用程序的生产版本 -
branches:用于保存与各个分支相对应的子文件夹 -
tags:用于保存特定项目修订版本的标签(只读)
-
两路合并与三路合并 2
两路合并:

三路合并
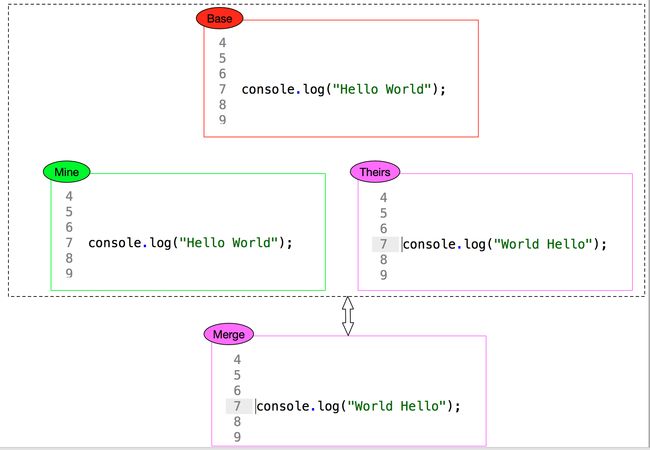
三路合并冲突
分布式版本控制系统——DVCS
主要就是Git
我们知道,前面SVN通过引入原子提交解决了CVS前只能进行单文件追踪的问题,但却还是没有解决单点故障的问题,即
- 如果中央服务器崩溃,那所有协作者都不得不停止手中的工作,因为大多数操作都必须与中央服务器进行交互
- 如果服务器版本数据丢失,将很难找回,因为开发者机器上同一时间只保存着其中一个分支的代码,只有中央服务器有所有分支的文件。
受到早期的商业版本管理软件BitKeeper的授权问题的刺激,Linux 之父 Linus Torvalds 创建了 Git,它通过分布式的版本存储设计,彻底解决了之前所有版本控制系统的单点故障问题。并且继承了之前版本管理系统的很多基础概念和优秀设计,包括但不限于:
- 分支与标签(branch,tags)系统
- 原子提交(commit)
- 文件校验和用以验证文件有无篡改
- 三路合并
- ……
在这些基础上,Git实现了以下特性:
- 分布式。虽然也会有一个中央服务器,存储着所有文件的所有历史版本,但是,每个开发者本地的客户机上也都有一份完整的拷贝,里面也拥有所有文件所有历史版本。这一点带来两个结果:
-
- 彻底解决了单点故障的问题。无论是中央服务器,还是任何一台客户机出现故障或文件丢失,都不会影响其它客户机上数据的完整性,并且事后都可以从其它任意一台客户机恢复所有文件的所有历史版本。
-
- 操作本地化。CVS和SVN的检入检出,分支切换等操作都必须依赖网络,因为他们需要和中央服务器通讯才能完成。但是Git本地拥有了仓库的所有文件所有历史版本以及所有分支和tag,所以其大部分操作都只需要在本地进行,不需要网络,只有在需要和中央服务器同步仓库的时候才需要用到网络。
-
- 暂存区。由于Git中是使用二进制的blob对象存储源文件数据的,那么我们如何知道工作目录的文件对应的是哪个二进制对象呢?这就是暂存区的用武之地:暂存区的本质是一个索引,它建立了工作目录文件和二进制Blob对象之间的映射关系。
- 分支操作的优化。从上面的历史脉络中我们可以发现,之前的版本控制系统也都一直支持分支操作,但Git的分支与之前所有的分支都不一样。
SVN和CVS的分支都是将当前分支里的所有文件复制到一个新的分支目录中取,而Git只是新建一个引用,所以Git的分支操作非常轻量级,这就是官方推荐多使用分支操作的原因,后面我们后详细介绍它的原理。
接下来,我们就详细解析Git的版本控制原理,通过与以上各种版本控制系统方案的对比,来彻底理解Git的工作理念和优缺点。
原理
实战
1. 本地建立一个目录,将其初始化为git仓库
$ mkdir git-test
$ cd git-test
$ git init
现在我们看看当前的目录:
$ ll -a
total 12
drwxr-xr-x 1 trs 197121 0 Jul 29 10:50 ./
drwxr-xr-x 1 trs 197121 0 Jul 29 10:50 ../
drwxr-xr-x 1 trs 197121 0 Jul 29 10:50 .git/
现在,我们没有添加任何文件,但是目录中自动生成了一个.git目录,这个就是Git仓库了
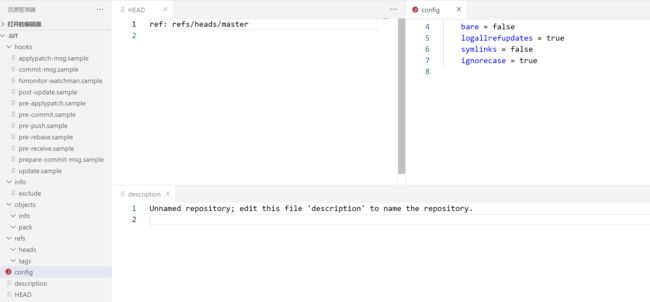
我们看看初始状态下,这个.git目录中都有什么:
$ cd .git
$ ll -a

total 11
drwxr-xr-x 1 trs 197121   0 Jul 29 10:50 ./
drwxr-xr-x 1 trs 197121   0 Jul 29 10:50 ../
-rw-r--r-- 1 trs 197121  23 Jul 29 10:50 HEAD
-rw-r--r-- 1 trs 197121 130 Jul 29 10:50 config
-rw-r--r-- 1 trs 197121  73 Jul 29 10:50 description
drwxr-xr-x 1 trs 197121   0 Jul 29 10:50 hooks/
drwxr-xr-x 1 trs 197121   0 Jul 29 10:50 info/
drwxr-xr-x 1 trs 197121   0 Jul 29 10:50 objects/
drwxr-xr-x 1 trs 197121   0 Jul 29 10:50 refs/
我们逐一说明:
HEAD:一个文本文件,它内部存放着当前工作目录所在的分支所指向的那个分支,可以认为它就是【当前分支】
config: 配置文件,它内部存放着当前仓库的一些配置
description: 一个文本文件,里面是对仓库的描述,初始状态下没有,会提示我们编辑此文件来为仓库创建描述
hooks:GIT 操作的一些钩子,用以在git的一些操作前后添加一些自定义行为
info exclude:存放仓库的一些信息
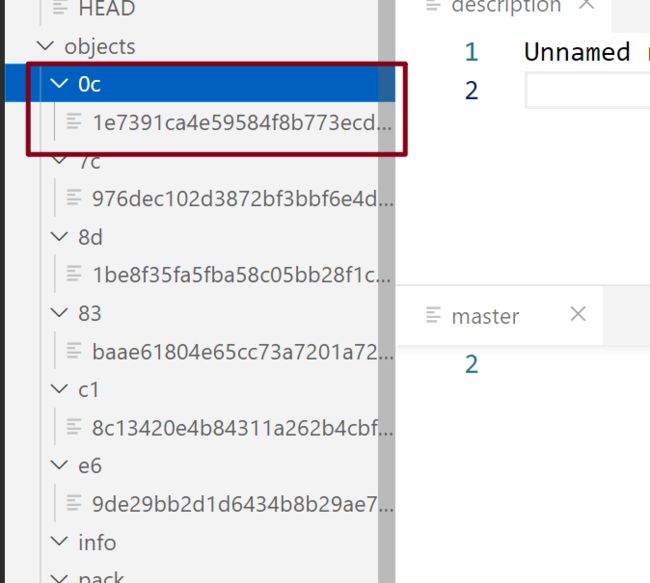
objects 本地仓库的真正所在,存放二进制文件,初始化时只有info与pack两个空目录
refs 引用,存放分支与tag当前指向的提交的信息,初始化时只有heads与tags两个空目录
直接上图看内容:

2. 新建一个目录
先返回工作目录,然后新建一个目录
$ cd ..
$ mkdir firstdir
现在我们再看.git目录,是没有任何变化的
我们看看当前Git工作目录状态
$ git status
On branch master

No commits yet

nothing to commit (create/copy files and use "git add" to track)
可以看到,现在还没有任何需要提交的东西。
我们执行下git add , 再看看Git仓库状态:
$ git add .
$ git status
On branch master

No commits yet

nothing to commit (create/copy files and use "git add" to track)
可以看到,没有任何变化,而我们的.git目录里的内容也是毫无变化,由此,我么得到了第一个结论:
结论1:Git无法跟踪空目录
上面我们说过,SVN 是可以跟踪空目录的,由此看见,它也是唯一支持跟踪空目录的版本控制系统。
3. 新建一个文件
我们在根目录里新建一个文本文件
$ touch test1.txt
现在还没有为这个文件添加任何内容,我们看看Git工作目录状态
$ git status
On branch master

No commits yet

Untracked files:
  (use "git add ..." to include in what will be committed)
        test1.txt

nothing added to commit but untracked files present (use "git add" to track)
Git提示我们可以使用git add将这个空文件加入Git仓库的追踪列表里了,再看看.git目录:
依旧是没有任何变化。
4. 将新文件添加到暂存区
接下来,我们执行git add .操作,将上面建立的空的新文件添加到Git的暂存区里,然后再看看Git工作目录状态
$ git add .
$ git status
On branch master

No commits yet

Changes to be committed:
  (use "git rm --cached ..." to unstage)
        new file:   test1.txt
可以看到,现在Git提示我们有变化【待提交】,变化类型为new file,变化内容为test1.txt
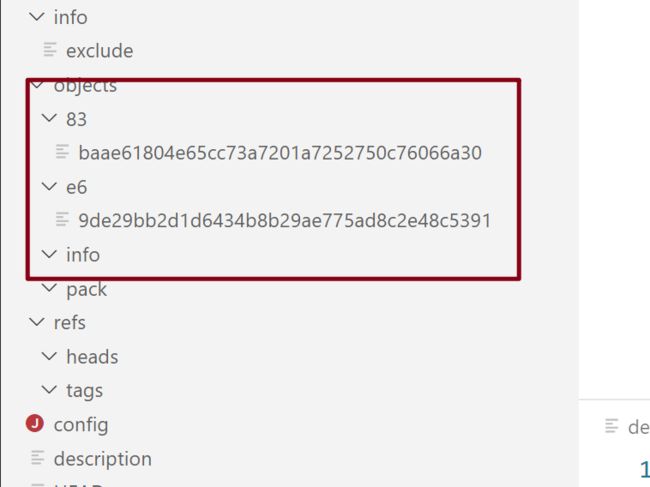
此时,我们再看 .git目录,终于有了一些变化:
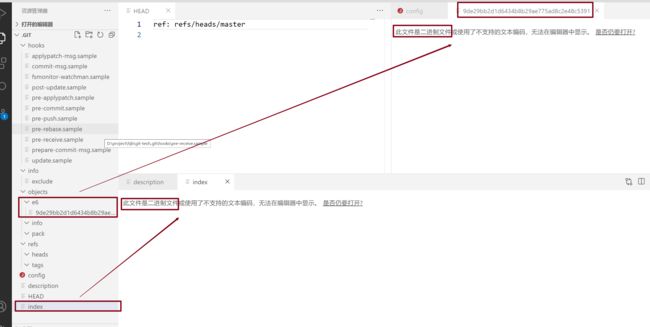
有两个变化:
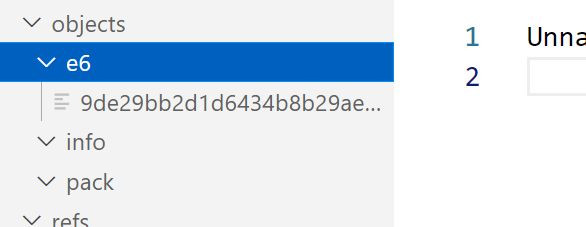
- 在
objects目录下多了一个目录e6,里面有一个名为9de29bb2d1d6434b8b29ae775ad8c2e48c5391的二进制文件 - 在
.git根目录下多了一个名为index的二进制文件,这其实就是我们说的暂存区,有些地方也叫它索引文件。
由于它们是二进制文件,我们无法通过编辑器查看它们的内容,但我们可以通过git提供的底层命令来查看它们的内容。
查看objects中二进制文件的内容
我们使用git cat-file命令来查看位于objects目录下二进制文件的内容:
$ git cat-file -p e69de29bb2d1d6434b8b29ae775ad8c2e48c5391
首先,我们注意到,没有任何输出。其实这个文件存储的就是我们的test1.txt的内容,没有输出是因为此时我们还未给它添加内容,下面一小节我们给它添加内容再说。
其次,我们注意到我们查看的文件名是e69de29bb2d1d6434b8b29ae775ad8c2e48c5391,它是我们上面看到的objects中的目录名(e6)+ 目录下的文件名9de29bb2d1d6434b8b29ae775ad8c2e48c5391 的结果。这和Git对文件的存储机制有关。
Git会使用SHA-1散列算法对要存储的内容进行计算(计算前会在头部加一字符串,该字符串标明内容的类型和长度),得到一个40位的散列值,然后将前2位作为目录名,后38位作为文件名存储到
objects目录下
查看暂存区index的内容
我们使用git ls-files 命令来查看暂存区index文件的内容:
git ls-files -s
100644 e69de29bb2d1d6434b8b29ae775ad8c2e48c5391 0       test1.txt
这个命令的输出格式和说明如下:
[<tag> ]<mode> <object> <stage> <file>
tag: 可选,文件所属tag,此处没有。mode: 模式位,描述文件模式- 100644 - 普通文件;
- 100755 - 可执行文件;
- 120000 - 符号链接(symbolic link);
- 040000 - 目录;
object: blob对象名称(即在objects目录下的目录+文件名)stage: 暂存区编号——分支合并出现冲突时同一个文件会有多个不同版本,都会被索引入暂存区。file:工作目录文件名
这里,其实就是将文件在工作目录中的文件名和在objects目录下的文件名做了映射。这就是它被称为索引的原因。
5. 为文件添加内容
我们给test1.txt 增加一些内容,然后查看Git工作目录状态:
$ echo 'version 1' >> test1.txt
$ git status
On branch master

No commits yet

Changes to be committed:
  (use "git rm --cached ..." to unstage)
        new file:   test1.txt

Changes not staged for commit:
  (use "git add ..." to update what will be committed)
  (use "git restore ..." to discard changes in working directory)
        modified:   test1.txt
我们看到,待提交的信息并没有因为工作目录中文件内容的改变而改变,并且多了一条未暂存的变化提示,变化类型为modified(已修改),涉及文件为test1.txt
此时,我们查看objects目录和暂存区内容,都没有任何变化:
$ git ls-files -s
100644 e69de29bb2d1d6434b8b29ae775ad8c2e48c5391 0       test1.txt
然后我们执行git add,再查看Git工作目录状态、objects目录、暂存区内容
$ git add .
warning: LF will be replaced by CRLF in test1.txt.
The file will have its original line endings in your working directory

$ git status
On branch master

No commits yet

Changes to be committed:
  (use "git rm --cached ..." to unstage)
        new file:   test1.txt
此时,已经没有【未暂存】的内容提示了,只剩【待提交】内容提示。
注意,由于从来没有提交过,所以此时【待提交】内容提示中的变化类型还是new file,而非modified,这里得出一个结论:
结论2: git status 显示的状态信息中的变化类型是相对于上一次暂存区变动后的

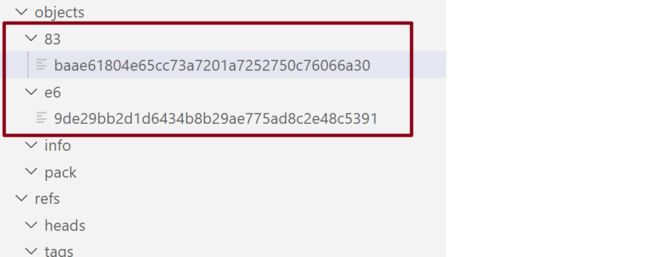
此时,objects目录多了一个目录和文件,我们查看下它的内容:
$ git cat-file -p 83baae61804e65cc73a7201a7252750c76066a30
version 1
正是我们刚刚为test1.txt添加的内容。
此时我们发现,先前空内容的二进制对象e6xxx并没有因为内容的改变而消失,而是仍旧存在。而此时,它就是作为一个历史版本存在的。这样,我们又得到如下结论:
结论3:对于:一个文件,每次重新被添加到暂存区时,都会将当时那个状态的文件内容做一次全文快照(SHA-1计算),保存为二进制对象,即Git的版本库保存的是每次变化后的全文快照,而非增量内容
$ git ls-files -s
100644 83baae61804e65cc73a7201a7252750c76066a30 0       test1.txt
我们发现,此时暂存区也发生了变化,此时test1.txt对应的二进制对象名称变成了刚刚添加的那个。由是,我们又得到一个结论:
结论4:对于一个文件,当其内容改变并被重新添加到暂存区时,暂存区会更新它与objects目录下二进制文件的映射关系
6. 从工作目录删除新文件
我们将空文件test1.txt从工作目录中删除,再查看Git工作目录状态
$ rm -rf test1.txt
$ git status
On branch master

No commits yet

Changes to be committed:
  (use "git rm --cached ..." to unstage)
        new file:   test1.txt

Changes not staged for commit:
  (use "git add/rm ..." to update what will be committed)
  (use "git restore ..." to discard changes in working directory)
        deleted:    test1.txt
我们看到,待提交的信息并没有因为工作目录中文件的删除而改变,并且多了一条未暂存的变化提示,变化类型为deleted(已删除),涉及文件为test1.txt
此时,我们再看暂存区的内容:
$ git ls-files -s
100644 83baae61804e65cc73a7201a7252750c76066a30 0       test1.txt
没有发生变化。
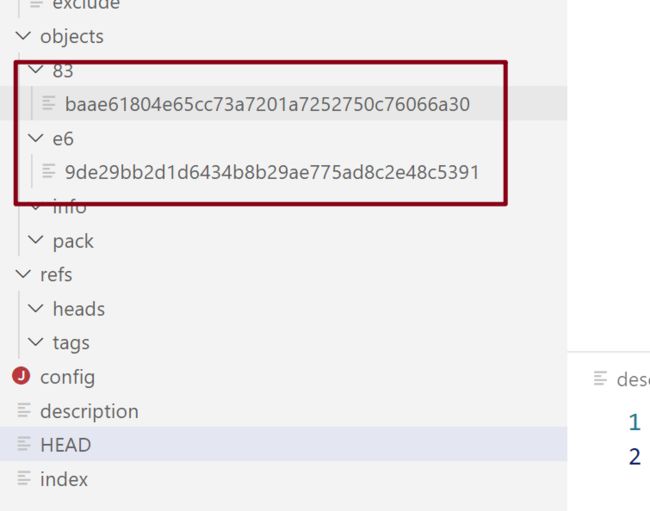
再看objects目录:

然后我们再执行一遍git add操作,再看Git工作目录状态和暂存区文件内容
$ git add .
$ git status
On branch master

No commits yet

nothing to commit (create/copy files and use "git add" to track)
$ git ls-files -s
// 没有输出
然后我们再看目录结构:
objects目录下的二进制对象(其实就是该文件的历史版本)还在。
至此,我们得到以下结论:
结论5:在没有进行git操作之前,单纯对工作目录的文件进行增删改操作,只会影响git status的输出,不会影响暂存区内容
结论6: git add 执行了两个操作
1.  如果工作区的文件发生了改变(不包括删除),则为其建立新的快照(二进制对象),并存储到`objects`目录下
2.  更新索引文件中发生改变的文件所对应的二进制对象。(如果删除了文件,则删除文件对应的索引)。
简言之:
- 建立快照(
objects) - 更新索引(
index)。
实际上,Git底层就是调用了两个底层命令来完成git add命令的:
git hash-object:计算文件的SHA值(使用SHA-1算法),生成快照(需要加-w)参数git update-inidex: 更新索引
有兴趣,可以到这里进行深度阅读。
7. 在目录中新建一个文件并添加到暂存区
$ cd fisrtdir/
$ touch test1.txt
$ echo 'version 1' >> test1.txt
$ git add .
warning: LF will be replaced by CRLF in fisrtdir/test1.txt.
The file will have its original line endings in your working directory
我们从根目录转战到一开始我们创建的目录中,重新建立一个与刚才我们删除的文件文件名和内容一样的文件,并把它添加到了暂存区,现在看一下状态:
$ git status
On branch master

No commits yet

Changes to be committed:
  (use "git rm --cached ..." to unstage)
        new file:   test1.txt
再看下objects目录
没有变化!!!
我们上面说过,git add 操作会为发生变化的文件创建一个新的快照,但是这里却没有变化,说明什么?
Git是以内容的SHA-1计算值来作为版本历史的,如果两个文件有一模一样的内容,那么它们将共享一个二进制快照。
我们可以先看下暂存区再验证上面这个猜想
$ git ls-files -s
100644 83baae61804e65cc73a7201a7252750c76066a30 0       test1.txt
好的,这里索引将文件与我们之前那个已经删除的文件的最后一个版本对应了起来。
现在,我们在同一个目录下,创建另一个与这个文件内容一样的文件,看看会发生什么变化:
$ touch test2.txt
$ echo 'version 1' >> test2.txt
$ git add .
warning: LF will be replaced by CRLF in fisrtdir/test2.txt.
The file will have its original line endings in your working directory
$ git status
On branch master

No commits yet

Changes to be committed:
  (use "git rm --cached ..." to unstage)
        new file:   test1.txt
        new file:   test2.txt
现在,我们的待提交列表里有了两个文件。
然后看看objects目录:
岿然不动!!!
我们得到了一个结论:
结论7::如果两个文件的内容一模一样,无论他们的路径和文件名是否一样,它们共享objects里同一个二进制对象
顺便也看下暂存区:
$ git ls-files -s
100644 83baae61804e65cc73a7201a7252750c76066a30 0       test1.txt
100644 83baae61804e65cc73a7201a7252750c76066a30 0       test2.txt
果然,在暂存区,工作目录的两个文件被映射到了objects目录下的同一个对象上。
8. 提交一下
前面我们实验了工作目录的变更与暂存区(index)和本地仓库(objects)之间的变化关系和原理,接下来我们进行一次提交,看看暂存区和本地仓库又会发生什么新的变化。
$ cd .. // 回到项目根目录
$ git status
On branch master

No commits yet

Changes to be committed:
  (use "git rm --cached ..." to unstage)
        new file:   fisrtdir/test1.txt
        new file:   fisrtdir/test2.txt
注意,此时回到根目录所显示的git status信息和刚刚在firstdir目录中执行git status时的输出是有差别的:
待提交的文件加上了路径。
据此,我们又得到一个结论:
结论8: git status 反映的是执行命令时所在工作目录文件的变化,其文件路径是相对于执行命令时的目录的
$ git commit -m "v1"
[master (root-commit) c18c134] v1
 2 files changed, 2 insertions(+)
 create mode 100644 fisrtdir/test1.txt
 create mode 100644 fisrtdir/test2.txt
$ git status
On branch master
nothing to commit, working tree clean
执行完commit,我们看到了一些返回信息,现在我们来看看它们都代表什么意思:
[branch (root-commit) commitHash] msg
changed file count, changed lines info
changed file list: type mode modevalue filepath
-
branch(root-commit): 当前提交到了哪个分支上,可选的root-commit表明这是整个项目的第一次提交 -
commitHash:本次提交在objects目录下所对应的二进制对象名称的前7位 -
msg: 用户提交时输入的提交信息,即-m参数的值 -
changed file count:本次提交涉及的有变化的文件数量 -
changed lines info: 本次提交涉及的有变化的行数说明(+代表插入,-代表删除),如果是对某行的修改,则意味着先删除,后插入 -
changed file list:发生变化的文件列表,具体:type:变化类型,这里create代表新创建mode: 固定值,文件模式modeValue: 文件模式的值filepath: 文件路径
此时查看工作目录状态,会被告知当前出于哪个分支,没有待提交的内容,工作目录是干净的(即上次提交后没有任何变化)。
先来看下暂存区:
$ git ls-files -s
100644 83baae61804e65cc73a7201a7252750c76066a30 0       fisrtdir/test1.txt
100644 83baae61804e65cc73a7201a7252750c76066a30 0       fisrtdir/test2.txt
没有发生任何变化,我们又得到一个结论:
结论9: Git提交不会改变暂存区的内容
然后看下
objects目录
好家伙,竟然多了这么多,没关系,我们一个一个看
-
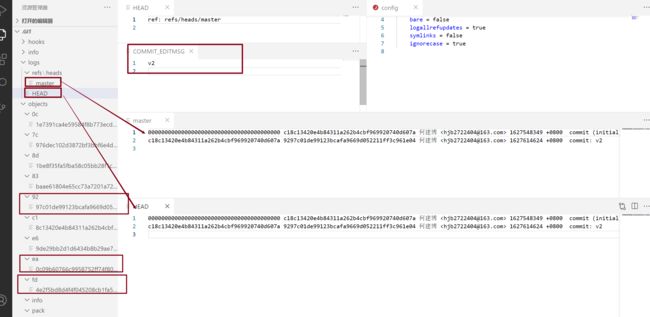
COMMIT_EDITMSG: 第一次提交后自动创建的文本文件,用来存储上一次提交时用户输入的提交信息,当我们执行git amend命令时,其实就是在编辑这个文件。 -
logs目录,保存所有更新的引用记录,里面包含了:-
HEAD保存的是所有的操作记录,使用git reflog查询的结果就是从这个文件来的。其格式如下:preHashcurHashusernameuseremailtimeopertypemsgpreHash:上一次提交的SHA值,这里由于是第一次,所以上一次是0000000……curHash:本次提交的SHA值username:操作者姓名useremail: 操作者邮箱time: 操作时间,包含时间戳和时区opertype: 操作类型,这里是提交msg: 操作信息,这里是提交信息
-
refs文件夹中有两个文件夹heads: 里面存储的是本地分支的对象,每个对象的文件名就是本地的一个分支名。我们使用git branch查看本地所有分支时,查询出的分支就是heads文件夹下所有文件的名称,这些分支文件中存储的是对应分支下的操作记录,操作记录的格式同logs/HEAD中的一样。remotes:这里还没创建,要等到添加了远程仓库后才创建。到时我们再说
-
-
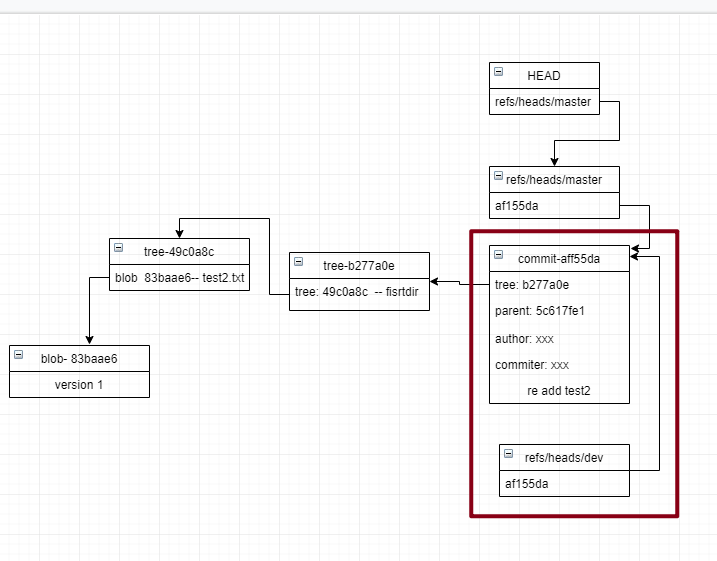
refs目录下heads目录下多了一个master文件: 文件中存储了master分支当前指向的commit
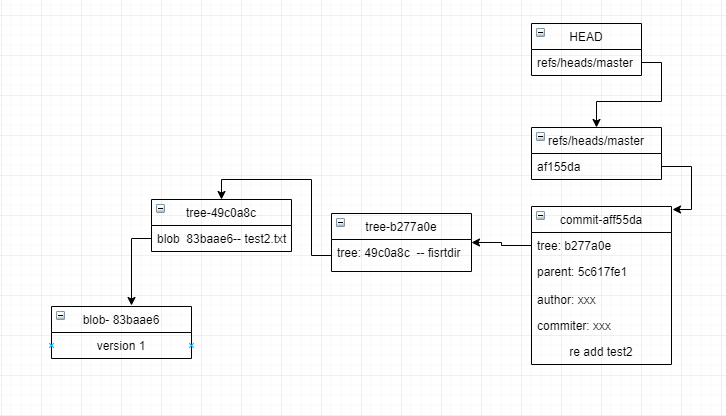
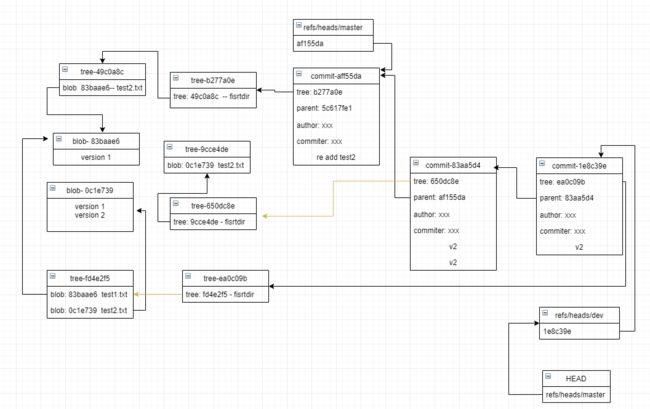
最后,我们看
objects下面又多了三个对象,加上原来是两个对象,总共有五个对象了,现在我们按个来看下它们的内容和类型(通过git cat-file的-t选项):$ git cat-file -p 7c976dec102d3872bf3bbf6e4df6c694249cb645 100644 blob 83baae61804e65cc73a7201a7252750c76066a30 test1.txt 100644 blob 83baae61804e65cc73a7201a7252750c76066a30 test2.txt $ git cat-file -t 7c976dec102d3872bf3bbf6e4df6c694249cb645 tree第一个是一个
tree对象,它里面有两条记录,是本次提交的两个文件与objects下对象的映射关系,注意它们映射的是blob对象$ git cat-file -p 8d1be8f35fa5fba58c05bb28f1cb50813394a9c4 040000 tree 7c976dec102d3872bf3bbf6e4df6c694249cb645 fisrtdir $ git cat-file -t 8d1be8f35fa5fba58c05bb28f1cb50813394a9c4 tree第二个也是一个
tree对象,它有一条记录,反映的是firstdir这个目录和objects中对象的映射关系,它被映射到了上面第一个tree对象上。最前面的040000代表这是一个目录。$ git cat-file -p 83baae61804e65cc73a7201a7252750c76066a30 version 1 $ git cat-file -t 83baae61804e65cc73a7201a7252750c76066a30 blob第三个是早先生成的,它是一个
blob对象,它就是工作目录中test1.txt和test2.txt两个文件所对应的二进制对象。里面存储的就是它们的内容。$ git cat-file -p e69de29bb2d1d6434b8b29ae775ad8c2e48c5391 $ git cat-file -t e69de29bb2d1d6434b8b29ae775ad8c2e48c5391 blob第四个是我们最早生成的,就是那个没有内容的空文件(后来被删除)所生成的
blob对象,由于它没有内容,所以内容输出为空$ git cat-file -p c18c13420e4b84311a262b4cbf969920740d607a tree 8d1be8f35fa5fba58c05bb28f1cb50813394a9c4 author 何建博 <[email protected]> 1627548349 +0800 committer 何建博 <[email protected]> 1627548349 +0800 v1 $ git cat-file -t c18c13420e4b84311a262b4cbf969920740d607a commit第五个是一个类型为
commit的对象,它里面存储了以下信息:- 本次
commit所执行的文件树对象 - 作者信息
- 提交者信息
- 提交描述
结论10:作者(author)_和_提交者(committer)_之间是差别是,作者指的是实际作出修改的人,提交者指的是最后将此工作成果提交到仓库的人
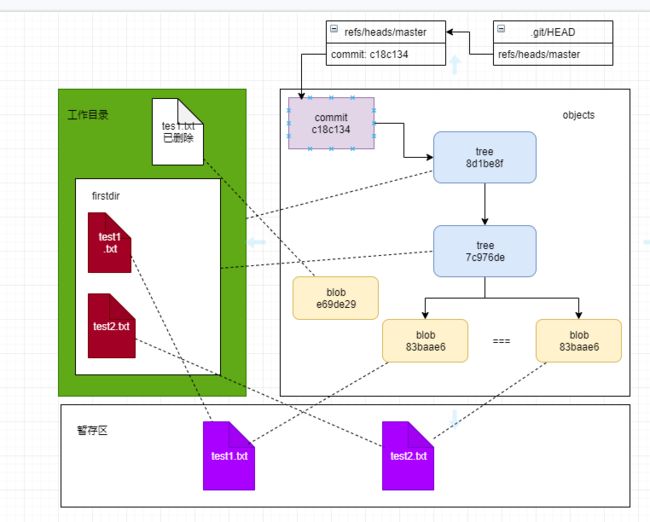
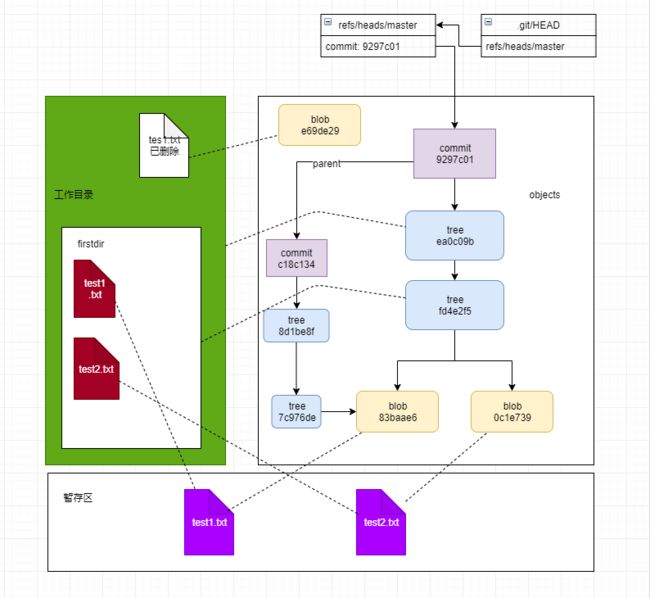
现在,我们可以将上述五个对象的关系使用关系图来描述下了:
9. 修改文件内容,并添加到暂存区后提交
$ cd fisrtdir/
$ echo 'version 2' >> test2.txt
$ git add .
依据之前所说,git add命令会建立快照和更新索引,objects下新增的这个对象就是新的快照
我们验证下,看它的内容
$ git cat-file -p 0c1e7391ca4e59584f8b773ecdbbb9467eba1547
version 1
version 2
$ git cat-file -t 0c1e7391ca4e59584f8b773ecdbbb9467eba1547
blob
再看索引区:
$ git ls-files -s
100644 83baae61804e65cc73a7201a7252750c76066a30 0       test1.txt
100644 0c1e7391ca4e59584f8b773ecdbbb9467eba1547 0       test2.txt
test2.txt的索引已经更新为了刚刚建立的快照。
我们再提交一下
$ git commit -m "v2"
[master 9297c01] v2
 1 file changed, 1 insertion(+)
现在,本地仓库里发生了以下变化:
COMMIT_EDITMSG:内容变为最新一次提交的描述。可见,这个文件总是存储最新一次提交的描述信息refs/HEAD:此时多了一条提交记录,正如我们上面所说,它保存了所有的操作记录。refs/heads/master:也多了一条提交记录,这个记录是属于master分支的。objects/9297c01de99123bcafa9669d052211ff3c961e04ea0c09b60766c9958752ff74f807b036e380feb0fd4e2f5bd8d4f4f045208cb1fa5b339477b88954
看下这三个二进制文件的内容和类型:
// 9297c01de99123bcafa9669d052211ff3c961e04
$ git cat-file -p 9297c01de99123bcafa9669d052211ff3c961e04
tree ea0c09b60766c9958752ff74f807b036e380feb0
parent c18c13420e4b84311a262b4cbf969920740d607a
author 何建博 <[email protected]> 1627614624 +0800
committer 何建博 <[email protected]> 1627614624 +0800

v2
$ git cat-file -t 9297c01de99123bcafa9669d052211ff3c961e04
commit
// ea0c09b60766c9958752ff74f807b036e380feb0
$ git cat-file -p ea0c09b60766c9958752ff74f807b036e380feb0
040000 tree fd4e2f5bd8d4f4f045208cb1fa5b339477b88954    fisrtdir

$ git cat-file -t ea0c09b60766c9958752ff74f807b036e380feb0
tree


//fd4e2f5bd8d4f4f045208cb1fa5b339477b88954
$ git cat-file -p fd4e2f5bd8d4f4f045208cb1fa5b339477b88954
100644 blob 83baae61804e65cc73a7201a7252750c76066a30    test1.txt
100644 blob 0c1e7391ca4e59584f8b773ecdbbb9467eba1547    test2.txt
$ git cat-file -t fd4e2f5bd8d4f4f045208cb1fa5b339477b88954
tree
又是一个commit对象和两个tree对象.
那我们修改了内容,又进行了一次提交,之前那五个对象会有变化吗?
不会,因为objects中的对象名称都是根据其内容计算出的SHA值,如果SHA值没有发生变化,说明内容也没有变化。我们还是验证一下:
$ git cat-file -p 7c976dec102d3872bf3bbf6e4df6c694249cb645
100644 blob 83baae61804e65cc73a7201a7252750c76066a30    test1.txt
100644 blob 83baae61804e65cc73a7201a7252750c76066a30    test2.txt
$ git cat-file -p 8d1be8f35fa5fba58c05bb28f1cb50813394a9c4
040000 tree 7c976dec102d3872bf3bbf6e4df6c694249cb645    fisrtdir
$ git cat-file -p 83baae61804e65cc73a7201a7252750c76066a30
version 1
$ git cat-file -p e69de29bb2d1d6434b8b29ae775ad8c2e48c5391
$ git cat-file -p c18c13420e4b84311a262b4cbf969920740d607a
tree 8d1be8f35fa5fba58c05bb28f1cb50813394a9c4
author 何建博 <[email protected]> 1627548349 +0800
committer 何建博 <[email protected]> 1627548349 +0800

v1
可以与前文结果对照,并无什么变化。
所以,我们又得到一个结论:
结论11,: Git的每次提交,都会根据本次提交与上次提交的不同,生成新的tree对象和commit对象,并更新日志目录里的操作记录和对应分支的操作记录
简言之,git commit做了如下操作
- 生成存储目录嵌套结构的
tree对象 - 生成
commit对象,存储顶级tree对象、作者、提交者信息 - 更新日志。
事实上,Git底层是调用如下底层命令来实现上述操作的:
git write-tree: 创建tree对象git commit-tree:创建commit对象git update-ref: 更新日志
对细节感兴趣可以看这里
现在,我们的关系图更新如下:
10. 与修改相关的命令
git diff 查看变更内容
现在,我们先看看工作目录状态:
$ git status
On branch master
nothing to commit, working tree clean
工作目录是干净的,所以现在执行git diff命令应该是没有任何输出的:
$ git diff
试着修改一下test2.txt的内容,再执行git diff
$ echo 'version 3' >> test2.txt

$ cat test2.txt
version 1
version 2
version 3

$ git diff
warning: LF will be replaced by CRLF in fisrtdir/test2.txt.
The file will have its original line endings in your working directory
diff --git a/fisrtdir/test2.txt b/fisrtdir/test2.txt
index 0c1e739..822f9b8 100644
--- a/fisrtdir/test2.txt
+++ b/fisrtdir/test2.txt
@@ -1,2 +1,3 @@
 version 1
 version 2
+version 3
可以看到git diff输出了信息3,这些信息包括:
- 前两行,一个警告信息,警告比较时文件内行尾换行符
LF将被换行符CRLF替换4,但工作目录里的文件还是它原来的格式。 - 下一行,
diff,标识结果格式为git格式的diff,以及用作比较的两个版本,a版本和b版本,a版本是变动前的版本,即暂存区快照中的内容,b版本是工作目录中的当前内容。 - 下一行,
index 0c1e739代表暂存区快照地址,.. 822f9b8代表工作目录中内容的HASH计算值。100644是文件模式,代表普通文件 - 下面两行,表示进行比较的两个文件,
---表示变动前的版本,+++表示变动后的版本 - 再下面一行是变动小结,表示变动的位置,前后以
@@包裹-1,2:-号表示第一个文件(即a版本的test2.txt)1表示从第1行开始2表示连续2行- 总的意思是:下面具体的变动内容中,从第 1 行开始的连续 2 行的内容时第一个文件的
+1,3:+号表示第二个文件(即b版本的test2.txt)1从第1行开始3表示连续3行- 总的意思是:下面具体的变动内容中,从第 1 行开始的连续 3行的内容时第二个文件的
- 再下面几行就是所有的具体变化内容,上面变动小结的序号就是以这里的行的序号为准的。
我们上面说,比较的版本是暂存区的快照版本和工作目录的版本,我们验证一下。
现在我们知道,上次提交,test2.txt对应的blob对象是0c1e7391ca4e59584f8b773ecdbbb9467eba1547
我们看看它的内容:
$ git cat-file -p 0c1e7391ca4e59584f8b773ecdbbb9467eba1547
version 1
version 2
那现在工作目录中的内容是:
$ cat test2.txt
version 1
version 2
version 3
现在,我们把工作目录中的内容添加到暂存区,但不提交
$ git add .
warning: LF will be replaced by CRLF in fisrtdir/test2.txt.
The file will have its original line endings in your working directory
这里,我们同样看到了换行符替换的警告信息,这就是为什么比较时要把工作区内容的换行符进行临时替换了,因为暂存区生成快照时也是替换了的,这样才能保证diff时的一致性。
现在,我们可以看看暂存区:
$ git ls-files -s
100644 83baae61804e65cc73a7201a7252750c76066a30 0       test1.txt
100644 822f9b8f82f0e134b230d8e03c220c7fe2ce2c79 0       test2.txt
这里,test2.txt对应的blob对象信息已更新为822f9b8f82f0e134b230d8e03c220c7fe2ce2c79,我们看看这个新生成的快照对象的内容:
$ git cat-file -p 822f9b8f82f0e134b230d8e03c220c7fe2ce2c79
version 1
version 2
version 3
接下来,我们再次更改工作目录的内容:
$ echo 'version 4' >> test2.txt
$ cat test2.txt
version 1
version 2
version 3
version 4
现在,上次提交的快照、当前暂存区的快照、当前工作目录下test2.txt的内容都是不一样的了,我们再看git diff的结果:
$ git diff
warning: LF will be replaced by CRLF in fisrtdir/test2.txt.
The file will have its original line endings in your working directory
diff --git a/fisrtdir/test2.txt b/fisrtdir/test2.txt
index 822f9b8..48ca800 100644
--- a/fisrtdir/test2.txt
+++ b/fisrtdir/test2.txt
@@ -1,3 +1,4 @@
 version 1
 version 2
 version 3
+version 4
我们无论是从上面第5行,还是下面具体内容,都可以发现,参与比较的确实是暂存区快照和工作区内容,而没有上次提交什么事。
所以:
结论12:git diff默认不带参数执行时, 对比暂存区快照与工作目录中文件内容的差异
git mv 文件改名
我们尝试将test1.txt改名为test.txt
$ git mv test1.txt test.txt
$ ll
total 2
-rw-r--r-- 1 trs 197121 10 Jul 29 16:19 test.txt
-rw-r--r-- 1 trs 197121 40 Jul 30 14:14 test2.txt
改名成功,看看工作目录状态:
$ git status
On branch master
Changes to be committed:
  (use "git restore --staged ..." to unstage)
        renamed:    test1.txt -> test.txt
        modified:   test2.txt

Changes not staged for commit:
  (use "git add ..." to update what will be committed)
  (use "git restore ..." to discard changes in working directory)
        modified:   test2.txt
我们看到,改名操作没有进行git add, 但这个变动却直接进入了待提交的列表。(test2.txt的修改是我们上文操作,先不用管)
我们看objects目录下,没有任何变化,因为我们改的是文件名,而前面说过,objects下的对象只和文件内容有关,与文件名无关,所以这里没有发生变化。
再看看暂存区:
$ git ls-files -s
100644 83baae61804e65cc73a7201a7252750c76066a30 0       test.txt
100644 822f9b8f82f0e134b230d8e03c220c7fe2ce2c79 0       test2.txt
暂存区发生了变化,原来对应test1.txt的那条记录里,除了test1.txt变成了test.txt,其它还和原来一样。
所以:
结论13: git mv 更改工作目录中文件的文件名,并将暂存区中对应的文件名使用修改后的名称进行替换,执行此操作后不用git add就可以直接提交
为了方便下面的操作,我们先进行一次提交:
$ git commit -m 'v3-v4-rename'
[master 604a016] v3-v4-rename
 2 files changed, 1 insertion(+)
 rename fisrtdir/{
     test1.txt => test.txt} (100%)
看看objects目录
[外链图片转存失败,源站可能有防盗链机制,建议将图片保存下来直接上传(img-2RB7EtD8-1628577772118)(C:\Users\trs\AppData\Roaming\Typora\typora-user-images\image-20210730144716102.png)]
这是新生成的commit对象和两个树对象:
$ git cat-file -p 1eabe4abc7348adfcf46691a68e75f15445074fa
040000 tree 65788721081a2317015819c537bb15501da014af    fisrtdir

$ git cat-file -p 604a016fee1bdd9b6d2f461c634f501fc0ce60de
tree 1eabe4abc7348adfcf46691a68e75f15445074fa
parent 9297c01de99123bcafa9669d052211ff3c961e04
author 何建博 <[email protected]> 1627626907 +0800
committer 何建博 <[email protected]> 1627626907 +0800

v3-v4-rename

$ git cat-file -p 65788721081a2317015819c537bb15501da014af
100644 blob 83baae61804e65cc73a7201a7252750c76066a30    test.txt
100644 blob 822f9b8f82f0e134b230d8e03c220c7fe2ce2c79    test2.txt
这时当前仓库内其他信息:
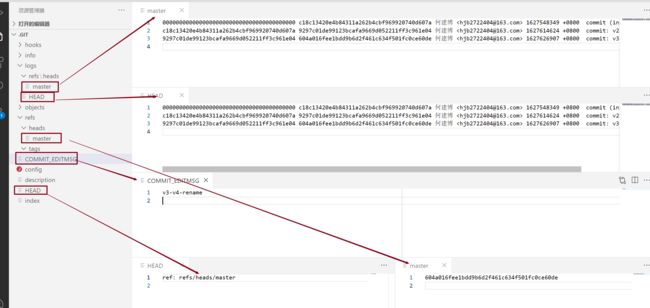
现在,我们先看下工作目录状态:
$ git status
On branch master
Changes not staged for commit:
  (use "git add ..." to update what will be committed)
  (use "git restore ..." to discard changes in working directory)
        modified:   test2.txt

no changes added to commit (use "git add" and/or "git commit -a")

$ cat test2.txt
version 1
version 2
version 3
version 4
看到,我们对test2.txt的最后一次修改还未添加到暂存区,接下来,我们执行下git restore命令,撤销最后一次修改。
$ git restore test2.txt
$ git status
On branch master
nothing to commit, working tree clean
$ cat test2.txt
version 1
version 2
version 3
除了工作目录,暂存区与objects目录没有任何变化。
git reset 撤销提交
第一种,软撤销 --soft
$ git reset --soft HEAD~1
$ git status
On branch master
Changes to be committed:
  (use "git restore --staged ..." to unstage)
        renamed:    test1.txt -> test.txt
        modified:   test2.txt
可以看到,我们最后一次提交的内容又回到了待提交列表中,而此时,我们看objects目录:
// 进入objects目录

$ ll -a
total 8
drwxr-xr-x 1 trs 197121 0 Jul 30 14:35 ./
drwxr-xr-x 1 trs 197121 0 Jul 30 15:52 ../
drwxr-xr-x 1 trs 197121 0 Jul 30 11:03 0c/
drwxr-xr-x 1 trs 197121 0 Jul 30 14:35 1e/
drwxr-xr-x 1 trs 197121 0 Jul 30 14:35 60/
drwxr-xr-x 1 trs 197121 0 Jul 30 14:35 65/
drwxr-xr-x 1 trs 197121 0 Jul 29 16:45 7c/
drwxr-xr-x 1 trs 197121 0 Jul 30 14:10 82/
drwxr-xr-x 1 trs 197121 0 Jul 29 14:03 83/
drwxr-xr-x 1 trs 197121 0 Jul 29 16:45 8d/
drwxr-xr-x 1 trs 197121 0 Jul 30 11:10 92/
drwxr-xr-x 1 trs 197121 0 Jul 29 16:45 c1/
drwxr-xr-x 1 trs 197121 0 Jul 29 13:56 e6/
drwxr-xr-x 1 trs 197121 0 Jul 30 11:10 ea/
drwxr-xr-x 1 trs 197121 0 Jul 30 11:10 fd/
drwxr-xr-x 1 trs 197121 0 Jul 29 10:50 info/
drwxr-xr-x 1 trs 197121 0 Jul 29 10:50 pack/
没有任何变化。
再看仓库其他信息
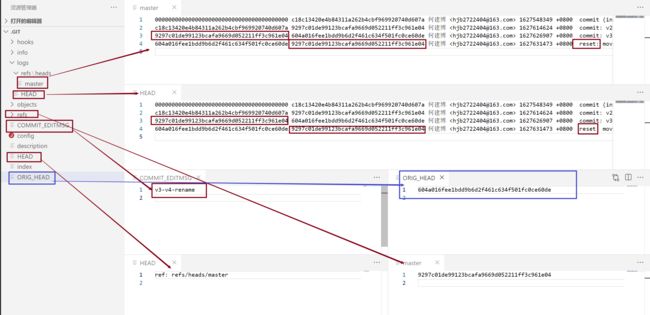
又是很多变化,我们一个一个看:
logs里面,无论是HEAD还是master分支的操作记录都多了一条操作类型为reset的记录,这条记录中,前一次提交HASH是我们的上次提交的HASH,而本次HASH则是上上次提交的HASHrefs目录里的master当前内容由上次提交的HASH编程了上上次提交的HASHCOMMIT_EDITMSG的内容没有变化,可见它只有在有新提交时才会变,而撤销提交不会影响它。- 多了一个文件
ORIG_HEAD,存储了上一次提交的HASH
总结下软撤销做的工作:
- 更新操作记录 —— 添加一条
reset记录 - 更新当前分支引用的提交引用地址
- 保存撤销前的提交HASH
第二种: 混合撤销 ,参数--mixed
在进行第二种撤销前,我们先再次进行提交:
$ git commit -m "re-commit"
[master 87f7898] re-commit
 2 files changed, 1 insertion(+)
 rename fisrtdir/{
     test1.txt => test.txt} (100%)

 $ git status
On branch master
nothing to commit, working tree clean
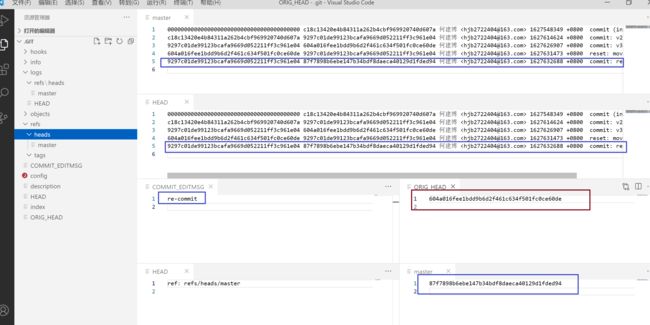
还是老规矩,更新了分支引用,更新了最后一次提交信息,更新了操作记录
$ ll -a
total 8
drwxr-xr-x 1 trs 197121 0 Jul 30 16:11 ./
drwxr-xr-x 1 trs 197121 0 Jul 30 16:11 ../
drwxr-xr-x 1 trs 197121 0 Jul 30 11:03 0c/
drwxr-xr-x 1 trs 197121 0 Jul 30 14:35 1e/
drwxr-xr-x 1 trs 197121 0 Jul 30 14:35 60/
drwxr-xr-x 1 trs 197121 0 Jul 30 14:35 65/
drwxr-xr-x 1 trs 197121 0 Jul 29 16:45 7c/
drwxr-xr-x 1 trs 197121 0 Jul 30 14:10 82/
drwxr-xr-x 1 trs 197121 0 Jul 29 14:03 83/
drwxr-xr-x 1 trs 197121 0 Jul 30 16:11 87/
drwxr-xr-x 1 trs 197121 0 Jul 29 16:45 8d/
drwxr-xr-x 1 trs 197121 0 Jul 30 11:10 92/
drwxr-xr-x 1 trs 197121 0 Jul 29 16:45 c1/
drwxr-xr-x 1 trs 197121 0 Jul 29 13:56 e6/
drwxr-xr-x 1 trs 197121 0 Jul 30 11:10 ea/
drwxr-xr-x 1 trs 197121 0 Jul 30 11:10 fd/
drwxr-xr-x 1 trs 197121 0 Jul 29 10:50 info/
drwxr-xr-x 1 trs 197121 0 Jul 29 10:50 pack/
objects还是没变化,因为文件内容没有变化。同理,暂存区也没有变化。
现在,我们进行混合撤销操作:
$ git reset --mixed HEAD~1
Unstaged changes after reset:
D       fisrtdir/test1.txt
M       fisrtdir/test2.txt

$ git status
On branch master
Changes not staged for commit:
  (use "git add/rm ..." to update what will be committed)
  (use "git restore ..." to discard changes in working directory)
        deleted:    test1.txt
        modified:   test2.txt

Untracked files:
  (use "git add ..." to include in what will be committed)
        test.txt

no changes added to commit (use "git add" and/or "git commit -a")
不同于软撤销,将更改恢复到待提交列表,混合撤销将更改恢复到了未暂存列表
并且,我们的重命名操作也被回退,这里显示的是删除了test1.txt,新增了test.txt.
看看仓库的其它信息:
然后再看暂存区:
$ git ls-files -s
100644 83baae61804e65cc73a7201a7252750c76066a30 0       test1.txt
100644 0c1e7391ca4e59584f8b773ecdbbb9467eba1547 0       test2.txt

$ git cat-file -p 0c1e7391ca4e59584f8b773ecdbbb9467eba1547
version 1
version 2
发生了两点变化:
- 我们之前重命名后的
test.txt又变回了test1.txt test2.txt对应的blob对象的SHA值变为了之前v2的版本:
由此,混合撤销做了以下工作:
- 更新了操作记录——添加一条
reset类型的记录 - 将上上次提交到上次提交之间的更改全部恢复为未暂存状态
- 更新暂存区索引。(因为第二步)
这种撤销是我们执行不带参数的git reset命令时的默认处理方式
第三种: 硬撤销 ,参数--hard
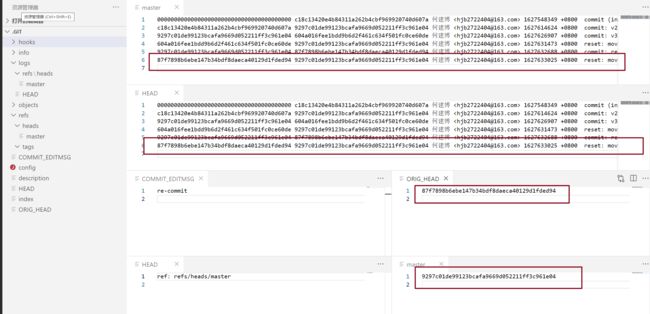
在进行第三种撤销操作前,我们还是再次提交:
$ git add .
warning: LF will be replaced by CRLF in fisrtdir/test.txt.
The file will have its original line endings in your working directory

$ git status
On branch master
Changes to be committed:
  (use "git restore --staged ..." to unstage)
        renamed:    test1.txt -> test.txt
        modified:   test2.txt

$ git commit -m "re-commit-2"
[master f4fed17] re-commit-2
 2 files changed, 1 insertion(+)
 rename fisrtdir/{
     test1.txt => test.txt} (100%)

$ git status
On branch master
nothing to commit, working tree clean
看 objects对象
//在objects目录下执行
$ ll -a
total 8
drwxr-xr-x 1 trs 197121 0 Jul 30 16:32 ./
drwxr-xr-x 1 trs 197121 0 Jul 30 16:32 ../
drwxr-xr-x 1 trs 197121 0 Jul 30 11:03 0c/
drwxr-xr-x 1 trs 197121 0 Jul 30 14:35 1e/
drwxr-xr-x 1 trs 197121 0 Jul 30 14:35 60/
drwxr-xr-x 1 trs 197121 0 Jul 30 14:35 65/
drwxr-xr-x 1 trs 197121 0 Jul 29 16:45 7c/
drwxr-xr-x 1 trs 197121 0 Jul 30 14:10 82/
drwxr-xr-x 1 trs 197121 0 Jul 29 14:03 83/
drwxr-xr-x 1 trs 197121 0 Jul 30 16:11 87/
drwxr-xr-x 1 trs 197121 0 Jul 29 16:45 8d/
drwxr-xr-x 1 trs 197121 0 Jul 30 11:10 92/
drwxr-xr-x 1 trs 197121 0 Jul 29 16:45 c1/
drwxr-xr-x 1 trs 197121 0 Jul 29 13:56 e6/
drwxr-xr-x 1 trs 197121 0 Jul 30 11:10 ea/
drwxr-xr-x 1 trs 197121 0 Jul 30 16:32 f4/  // 这里新生成了一个对象
drwxr-xr-x 1 trs 197121 0 Jul 30 11:10 fd/
drwxr-xr-x 1 trs 197121 0 Jul 29 10:50 info/
drwxr-xr-x 1 trs 197121 0 Jul 29 10:50 pack/
我们发现多了一个对象,让我们看下它的内容:
$ git cat-file -p f4fed170c78535c48e9128fa4f1b51d2bcd4face
tree 1eabe4abc7348adfcf46691a68e75f15445074fa
parent 9297c01de99123bcafa9669d052211ff3c961e04
author 何建博 <[email protected]> 1627633951 +0800
committer 何建博 <[email protected]> 1627633951 +0800

re-commit-2

$ git cat-file -t f4fed170c78535c48e9128fa4f1b51d2bcd4face
commit
我们发现,这是新建了一个commit对象,既然objects目录下新建了提交对象,那说明它的内容发生了改变,我们对比一下它和之前那次提交的commit对象的不同
$ git cat-file -p 604a016fee1bdd9b6d2f461c634f501fc0ce60de
tree 1eabe4abc7348adfcf46691a68e75f15445074fa
parent 9297c01de99123bcafa9669d052211ff3c961e04
author 何建博 <[email protected]> 1627626907 +0800
committer 何建博 <[email protected]> 1627626907 +0800

v3-v4-rename
我们发现,是因为提交信息(msg)变了。所以生成了新的commit。
看看仓库其他信息:
现在,进行硬撤销:
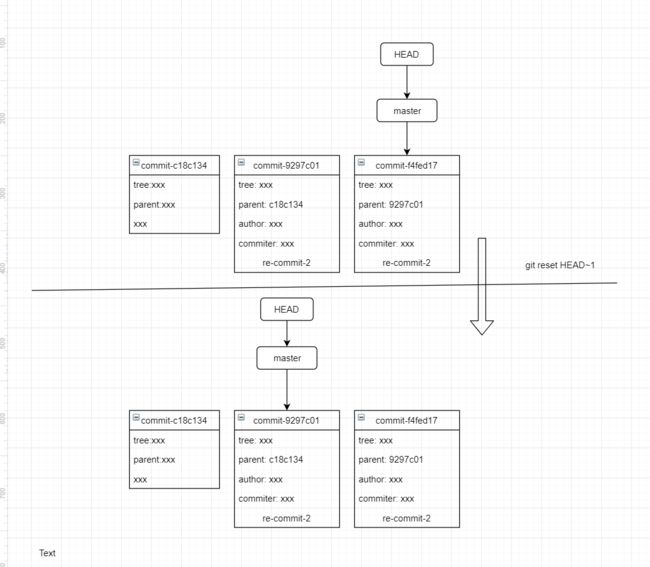
$ git reset --hard HEAD~1
HEAD is now at 9297c01 v2
$ git status
On branch master
nothing to commit, working tree clean
$ ll
total 2
-rw-r--r-- 1 trs 197121 11 Jul 30 16:47 test1.txt
-rw-r--r-- 1 trs 197121 22 Jul 30 16:47 test2.txt
$ cat test2.txt
version 1
version 2
$ git ls-files -s
100644 83baae61804e65cc73a7201a7252750c76066a30 0       test1.txt
100644 0c1e7391ca4e59584f8b773ecdbbb9467eba1547 0       test2.txt
可以看到,硬撤销直接将工作目录和暂存区都重置为上上次提交后的状态了。
硬撤销后,objects目录没有变化
看看仓库其他信息:
- 更新操作记录——添加了一条
reset记录 - 更新了当前分支引用的提交HASH地址
- 保存了上一次提交的HASH
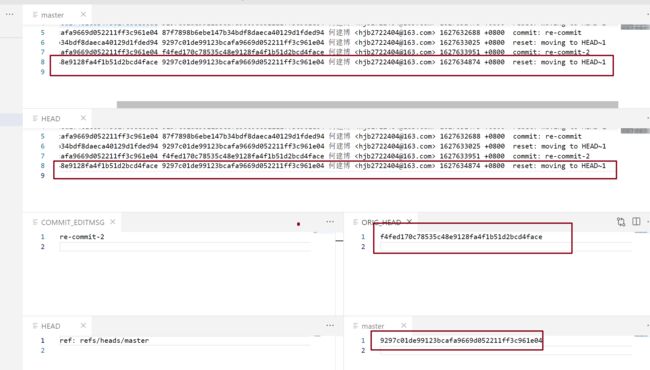
现在,我们来总结一下Git撤销提交的三种模式:
- 软撤销(
--sort): 将已提交的更改恢复为待提交状态,暂存区索引与工作目录文件都无变化,只是本地仓库中更改了当前分支所引用的提交快照。 - 混合撤销(
--mixed默认方式):将已提交的更改恢复为未暂存状态,工作目录文件不发生变化,本地仓库更改了当前分支所引用的提交快照,但暂存区索引会恢复到将这些更改添加到暂存区之前的状态。 - 硬撤销(
--hard):将已提交的更改丢弃掉,工作目录恢复到这些更改未发生之前的状态,暂存区索引也回到这些更改未发生之前,本地仓库更改了当前分支所引用的提交快照。
以上所说“更改”指的是上上次提交到上次提交之间对工作目录内容所做的所有修改。
到这里,我们还有一个疑问——git reset 的硬撤销模式将工作区的内容使用上上次提交快照中的内容给替换掉了,那么它是如何实现的呢?
我们不妨根据现有信息大胆猜测一下,以下内容纯属猜测,Git内部到底是不是这么运行的,并不能十分确定。
这里,我们先看看命令:
$ git reset --hard HEAD~1
前面的命令我们不管了,关键看最后一个HEAD~1,这个参数告诉命令,我们要恢复到当前提交(HEAD)的前1个提交(~1).如果我们要回到往前数第3个提交,我们既要传入HEAD~3。我们看到了HEAD,回想上文,仓库中有三个和HEAD有关的文件:
.git/HEAD: 这个文件里的内容是一个ref地址,指向的是当前操作的分支文件refs/heads/master
.git/logs/HEAD:这里存放的是所有操作记录
.git/ORIG_HEAD: 这里是执行git reset之后才生成的,存储的是reset之前最后一次提交的SHA值。
按照上面分析,既然reset命令可以回到当前提交之前的N个提交,那说明这N个提交信息它都能读取到,那只能是读取了.git/logs/HEAD里的记录,但是细一想,真是这样吗?
不然,因为.git/logs/HEAD里存放的是所有分支的操作记录,但很明显,当我们执行reset时期望的是回到当前分支的往前数第N个提交。那很明显,命令里的HEAD应该代表的是当前分支,即读取的是.git/HEAD里的引用地址,按照引用地址,找到了这个文件:
.git/refs/heads/master
这个里面存储的是当前分支此时指向哪个提交对象上:f4fed170c78535c48e9128fa4f1b51d2bcd4face
然后,我们知道,还有一个地方可以查到当前分支master所有的提交记录,那就是:
.git/logs/refs/heads/master
我们可以在这个文件里看到当前指向的提交f4fed170c78535c48e9128fa4f1b51d2bcd4face的前一条提交的SHA值是
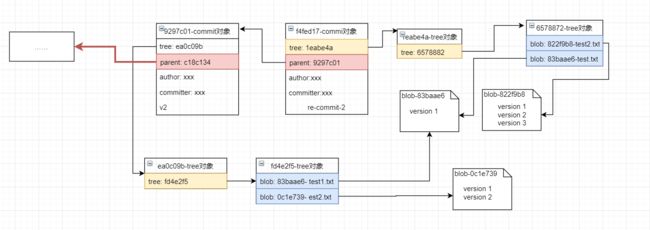
9297c01de99123bcafa9669d052211ff3c961e04,实际上,此时仓库里各个提交对象、树对象和blob对象的关系如下图所示:
实际上,除了第一次提交的commit对象,其它所有的提交对象都有一个parent属性,指向本次提交的前一次提交的HASH,通过这种机制,所有的commit形成了一个链条,当我们指定HEAD~N时,就会:
- 沿着这个链条往前找
N步,找到那个目标提交的HASH, - 然后根据
HASH值读取到目标提交对象, - 再根据对象里记录的
tree对象的HASH,找到树对象,沿着树对象形成的链条往后递归 - 找到所有的树对象,和每个树对象里的嵌套的树对象以及
blob对象,及其对应的目录名称和文件名称、文件内容, - 最后删除原来工作目录中的所有文件,按照从快照中读取到的目录层级、文件名称、文件内容,挨个将它们写入工作目录。
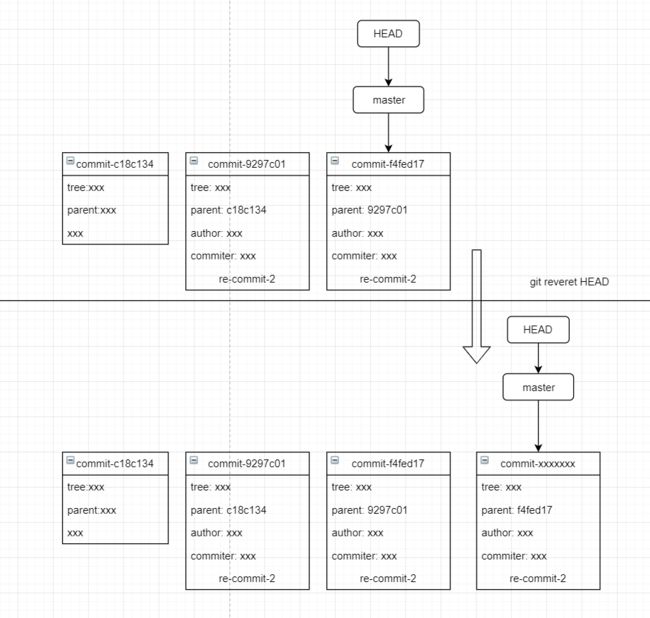
git revert 撤销操作
在执行完git reset硬撤销后,我们看看现在的提交记录:
$ git log
commit 9297c01de99123bcafa9669d052211ff3c961e04 (HEAD -> master)
Author: 何建博 <[email protected]>
Date:   Fri Jul 30 11:10:24 2021 +0800

    v2

commit c18c13420e4b84311a262b4cbf969920740d607a
Author: 何建博 <[email protected]>
Date:   Thu Jul 29 16:45:49 2021 +0800

    v1

$ ll
total 2
-rw-r--r-- 1 trs 197121 11 Jul 30 16:47 test1.txt
-rw-r--r-- 1 trs 197121 11 Aug  2 11:19 test2.txt

$ cat test1.txt
version 1

$ cat test2.txt
version 1
version 2
可以看到,在我们恢复到9297c01de99123bcafa9669d052211ff3c961e04提交后,在这之后的提交记录都没有了。
当前工作目录的内容变成了提交v2的内容。
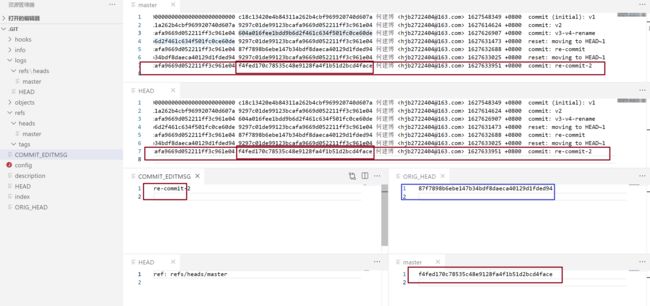
现在,我们执行git revert操作:
$ git revert HEAD
Revert "v2"

This reverts commit 9297c01de99123bcafa9669d052211ff3c961e04.

# Please enter the commit message for your changes. Lines starting
# with '#' will be ignored, and an empty message aborts the commit.
#
# On branch master
# Changes to be committed:
#       modified:   fisrtdir/test2.txt
可以看到,程序要求我们填写一个新的提交信息,默认值为Revert "v2",我们采用默认值,直接输入:wq保存执行:
$ git revert HEAD
[master d4f0c34] Revert "v2"
 1 file changed, 1 deletion(-)

$ git log
commit d4f0c34c2f25ede948c66f78f937e66c06c16b05 (HEAD -> master)
Author: 何建博 <[email protected]>
Date:   Mon Aug 2 11:19:46 2021 +0800

    Revert "v2"

    This reverts commit 9297c01de99123bcafa9669d052211ff3c961e04.

commit 9297c01de99123bcafa9669d052211ff3c961e04
Author: 何建博 <[email protected]>
Date:   Fri Jul 30 11:10:24 2021 +0800

    v2

commit c18c13420e4b84311a262b4cbf969920740d607a
Author: 何建博 <[email protected]>
Date:   Thu Jul 29 16:45:49 2021 +0800

    v1
可以看到,新生成了一条commit记录,
再看看当前工作目录内容:
$ ll
total 2
-rw-r--r-- 1 trs 197121 11 Jul 30 16:47 test1.txt
-rw-r--r-- 1 trs 197121 11 Aug  2 11:19 test2.txt

$ cat test1.txt
version 1

$ cat test2.txt
version 1

$ git ls-files -s
100644 83baae61804e65cc73a7201a7252750c76066a30 0       test1.txt
100644 83baae61804e65cc73a7201a7252750c76066a30 0       test2.txt
可以看到,当前工作目录内容变成了提交v1的内容,暂存区的索引也变成了v1提交前的索引。
再看objects目录:
$ ll
total 0
drwxr-xr-x 1 trs 197121 0 Jul 30 11:03 0c/
drwxr-xr-x 1 trs 197121 0 Jul 30 14:35 1e/
drwxr-xr-x 1 trs 197121 0 Jul 30 14:35 60/
drwxr-xr-x 1 trs 197121 0 Jul 30 14:35 65/
drwxr-xr-x 1 trs 197121 0 Jul 29 16:45 7c/
drwxr-xr-x 1 trs 197121 0 Jul 30 14:10 82/
drwxr-xr-x 1 trs 197121 0 Jul 29 14:03 83/
drwxr-xr-x 1 trs 197121 0 Jul 30 16:11 87/
drwxr-xr-x 1 trs 197121 0 Jul 29 16:45 8d/
drwxr-xr-x 1 trs 197121 0 Jul 30 11:10 92/
drwxr-xr-x 1 trs 197121 0 Jul 29 16:45 c1/
drwxr-xr-x 1 trs 197121 0 Aug  2 11:23 d4/   // 这里多了一个对象
drwxr-xr-x 1 trs 197121 0 Jul 29 13:56 e6/
drwxr-xr-x 1 trs 197121 0 Jul 30 11:10 ea/
drwxr-xr-x 1 trs 197121 0 Jul 30 16:32 f4/
drwxr-xr-x 1 trs 197121 0 Jul 30 11:10 fd/
drwxr-xr-x 1 trs 197121 0 Jul 29 10:50 info/
drwxr-xr-x 1 trs 197121 0 Jul 29 10:50 pack/
毋庸置疑,这就是这次revert操作新生成的提交。
再看看仓库信息:
可见,git revert的操作效果和git reset --hard硬撤销的效果是一样的,但是它们有一个区别:
git reset --hard不生成新的提交,只是简单地将当前分支指向目标提交,会删除目标提交之后的所有提交记录git revert不会删除之前的提交记录,会生成一次新的提交,并将当前分支指向这次新的提交,这次提交所指向的顶级tree对象和目标对象一样
用图谱描述以上两种不同的变化:
git reset --hard:
git revert:
git rm 删除文件
这个命令有两种效果:
- 从工作目录和暂存区删除
- 只从暂存区删除(加
--cached参数)
接着上面的实验步骤,我们先实验第一种,先查看当前工作目录与暂存区,然后执行rm命令,再看工作目录和暂存区
// 执行git rm 命令前
$ ll
total 2
-rw-r--r-- 1 trs 197121 11 Jul 30 16:47 test1.txt
-rw-r--r-- 1 trs 197121 11 Aug  2 11:19 test2.txt


$ git ls-files -s
100644 83baae61804e65cc73a7201a7252750c76066a30 0       test1.txt
100644 83baae61804e65cc73a7201a7252750c76066a30 0       test2.txt


// 执行git rm 命令

$ git rm test1.txt
rm 'fisrtdir/test1.txt'

// 执行git rm 命令之后
$ ll
total 1
-rw-r--r-- 1 trs 197121 11 Aug  2 11:19 test2.txt

$ git ls-files -s
100644 83baae61804e65cc73a7201a7252750c76066a30 0       test2.txt

$ git status
On branch master
Changes to be committed:
  (use "git restore --staged ..." to unstage)
        deleted:    test1.txt
我们看到,git rm命令执行了以下操作:
- 删除了工作目录中的文件
- 更新了暂存区索引
它的效果类似下面操作
$ rm test1.txt
$ git add
再来试试第二种,
$ git rm --cached test2.txt
rm 'fisrtdir/test2.txt'

$ ll
total 1
-rw-r--r-- 1 trs 197121 11 Aug  2 11:19 test2.txt

$ git ls-files -s
// 没有输出

$ git status
On branch master
Changes to be committed:
  (use "git restore --staged ..." to unstage)
        deleted:    test1.txt
        deleted:    test2.txt

Untracked files:
  (use "git add ..." to include in what will be committed)
加了--cached参数的git rm命令只更新了索引,从索引中删除了对指定文件的索引,但工作目录中对应的文件却并没有被删除。
注意此时的工作树状态——如果此时提交的话,下次再回到当前提交,工作目录中将没有test2.txt,并且此时的test2.txt将处于未跟踪状态:
$ git commit -m "rm"
[master 5c617fe] rm
 2 files changed, 2 deletions(-)
 delete mode 100644 fisrtdir/test1.txt
 delete mode 100644 fisrtdir/test2.txt

 $ ll
total 1
-rw-r--r-- 1 trs 197121 11 Aug  2 11:19 test2.txt

$ git status
On branch master
Untracked files:
  (use "git add ..." to include in what will be committed)
        ./

$ git add .

$ git status
On branch master
Changes to be committed:
  (use "git restore --staged ..." to unstage)
        new file:   test2.txt
同时,我们从git status给出的提示也可以知道,使用git restore --staged命令也可以实现git rm --cached命令的效果。
最后,我们提交这次更改,因为,马上将要引入一个最重要的东西——分支。
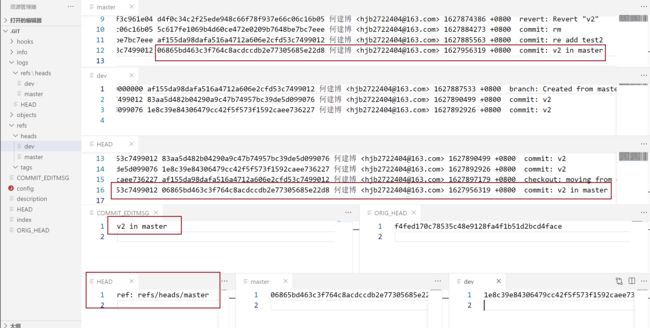
$ git commit -m "re add test2"
[master af155da] re add test2
 1 file changed, 1 insertion(+)
 create mode 100644 fisrtdir/test2.txt
11. 新建一个分支
在新建分支前,我们还是先看看当前工作目录、暂存区、objects与仓库其它信息:
工作目录和暂存区:
$ ll
total 1
-rw-r--r-- 1 trs 197121 11 Aug  2 11:19 test2.txt

$ cat test2.txt
version 1

$ git ls-files -s
100644 83baae61804e65cc73a7201a7252750c76066a30 0       test2.txt
objects目录
$ ll
total 0
drwxr-xr-x 1 trs 197121 0 Jul 30 11:03 0c/
drwxr-xr-x 1 trs 197121 0 Jul 30 14:35 1e/
drwxr-xr-x 1 trs 197121 0 Aug  2 14:26 49/
drwxr-xr-x 1 trs 197121 0 Aug  2 14:04 4b/
drwxr-xr-x 1 trs 197121 0 Aug  2 14:04 5c/
drwxr-xr-x 1 trs 197121 0 Jul 30 14:35 60/
drwxr-xr-x 1 trs 197121 0 Jul 30 14:35 65/
drwxr-xr-x 1 trs 197121 0 Jul 29 16:45 7c/
drwxr-xr-x 1 trs 197121 0 Jul 30 14:10 82/
drwxr-xr-x 1 trs 197121 0 Jul 29 14:03 83/
drwxr-xr-x 1 trs 197121 0 Jul 30 16:11 87/
drwxr-xr-x 1 trs 197121 0 Jul 29 16:45 8d/
drwxr-xr-x 1 trs 197121 0 Jul 30 11:10 92/
drwxr-xr-x 1 trs 197121 0 Aug  2 14:26 af/
drwxr-xr-x 1 trs 197121 0 Aug  2 14:26 b2/
drwxr-xr-x 1 trs 197121 0 Jul 29 16:45 c1/
drwxr-xr-x 1 trs 197121 0 Aug  2 11:23 d4/
drwxr-xr-x 1 trs 197121 0 Jul 29 13:56 e6/
drwxr-xr-x 1 trs 197121 0 Jul 30 11:10 ea/
drwxr-xr-x 1 trs 197121 0 Jul 30 16:32 f4/
drwxr-xr-x 1 trs 197121 0 Jul 30 11:10 fd/
drwxr-xr-x 1 trs 197121 0 Jul 29 10:50 info/
drwxr-xr-x 1 trs 197121 0 Jul 29 10:50 pack/
仓库其它信息:
当前关系图谱:
好的,现在我们使用git branch 查看下当前的分支情况
$ git branch
* master
目前只有一个分支,前面的* 号表明当前分支是master
接下来使用git branch 新建一个分支
$ git branch dev
$ git branch
  dev
* master
我们看到,本地分支列表中多了一个dev分支,但当前仍旧在master分支上。
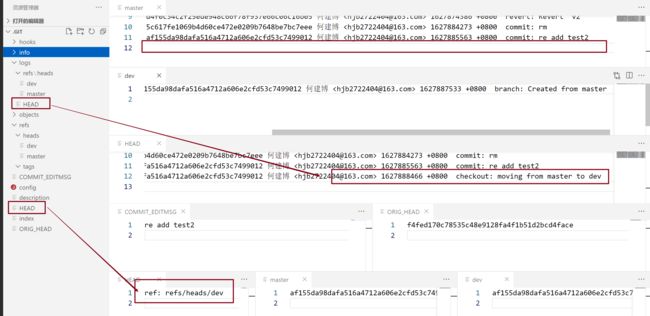
此时如果查看工作区,暂存区和objects目录,都没有发生变化,那看看当前仓库其它信息:
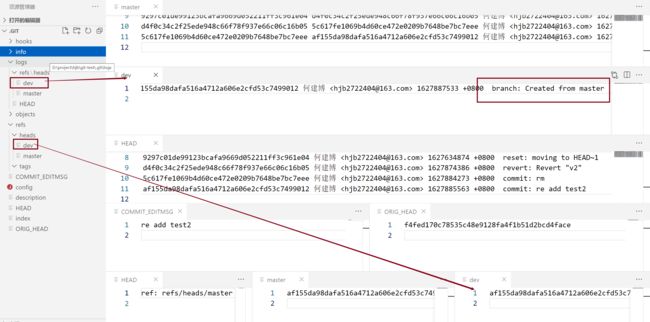
可以看到,多了两个文件:
logs/refs/heads/dev:dev分支的操作记录,新建时的记录是branch: Created from masterrefs/heads/dev: 存放了dev分支所指向的提交的SHA值,此时它的内容与同目录下master的一样。
前面我们说过,Git的分支与之前所有版本控制系统都不一样,非常的轻量级,现在应该能够明白为什么了:
结论14:Git新建分支其实就是新建了一个引用指针而已,这个指针存储了新建分支时所在那个分支当时所指向的提交对象的SHA值。
此时,关系图谱如下:
接下来,我们使用git checkout命令切换到新建的dev分支
$ git checkout dev
Switched to branch 'dev'

$ git branch
* dev
  master
可以看到,当前分支已经切换为了dev分支
可以看到,此时,有两个文件发生了变化:
.git/HEAD:它的内容更新为了dev分支的引用地址logs/HEAD: 全局操作记录里多了一条checkout的记录。
我们前面说HEAD是当前分支的别名,现在能明白了,因为HEAD里的内容永远只有一行,那就是当前分支的引用地址(就是refs/heads/目录下的分支对应文件路径)。
现在,关系图谱如下:
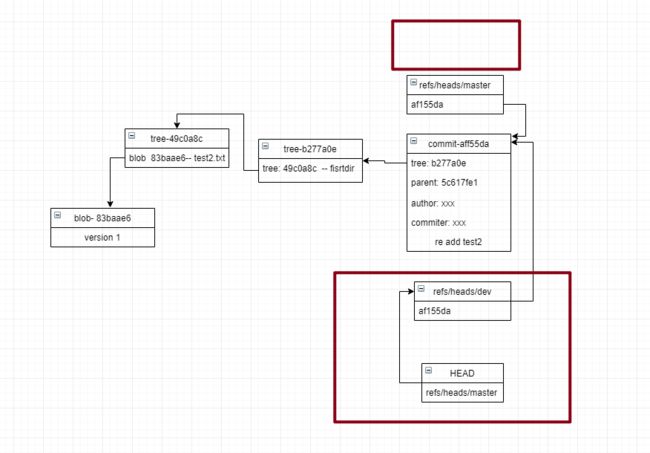
HEAD就像是一个分支指针,而切换分支就是移动指针位置而已。
12. 在新分支提交两次
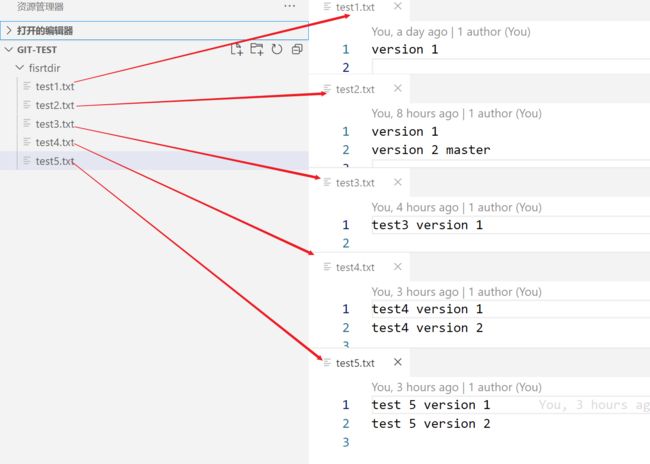
我们修改test2.txt的内容提交一次,再新建一个test1.txt文件,再提交一次,为了让objects目录变化最小,我们还是按照以前一样的内容进行修改:
$ ll
total 1
-rw-r--r-- 1 trs 197121 11 Aug  2 11:19 test2.txt

$ cat test2.txt
version 1

$ echo 'version 2' >> test2.txt

$ git add .
warning: LF will be replaced by CRLF in fisrtdir/test2.txt.
The file will have its original line endings in your working directory

$ cat test2.txt
version 1
version 2

$ git commit -m 'v2'
[dev 83aa5d4] v2
 1 file changed, 1 insertion(+)

 $ echo 'version 1' >> test1.txt

 $ ll
total 2
-rw-r--r-- 1 trs 197121 10 Aug  2 16:28 test1.txt
-rw-r--r-- 1 trs 197121 21 Aug  2 15:46 test2.txt

$ git add .
warning: LF will be replaced by CRLF in fisrtdir/test1.txt.
The file will have its original line endings in your working directory

$ git commit -m "v2"
[dev 1e8c39e] v2
 1 file changed, 1 insertion(+)
 create mode 100644 fisrtdir/test1.txt

$ git ls-files -s
100644 83baae61804e65cc73a7201a7252750c76066a30 0       test1.txt
100644 0c1e7391ca4e59584f8b773ecdbbb9467eba1547 0       test2.txt
看下仓库信息:
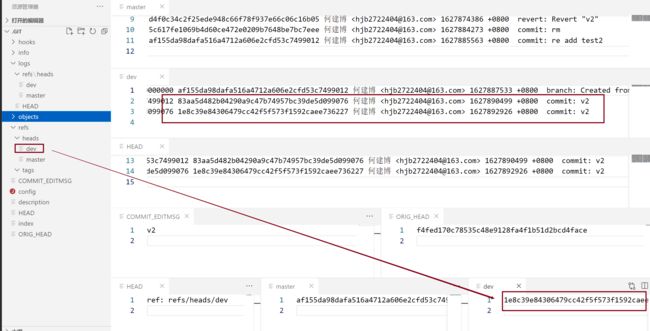
我们使用git cat-file方法一路追踪这两个提交对象(这里过程就省略了),得到如下关系图谱:
13. 合并分支
我们切回到master分支:
$ git checkout master
Switched to branch 'master'

$ git branch
  dev
* master
在master分支上修改test2.txt的内容,然后提交:
$ cat test2.txt
version 1

$ echo 'version 2 master' >> test2.txt

$ cat test2.txt
version 1
version 2 master

$ git add .
warning: LF will be replaced by CRLF in fisrtdir/test2.txt.
The file will have its original line endings in your working directory

$ git commit -m "v2 in master"
[master 06865bd] v2 in master
 1 file changed, 1 insertion(+)
看看当前仓库信息:
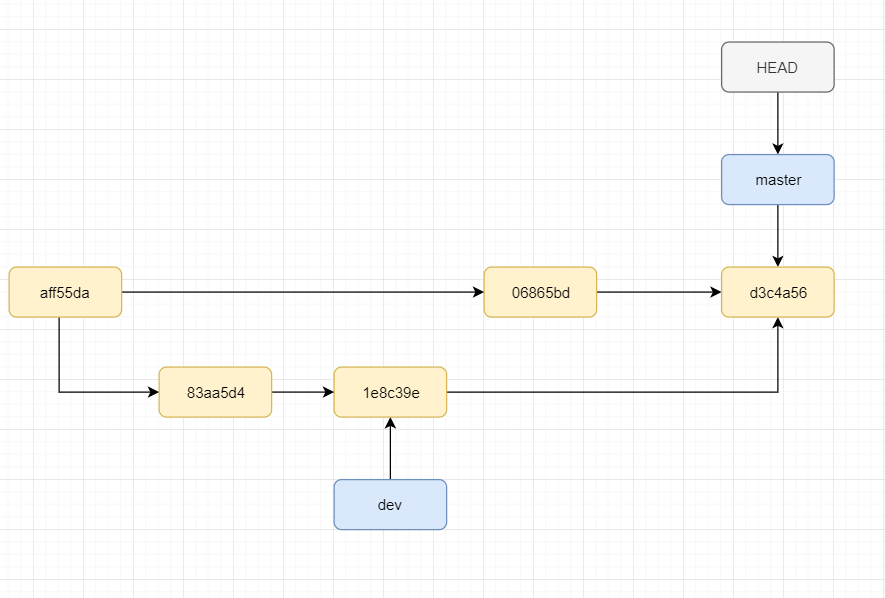
根据目前信息,我们画出当前仓库里分支与提交的关系图谱(为了方便聚焦于主要变化,不再展示内容细节):
现在,我们将dev分支合并入master分支:
$ git merge dev
Auto-merging fisrtdir/test2.txt
CONFLICT (content): Merge conflict in fisrtdir/test2.txt
Automatic merge failed; fix conflicts and then commit the result.

$ git status
On branch master
You have unmerged paths.
  (fix conflicts and run "git commit")
  (use "git merge --abort" to abort the merge)

Changes to be committed:
        new file:   test1.txt

Unmerged paths:
  (use "git add ..." to mark resolution)
        both modified:   test2.txt
我们看到,Git提示我们,它尝试自动合并两个分支的test2.txt,但是出现了冲突,自动合并失败,需要我们手动解决冲突后再提交结果。
再看当前工作树状态,发现多了一个Unmerged paths,里面是出现冲突的文件,类型为both modified,即两个分支同时都修改了这个文件。
[外链图片转存失败,源站可能有防盗链机制,建议将图片保存下来直接上传(img-0hvpMqHb-1628577772137)(C:\Users\trs\AppData\Roaming\Typora\typora-user-images\image-20210803104127601.png)]
此时我们看仓库状态信息,发现多了三个文件:
MERGE_HEAD: 一个指针,指向要合并的分支的当前提交对象。如果冲突未解决,就试图从远程仓库pull最先代码,pull命令会先检查有没有这个文件,如果这个文件存在,就会报错。MERGE_MODE: 暂时未查到关于此文件的相关资料,不知其作用MERGE_MSG:一个用于记录合并结果信息的文件。
再看此时的暂存区:
$ git ls-files -s
100644 83baae61804e65cc73a7201a7252750c76066a30 0       test1.txt
100644 83baae61804e65cc73a7201a7252750c76066a30 1       test2.txt
100644 d6508a9fed612872652dff0b673c6d35e129ef73 2       test2.txt
100644 0c1e7391ca4e59584f8b773ecdbbb9467eba1547 3       test2.txt
我们看到它保存了text2.txt的三个版本的索引,分别看下这三个内容:
$ git cat-file -p 83ba
version 1

$ git cat-file -p d650
version 1
version 2 master

$ git cat-file -p 0c1e
version 1
version 2
还记得前面说过的【三路合并】吗,可以看到,此时的三个版本分别是:
- 基础提交(即两个分支的共同祖先提交(
af155da))上test2.txt版本 - 当前分支所指向的提交(
06865bd)上的text2.txt版本 - 目标分支(被合并分支
dev)所指向的提交(1e8c39e)上的test2.txt版本。
然后,我们看下工作目录:
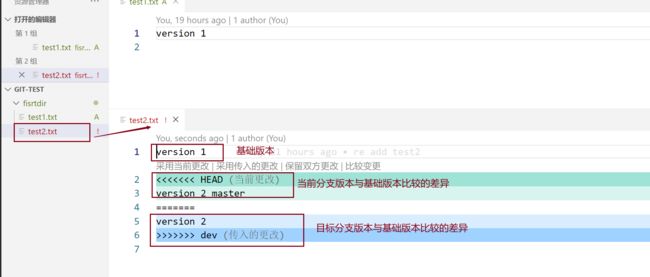
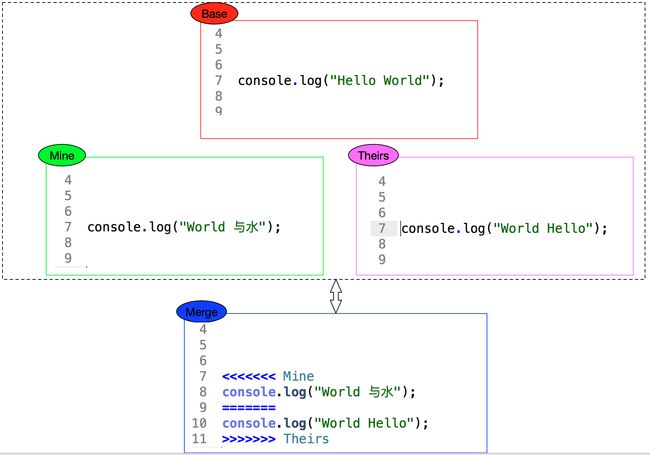
可以看到,当前工作目录下,有冲突的文件test2.txt中被加入了冲突标记,格式如下:
xxxxxxx // 基础版本与当前分支版本和目标分支版本相同的部分,
<<<<<< HEAD
xxxxxx // 当前分支版本与基础版本比较后的差异部分
==========
xxxxxxx // 目标分支版本与基础版本比较后的差异部分
>>>>>>> dev // 目标分支名称
xxxxxxx // 基础版本与当前分支版本和目标分支版本相同的部分,
在冲突时,=我们也可以通过git diff查看当前冲突详情:
$ git diff
diff --cc fisrtdir/test2.txt
index d6508a9,0c1e739..0000000
--- a/fisrtdir/test2.txt
+++ b/fisrtdir/test2.txt
@@@ -1,2 -1,2 +1,6 @@@
  version 1
++<<<<<<< HEAD
 +version 2 master
++=======
+ version 2
++>>>>>>> dev
我们再看此时的objects目录
我们查看下它的内容:
$ git cat-file -p 8b39
version 1
<<<<<<< HEAD
version 2 master
=======
version 2
>>>>>>> dev
我们发现,这个内容和我们当前工作目录中的text2.txt内容一模一样。
所以,我们此时工作目录中的冲突内容其实也是被创建了快照的。
我们尝试不解决冲突,直接提交:
$ git commit -m "not fix confilict"
error: Committing is not possible because you have unmerged files.
hint: Fix them up in the work tree, and then use 'git add/rm '
hint: as appropriate to mark resolution and make a commit.
fatal: Exiting because of an unresolved conflict.
U       fisrtdir/test2.txt
不允许提交,因为冲突未解决,我们尝试下先git add,再提交:
$ git add .
$ git status
On branch master
All conflicts fixed but you are still merging.
  (use "git commit" to conclude merge)

Changes to be committed:
        new file:   test1.txt
        modified:   test2.txt
不再有unMerged paths,所以,git add的又一个作用是:标记冲突已解决。
但其实此时冲突并未解决,我们还是把冲突给解决了(采用当前分支上的更改),重新git add,再提交:
$ cat test2.txt
version 1
version 2 master

$ git add .

$ git commit -m 'fix confilict'
[master d3c4a56] fix confilict
提交后的变化:
仓库信息:

可以发现,冲突解决后,MERGE_HEAD、MERGE_MSG、MERGE_MODE三个文件自动删除。其它变化与之前一样。
暂存区:
$ git ls-files -s
100644 83baae61804e65cc73a7201a7252750c76066a30 0       test1.txt
100644 d6508a9fed612872652dff0b673c6d35e129ef73 0       test2.txt
test2.txt的索引只留了一个版本。
objects目录

多了三个对象,不用多想,肯定是新生成的两个tree对象和一个commit对象:
$ git cat-file -p d3c4
tree 68603cac361ab7765ac5f4c6ef35639ba2aa4626
parent 06865bd463c3f764c8acdccdb2e77305685e22d8
parent 1e8c39e84306479cc42f5f573f1592caee736227
author 何建博 <[email protected]> 1627961783 +0800
committer 何建博 <[email protected]> 1627961783 +0800

fix confilict

$ git cat-file -t d3c4
commit

$ git cat-file -p 6860
040000 tree 89ff0fda87d52f3ee71393ebe95c694ab846d72d    fisrtdir

$ git cat-file -t 6860
tree

$ git cat-file -p 89ff
100644 blob 83baae61804e65cc73a7201a7252750c76066a30    test1.txt
100644 blob d6508a9fed612872652dff0b673c6d35e129ef73    test2.txt

$ git cat-file -t 89ff
tree
这里要特别注意的是,这次的commit对象中有两个parent,分别指向参与合并的两个分支。
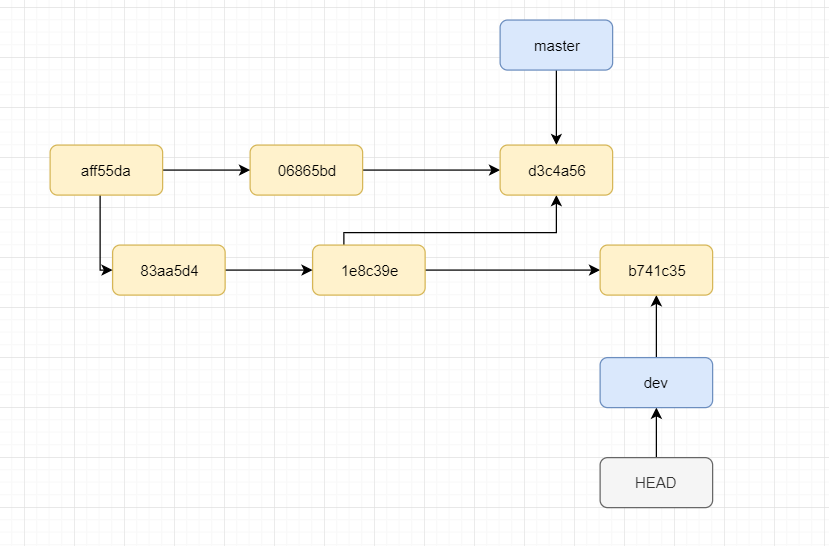
现在,我们看下当期的分支与提交图谱:
这里我们注意到,合并后,HEAD->master指针只是简单的沿着最新提交前进了一步(实际上就是改了refs/heads/master里的提交HASH为合并后新生成的提交的SHA值),这种模式我们称为fast-foward模式,即快速前进。这个模式有个缺点:
当分支很多,并且分支之间的各种合并操作很多时,整个提交图谱会显得很凌乱。
我们先使用git log --graph命令看下当前图谱:
$ git log --graph
* commit d3c4a568d736006aa9f61d9232d4841d4f378da9
|\ Merge: 06865bd 1e8c39e
| | Author: 何建博 <[email protected]>
| | Date: Tue Aug 3 11:36:23 2021 +0800
| |
| | fix confilict
| |
| * commit 1e8c39e84306479cc42f5f573f1592caee736227
| | Author: 何建博 <[email protected]>
| | Date: Mon Aug 2 16:28:46 2021 +0800
| |
| | v2
| |
| * commit 83aa5d482b04290a9c47b74957bc39de5d099076
| | Author: 何建博 <[email protected]>
| | Date: Mon Aug 2 15:48:19 2021 +0800
| |
| | v2
| |
* | commit 06865bd463c3f764c8acdccdb2e77305685e22d8
|/ Author: 何建博 <[email protected]>
| Date: Tue Aug 3 10:05:19 2021 +0800
|
| v2 in master
|
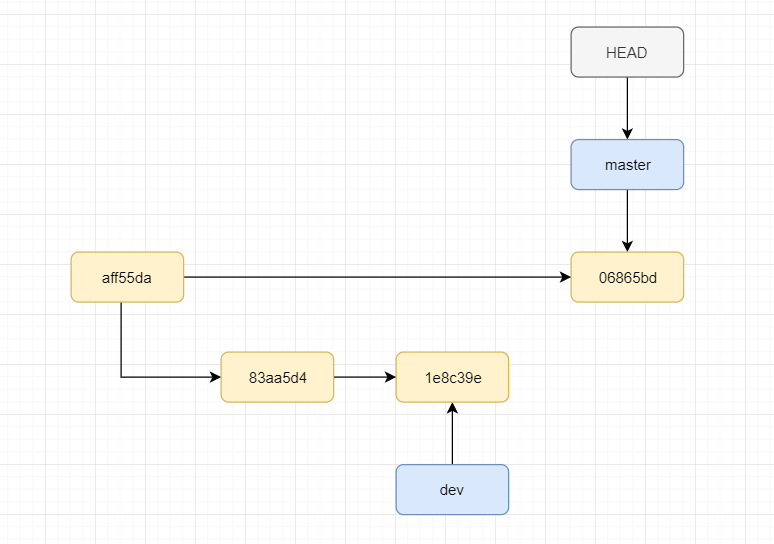
* commit af155da98dafa516a4712a606e2cfd53c7499012
| Author: 何建博 <[email protected]>
| Date: Mon Aug 2 14:26:03 2021 +0800
|
| re add test2
|
* commit 5c617fe1069b4d60ce472e0209b7648be7bc7eee
| Author: 何建博 <[email protected]>
| Date: Mon Aug 2 14:04:33 2021 +0800
上面的图谱中有两根竖直的虚线,分别代表两个分支master和dev,每个commit前都有一个*号,*号落在哪根线上,就代表那次提交是在哪个分支上进行的,比如上图中的两个v2提交前面的* 号都在第二根线上,说明他们是在dev分支上进行的。
下面,我们尝试一下非快速前进模式。
还是先切换到dev分支,增加一个test3.txt,写入一些内容并提交:
$ git checkout dev
Switched to branch 'dev'

$ echo 'test3 version 1' >> test3.txt

$ git add .
warning: LF will be replaced by CRLF in fisrtdir/test3.txt.
The file will have its original line endings in your working directory

$ git commit -m "init test3"
[dev b741c35] init test3
 1 file changed, 1 insertion(+)
 create mode 100644 fisrtdir/test3.txt
此时的提交图谱变为:
然后我们切回master分支,新建test4.txt,输入一些内容并提交:
$ git checkout -
Switched to branch 'master'

$ echo 'test4 version 1' >> test4.txt

$ git add .
warning: LF will be replaced by CRLF in fisrtdir/test4.txt.
The file will have its original line endings in your working directory

$ git commit -m "test4 init"
[master f326976] test4 init
 1 file changed, 1 insertion(+)
 create mode 100644 fisrtdir/test4.txt
这里,我使用了
git checkout -,这个命令代表【回到切换到当前分支之前的那个分支】
现在,提交图谱更新如下

然后,我们用非快速进行方式(加--no-ff参数)进行分支合并,还是将dev分支合并到master分支:
$ git merge --no-ff dev
Merge branch 'dev'
# Please enter a commit message to explain why this merge is necessary,
# especially if it merges an updated upstream into a topic branch.
#
# Lines starting with '#' will be ignored, and an empty message aborts
# the commit.
终端中会打开默认的编辑器(VIM),提示我们输入一个提交信息,默认为Merge branch 'dev'
我们直接采用默认值,按:wq保存:
$ git merge --no-ff dev
Merge made by the 'recursive' strategy.
 fisrtdir/test3.txt | 1 +
 1 file changed, 1 insertion(+)
 create mode 100644 fisrtdir/test3.txt
这里提示我们,使用了recursive递归策略来进行了合并。
这里有必要简单介绍一下Git进行合并时的两种策略5:
- resolve: 仅仅使用三路合并算法合并两个分支的顶部节点(例如当前分支和你拉取下来的另一个分支)。这种合并策略遵循三路合并算法,由两个分支的 HEAD 节点以及共同子节点进行三路合并
- recursive: 仅仅使用三路合并算法合并两个分支。和 resolve 不同的是,在交叉合并的情况时,这种合并方式是递归调用的,从共同祖先节点之后两个分支的不同节点开始递归调用三路合并算法进行合并,如果产生冲突,那么该文件不再继续合并,直接抛出冲突;其他未产生冲突的文件将一直执行到顶部节点。额外地,这种方式也能够检测并处理涉及修改文件名的操作。这是 git 合并和拉取代码的默认合并操作
不同于前一次合并,这里并没有返回合并后的提交HASH,但我们可以通过仓库信息看到:

注意我们上次手动解决冲突后的合并记录信息和本次没有冲突自动合并后记录信息的差异。
我们根据这个新的提交HASH一路追踪,得到了当前的提交图谱:
[外链图片转存失败,源站可能有防盗链机制,建议将图片保存下来直接上传(img-k4FoIkBR-1628577772147)(C:\Users\trs\AppData\Roaming\Typora\typora-user-images\image-20210803143027704.png)]
我们再用git log看下分支图谱
$ git log --graph
*   commit 2c91821b0ae94199eb2151e0a8aa0932b5b6221c (HEAD -> master)
|\  Merge: f326976 b741c35
| | Author: 何建博 <[email protected]>
| | Date:   Tue Aug 3 14:15:43 2021 +0800
| |
| |     Merge branch 'dev'
| |
| * commit b741c3531fd194361e8498d3496adbd26c032543 (dev)
| | Author: 何建博 <[email protected]>
| | Date:   Tue Aug 3 13:55:35 2021 +0800
| |
| |     init test3
| |
* | commit f326976f955c910518846b5b910b2fd248084109
| | Author: 何建博 <[email protected]>
| | Date:   Tue Aug 3 14:01:40 2021 +0800
| |
| |     test4 init
| |
* |   commit d3c4a568d736006aa9f61d9232d4841d4f378da9
|\ \  Merge: 06865bd 1e8c39e
| |/  Author: 何建博 <[email protected]>
| |   Date:   Tue Aug 3 11:36:23 2021 +0800
| |
| |       fix confilict
| * commit 1e8c39e84306479cc42f5f573f1592caee736227
| | Author: 何建博 <[email protected]>
| | Date:   Mon Aug 2 16:28:46 2021 +0800
| |
| |     v2
| |
| * commit 83aa5d482b04290a9c47b74957bc39de5d099076
| | Author: 何建博 <[email protected]>
| | Date:   Mon Aug 2 15:48:19 2021 +0800
| |
| |     v2
这时还不出两次合并有任何不同,因为第一次合并有冲突,所以我们手动进行了一次提交,导致两次看起来似乎一样。现在,我们再用一次快速前进模式(git merge默认使用此方式)来进行操作。
// 切换到dev分支
$ git checkout dev
Switched to branch 'dev'
// 修改test3.txt的内容
$ echo 'test3 version 2' >> test3.txt
// 添加到暂存区
$ git add .
warning: LF will be replaced by CRLF in fisrtdir/test3.txt.
The file will have its original line endings in your working directory
// 提交
$ git commit -m "test3 v2"
[dev e11c5ac] test3 v2
 1 file changed, 1 insertion(+)

// 切换回master分支
$ git checkout -
Switched to branch 'master'
// 修改test4.txt内容
$ echo 'test4 version 2' >> test4.txt
// 添加到暂存区
$ git add .
warning: LF will be replaced by CRLF in fisrtdir/test4.txt.
The file will have its original line endings in your working directory
// 提交
$ git commit -m "test4 v2"
[master 4cb949e] test4 v2
 1 file changed, 1 insertion(+)
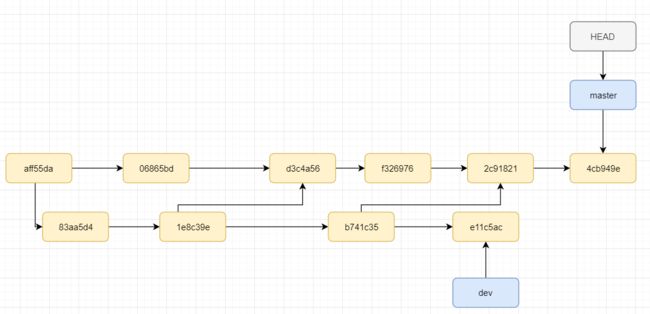
截止目前,提交图谱如下:
接下来,进行快速前进模式合并:
$ git merge dev
Merge branch 'master' to 'dev'
# Please enter a commit message to explain why this merge is necessary,
# especially if it merges an updated upstream into a topic branch.
#
# Lines starting with '#' will be ignored, and an empty message aborts
# the commit.
又让我们输入一次提交信息,我们输入Merge branch master to dev,然后按:wq保存
$ git merge dev
Merge made by the 'recursive' strategy.
 fisrtdir/test3.txt | 1 +
 1 file changed, 1 insertion(+)
此时查看提交图谱,发现并没有什么不同。
究竟为什么采用两种模式执行的结果是一样的呢?
原因是:结论15:ff 模式只有在顺着一个分支走下去可以到达另一个分支时才会选用
由于我们的dev分支缺少了master分支上的几次提交(没有test4.txt相关的所有提交),所以顺着其中一个并不能到达另一个分支。所以默认的git merge命令一直是采用的--no-ff模式。
现在,我们从master分支重新拉取一个dev2分支,然后在dev2分支上做两次提交,再回到master,直接合并dev2:
$ git checkout -b dev2
Switched to a new branch 'dev2'

$ echo 'test 5 version 1' >> test5.txt
$ git add .
warning: LF will be replaced by CRLF in fisrtdir/test5.txt.
The file will have its original line endings in your working directory
$ git commit -m "test5 v1"
[dev2 5513a65] test5 v1
 1 file changed, 1 insertion(+)
 create mode 100644 fisrtdir/test5.txt

$ echo 'test 5 version 2' >> test5.txt
$ git add .
warning: LF will be replaced by CRLF in fisrtdir/test5.txt.
The file will have its original line endings in your working directory
$ git commit -m 'test5 v2'
[dev2 fd3da8e] test5 v2
 1 file changed, 1 insertion(+)

$ git checkout -
Switched to branch 'master'
$ git merge dev2 --ff
Updating 4cb949e..fd3da8e
Fast-forward
 fisrtdir/test5.txt | 2 ++
 1 file changed, 2 insertions(+)
 create mode 100644 fisrtdir/test5.txt
注意,这里第一行使用了
git checkout -b dev2来新建并切换到了dev2分支,它相当于下面的步骤:
git branch dev2git checkout dev2
此时,查看仓库信息:

根据这些信息,我们得到了最新的提交图谱:
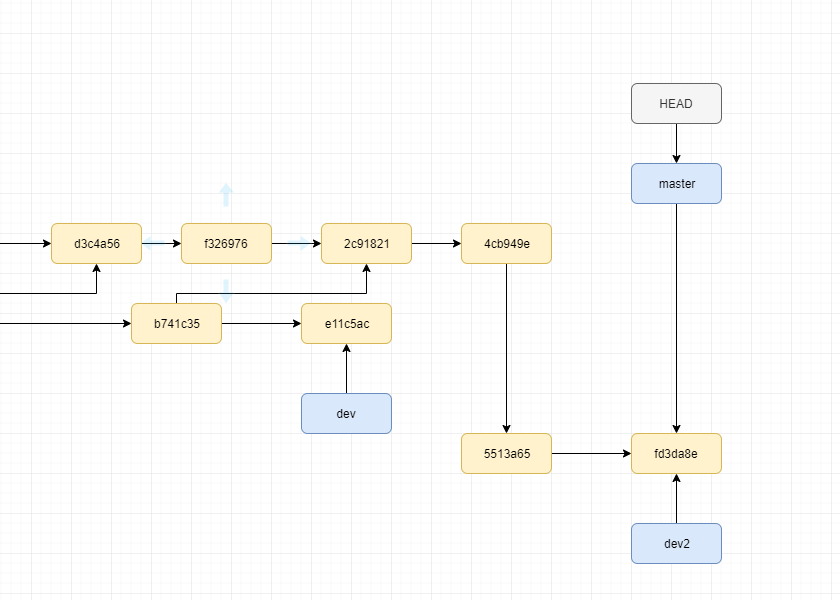
这次,我们终于看到了快速前进与非快速前进的差别:
- 非快速前进:在合入分支上新建一个提交,该提交中包含并合并了两个分支所指向提交的内容
- 快速前进: 直接将合入分支的指针指向被合入分支所指向的提交上。
我们再看分支提交图谱:
$ git log --graph
* commit fd3da8e44fb01aa14bf75a92d3947047d5d6c300 (HEAD -> master, dev2)
| Author: 何建博 <[email protected]>
| Date:   Tue Aug 3 15:13:44 2021 +0800
|
|     test5 v2
|
* commit 5513a65a509d8b9cd5dbdd9543bf76c32785c529
| Author: 何建博 <[email protected]>
| Date:   Tue Aug 3 15:13:13 2021 +0800
|
|     test5 v1
|
* commit 4cb949eda83a7cd44d838cb8f0adbbc7814db6dc
| Author: 何建博 <[email protected]>
| Date:   Tue Aug 3 14:40:41 2021 +0800
|
|     test4 v2
|
*   commit 2c91821b0ae94199eb2151e0a8aa0932b5b6221c
|\  Merge: f326976 b741c35
| | Author: 何建博 <[email protected]>
| | Date:   Tue Aug 3 14:15:43 2021 +0800
| |
| |     Merge branch 'dev'
| |
| * commit b741c3531fd194361e8498d3496adbd26c032543
| | Author: 何建博 <[email protected]>
| | Date:   Tue Aug 3 13:55:35 2021 +0800
| |
| |     init test3
| |
* | commit f326976f955c910518846b5b910b2fd248084109
| | Author: 何建博 <[email protected]>
| | Date:   Tue Aug 3 14:01:40 2021 +0800
| |
| |     test4 init
可以看到,test5 v1 和 test5 v2两次提交明明是在dev2分支上进行的,但这里却丝毫没有体现,甚至根本没有代表dev2分支的历史线。
所以,我们始终建议,任何时候,在git merge时都加上--no-ff模式,以便回顾提交历史时能够清晰地放映分支关系。
除了git merge命令外,Git里还有另外一种合并分支的方式git rebase(衍合),我们来看一下。
在进行下面的操作前,我们先要介绍一个命令—— git gc。
由于之前我们的诸多操作,现在objects里已经存在很多对象了:
$ ll
total 0
drwxr-xr-x 1 trs 197121 0 Aug  3 10:05 06/
drwxr-xr-x 1 trs 197121 0 Aug  3 14:54 0c/
drwxr-xr-x 1 trs 197121 0 Aug  3 14:56 0e/
drwxr-xr-x 1 trs 197121 0 Aug  3 14:53 0f/
drwxr-xr-x 1 trs 197121 0 Aug  3 14:53 10/
drwxr-xr-x 1 trs 197121 0 Aug  3 15:13 14/
drwxr-xr-x 1 trs 197121 0 Aug  3 14:57 17/
drwxr-xr-x 1 trs 197121 0 Aug  3 14:57 1c/
drwxr-xr-x 1 trs 197121 0 Aug  2 16:28 1e/
drwxr-xr-x 1 trs 197121 0 Aug  3 13:55 1f/
drwxr-xr-x 1 trs 197121 0 Aug  3 14:54 24/
drwxr-xr-x 1 trs 197121 0 Aug  3 14:17 2c/
drwxr-xr-x 1 trs 197121 0 Aug  3 14:39 2d/
drwxr-xr-x 1 trs 197121 0 Aug  3 15:13 31/
drwxr-xr-x 1 trs 197121 0 Aug  3 14:54 38/
drwxr-xr-x 1 trs 197121 0 Aug  3 14:57 39/
drwxr-xr-x 1 trs 197121 0 Aug  3 14:54 41/
drwxr-xr-x 1 trs 197121 0 Aug  2 14:26 49/
drwxr-xr-x 1 trs 197121 0 Aug  2 14:04 4b/
drwxr-xr-x 1 trs 197121 0 Aug  3 14:40 4c/
drwxr-xr-x 1 trs 197121 0 Aug  3 15:13 52/
drwxr-xr-x 1 trs 197121 0 Aug  3 14:54 53/
drwxr-xr-x 1 trs 197121 0 Aug  3 15:13 55/
drwxr-xr-x 1 trs 197121 0 Aug  2 14:04 5c/
drwxr-xr-x 1 trs 197121 0 Jul 30 14:35 60/
drwxr-xr-x 1 trs 197121 0 Aug  3 14:54 64/
drwxr-xr-x 1 trs 197121 0 Aug  2 15:48 65/
drwxr-xr-x 1 trs 197121 0 Aug  3 11:36 68/
drwxr-xr-x 1 trs 197121 0 Aug  3 14:48 6f/
drwxr-xr-x 1 trs 197121 0 Aug  3 15:13 70/
drwxr-xr-x 1 trs 197121 0 Aug  3 14:01 74/
drwxr-xr-x 1 trs 197121 0 Aug  3 15:13 75/
drwxr-xr-x 1 trs 197121 0 Aug  3 14:50 7a/
drwxr-xr-x 1 trs 197121 0 Jul 29 16:45 7c/
drwxr-xr-x 1 trs 197121 0 Aug  3 10:05 80/
drwxr-xr-x 1 trs 197121 0 Aug  3 14:54 81/
drwxr-xr-x 1 trs 197121 0 Jul 30 14:10 82/
drwxr-xr-x 1 trs 197121 0 Aug  2 15:48 83/
drwxr-xr-x 1 trs 197121 0 Jul 30 16:11 87/
drwxr-xr-x 1 trs 197121 0 Aug  3 11:36 89/
drwxr-xr-x 1 trs 197121 0 Aug  3 10:37 8b/
drwxr-xr-x 1 trs 197121 0 Jul 29 16:45 8d/
drwxr-xr-x 1 trs 197121 0 Aug  3 14:53 8e/
drwxr-xr-x 1 trs 197121 0 Aug  3 14:56 8f/
drwxr-xr-x 1 trs 197121 0 Aug  3 14:40 91/
drwxr-xr-x 1 trs 197121 0 Jul 30 11:10 92/
drwxr-xr-x 1 trs 197121 0 Aug  3 14:48 97/
drwxr-xr-x 1 trs 197121 0 Aug  3 14:39 98/
drwxr-xr-x 1 trs 197121 0 Aug  2 15:48 9c/
drwxr-xr-x 1 trs 197121 0 Aug  2 14:26 af/
drwxr-xr-x 1 trs 197121 0 Aug  2 14:26 b2/
drwxr-xr-x 1 trs 197121 0 Aug  3 13:55 b7/
drwxr-xr-x 1 trs 197121 0 Aug  3 14:40 b8/
drwxr-xr-x 1 trs 197121 0 Aug  3 14:01 ba/
drwxr-xr-x 1 trs 197121 0 Aug  3 14:56 bd/
drwxr-xr-x 1 trs 197121 0 Jul 29 16:45 c1/
drwxr-xr-x 1 trs 197121 0 Aug  3 14:15 c3/
drwxr-xr-x 1 trs 197121 0 Aug  3 10:05 c4/
drwxr-xr-x 1 trs 197121 0 Aug  3 14:53 c9/
drwxr-xr-x 1 trs 197121 0 Aug  3 11:36 d3/
drwxr-xr-x 1 trs 197121 0 Aug  2 11:23 d4/
drwxr-xr-x 1 trs 197121 0 Aug  3 10:05 d6/
drwxr-xr-x 1 trs 197121 0 Aug  3 14:40 dd/
drwxr-xr-x 1 trs 197121 0 Aug  3 14:39 e1/
drwxr-xr-x 1 trs 197121 0 Aug  3 13:55 e4/
drwxr-xr-x 1 trs 197121 0 Jul 29 13:56 e6/
drwxr-xr-x 1 trs 197121 0 Jul 30 11:10 ea/
drwxr-xr-x 1 trs 197121 0 Aug  3 14:15 ef/
drwxr-xr-x 1 trs 197121 0 Aug  3 14:39 f3/
drwxr-xr-x 1 trs 197121 0 Jul 30 16:32 f4/
drwxr-xr-x 1 trs 197121 0 Aug  3 15:13 f7/
drwxr-xr-x 1 trs 197121 0 Aug  3 15:11 f9/
drwxr-xr-x 1 trs 197121 0 Aug  3 15:13 fd/
drwxr-xr-x 1 trs 197121 0 Jul 29 10:50 info/
drwxr-xr-x 1 trs 197121 0 Jul 29 10:50 pack/
实际上,这些对象都是松散对象格式,就拿blob对象来说,它存储的是实际上我们的文件的内容,所以它的大小和源文件是一样的,我们从暂存区找个文件验证一下:
$ git ls-files -s
100644 83baae61804e65cc73a7201a7252750c76066a30 0       test1.txt
100644 d6508a9fed612872652dff0b673c6d35e129ef73 0       test2.txt
100644 1728e5ee30cee9e075deb93f91d003efc08c153e 0       test3.txt
100644 91b749ddf2b1579a482306ed42a5a4636a927d6b 0       test4.txt
100644 31715cd8e1d6bd99296db7f2b98ec8243d873c0c 0       test5.txt
我们以test2.txt为例,先看看它的源文件有多大:
$ cat test2.txt
version 1
version 2 master

$ ls -l test2.txt
-rw-r--r-- 1 trs 197121 29 Aug  3 15:10 test2.txt
它的大小是197121字节
再看它对应的blob对象大小:
// 在objects目录下:
$ cd d6
$ ls -l 508a9fed612872652dff0b673c6d35e129ef73
-r--r--r-- 1 trs 197121 36 Aug  3 14:54 508a9fed612872652dff0b673c6d35e129ef73
与源文件大小是一样的。
那么,这就带来一个问题,这么多对象,而且大小还和源文件一样,在用于向远程仓库推送时,岂不是会很慢?
完全不会,因为在推送前,Git会调用git gc命令,将这些松散对象压缩打包成一个pack文件,由于经过了压缩(实际上就是只存储同一个文件不同版本之间的差异来缩小体积),网络传输速度大大提高。
我们试一下:
$ git gc$ git gc
Enumerating objects: 80, done.
Counting objects: 100% (80/80), done.
Delta compression using up to 8 threads
Compressing objects: 100% (44/44), done.
Writing objects: 100% (80/80), done.
Total 80 (delta 17), reused 0 (delta 0)
输出信息告诉我们,总共有80个对象,然后可以使用差异内容来压缩的有44个,最后有17个差异内容。
再来看看仓库信息发生了哪些变化:
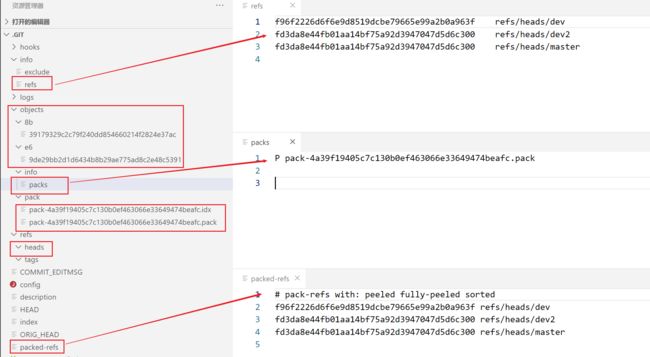
- 首先,
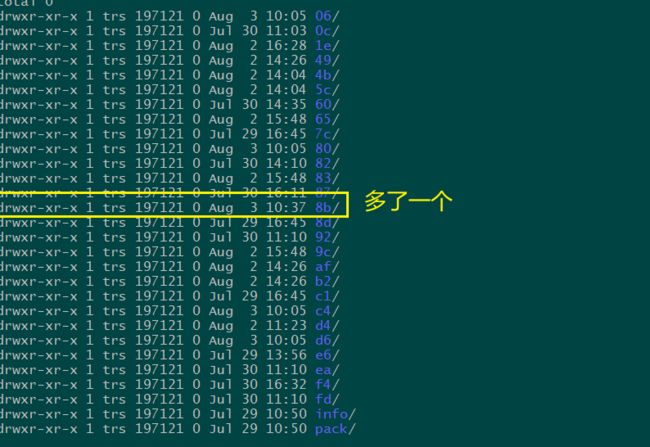
refs/heads中的分支信息没有了 info目录下多了一个refs文件,记录了分支的引用信息objects下的对象只剩下两个了,并且info目录下多了一个packs文件,记录了打包文件的文件名pack目录下多了两个文件:.idx的文件,是一个索引文件.pack,打包文件,实际数据存储的地方
- 根目录多了一个
packed-refs文件,里面记录了各个分支对应的提交对象信息。
那么,还有两个对象没有被打包,我们看下它们的内容:
$ git cat-file -p 8b39
version 1
<<<<<<< HEAD
version 2 master
=======
version 2
>>>>>>> dev

$ git cat-file -p e69d
// 没有输出
如果还记得我们之前的操作的话,你应该知道,第一个对象是我们第一次合并时,生成的冲突内容对象,而第二个对象,是我们最开始在根目录添加的那个没有任何内容的后来又删除的test1.txt对应的blob对象,由于在整个项目的分支-提交-树-blob链条中,已经没用任何地方再用到他们,所以它们成为了无用对象,在打包时被排除了。
好的,经过打包操作,我们把objects目录基本算清理干净了,这方便我们看接下来执行git rebase 操作时它所发生的变化。
现在,我们仍旧出于master分支上,我们需要切换到dev2分支上。
我们的目标是从dev2分支切换出一个新的分支dev3,在dev3上做四次提交,并且把dev3上的提交合并到dev2上面。
$ git status
On branch master
nothing to commit, working tree clean

$ git checkout dev2
Switched to branch 'dev2'

$ git checkout -b dev3
Switched to a new branch 'dev3'

$ echo '1' >> dev3.txt
$ git add .
$ git commit -m "dev3 v1"
[dev3 fd4fa54] dev3 v1
 1 file changed, 1 insertion(+)
 create mode 100644 fisrtdir/dev3.txt

$ echo '2' >> dev3.txt
$ git add .
$ git commit -m "dev3 v2"
[dev3 24e0ca3] dev3 v2
 1 file changed, 1 insertion(+)

$ echo '3' >> dev3.txt
$ git add .
$ git commit -m "dev3 v3"
[dev3 8b92a39] dev3 v3
 1 file changed, 1 insertion(+)

$ echo '4' >> dev3.txt
$ git add .
$ git commit -m "dev3 v4"
[dev3 fb02e99] dev3 v4
 1 file changed, 1 insertion(+)

 $ git checkout dev2
Switched to branch 'dev2'

$ git branch dev4
经过以上操作,最后,我们切回到了dev2分支,并且从它新建了dev4分支,用于后续的操作。
在进行合并操作前,我们先看下当前状态:
工作区:
暂存区:
$ git ls-files -s
100644 83baae61804e65cc73a7201a7252750c76066a30 0       test1.txt
100644 d6508a9fed612872652dff0b673c6d35e129ef73 0       test2.txt
100644 1728e5ee30cee9e075deb93f91d003efc08c153e 0       test3.txt
100644 91b749ddf2b1579a482306ed42a5a4636a927d6b 0       test4.txt
100644 31715cd8e1d6bd99296db7f2b98ec8243d873c0c 0       test5.txt
当前分支(dev2)提交历史,我限定了最近两次提交:
$ git log -2
commit fd3da8e44fb01aa14bf75a92d3947047d5d6c300 (HEAD -> dev2, master, dev4)
Author: 何建博 <[email protected]>
Date:   Tue Aug 3 15:13:44 2021 +0800

    test5 v2

commit 5513a65a509d8b9cd5dbdd9543bf76c32785c529
Author: 何建博 <[email protected]>
Date:   Tue Aug 3 15:13:13 2021 +0800

    test5 v1
看下仓库信息:
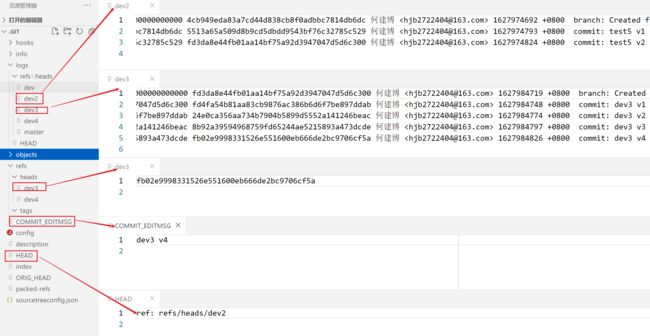
依据以上信息,我们先整理下提交图谱:
现在,我们使用git rebase来将dev3的四次提交合并入dev2
$ git rebase dev3
First, rewinding head to replay your work on top of it...
Fast-forwarded dev2 to dev3.
命令输出信息提示我们,重新倒带头部,重新应用到当前工作分支的顶部(所指向的提交),并且使用的是【快速前进】模式。
现在再看看状态:
工作区:成功合并到了dev3上的内容

objects目录没有变化
看看仓库信息:

这里,我们可以出git rebase与git merge操作后操作记录的不同,我们再来看看master之前快速前进模式合并后的记录:

其次,dev2的引用的提交对象直接变成了与dev3一样的。
根据以上信息,我们得到了提交图谱
看起来,git rebase 与 git merge的快速前进模式似乎是一样的效果。
结论16:实际上,当我们从一个源分支(如dev2)上切出一个新分支(如dev3),然后在新分支上进行若干次提交而源分支不做任何提交后,此时将新分支衍合(即rebase)到源分支,其效果是和git merge的快速前进模式(--ff)是一样的。
现在,我们再次进行打包操作,清理objects目录:
$ git gc
Enumerating objects: 96, done.
Counting objects: 100% (96/96), done.
Delta compression using up to 8 threads
Compressing objects: 100% (35/35), done.
Writing objects: 100% (96/96), done.
Total 96 (delta 21), reused 79 (delta 17)

// 在objects目录
$ ll
total 4
drwxr-xr-x 1 trs 197121 0 Aug  4 09:25 8b/
drwxr-xr-x 1 trs 197121 0 Jul 29 13:56 e6/
drwxr-xr-x 1 trs 197121 0 Aug  4 09:25 info/
drwxr-xr-x 1 trs 197121 0 Aug  4 09:25 pack/

$ ll pack
total 12
-r--r--r-- 1 trs 197121 3760 Aug  4 09:25 pack-0752eca71323f6ee23f45c3a663c671d312e2e5f.idx
-r--r--r-- 1 trs 197121 7229 Aug  4 09:25 pack-0752eca71323f6ee23f45c3a663c671d312e2e5f.pack
这里注意看输出的提示,当我们再次进行打包操作时,依旧是要算上之前打包的所有内容的,并且会生成一个新的包替换之前的包。
之前的操作,我们都是在fisrtdir目录中进行的操作,以下操作,我们在根目录进行:
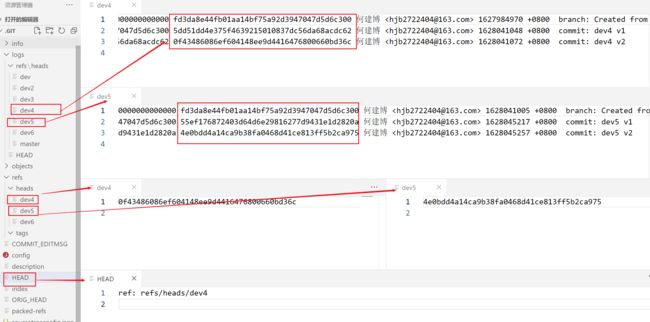
然后我们切换到dev4,并从dev4上新建dev5与dev6分支,并且分别在dev4与dev5分支上j进行两次提交,然后再将dev5衍合(rebase)到dev4分支上。
$ git checkout dev4
Switched to branch 'dev4'

$ git branch dev5
$ git branch dev6

$ echo '1' >> dev4.txt
$ git add .
$ git commit -m "dev4 v1"
[dev4 5dd51dd] dev4 v1
 1 file changed, 1 insertion(+)
 create mode 100644 dev4.txt

$ echo '2' >> dev4.txt
$ git add .
$ git commit -m "dev4 v2"
[dev4 0f43486] dev4 v2
 1 file changed, 1 insertion(+)

 $ git checkout dev5
Switched to branch 'dev5'
$ echo '1' >> 'dev5.txt'
$ git add .
$ git commit -m "dev5 v1"
[dev5 55ef176] dev5 v1
 1 file changed, 1 insertion(+)
 create mode 100644 dev5.txt

$ echo '2' >> 'dev5.txt'
$ git add .
$ git commit -m "dev5 v2"
[dev5 4e0bdd4] dev5 v2
 1 file changed, 1 insertion(+)

$ git checkout dev4
Switched to branch 'dev4'
看看当前仓库状态:
根据以上易信息,我们整理出当前的分支提交图谱:
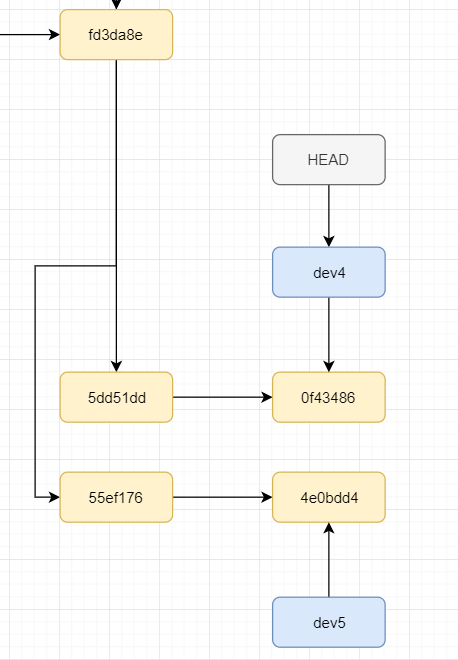
现在,我们再次执行git gc对当前对象打包:
$ git gc
Enumerating objects: 104, done.
Counting objects: 100% (104/104), done.
Delta compression using up to 8 threads
Compressing objects: 100% (39/39), done.
Writing objects: 100% (104/104), done.
Total 104 (delta 23), reused 95 (delta 21)
看下当前objects目录:
$ ll
total 4
drwxr-xr-x 1 trs 197121 0 Aug  4 09:25 8b/
drwxr-xr-x 1 trs 197121 0 Jul 29 13:56 e6/
drwxr-xr-x 1 trs 197121 0 Aug  4 10:59 info/
drwxr-xr-x 1 trs 197121 0 Aug  4 10:59 pack/
然后执行衍合操作:
$ git rebase dev5
First, rewinding head to replay your work on top of it...
Applying: dev4 v1
Applying: dev4 v2
这里提示,应用了dev3 v1和dev5两个版本,这里我们先不说代表什么意思,先看看objects目录:
$ ll
total 4
drwxr-xr-x 1 trs 197121 0 Aug  4 11:01 7c/
drwxr-xr-x 1 trs 197121 0 Aug  4 11:01 84/
drwxr-xr-x 1 trs 197121 0 Aug  4 09:25 8b/
drwxr-xr-x 1 trs 197121 0 Aug  4 11:01 a8/
drwxr-xr-x 1 trs 197121 0 Aug  4 11:01 d3/
drwxr-xr-x 1 trs 197121 0 Jul 29 13:56 e6/
drwxr-xr-x 1 trs 197121 0 Aug  4 10:59 info/
drwxr-xr-x 1 trs 197121 0 Aug  4 10:59 pack/
对比上面可以看出,多了4个对象,我们看下它们的内容:
$ git cat-file -p 7c78
tree 84b5c0989343771fba3731f5bcd823f37c90e9ed
parent a8f986aafd750b239a75edef98b225a0ce4ee978
author 何建博 <[email protected]> 1628041072 +0800
committer 何建博 <[email protected]> 1628046065 +0800

dev4 v2

$ git cat-file -p 84b5
100644 blob 1191247b6d9a206f6ba3d8ac79e26d041dd86941    dev4.txt
100644 blob 1191247b6d9a206f6ba3d8ac79e26d041dd86941    dev5.txt
040000 tree 75242e9fdbeba1b611a896ee69aae732962b8e94    fisrtdir

$ git cat-file -p a8f9
tree d3258920a8783ca1594dac226a8c856f44e2efe0
parent 4e0bdd4a14ca9b38fa0468d41ce813ff5b2ca975
author 何建博 <[email protected]> 1628041048 +0800
committer 何建博 <[email protected]> 1628046065 +0800

dev4 v1


$ git cat-file -p d325
100644 blob d00491fd7e5bb6fa28c517a0bb32b8b506539d4d    dev4.txt
100644 blob 1191247b6d9a206f6ba3d8ac79e26d041dd86941    dev5.txt
040000 tree 75242e9fdbeba1b611a896ee69aae732962b8e94    fisrtdir
是两个树对象和两个提交对象,两个树对象我们知道,是因为我们切换回了根目录进行内容更改,所以目录结构变了,新生成了两个树对象。那么,为什么多了两个提交对象呢?
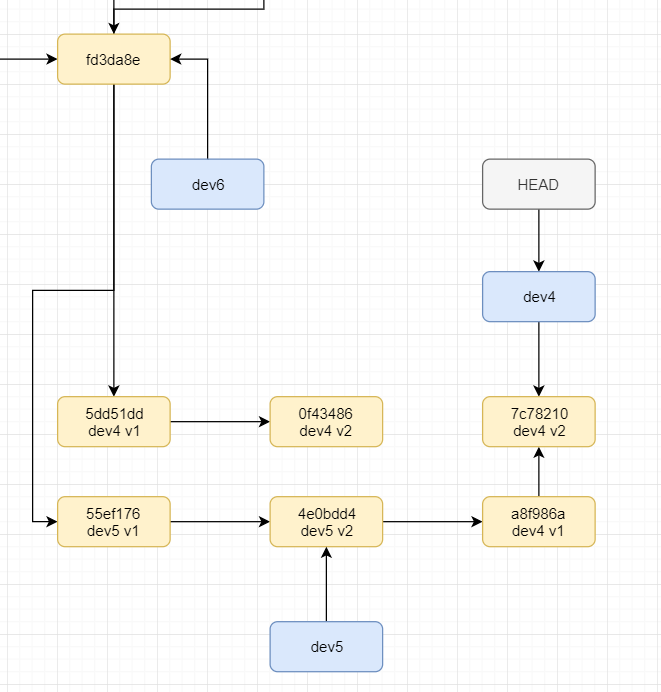
从这两个提交对象的提交信息来看,是复制了dev4 v1(提交HASH为5dd51dd)和dev4 v2 (提交Hash为0f43486)两个提交,但这个新复制的dev4 v1的父提交却又是dev5 v2(4e0bdd4).
再看看仓库信息:
根据以上信息,我们得到当前分支提交图谱:

所以,
结论17: git rebase操作实际上是——
1. 从当前分支上,找到与目标分支的【共同祖先提交】之后的那次提交
2. 从那次提交开始,把之后的所有提交挨个提取出来,
3. 在目标分支的最新提交基础上将提取出来的提交挨个再重做一次,
4. 将当前分支指向目标分支重做后的最后一个提交。
这也就是为什么上一次衍合操作看起来和git merge的快速前进模式看起来一样的原因:因为当前分支没有做任何提交,所以直接执行了第4步。
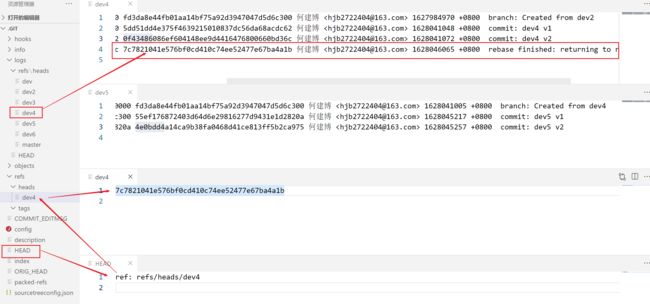
我们看下当前分支dev4的提交历史:
$ git log --graph
* commit 7c7821041e576bf0cd410c74ee52477e67ba4a1b (HEAD -> dev4)
| Author: 何建博 <[email protected]>
| Date:   Wed Aug 4 09:37:52 2021 +0800
|
|     dev4 v2
|
* commit a8f986aafd750b239a75edef98b225a0ce4ee978
| Author: 何建博 <[email protected]>
| Date:   Wed Aug 4 09:37:28 2021 +0800
|
|     dev4 v1
|
* commit 4e0bdd4a14ca9b38fa0468d41ce813ff5b2ca975 (dev5)
| Author: 何建博 <[email protected]>
| Date:   Wed Aug 4 10:47:37 2021 +0800
|
|     dev5 v2
|
* commit 55ef176872403d64d6e29816277d9431e1d2820a
| Author: 何建博 <[email protected]>
| Date:   Wed Aug 4 10:46:57 2021 +0800
|
|     dev5 v1
|
* commit fd3da8e44fb01aa14bf75a92d3947047d5d6c300 (master, dev6)
| Author: 何建博 <[email protected]>
| Date:   Tue Aug 3 15:13:44 2021 +0800
|
|     test5 v2
|
* commit 5513a65a509d8b9cd5dbdd9543bf76c32785c529
| Author: 何建博 <[email protected]>
| Date:   Tue Aug 3 15:13:13 2021 +0800
|
|     test5 v1
|
从这里我们可以看出这个操作的两个问题来:
- 与
git merge的快速前进模式一样,丢失了分支历史线,只剩了一根单一的当前分支的历史线。 - 时间顺序错乱。我们在
dev 4分支上提交的dev4 v1和dev4 v2的时间是早于dev5 v1和dev5 v2的,但是这里看,他们却在dev5 v1和dev5 v2的上面。
所以,官方建议是:结论18:可以在自己的分支之间进行衍合(rebase)操作,但不要在自己的分支与其他人的分支(包括所有远程分支)之间进行衍合操作,因为会造成分支线和时间线混乱。
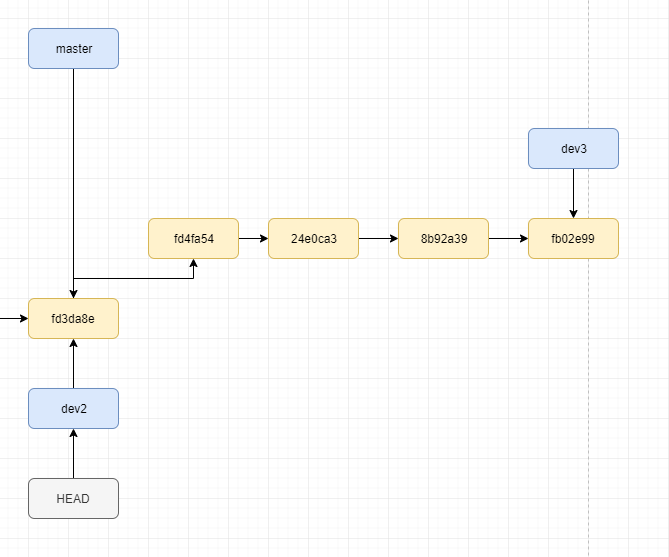
14 分支片段复制
有时候,我们需要将某个分支上的中间几次提交合并到另一个分支上,这种操作我们暂且称作【分支片段复制】,那么该如何操作呢?
有两个命令可以做到:
git rebase,对,又是它,只不过这次传递给它的参数不再是分支名,而是提交的SHA值。git cherry-pick,给定一个或多个现有提交,应用每个提交的更改,为每个提交记录一个新提交。这个命令要求工作目录是干净的。
我们先看用git rebase是怎么操作的。
我们的目标是,在dev6上做四次提交,然后将前两次提交合并入dev4分支。
我们先看下当前的提交图谱:
当前dev6指向fd3da8e提交,而dev4则指向7c78210提交。
我们按照目标进行操作:
$ git checkout dev6
Switched to branch 'dev6'

$ echo '1' >> dev6.txt
$ git add .
$ git commit -m "dev6 v1"
[dev6 09af99d] dev6 v1
 1 file changed, 1 insertion(+)
 create mode 100644 dev6.txt

$ echo '2' >> dev6.txt
$ git add .
$ git commit -m "dev6 v2"
[dev6 9061323] dev6 v2
 1 file changed, 1 insertion(+)

$ echo '3' >> dev6.txt
$ git add .
$ git commit -m "dev6 v3"
[dev6 1a324be] dev6 v3
 1 file changed, 1 insertion(+)

$ echo '4' >> dev6.txt
$ git add .
$ git commit -m "dev6 v4"
[dev6 846c2c3] dev6 v4
 1 file changed, 1 insertion(+)

$ git checkout -
Switched to branch 'dev4'
看看现在的仓库信息:

根据以上信息,得到现在的分支提交关系图谱变为:
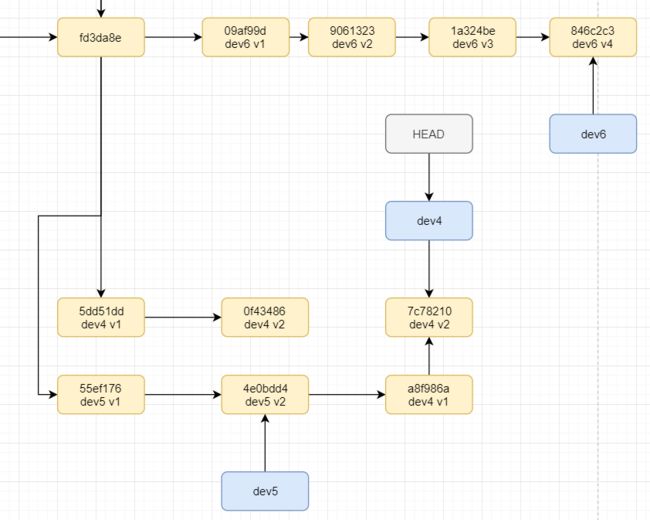
照例,我们执行git gc打包objects里的对象:
$git gc

// objects目录
$ ll
total 4
drwxr-xr-x 1 trs 197121 0 Aug  4 09:25 8b/
drwxr-xr-x 1 trs 197121 0 Jul 29 13:56 e6/
drwxr-xr-x 1 trs 197121 0 Aug  4 14:22 info/
drwxr-xr-x 1 trs 197121 0 Aug  4 14:22 pack/
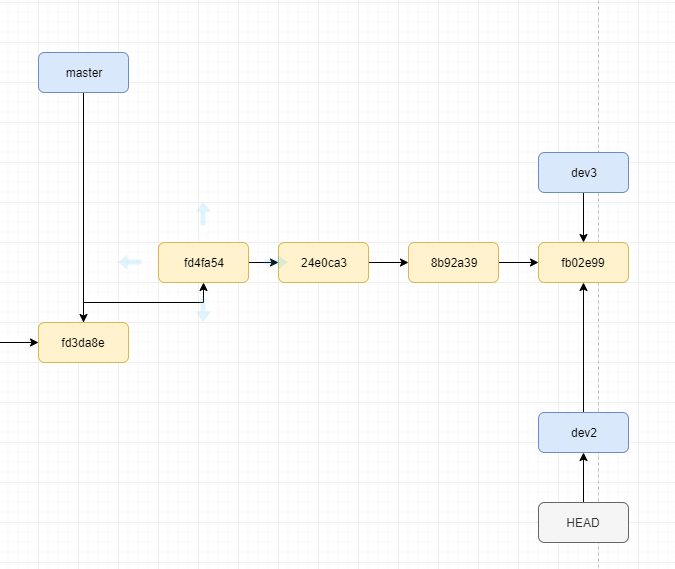
接下来,我们使用git rebase操作将dev6 v1(提交HASH09af99d)、dev6 v2(提交HASH9061323)两次提交合并到dev4分支上。
$ git checkout dev6
Switched to branch 'dev6'

$ git rebase 09af99d 9061323 --onto dev4
First, rewinding head to replay your work on top of it...
Applying: dev6 v1
Applying: dev6 v2
首先来说明下我们的操作:
- 使用
rebase复制某个分支(这里是dev6)的某几个连续提交到另一个分支(这里是dev4)上,需要在被复制的分支(dev6)上操作。所以,我们先切换到了dev6分支上。 - 使用
git rebase startpoint endpoint --onto targetBranchName命令来完成复制粘贴的操作,其中:startpoint endpoint,要复制的多个提交的第一个和最后一个提交的HASH,这两个提交之间的提交都将被复制--onto指定将提交应用到哪里targetBranchName,指定目标分支,即这几个提交要被复制到哪个分支上。
先来看看主要区域的变化:
工作目录:
objects目录:
drwxr-xr-x 1 trs 197121 0 Aug  4 14:32 07/
drwxr-xr-x 1 trs 197121 0 Aug  4 14:32 55/
drwxr-xr-x 1 trs 197121 0 Aug  4 14:32 81/
drwxr-xr-x 1 trs 197121 0 Aug  4 09:25 8b/
drwxr-xr-x 1 trs 197121 0 Aug  4 14:32 db/
drwxr-xr-x 1 trs 197121 0 Jul 29 13:56 e6/
drwxr-xr-x 1 trs 197121 0 Aug  4 14:22 info/
drwxr-xr-x 1 trs 197121 0 Aug  4 14:22 pack/
生成了四个对象,我们分别来看一下它们的内容:
$ git cat-file -p 07c7
100644 blob 1191247b6d9a206f6ba3d8ac79e26d041dd86941    dev4.txt
100644 blob 1191247b6d9a206f6ba3d8ac79e26d041dd86941    dev5.txt
100644 blob d00491fd7e5bb6fa28c517a0bb32b8b506539d4d    dev6.txt
040000 tree 75242e9fdbeba1b611a896ee69aae732962b8e94    fisrtdir

$ git cat-file -p 55a2
tree 81ac24f940adb7fac88ffe83bc7e020290584428
parent db24271a59244dacc57976eac93604aecc2fa48c
author 何建博 <[email protected]> 1628057385 +0800
committer 何建博 <[email protected]> 1628058745 +0800

dev6 v2

$ git cat-file -p 81ac
100644 blob 1191247b6d9a206f6ba3d8ac79e26d041dd86941    dev4.txt
100644 blob 1191247b6d9a206f6ba3d8ac79e26d041dd86941    dev5.txt
100644 blob 1191247b6d9a206f6ba3d8ac79e26d041dd86941    dev6.txt
040000 tree 75242e9fdbeba1b611a896ee69aae732962b8e94    fisrtdir

$ git cat-file -p db24
tree 07c7729b5cdee28aaea6114e29097578eb6928d4
parent 7c7821041e576bf0cd410c74ee52477e67ba4a1b
author 何建博 <[email protected]> 1628057355 +0800
committer 何建博 <[email protected]> 1628058745 +0800

dev6 v1
与上文的衍合操作一样,生成了两次提交和两个树对象。
再看看仓库信息:
神奇的是,其它都没有变,只有HEAD变了,之前的HEAD一直都存放的是一个指向分支引用的地址,但是这次变成了新生成的提交对象dev6 v2
根据以上信息,我们更新提交关系图:
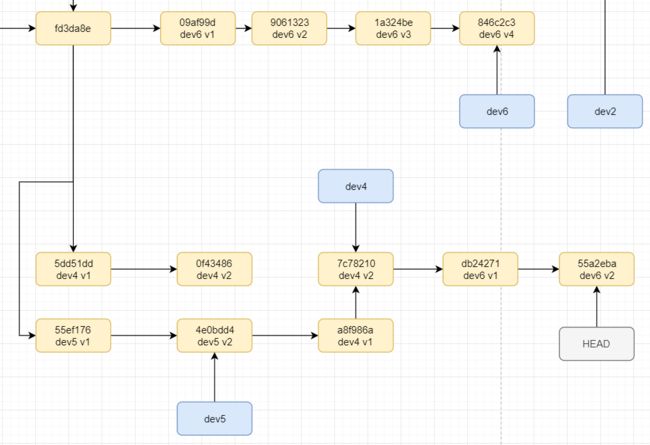
我们看到,在dev4分支上,又多出了两个提交,正是我们从dev6复制出的两次提交。
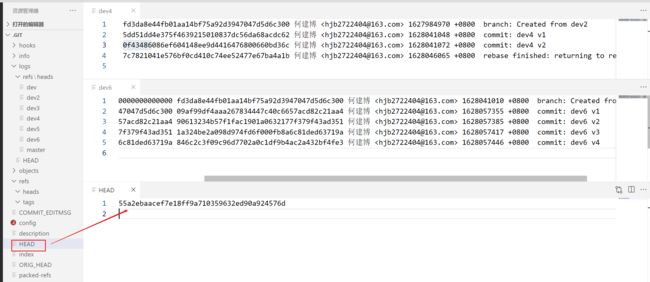
但此时出现了新情况,此时dev4仍旧指向7c78210提交,而HEAD却指向了最新的55a2eba提交上,我们把这种情况称为游离HEAD,专门指HEAD指向与分支指向不同的情况。
此时,我们需要回到dev4分支所指向的提交,并且使用git reset命令强制让dev4指向当前HEAD所在提交:
$git checkout dev4
Warning: you are leaving 2 commits behind, not connected to
any of your branches:

  55a2eba dev6 v2
  db24271 dev6 v1

If you want to keep them by creating a new branch, this may be a good time
to do so with:

 git branch <new-branch-name> 55a2eba

Switched to branch 'dev4'

$ git reset --hard 55a2eba
HEAD is now at 55a2eba dev6 v2
注意,当HEAD处于游离状态时,我们切换到分支时,会给出提示。这里提示我们当前dev4分支所指向的提交比HEAD所指向的提交落后了两个提交,并给出了两个提交的信息和解决办法,它建议的解决办法是使用git branch命令从挡墙HEAD指向的提交处新建一个分支出来,我们不采用它的办法,而是直接reset当前分支指向。
现在再看状态:
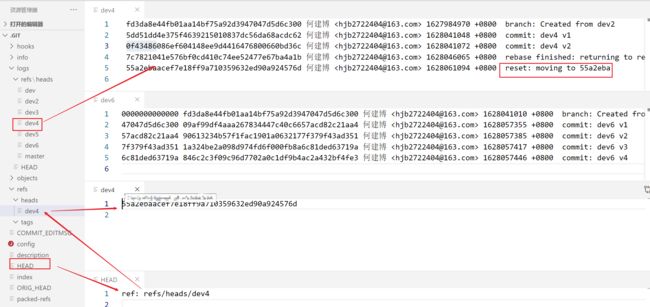
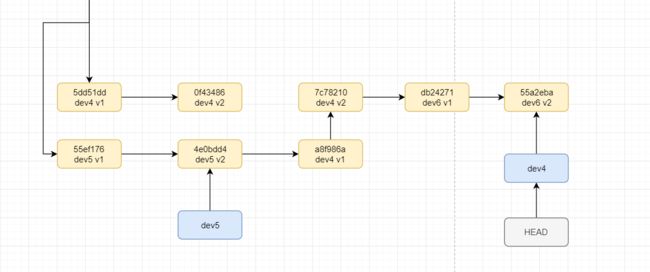
再看下提交历史图谱:
$ git log --graph
* commit 55a2ebaacef7e18ff9a710359632ed90a924576d (HEAD -> dev4)
| Author: 何建博 <[email protected]>
| Date:   Wed Aug 4 14:09:45 2021 +0800
|
|     dev6 v2
|
* commit db24271a59244dacc57976eac93604aecc2fa48c
| Author: 何建博 <[email protected]>
| Date:   Wed Aug 4 14:09:15 2021 +0800
|
|     dev6 v1
|
* commit 7c7821041e576bf0cd410c74ee52477e67ba4a1b
| Author: 何建博 <[email protected]>
| Date:   Wed Aug 4 09:37:52 2021 +0800
|
|     dev4 v2
|
* commit a8f986aafd750b239a75edef98b225a0ce4ee978
| Author: 何建博 <[email protected]>
| Date:   Wed Aug 4 09:37:28 2021 +0800
|
|     dev4 v1
|
* commit 4e0bdd4a14ca9b38fa0468d41ce813ff5b2ca975
| Author: 何建博 <[email protected]>
| Date:   Wed Aug 4 10:47:37 2021 +0800
|
|     dev5 v2
|
* commit 55ef176872403d64d6e29816277d9431e1d2820a
| Author: 何建博 <[email protected]>
| Date:   Wed Aug 4 10:46:57 2021 +0800
|
|     dev5 v1
与衍合操作一样,提交区间的复制粘贴不显示分支信息,即从这个历史线看不出哪些提交是从哪个分支复制过来的
接下来,我们再使用git cherry-pick命令来将dev6的前两次提交复制到dev5分支上去。
注意,如上图,此时dev5分支指向的提交是dev5 v2(4e0bdd4).
与git rebase不同,git cherry-pick需要在目标分支上运行,比如我们要将dev6上的提交复制到dev5分支,那么我们需要在dev5上操作,而git rebase则是在dev6上操作:
我们当前就正处在dev4分支上,老规矩,先指向git gc,然后查看仓库状态:
$ git gc
// objects目录下:
$ ll
total 4
drwxr-xr-x 1 trs 197121 0 Aug  4 09:25 8b/
drwxr-xr-x 1 trs 197121 0 Jul 29 13:56 e6/
drwxr-xr-x 1 trs 197121 0 Aug  4 15:47 info/
drwxr-xr-x 1 trs 197121 0 Aug  4 15:47 pack/
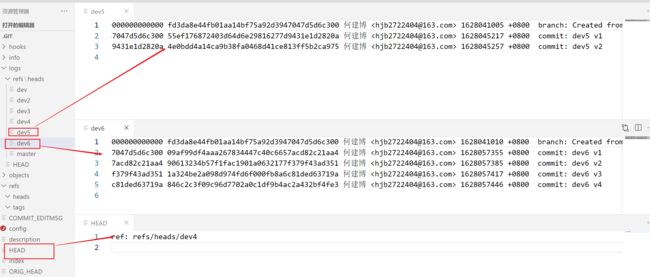
然后切换到dev5分支,进行cherry-pick操作:
$ git checkout dev5
Switched to branch 'dev5'  // 此时HEAD指向`dev5`

$ git cherry-pick 09af99d^..9061323
[dev5 96f758d] dev6 v1
 Date: Wed Aug 4 14:09:15 2021 +0800
 1 file changed, 1 insertion(+)
 create mode 100644 dev6.txt
[dev5 8dcd326] dev6 v2
 Date: Wed Aug 4 14:09:45 2021 +0800
 1 file changed, 1 insertion(+)
我们先解释下命令和输出:
- 使用
git cherry-pick start..end来将start与end两个提交之间的所有提交复制到本分支 start..end是一个左开右闭的区间,意思是复制时将包含end而不包含start.- 所以我们使用
start^来将开始提交指定为start之前一个提交 - 执行命令后,输出了我们复制的两个提交的相关信息,包括HASH、提交说明、源提交创建日期、提交中包含的变动数量等。
我们看下工作目录:
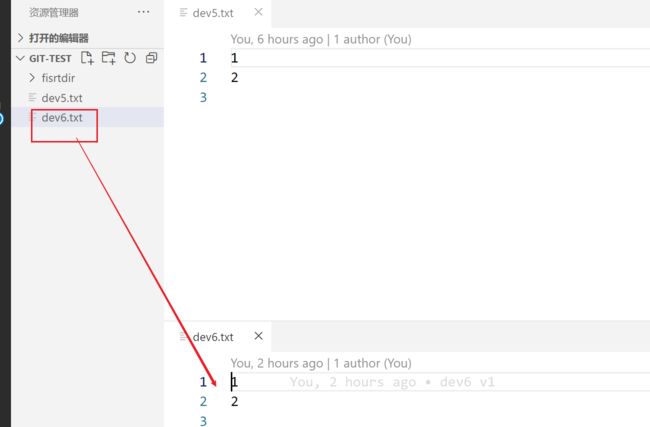
然后看下objects目录:
$ ll
total 4
drwxr-xr-x 1 trs 197121 0 Aug  4 16:15 64/
drwxr-xr-x 1 trs 197121 0 Aug  4 09:25 8b/
drwxr-xr-x 1 trs 197121 0 Aug  4 16:15 8d/
drwxr-xr-x 1 trs 197121 0 Aug  4 16:15 96/
drwxr-xr-x 1 trs 197121 0 Aug  4 16:15 c1/
drwxr-xr-x 1 trs 197121 0 Jul 29 13:56 e6/
drwxr-xr-x 1 trs 197121 0 Aug  4 15:47 info/
drwxr-xr-x 1 trs 197121 0 Aug  4 15:47 pack/
同样,也是生成了四个对象,不出意外,应该是两个树对象和两个提交对象:
$ git cat-file -p 8dcd
tree c1bc787666536cb9daafb6c32947ec19deb82afc
parent 96f758d85051aeb54c795ddb07b5d15cf7313a7a
author 何建博 <[email protected]> 1628057385 +0800
committer 何建博 <[email protected]> 1628064910 +0800

dev6 v2

$ git cat-file -p 6466
100644 blob 1191247b6d9a206f6ba3d8ac79e26d041dd86941    dev5.txt
100644 blob d00491fd7e5bb6fa28c517a0bb32b8b506539d4d    dev6.txt
040000 tree 75242e9fdbeba1b611a896ee69aae732962b8e94    fisrtdir

$ git cat-file -p 96f7
tree 6466b593f32a0212d1c936c7f6e675f27a8ec78a
parent 4e0bdd4a14ca9b38fa0468d41ce813ff5b2ca975
author 何建博 <[email protected]> 1628057355 +0800
committer 何建博 <[email protected]> 1628064910 +0800

dev6 v1

$ git cat-file -p c1bc
100644 blob 1191247b6d9a206f6ba3d8ac79e26d041dd86941    dev5.txt
100644 blob 1191247b6d9a206f6ba3d8ac79e26d041dd86941    dev6.txt
040000 tree 75242e9fdbeba1b611a896ee69aae732962b8e94    fisrtdir
然后看仓库状态:

我们发现,git cherry-pick与git rebase不同,它会将复制过来的每次提交都生成一条操作记录。
此时,关系图谱变为:

看下提交历史图谱:
$ git log --graph
* commit 8dcd32635ea5a0450ade6a3e2f964f8b8dd064b0 (HEAD -> dev5)
| Author: 何建博 <[email protected]>
| Date:   Wed Aug 4 14:09:45 2021 +0800
|
|     dev6 v2
|
* commit 96f758d85051aeb54c795ddb07b5d15cf7313a7a
| Author: 何建博 <[email protected]>
| Date:   Wed Aug 4 14:09:15 2021 +0800
|
|     dev6 v1
|
* commit 4e0bdd4a14ca9b38fa0468d41ce813ff5b2ca975
| Author: 何建博 <[email protected]>
| Date:   Wed Aug 4 10:47:37 2021 +0800
|
|     dev5 v2
|
* commit 55ef176872403d64d6e29816277d9431e1d2820a
| Author: 何建博 <[email protected]>
| Date:   Wed Aug 4 10:46:57 2021 +0800
|
|     dev5 v1
|
* commit fd3da8e44fb01aa14bf75a92d3947047d5d6c300 (master)
| Author: 何建博 <[email protected]>
| Date:   Tue Aug 3 15:13:44 2021 +0800
|
|     test5 v2
结论19:git cherry-pick与git rebase一样,无法在提交历史图谱里体现哪些提交是从哪个分支复制过来的。
15 临时贮藏
在实际协作时,会有这样的情况,我们在某个分支上正在进行开发,此时另一个分支上有一个问题需要修复,那我们就需要切换到另一个分支去工作,可是当前这个分支上的工作还未完成,又不想提交(因为会影响提交历史),这个时候我们就可以把已经开发的尚未提交的那部分(包括工作目录中的和暂存区中的)改动(我们称它们为stash)暂时贮藏在一个独立的【栈】里面。
所谓栈的意思是这个空间的数据结构,意味着我们可以将多个不同分支的未提交的更改(即多个stash)都同时存入这个空间,而从空间取出时遵照【先进后出】的原则,就是先存入的后取出。(这是指使用pop命令时的情况,实际上,我们可以直接取出指定编号的那部分)。
现在,
- 我们先在
dev5分支上做一些改动,提交到暂存区, - 然后再做一些改动,
- 然后将所有这些改动存入【栈】中,
- 再切换到
dev4分支上,做同样的操作, - 再切回
dev5分支,取出刚刚存入【栈】的内容
这个过程中,我们随时观察仓库的状态。
老规矩,先git gc打包现有objects:
$ git gc

// objects目录
$ ll
total 4
drwxr-xr-x 1 trs 197121 0 Aug  4 09:25 8b/
drwxr-xr-x 1 trs 197121 0 Jul 29 13:56 e6/
drwxr-xr-x 1 trs 197121 0 Aug  4 17:27 info/
drwxr-xr-x 1 trs 197121 0 Aug  4 17:27 pack/
当前在dev5分支下,为了便于观察变化,我们在根目录下创建与之前内容一样的test1.txt和test2.txt
$ echo 'version 1' >> test1.txt
$ git add .
$ echo 'version 1' >> test2.txt
$ echo 'version 2' >> test2.txt
$ git status
On branch dev5
Changes to be committed:
  (use "git restore --staged ..." to unstage)
        new file:   test1.txt

Untracked files:
  (use "git add ..." to include in what will be committed)
        test2.txt
此时我们再次查看objeects目录,没有变化。再看下仓库其它信息,也没有变化。

现在,我们使用贮藏命令将工作区和暂存区贮藏起来:
$ git stash
Saved working directory and index state WIP on dev5: 8dcd326 dev6 v2

$ git status
On branch dev5
Untracked files:
  (use "git add ..." to include in what will be committed)
        test2.txt

nothing added to commit but untracked files present (use "git add" to track)
从命令的输出我们可以看到,dev5分支上8dcd326提交之后变化的工作目录和暂存区的状态已经保存。
其中,WIP 代表Work in progress,表示【在处理中的工作】,也即【未完成的工作】。
但是此时test2.txt还未加入暂存区,仍旧是未跟踪状态。
我们看下objects目录:
$ ll
total 4
drwxr-xr-x 1 trs 197121 0 Aug  4 17:33 0c/
drwxr-xr-x 1 trs 197121 0 Aug  4 09:25 8b/
drwxr-xr-x 1 trs 197121 0 Aug  4 17:33 99/
drwxr-xr-x 1 trs 197121 0 Aug  4 17:33 a4/
drwxr-xr-x 1 trs 197121 0 Jul 29 13:56 e6/
drwxr-xr-x 1 trs 197121 0 Aug  4 17:27 info/
drwxr-xr-x 1 trs 197121 0 Aug  4 17:27 pack/
发现多了三个对象,我们分别看下它们的内容和类型:
$ git cat-file -p 0cc0
tree 990b0127d134c87c5e8d85c4f3922d0420d4bf1f
parent 8dcd32635ea5a0450ade6a3e2f964f8b8dd064b0
author 何建博 <[email protected]> 1628069596 +0800
committer 何建博 <[email protected]> 1628069596 +0800

index on dev5: 8dcd326 dev6 v2

$ git cat-file -t 0cc0
commit


$ git cat-file -p 990b
100644 blob 1191247b6d9a206f6ba3d8ac79e26d041dd86941    dev5.txt
100644 blob 1191247b6d9a206f6ba3d8ac79e26d041dd86941    dev6.txt
040000 tree 75242e9fdbeba1b611a896ee69aae732962b8e94    fisrtdir
100644 blob 83baae61804e65cc73a7201a7252750c76066a30    test1.txt

$ git cat-file -t 990b
tree

 git cat-file -p a449
tree 990b0127d134c87c5e8d85c4f3922d0420d4bf1f
parent 8dcd32635ea5a0450ade6a3e2f964f8b8dd064b0
parent 0cc0b3ad20617d22706a00ca99932c9bebd38eb1
author 何建博 <[email protected]> 1628069596 +0800
committer 何建博 <[email protected]> 1628069596 +0800

WIP on dev5: 8dcd326 dev6 v2

$ git cat-file -t a449
commit
我们发现,这是一个树对象和两个提交对象。其中,第一个提交对象的parent父提交对象是8dcd326,正是我们当前分支的上一次提交,而第二个提交对象的parent父提交对象有两个,一个同样是8dcd326,另一个则是第一个提交对象。
同时,我们注意到,在tree对象里,没有test2.txt的身影。
而此时观察仓库其它状态:

发现在refs目录下多了一个stash文件,里面存放的是上述新生成的第二个提交对象的SHA值。
而在logs/refs目录里,也多了一个stash文件,内容如下:
0000000000000000000000000000000000000000 a44902bbb10185a981ab5e6d2afba3ed84fba140 何建博 <hjb2722404@163.com> 1628069596 +0800 WIP on dev5: 8dcd326 dev6 v2
我们观察一下当前的关系图:

然后,我们再切换到dev4分支上,做一点改动,贮藏:
$ git checkout dev4
Switched to branch 'dev4'

$ git status
On branch dev4
Untracked files:
  (use "git add ..." to include in what will be committed)
        test2.txt

nothing added to commit but untracked files present (use "git add" to track)
我们看到,text2.txt现在还是未被跟踪的状态。
$ echo 'version 1' >> test1.txt
$ git add .
warning: LF will be replaced by CRLF in test1.txt.
The file will have its original line endings in your working directory
warning: LF will be replaced by CRLF in test2.txt.
The file will have its original line endings in your working directory
$ echo 'new content' >> dev4.txt

$ git stash
warning: LF will be replaced by CRLF in dev4.txt.
The file will have its original line endings in your working directory
Saved working directory and index state WIP on dev4: 55a2eba dev6 v2

$ git status
On branch dev4
nothing to commit, working tree clean
这里注意,在刚刚的dev5分支上,test2.txt由于是新加的文件,从没有被添加到过暂存区,所以在贮藏的时候,没有把它存入【栈】,而这里我们对dev4.txt的修改同样没有使用git add添加到暂存区,但是通过git status的状态知道它是被存入【栈】中了,这就是说:
结论20:git stash对未加入暂存区的文件,只会存入那些已跟踪的,而不会存入未跟踪的。
我们再看下objects目录:
$ ll
total 4
drwxr-xr-x 1 trs 197121 0 Aug  4 17:33 0c/
drwxr-xr-x 1 trs 197121 0 Aug  4 18:02 21/
drwxr-xr-x 1 trs 197121 0 Aug  4 18:02 4d/
drwxr-xr-x 1 trs 197121 0 Aug  4 09:25 8b/
drwxr-xr-x 1 trs 197121 0 Aug  4 18:02 93/
drwxr-xr-x 1 trs 197121 0 Aug  4 17:33 99/
drwxr-xr-x 1 trs 197121 0 Aug  4 17:33 a4/
drwxr-xr-x 1 trs 197121 0 Jul 29 13:56 e6/
drwxr-xr-x 1 trs 197121 0 Aug  4 18:02 eb/
drwxr-xr-x 1 trs 197121 0 Aug  4 18:02 f9/
drwxr-xr-x 1 trs 197121 0 Aug  4 17:27 info/
drwxr-xr-x 1 trs 197121 0 Aug  4 17:27 pack/
看看18:02分,新生成了5个对象,我们分别看下它们的内容:
$ git cat-file -p 21d8
tree eb9b50facff4936f5bc47ef2178af671f27f0d6a
parent 55a2ebaacef7e18ff9a710359632ed90a924576d
parent 938a1efde684b575d52401633b46e06bd201d9e0
author 何建博 <[email protected]> 1628071327 +0800
committer 何建博 <[email protected]> 1628071327 +0800

WIP on dev4: 55a2eba dev6 v2

$ git cat-file -p 4da1
1
2
new content

$ git cat-file -p 938a
tree f9745c9a0bf2897b6e2144f3f531e9ee38f248a2
parent 55a2ebaacef7e18ff9a710359632ed90a924576d
author 何建博 <[email protected]> 1628071327 +0800
committer 何建博 <[email protected]> 1628071327 +0800

index on dev4: 55a2eba dev6 v2

$ git cat-file -p eb9b
100644 blob 4da168afac6ed75a06b7de80a9975e0b406186be    dev4.txt
100644 blob 1191247b6d9a206f6ba3d8ac79e26d041dd86941    dev5.txt
100644 blob 1191247b6d9a206f6ba3d8ac79e26d041dd86941    dev6.txt
040000 tree 75242e9fdbeba1b611a896ee69aae732962b8e94    fisrtdir
100644 blob 83baae61804e65cc73a7201a7252750c76066a30    test1.txt
100644 blob 0c1e7391ca4e59584f8b773ecdbbb9467eba1547    test2.txt

$ git cat-file -p f974
100644 blob 1191247b6d9a206f6ba3d8ac79e26d041dd86941    dev4.txt
100644 blob 1191247b6d9a206f6ba3d8ac79e26d041dd86941    dev5.txt
100644 blob 1191247b6d9a206f6ba3d8ac79e26d041dd86941    dev6.txt
040000 tree 75242e9fdbeba1b611a896ee69aae732962b8e94    fisrtdir
100644 blob 83baae61804e65cc73a7201a7252750c76066a30    test1.txt
100644 blob 0c1e7391ca4e59584f8b773ecdbbb9467eba1547    test2.txt
这5个对象,与之前一样,有两个提交对象,不同的是,这一次,针对dev4.txt的改动后的内容,生成了一个新的blob 对象,并且因为dev4.txt有改动前后的两种状态,所以生成了两个树对象,这两个树对象唯一的不同就是dev4.txt指向的提交HASH不同。
我们再看下仓库状态:
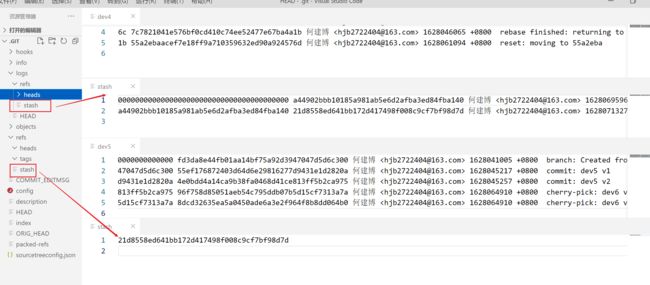
新增了一条操作记录,refs目录下的stash所指向的提交HASH也变成了最新的那个,我们梳理下关系图:
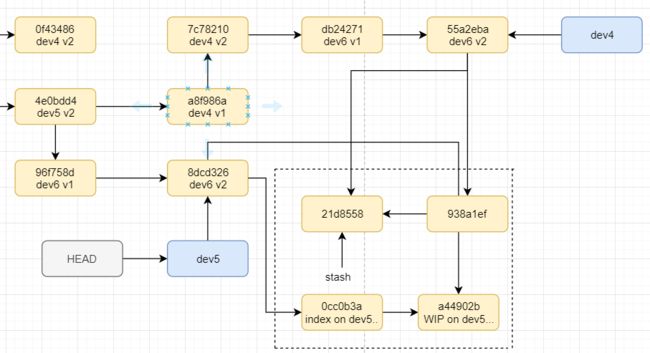
然后,我们切换回dev5,尝试取出【栈】中的内容:
$ git checkout dev5
Switched to branch 'dev5'
先看下当前【栈】的状态:
$ git stash list
stash@{
     0}: WIP on dev4: 55a2eba dev6 v2
stash@{
     1}: WIP on dev5: 8dcd326 dev6 v2
我们看到,此时【栈】中有两个stash:
- 第1个编号是0,是在
dev4上存入栈的, - 第2个编号是1,是在
dev5上存入栈的。
那我们要取第2个,怎么取呢?使用git stash apply stashName:
$ git stash apply stash@{
     1}
On branch dev5
Changes to be committed:
  (use "git restore --staged ..." to unstage)
        new file:   test1.txt
其中,stashName就是我们执行git stash list后输出的每行冒号前面那一串。
我们看到,在从【栈】中取出指定内容后,会输出当前工作目录的状态,确实是我们之前在dev5上存入时的状态(注意,由于test2.txt没有被存入【栈】,所以这里没有)。
我们提交后再切换到dev4分支,取出存入的内容。
$ git add .

$ git commit -m 'new test1'
[dev5 0181d3f] new test1
 1 file changed, 1 insertion(+)
 create mode 100644 test1.txt

$ git checkout dev4
Switched to branch 'dev4'

$ git stash list
stash@{
     0}: WIP on dev4: 55a2eba dev6 v2
stash@{
     1}: WIP on dev5: 8dcd326 dev6 v2

$ git stash pop
On branch dev4
Changes to be committed:
  (use "git restore --staged ..." to unstage)
        new file:   test1.txt
        new file:   test2.txt

Changes not staged for commit:
  (use "git add ..." to update what will be committed)
  (use "git restore ..." to discard changes in working directory)
        modified:   dev4.txt

Dropped refs/stash@{
     0} (21d8558ed641bb172d417498f008c9cf7bf98d7d)

$ git stash list
stash@{
     0}: WIP on dev5: 8dcd326 dev6 v2
这里有更多需要说明的了。
git stash apply命令不从【栈】中删除对应的stash- ``git stash pop`属于出栈动作,所以会把内容直接从【栈】中删除
git stash pop每次只能取出一个stash,并且永远只能取出处于栈顶的那个stash,即编号为0的stash@{0}那个stash。- 当栈顶
stash被pop出栈后,原来编号为1的那个stash将变成编号为0的stash,后面的一次类推。
现在再看仓库状态的变化:
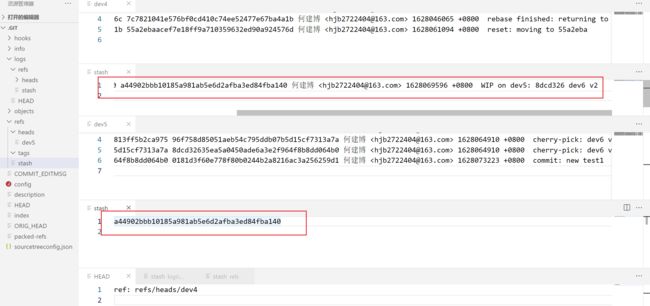
显而易见地有两条变化:
-
在
log/refs/stash中,被取出的那个stash,其存入时的操作记录也被删除了。 -
在
refs/stash中,stash指针重新指向了dev5分支上贮藏的那个stash。也就是说,现在关系图又恢复成了:
可见,【栈】就是一个临时性的空间,针对每一个stash,这个空间里存储着两个提交对象,其中一个是暂存区的快照,另一个是工作目录的快照。其中工作目录的快照同时又将上一次提交和本次暂存区快照的内容快照作为父对象。
当我们从【栈】中取出stash时,其实就是从工作区快照开始逆向解析提交链(顺着parent属性),然后直到上一次提交,把这个过程中解析出的内容恢复到工作目录和暂存区。
好了,了解了git stash命令的原理后,我们现在看看当前工作目录的状态:
$ git status
On branch dev4
Changes to be committed:
  (use "git restore --staged ..." to unstage)
        new file:   test1.txt
        new file:   test2.txt

Changes not staged for commit:
  (use "git add ..." to update what will be committed)
  (use "git restore ..." to discard changes in working directory)
        modified:   dev4.txt

$ git ls-files -s
100644 1191247b6d9a206f6ba3d8ac79e26d041dd86941 0       dev4.txt
100644 1191247b6d9a206f6ba3d8ac79e26d041dd86941 0       dev5.txt
100644 1191247b6d9a206f6ba3d8ac79e26d041dd86941 0       dev6.txt
100644 83baae61804e65cc73a7201a7252750c76066a30 0       fisrtdir/test1.txt
100644 d6508a9fed612872652dff0b673c6d35e129ef73 0       fisrtdir/test2.txt
100644 1728e5ee30cee9e075deb93f91d003efc08c153e 0       fisrtdir/test3.txt
100644 91b749ddf2b1579a482306ed42a5a4636a927d6b 0       fisrtdir/test4.txt
100644 31715cd8e1d6bd99296db7f2b98ec8243d873c0c 0       fisrtdir/test5.txt
100644 83baae61804e65cc73a7201a7252750c76066a30 0       test1.txt
100644 0c1e7391ca4e59584f8b773ecdbbb9467eba1547 0       test2.txt
这是我们刚刚从【栈】中取出的stash内容,现在,我们舍弃这些修改。
前面说过,使用git rm命令可以从暂存区和工作目录删除未提交内容。
下面,我们使用另一种方式git checkout . + git restore
$ git checkout .
Updated 1 path from the index

$ git status
On branch dev4
Changes to be committed:
  (use "git restore --staged ..." to unstage)
        new file:   test1.txt
        new file:   test2.txt

$ git restore --staged .
$ git status
On branch dev4
Untracked files:
  (use "git add ..." to include in what will be committed)
        test1.txt
        test2.txt

$ git checkout .
Updated 0 paths from the index

$ git status
On branch dev4
Untracked files:
  (use "git add ..." to include in what will be committed)
        test1.txt
        test2.txt
$ git restore test1.txt
error: pathspec 'test1.txt' did not match any file(s) known to git
$ git rm test1.txt
fatal: pathspec 'test1.txt' did not match any files

$ rm test1.txt
$ rm test2.txt
$ git status
On branch dev4
nothing to commit, working tree clean
我们注意到:
- 对于已被跟踪,工作目录中已修改,但未暂存的
dev4.txt,使用git checkout .可以将这些改动丢弃。 - 对于已处于暂存区的
test1.txt与test2.txt,git checkout .无法丢弃。而使用git restore --staged .可以将其改变为未跟踪状态,即从暂存区删除。 - 对于已处于未跟踪状态的
test1.txt和test2.txt,无论是git checkout还是git restore或者是git rm,我们都无法将其从工作目录删除,此时,只有我们手动删除(调用linux的rm命令)才可以。
现在, 工作目录是干净的了,我们将开始探索Git中的下一个重要概念:标签(tag)
16. 标签
通过上文的学习,我们知道,分支实际上是一个指针,随着不断地进行新的提交,它会不断地指向新的提交,但有时候我们需要快速回到某个以前的提交怎么办呢?当然,我们可以记住这个提交的SHA值,但是我们能记住一两个,能记住100个吗?比如我们的软件发布了100个版本,我们能记住每个版本发布时所在的按个提交的SHA值吗?
除非我们都是最强大脑,否则这是不可能的,所以,此时我们就可以给想要记住的那次提交打一个标签,起一个容易记住的名字,比如1.1.1.0这样的。实际上,在真实项目开发场景中,我们绝大多数时候就是用标签来标注我们要发布的版本的。而标签如果被用来标记版本号,则会遵循《语义化版本控制规范》
现在,假定这个时候的dev4分支当前就是待发布的1.0.0版本了,那我们使用git tag命令来给它打一个标签,老规矩,在打标签前先执行git gc打包已有objects,方便我们观察变化
$ git gc
Enumerating objects: 128, done.
Counting objects: 100% (128/128), done.
Delta compression using up to 8 threads
Compressing objects: 100% (54/54), done.
Writing objects: 100% (128/128), done.
Total 128 (delta 32), reused 123 (delta 30)

$ ll .git/objects/
total 4
drwxr-xr-x 1 trs 197121 0 Aug  4 18:02 21/
drwxr-xr-x 1 trs 197121 0 Aug  4 18:02 4d/
drwxr-xr-x 1 trs 197121 0 Aug  4 09:25 8b/
drwxr-xr-x 1 trs 197121 0 Aug  4 18:02 93/
drwxr-xr-x 1 trs 197121 0 Jul 29 13:56 e6/
drwxr-xr-x 1 trs 197121 0 Aug  4 18:02 eb/
drwxr-xr-x 1 trs 197121 0 Aug  4 18:02 f9/
drwxr-xr-x 1 trs 197121 0 Aug  5 16:12 info/
drwxr-xr-x 1 trs 197121 0 Aug  5 16:12 pack/

$ git tag v1.0.0
现在我们看下有什么变化,先看objects目录,输出与上面输出一致,没有变化,再看仓库状态:
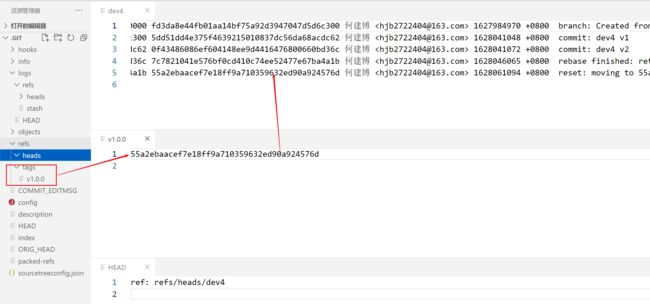
唯一的变化是:
refs/tags 目录下多了一个v1.0.0的文件,它里面保存了当前分支所指向的提交的SHA值,也就是说,它其实就是一个指针,但是与分支不一样,分支的内容会随着新的提交产生而改变,但它的内容永远不会变。
现在我们看看当前工作目录的内容:
$ ll
total 3
-rw-r--r-- 1 trs 197121 6 Aug  5 10:59 dev4.txt
-rw-r--r-- 1 trs 197121 6 Aug  4 14:32 dev5.txt
-rw-r--r-- 1 trs 197121 6 Aug  4 16:15 dev6.txt
drwxr-xr-x 1 trs 197121 0 Aug  4 09:36 fisrtdir/
记住当前内容,我们在dev4上做一些变更并提交:
$ echo '1' >> dev4-1.txt
$ git add .
$ git commit -m "4-1"
[dev4 59c0b6d] 4-1
 1 file changed, 1 insertion(+)
 create mode 100644 dev4-1.txt

$ echo '2' >> dev4-2.txt
$ git add .
$ git commit -m "4-2"
[dev4 b757051] 4-2
 1 file changed, 1 insertion(+)
 create mode 100644 dev4-2.txt

 $ ll
total 5
-rw-r--r-- 1 trs 197121 2 Aug  5 16:23 dev4-1.txt
-rw-r--r-- 1 trs 197121 2 Aug  5 16:24 dev4-2.txt
-rw-r--r-- 1 trs 197121 6 Aug  5 10:59 dev4.txt
-rw-r--r-- 1 trs 197121 6 Aug  4 14:32 dev5.txt
-rw-r--r-- 1 trs 197121 6 Aug  4 16:15 dev6.txt
drwxr-xr-x 1 trs 197121 0 Aug  4 09:36 fisrtdir/
此时的提交图谱如下:
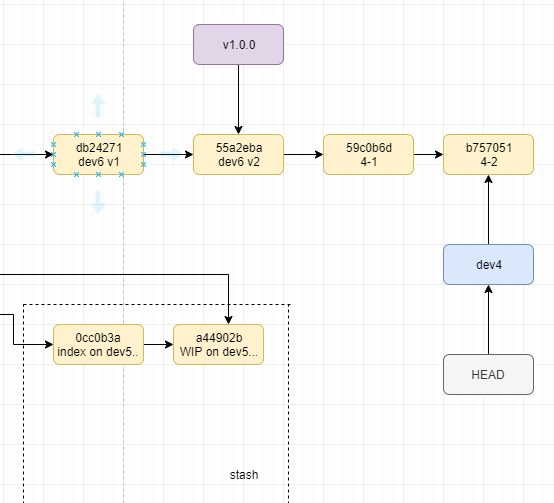
此时,我们想回顾看看在v1.0.0版本时我们发布了哪些内容,就可以使用git checkout tagName切换到那个标签所指向的提交处:
$ git checkout v1.0.0
Note: switching to 'v1.0.0'.

You are in 'detached HEAD' state. You can look around, make experimental
changes and commit them, and you can discard any commits you make in this
state without impacting any branches by switching back to a branch.

If you want to create a new branch to retain commits you create, you may
do so (now or later) by using -c with the switch command. Example:

  git switch -c <new-branch-name>

Or undo this operation with:

  git switch -

Turn off this advice by setting config variable advice.detachedHead to false

HEAD is now at 55a2eba dev6 v2

$ ll
total 3
-rw-r--r-- 1 trs 197121 6 Aug  5 10:59 dev4.txt
-rw-r--r-- 1 trs 197121 6 Aug  4 14:32 dev5.txt
-rw-r--r-- 1 trs 197121 6 Aug  4 16:15 dev6.txt
drwxr-xr-x 1 trs 197121 0 Aug  4 09:36 fisrtdir/
首先,通过列出目录我们可以看出,确实回到了之前发布1.0.0版本时的提交。这里,命令输出了一些说明,我们说明一下:
- 首先,告诉我们已经切换到了
v1.0.0 - 然后,告诉我们,我们当前出于
HEAD游离状态,你可以在当前状态做任何更改和提交,这都不会影响现有的任何分支 - 如果你想要保存这些修改和提交,就必须使用
git switch命令来创建一个新的分支 - 如果你想要撤销本次
checkout操作(即从tag回到分支),则可以使用git switch -命令,这个命令的效果和git checkout -的效果是一样的。 - 可以通过设置
advice.detachedHead为false来关闭这个提示,以后再出于HEAD游离状态时不会再有此提示 - 当前
HEAD处于55a2eba这次提交上。
看看仓库状态:
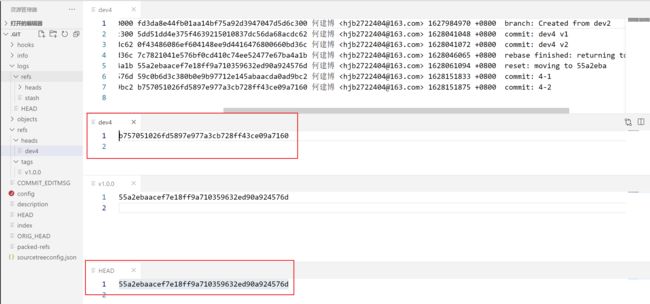
也就是说,此时的提交图谱变为了:
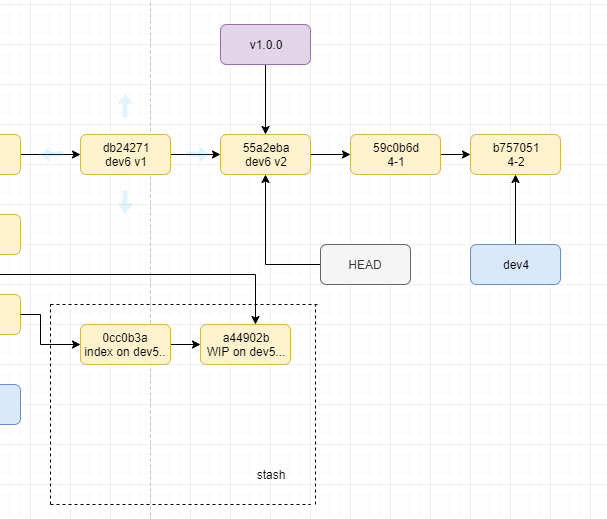
既然有此提示,那我们就尝试一下,在当前状态下做一个修改提交:
$ git gc
Enumerating objects: 133, done.
Counting objects: 100% (133/133), done.
Delta compression using up to 8 threads
Compressing objects: 100% (56/56), done.
Writing objects: 100% (133/133), done.
Total 133 (delta 34), reused 127 (delta 32)

$ ll .git/objects/
total 4
drwxr-xr-x 1 trs 197121 0 Aug  4 18:02 21/
drwxr-xr-x 1 trs 197121 0 Aug  4 18:02 4d/
drwxr-xr-x 1 trs 197121 0 Aug  4 09:25 8b/
drwxr-xr-x 1 trs 197121 0 Aug  4 18:02 93/
drwxr-xr-x 1 trs 197121 0 Jul 29 13:56 e6/
drwxr-xr-x 1 trs 197121 0 Aug  4 18:02 eb/
drwxr-xr-x 1 trs 197121 0 Aug  4 18:02 f9/
drwxr-xr-x 1 trs 197121 0 Aug  5 16:43 info/
drwxr-xr-x 1 trs 197121 0 Aug  5 16:43 pack/

$ echo '1' >> tag1.txt

$ ll
total 4
-rw-r--r-- 1 trs 197121 6 Aug  5 10:59 dev4.txt
-rw-r--r-- 1 trs 197121 6 Aug  4 14:32 dev5.txt
-rw-r--r-- 1 trs 197121 6 Aug  4 16:15 dev6.txt
drwxr-xr-x 1 trs 197121 0 Aug  4 09:36 fisrtdir/
-rw-r--r-- 1 trs 197121 2 Aug  5 16:44 tag1.txt

$ git add .

$ git commit -m "tag 1"
[detached HEAD af63581] tag 1
 1 file changed, 1 insertion(+)
 create mode 100644 tag1.txt

$ ll .git/objects/
total 4
drwxr-xr-x 1 trs 197121 0 Aug  5 16:44 07/
drwxr-xr-x 1 trs 197121 0 Aug  4 18:02 21/
drwxr-xr-x 1 trs 197121 0 Aug  4 18:02 4d/
drwxr-xr-x 1 trs 197121 0 Aug  4 09:25 8b/
drwxr-xr-x 1 trs 197121 0 Aug  4 18:02 93/
drwxr-xr-x 1 trs 197121 0 Aug  5 16:44 af/
drwxr-xr-x 1 trs 197121 0 Jul 29 13:56 e6/
drwxr-xr-x 1 trs 197121 0 Aug  4 18:02 eb/
drwxr-xr-x 1 trs 197121 0 Aug  4 18:02 f9/
drwxr-xr-x 1 trs 197121 0 Aug  5 16:43 info/
drwxr-xr-x 1 trs 197121 0 Aug  5 16:43 pack/
可以看到,再我们进行修改提交后,16:44分生成了两个新的对象:
$ git cat-file -p 0737
100644 blob 1191247b6d9a206f6ba3d8ac79e26d041dd86941    dev4.txt
100644 blob 1191247b6d9a206f6ba3d8ac79e26d041dd86941    dev5.txt
100644 blob 1191247b6d9a206f6ba3d8ac79e26d041dd86941    dev6.txt
040000 tree 75242e9fdbeba1b611a896ee69aae732962b8e94    fisrtdir
100644 blob d00491fd7e5bb6fa28c517a0bb32b8b506539d4d    tag1.txt

$ git cat-file -p af63
tree 07374fee96debdaa6406fa9768862326b1d29223
parent 55a2ebaacef7e18ff9a710359632ed90a924576d
author 何建博 <[email protected]> 1628153083 +0800
committer 何建博 <[email protected]> 1628153083 +0800

tag 1
正是针对我们刚刚的修改生成的一个树对象和一个提交对象
看看仓库状态:
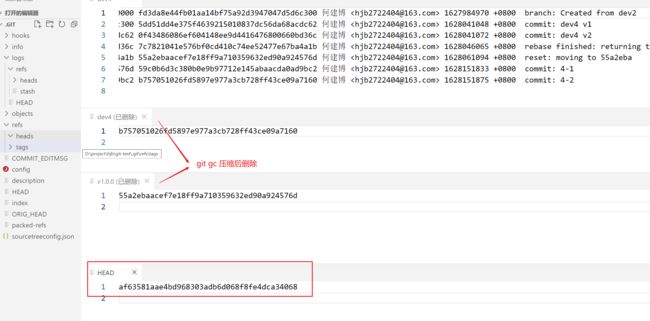
此时关系图如下:
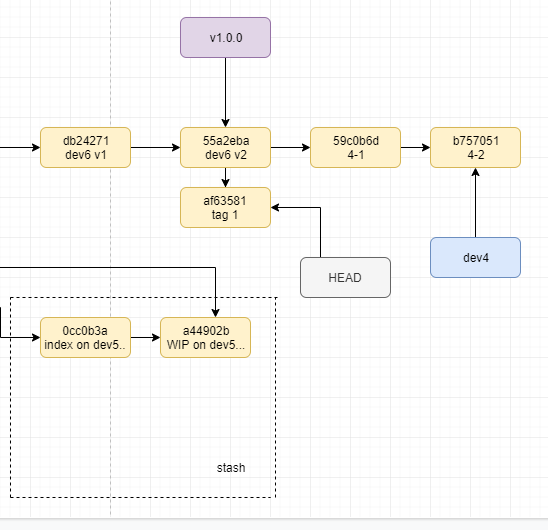
也就是说,当前HEAD、分支(dev4)、标签(v1.0.0)指向不同的提交。
这时,如果我们想要保存这次修改,就使用建议的命令:
$ git switch -c fromTagv1
Switched to a new branch 'fromTagv1'

$ ll
total 4
-rw-r--r-- 1 trs 197121 6 Aug  5 10:59 dev4.txt
-rw-r--r-- 1 trs 197121 6 Aug  4 14:32 dev5.txt
-rw-r--r-- 1 trs 197121 6 Aug  4 16:15 dev6.txt
drwxr-xr-x 1 trs 197121 0 Aug  4 09:36 fisrtdir/
-rw-r--r-- 1 trs 197121 2 Aug  5 16:44 tag1.txt
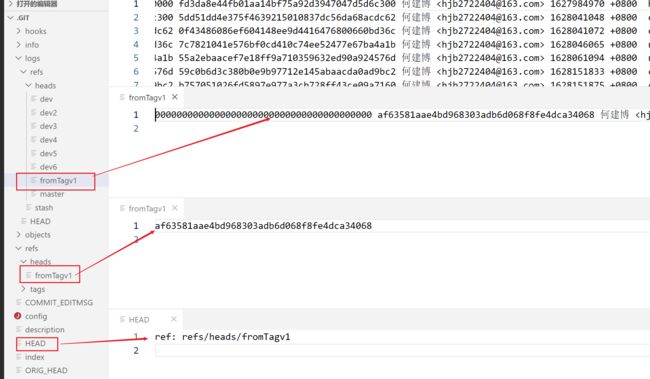
HEAD指向了新建的分支,新分支指向了之前我们在tag上所做的那次提交。
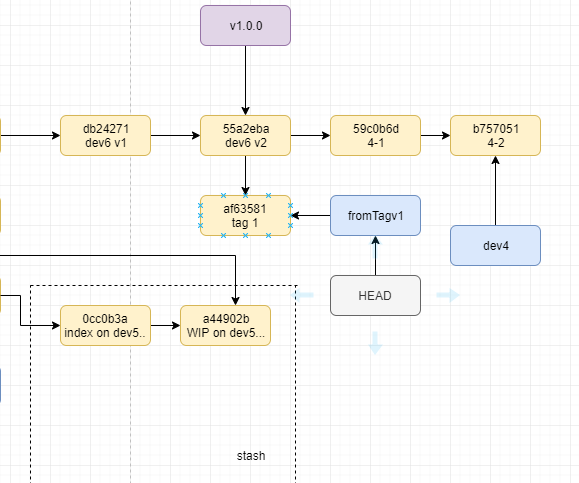
现在,我们再切换回tag:
$ git checkout v1.0.0
Note: switching to 'v1.0.0'.

You are in 'detached HEAD' state. You can look around, make experimental
changes and commit them, and you can discard any commits you make in this
state without impacting any branches by switching back to a branch.

If you want to create a new branch to retain commits you create, you may
do so (now or later) by using -c with the switch command. Example:

  git switch -c <new-branch-name>

Or undo this operation with:

  git switch -

Turn off this advice by setting config variable advice.detachedHead to false

HEAD is now at 55a2eba dev6 v2

$ ll
total 3
-rw-r--r-- 1 trs 197121 6 Aug  5 10:59 dev4.txt
-rw-r--r-- 1 trs 197121 6 Aug  4 14:32 dev5.txt
-rw-r--r-- 1 trs 197121 6 Aug  4 16:15 dev6.txt
drwxr-xr-x 1 trs 197121 0 Aug  4 09:36 fisrtdir/
可以看到,我们所做的更改丝毫没有影响tag的内容。
现在,我们再次做一次修改,然后不提交,再切回dev4,看看会发生什么:
$ echo '2' >> tag1.txt

$ ll
total 4
-rw-r--r-- 1 trs 197121 6 Aug  5 10:59 dev4.txt
-rw-r--r-- 1 trs 197121 6 Aug  4 14:32 dev5.txt
-rw-r--r-- 1 trs 197121 6 Aug  4 16:15 dev6.txt
drwxr-xr-x 1 trs 197121 0 Aug  4 09:36 fisrtdir/
-rw-r--r-- 1 trs 197121 2 Aug  5 17:00 tag1.txt

$ git checkout dev4
Previous HEAD position was 55a2eba dev6 v2
Switched to branch 'dev4'

$ git status
On branch dev4
Untracked files:
  (use "git add ..." to include in what will be committed)
        tag1.txt

nothing added to commit but untracked files present (use "git add" to track)
可以看到,在tag上,未跟踪的内容切换到其它分支上,内容仍旧存在,仍旧是未跟踪。
我们手动删除这个文件,再次切换回tag,再修改一下已跟踪的文件,再切换回dev4:
$ rm tag1.txt
$ git checkout v1.0.0
Note: switching to 'v1.0.0'.

$ ll
total 3
-rw-r--r-- 1 trs 197121 6 Aug  5 10:59 dev4.txt
-rw-r--r-- 1 trs 197121 6 Aug  4 14:32 dev5.txt
-rw-r--r-- 1 trs 197121 6 Aug  4 16:15 dev6.txt
drwxr-xr-x 1 trs 197121 0 Aug  4 09:36 fisrtdir/

$ cat dev4.txt
1
2

$ echo '3' >> dev4.txt
$ cat dev4.txt
1
2
3

$ git checkout dev4
Previous HEAD position was 55a2eba dev6 v2
Switched to branch 'dev4'
M       dev4.txt

$ git status
On branch dev4
Changes not staged for commit:
  (use "git add ..." to update what will be committed)
  (use "git restore ..." to discard changes in working directory)
        modified:   dev4.txt

no changes added to commit (use "git add" and/or "git commit -a")
一样的,对于已跟踪但未暂存的内容,同样切换到其它分之后,仍旧保留更改与状态。
其实,对于已暂存未提交的内容,也是一样的会在切换时把更改和状态保留着的。
想想就能明白了,虽然我们是在tag与分支之间进行切换,但本质上是在两次提交之间切换,而在两个分支之间切换的本是也是在两次提交之间切换,所以它们的行为都是一样的。
现在,我们将更改提交到dev4上
$ git add .
$ git commit -m "from tag"
[dev4 3d9cb7e] from tag
 1 file changed, 1 insertion(+)
此时,提交图谱如下:

刚刚我们打的标签是一个轻量标签,它只是一个简单的指向一个提交,而没有自己的信息,
$ git show v1.0.0
commit 55a2ebaacef7e18ff9a710359632ed90a924576d (tag: v1.0.0)
Author: 何建博 <[email protected]>
Date:   Wed Aug 4 14:09:45 2021 +0800

    dev6 v2
还有另一种标签,叫做【附注标签】,在这个标签上,我们可以加入一些说明和签署信息,我们在当前dev4上再打一个v2.0.0的标签,这次我们用【附注标签】:
$ git tag -a v2.0.0 -m "本次发版修改了dev4.txt"

$ ll .git/objects/
total 4
drwxr-xr-x 1 trs 197121 0 Aug  5 16:44 07/
drwxr-xr-x 1 trs 197121 0 Aug  4 18:02 21/
drwxr-xr-x 1 trs 197121 0 Aug  5 17:32 23/
drwxr-xr-x 1 trs 197121 0 Aug  5 17:24 3d/
drwxr-xr-x 1 trs 197121 0 Aug  4 18:02 4d/
drwxr-xr-x 1 trs 197121 0 Aug  5 17:24 68/
drwxr-xr-x 1 trs 197121 0 Aug  4 09:25 8b/
drwxr-xr-x 1 trs 197121 0 Aug  4 18:02 93/
drwxr-xr-x 1 trs 197121 0 Aug  5 16:44 af/
drwxr-xr-x 1 trs 197121 0 Jul 29 13:56 e6/
drwxr-xr-x 1 trs 197121 0 Aug  4 18:02 eb/
drwxr-xr-x 1 trs 197121 0 Aug  4 18:02 f9/
drwxr-xr-x 1 trs 197121 0 Aug  5 16:43 info/
drwxr-xr-x 1 trs 197121 0 Aug  5 16:43 pack/
这次打标签是在17:32分执行的,我们看一下,在这个时间点又生成了一个对象:
$ git cat-file -p 2363
object 3d9cb7e51fbaa6a3192d83fb6a24d4f97b0b48ca
type commit
tag v2.0.0
tagger 何建博 <[email protected]> 1628155925 +0800

本次发版修改了dev4.txt

$ git cat-file -t 2363
tag
前面我们接触了Git底层的三种对象:提交(commit)对象,树(tree)对象,实体(blob)对象。
这里,我们终于遇见了Git中的最后一种对象:标签(tag)对象。
标签对象存储了:
- 一个
type为commit的object(对象)的SHA值,实际上,这就是dev4当前所指向的那个提交对象。 - 标签的名字:
v2.0.0 - 打标签的人的信息及时间。
- 标签说明
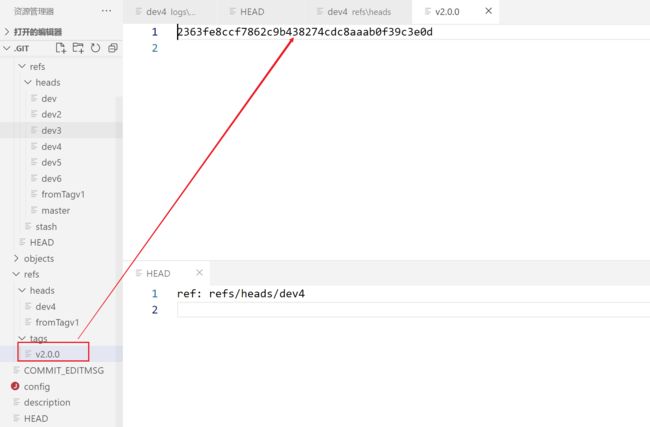
此时的提交关系图:
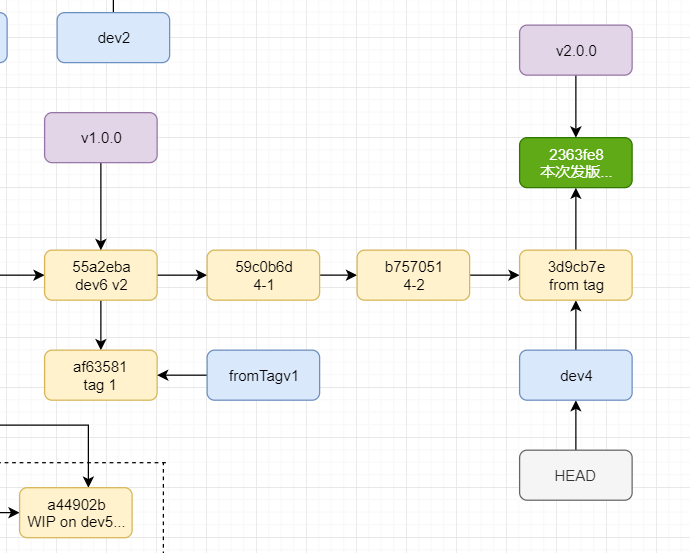
在这里,我们可以看到【轻量标签】和【附注标签】的区别:
- 轻量标签只是一个指向提交对象的指针,不生成任何对象
- 附注标签会生成一个标签对象来存储标签信息,标签指针指向这个标签对象。
我们还可以通过git show方法类看下两类标签的不同:
$ git show v1.0.0
commit 55a2ebaacef7e18ff9a710359632ed90a924576d (tag: v1.0.0)
Author: 何建博 <[email protected]>
Date:   Wed Aug 4 14:09:45 2021 +0800

    dev6 v2

diff --git a/dev6.txt b/dev6.txt
xxx

$ git show v2.0.0
tag v2.0.0
Tagger: 何建博 <[email protected]>
Date:   Thu Aug 5 17:32:05 2021 +0800

本次发版修改了dev4.txt

commit 3d9cb7e51fbaa6a3192d83fb6a24d4f97b0b48ca (HEAD -> dev4, tag: v2.0.0)
Author: 何建博 <[email protected]>
Date:   Thu Aug 5 17:24:43 2021 +0800

    from tag

diff --git a/dev4.txt b/dev4.txt
xxx
轻量标签只显示它指向的那个提交对象的信息,而附注标签则即显示了标签对象的信息,又显示了它所指向的提交对象的信息。
所以,我们建议,尽量使用【附注标签】。
基本上,涉及本地开发的一些基本操作,我们已经学习的差不多了,现在,我们看看如何通过远程仓库来进行协作。
17. 远程仓库
为了学习多人通过远程仓库进行协作时到底发生了什么,我们必须先建立一个远程仓库。我们选择直接在gitee上新建一个仓库,作为我们的远程仓库。
具体如何在gitee上新建仓库,这里就不演示了,我已经建好一个仓库远程仓库,它的地址是:
https://gitee.com/hjb2722404/git-test
我们看一下:

现在,这个仓库还没有任何内容,我们看到它提示我们,有两种方式初始化它:
- 一种是从本地新建并初始化一个仓库,添加一些内容,关联远程仓库,然后通过
git push将本地仓库推送到远程仓库 - 一种是直接将本地已有的仓库关联远程仓库,并推送到远程仓库
我们已经有了一个仓库,所以选择第一种。
在进行这个操作前,需要说明的是,要想获得将本地仓库内容推送到远程仓库的权限,需要先将本地生成的SSH公钥加入到远程仓库的公钥库中,我们已经将本地的SSH公钥和另一台ubuntu主机的公钥都存入了远程仓库的公钥库中,过程就不再展示了,有兴趣请互联网搜索相关资料阅读。
首先,看一下当前本地仓库状态:

我们按照远程仓库页面上的提示在当前分支上dev4进行操作:
$$ find .git/objects/ -type f
.git/objects/07/374fee96debdaa6406fa9768862326b1d29223
.git/objects/21/d8558ed641bb172d417498f008c9cf7bf98d7d
.git/objects/23/63fe8ccf7862c9b438274cdc8aaab0f39c3e0d
.git/objects/3d/9cb7e51fbaa6a3192d83fb6a24d4f97b0b48ca
.git/objects/4d/a168afac6ed75a06b7de80a9975e0b406186be
.git/objects/68/71fab3194b5e9438d66952e18267be4fc1539f
.git/objects/8b/39179329c2c79f240dd854660214f2824e37ac
.git/objects/93/8a1efde684b575d52401633b46e06bd201d9e0
.git/objects/af/63581aae4bd968303adb6d068f8fe4dca34068
.git/objects/e6/9de29bb2d1d6434b8b29ae775ad8c2e48c5391
.git/objects/eb/9b50facff4936f5bc47ef2178af671f27f0d6a
.git/objects/f9/745c9a0bf2897b6e2144f3f531e9ee38f248a2
.git/objects/info/packs
.git/objects/pack/pack-52baf12078dedba1121a601848ad83fe26d58036.idx
.git/objects/pack/pack-52baf12078dedba1121a601848ad83fe26d58036.pack

$ git remote add origin https://gitee.com/hjb2722404/git-test.git
这一步执行完,我们发现,仓库状态发生了变化:

.git/config里多了远程仓库的信息,远程仓库名为origin,下面有两个属性:
url:通过这个地址可以访问到远程仓库fetch:从远程仓库拉取时将会把远程仓库.git目录下的refs/remotes/origin/*文件映射到本地的.git/refs/heds/*
$ git push -u origin master
Enumerating objects: 48, done.
Counting objects: 100% (48/48), done.
Delta compression using up to 8 threads
Compressing objects: 100% (17/17), done.
Writing objects: 100% (48/48), 3.58 KiB | 1.19 MiB/s, done.
Total 48 (delta 8), reused 45 (delta 7)
remote: Powered by GITEE.COM [GNK-6.0]
To https://gitee.com/hjb2722404/git-test.git
 * [new branch]      master -> master
Branch 'master' set up to track remote branch 'master' from 'origin'.

$ find .git/objects/ -type f
.git/objects/07/374fee96debdaa6406fa9768862326b1d29223
.git/objects/21/d8558ed641bb172d417498f008c9cf7bf98d7d
.git/objects/23/63fe8ccf7862c9b438274cdc8aaab0f39c3e0d
.git/objects/3d/9cb7e51fbaa6a3192d83fb6a24d4f97b0b48ca
.git/objects/4d/a168afac6ed75a06b7de80a9975e0b406186be
.git/objects/68/71fab3194b5e9438d66952e18267be4fc1539f
.git/objects/8b/39179329c2c79f240dd854660214f2824e37ac
.git/objects/93/8a1efde684b575d52401633b46e06bd201d9e0
.git/objects/af/63581aae4bd968303adb6d068f8fe4dca34068
.git/objects/e6/9de29bb2d1d6434b8b29ae775ad8c2e48c5391
.git/objects/eb/9b50facff4936f5bc47ef2178af671f27f0d6a
.git/objects/f9/745c9a0bf2897b6e2144f3f531e9ee38f248a2
.git/objects/info/packs
.git/objects/pack/pack-52baf12078dedba1121a601848ad83fe26d58036.idx
.git/objects/pack/pack-52baf12078dedba1121a601848ad83fe26d58036.pack
我们说明一下:
-
首先,我们看到,
git push调用了git gc命令来对当前的objects进行打包,但是之后我们查看objects目录里的objects并不见减少,原因我们下面解释。 -
打包完后,输出了远程仓库的信息:
Powered by GITEE.COM[GNK-6.0]:表明远程仓库是由GITEE.COM所有,【GNK-6.0】是(Gitee native hook)的意思,它是gitee系统的钩子库,在推送时它会检测文件大小等。- 接下来是远程仓库的地址
- 然后告诉我们,远程仓库新生成了一个分支,并将本地的
master分支映射到了远程仓库的master上面
这就是为什么明明执行了打包操作,
objects目录却不见减少的原因:-
虽然我们是在
dev4上进行的推送,但我们的命令时git push -u origin master,所以实际上我们是将本地的master分支推送到远程仓库了,而master早就打过包了,当前objects目录里的内容时属于dev4的,自然没有被打入包,而之所以pack里的包名没有变化,是因为在packed-refs里记录了master分支所指向的提交对象HASH,Git会在后台沿着这个提交向前递归所有它包含的提交和内容进行打包,然后传输到远程仓库,并不会改变本地仓库。
从上图中我们还可以看出,此时
config文件里又多了一条配置记录,它描述了将本地master分支映射到远程仓库的refs/heads/master文件。
现在我们看远程仓库:
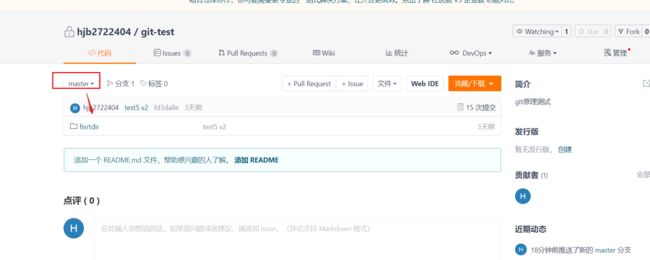
可以看到,这里是master分支,对应的内容也和本地master分支一样,指向的最新提交是test5 v2.
现在,我们切换到ubuntu主机上,将远程仓库拉取下来:
// ubuntu
$ mkdir  test
$ cd test
$ git clone https://gitee.com/hjb2722404/git-test.git
Cloning into 'git-test'...
Username for 'https://gitee.com': [email protected]
Password for 'https://[email protected]@gitee.com':
remote: Enumerating objects: 48, done.
remote: Counting objects: 100% (48/48), done.
remote: Compressing objects: 100% (24/24), done.
remote: Total 48 (delta 9), reused 0 (delta 0), pack-reused 0
Unpacking objects: 100% (48/48), 3.50 KiB | 14.00 KiB/s, done
我们通过git clone命令将远程仓库拉取下来,此时,命令行提示我们:
- 将远程仓库内容克隆至
git-test目录,我们没有创建这个目录,Git将自动创建 - 要求我们输入远程仓库所在服务器(
gitee.com)的用户名、密码 - 远程仓库打包压缩信息
- 本地解压包信息
现在我们看看ubuntu本地仓库
$ ll
total 0
drwxr-xr-x 1 hjb2722404 hjb2722404 4096 Aug  6 17:35 ./
drwxr-xr-x 1 hjb2722404 hjb2722404 4096 Aug  6 17:33 ../
drwxr-xr-x 1 hjb2722404 hjb2722404 4096 Aug  6 17:36 git-test/

$ cd git-test/

$ git status
On branch master
Your branch is up to date with 'origin/master'.

nothing to commit, working tree clean

$ ll
total 0
drwxr-xr-x 1 hjb2722404 hjb2722404 4096 Aug  6 17:36 ./
drwxr-xr-x 1 hjb2722404 hjb2722404 4096 Aug  6 17:35 ../
drwxr-xr-x 1 hjb2722404 hjb2722404 4096 Aug  6 17:47 .git/
drwxr-xr-x 1 hjb2722404 hjb2722404 4096 Aug  6 17:36 fisrtdir/
Git为我们建立了与远程仓库同名的目录,并且把远程仓库内容下载解压到了本地,我们看,它其实也自动初始化了Git本地仓库,所以它也有了一个.git目录。
我们还是在编辑器中看看这个仓库的信息:
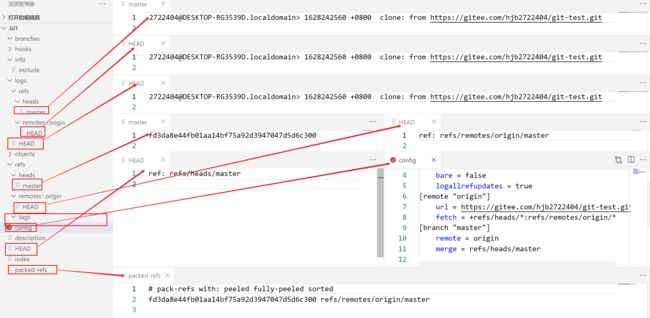
这里有一些需要说明的地方:
-
我们注意到在
logs目录里的三个文件:refs/heads/masterrefs/remotes/origin/HEADrefs/HEAD
它们都只有一条记录,也就是说,之前我们在
windows主机上的操作记录没有被推送到远程仓库,而远程仓库的操作记录也不会被同步到ubuntu主机,即:logs里面存储的所有操作记录,永远只存储在本机,不会被同步到其它仓库,每个协作者的本地仓库的操作记录都只会记录那个协作者自己的操作,而不会记录到其它协作者的操作记录 -
refs目录里既没有我们之前在windows主机打的tag,也没有我们的除了master之外的其它分支,说明:除非我们手动推送,否则本地仓库的分支和标签都不会自动同步到远程仓库去
-
config里有远程仓库的信息和本地分支与远程分支的映射信息,这是git clone时自动生成的 -
packed-refs文件也只记录本地用了的打包文件的信息,其它的不会通过远程仓库进行同步 -
stash与logs一样,永远只是本地的,无法被推送到远程。
我们在windows主机上把其它分支和标签都推送到远程仓库里去:
$ git branch -a
  dev
  dev2
  dev3
* dev4
  dev5
  dev6
  fromTagv1
  master
  remotes/origin/master

// 以下命令的输出我都省略了,大致同`git push origin master`的输出
$ git push origin dev
$ git push origin dev2
$ git push origin dev3
$ git push origin dev4
$ git push origin dev5
$ git push origin dev6
$ git push origin fromTagv1

$ git branch -a
  dev
  dev2
  dev3
* dev4
  dev5
  dev6
  fromTagv1
  master
  remotes/origin/dev
  remotes/origin/dev2
  remotes/origin/dev3
  remotes/origin/dev4
  remotes/origin/dev5
  remotes/origin/dev6
  remotes/origin/fromTagv1
  remotes/origin/master
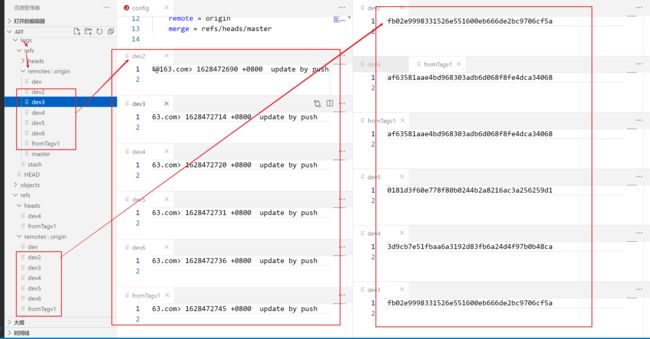
可以看到,所有被推送到远程仓库的分支,都会在
logs/refs/remotes/origin目录下产生对应的操作记录refs/remotes/origin目录下产生当前远程仓库指向的提交的记录。
我们看下远程仓库:
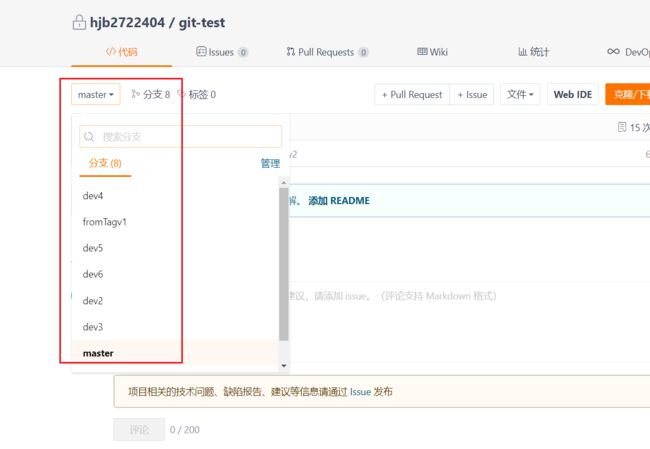
我们再到ubuntu主机上看下:
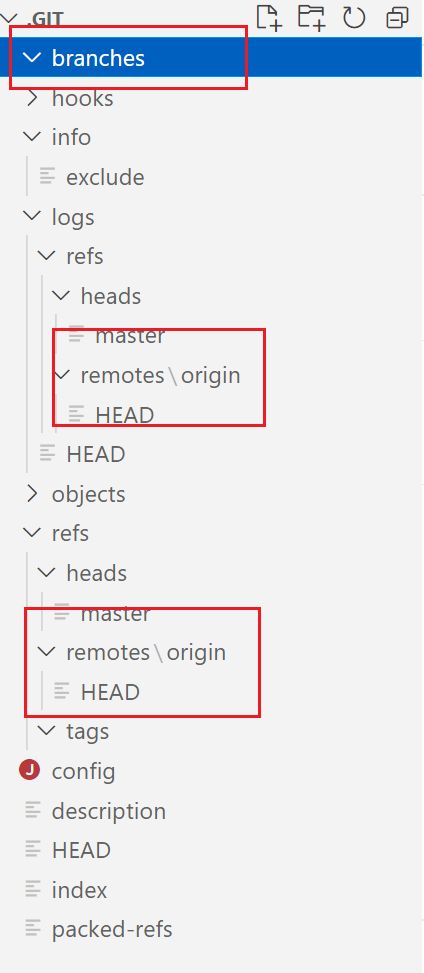
此时仓库里是没有远程仓库新加入的分支的信息的。
我们命令行里看下:
$ git branch -a
* master
  remotes/origin/HEAD -> origin/master
  remotes/origin/master
可以看到,也只有远程仓库master分支的信息。
我们执行git fetch再看一下:
$ git fetch
remote: Enumerating objects: 67, done.
remote: Counting objects: 100% (65/65), done.
remote: Compressing objects: 100% (46/46), done.
remote: Total 58 (delta 18), reused 0 (delta 0), pack-reused 0
Unpacking objects: 100% (58/58), 5.19 KiB | 19.00 KiB/s, done.
From https://gitee.com/hjb2722404/git-test
 * [new branch]      dev        -> origin/dev
 * [new branch]      dev2       -> origin/dev2
 * [new branch]      dev3       -> origin/dev3
 * [new branch]      dev4       -> origin/dev4
 * [new branch]      dev5       -> origin/dev5
 * [new branch]      dev6       -> origin/dev6
 * [new branch]      fromTagv1  -> origin/fromTagv1

 $ git branch -a
* master
  remotes/origin/HEAD -> origin/master
  remotes/origin/dev
  remotes/origin/dev2
  remotes/origin/dev3
  remotes/origin/dev4
  remotes/origin/dev5
  remotes/origin/dev6
  remotes/origin/fromTagv1
  remotes/origin/master
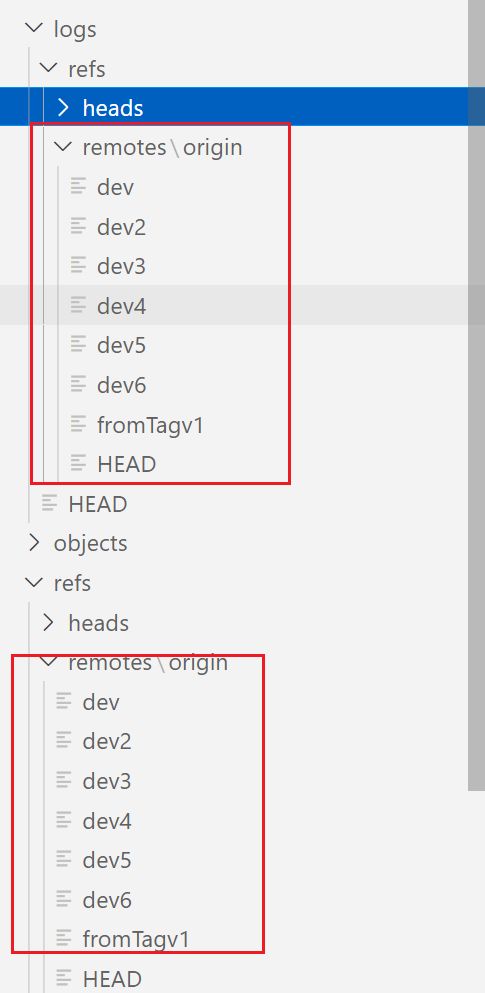
可见,git fetch的作用就是将远程仓库的信息同步到本地仓库,并且在本地仓库初始化对远程仓库的操作记录。
我们还注意到,在.git根目录多了一个文件:
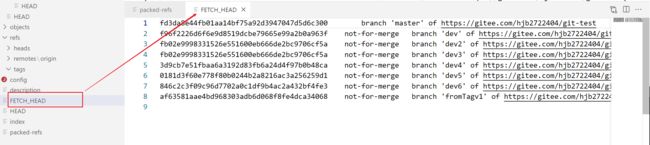
这个文件记录了所有远程分支的信息,包括:
- 分支所指向的提交对象SHA值
- 是否可以在执行
git pull命令(不带任何参数)时,自动执行git merge操作 - 分支所属远程仓库地址
在我们直接执行git pull命令而不带任何参数时,没有标识not-for-merge的分支(这里为master),会自动与本地同名分支做合并(即执行git merge)
当然,结论21:并不意味着我不管在哪个分支上执行git pull都会默认合并master分支,而是我们在哪个分支上执行的git fetch,那么默认git pull 时就会对哪个分支执行合并操作。
我们切换到dev分支:
$ git checkout dev
$ git status
On branch dev
Your branch is up to date with 'origin/dev'.

nothing to commit, working tree clean
$git fetch
然后再看:
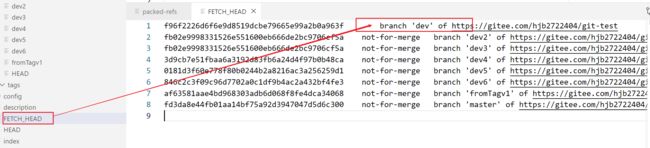
所以,每次git fetch时这个文件(FETCH_HEAD)的内容都会更新,fetch时所在的分支将被设定为git pull时默认执行git mrege的分支,而其它分支则不会。
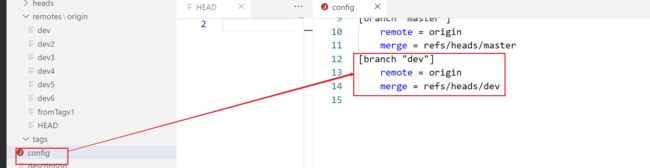
并且当我们执行了git checkout dev之后,config里就会记录dev分支对应的远程仓库的信息。
当然,我们还可以指定只fetch某个远程分支:
$ git fetch origin dev4
From https://gitee.com/hjb2722404/git-test
 * branch            dev4       -> FETCH_HEAD

好的,当前可合并分支为dev4,现在,我们切换到dev5:
$ git checkout dev5
然后回到windows主机,在dev4上修改一些内容提交,并推送到远程仓库:
$ git status
On branch dev4
nothing to commit, working tree clean

$ git add .
$ git commit -m "new"
[dev4 b0724fe] new
 1 file changed, 1 insertion(+)
 create mode 100644 new.txt
$ git push origin dev4
看下远程仓库:

然后在ubuntu主机的dev5分支上执行git pull操作:
$ git pull
remote: Enumerating objects: 4, done.
remote: Counting objects: 100% (4/4), done.
remote: Compressing objects: 100% (2/2), done.
remote: Total 3 (delta 1), reused 0 (delta 0), pack-reused 0
Unpacking objects: 100% (3/3), 252 bytes | 10.00 KiB/s, done.
From https://gitee.com/hjb2722404/git-test
   3d9cb7e..b0724fe  dev4       -> origin/dev4
Already up to date.
可以看到,倒数第二行告诉我们,将远程仓库的origin/dev4更新到了本地dev4上,我们看下本地dev4的内容:
$ git checkout dev4

$ ll
total 0
drwxr-xr-x 1 hjb2722404 hjb2722404 4096 Aug  9 16:25 ./
drwxr-xr-x 1 hjb2722404 hjb2722404 4096 Aug  6 17:35 ../
drwxr-xr-x 1 hjb2722404 hjb2722404 4096 Aug  9 16:25 .git/
-rw-r--r-- 1 hjb2722404 hjb2722404    2 Aug  9 16:25 dev4-1.txt
-rw-r--r-- 1 hjb2722404 hjb2722404    2 Aug  9 16:25 dev4-2.txt
-rw-r--r-- 1 hjb2722404 hjb2722404    6 Aug  9 16:25 dev4.txt
-rw-r--r-- 1 hjb2722404 hjb2722404    4 Aug  9 15:46 dev5.txt
-rw-r--r-- 1 hjb2722404 hjb2722404    4 Aug  9 15:46 dev6.txt
drwxr-xr-x 1 hjb2722404 hjb2722404 4096 Aug  9 15:46 fisrtdir/
-rw-r--r-- 1 hjb2722404 hjb2722404    4 Aug  9 16:25 new.txt  // 说明远程仓库的`dev4`已经合并到本地`dev4`上
现在,我们在ubuntu主机的dev4上切出一个新分支dev7,然后做几次提交:
$ git checkout -b dev7
$ echo '1' >> dev7.txt
$ git commit -m "dev7 v1"
*** Please tell me who you are.

Run

  git config --global user.email "[email protected]"
  git config --global user.name "Your Name"

to set your account's default identity.
Omit --global to set the identity only in this repository.

fatal: empty ident name (for <[email protected]>) not allowed
这里,进行提交时提示我们配置当前用户的邮箱和用户名,因为commit对象里需要记录author和commiter.
我们配置一下继续提交:
$ git config --local user.email "[email protected]"
$ git config --local user.name "huluwa"
$ git commit -m "dev7 v1"
[dev7 af00d0b] dev7 v1
 1 file changed, 1 insertion(+)
 create mode 100644 dev7.txt
 $ git cat-file -p af00d0b
tree f627f2820d5beb8d28b439c5deca0d4473fc0dbf
parent b0724fe0685e60cd678972ad617639aa9c5d2d2c
author huluwa <391655435@qq.com> 1628498152 +0800
committer huluwa <391655435@qq.com> 1628498152 +0800

dev7 v1
提交完我们看了下生成的提交对象,作者和提交者都是 huluwa
我们再提交一次:
$ echo '2' >> dev7.txt
$ git add .
$ git commit -m "dev7 v2"
[dev7 aa6d997] dev7 v2
 1 file changed, 1 insertion(+)

 $ git cat-file -p aa6d997
tree db6c9e02fe57878f0ba6b98fa277cfedd3740d65
parent af00d0b7c68407b4d751d72d810644b839cfb28e
author huluwa <391655435@qq.com> 1628498433 +0800
committer huluwa <391655435@qq.com> 1628498433 +0800

dev7 v2
现在,我们把换个分支推送到远程分支去:
$ git push origin dev7
现在看看远程仓库:
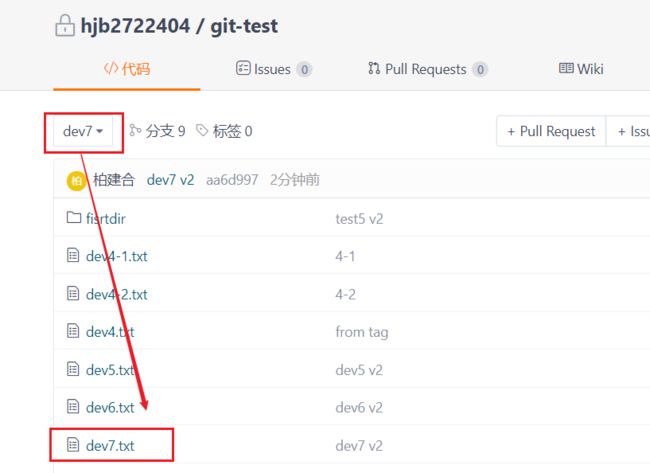
现在,我们回到windows主机,将dev7的两次提交合并为一次提交:
$ git checkout dev7
error: pathspec 'dev7' did not match any file(s) known to git
提示没有找到dev7分支, 这是因为本地还没有dev7,必须先通过git fetch从远程仓库拉取:
$ git fetch
$ git checkout dev7
Switched to a new branch 'dev7'
Branch 'dev7' set up to track remote branch 'dev7' from 'origin'.
$ git log -3
commit aa6d997d9b785136b468465d593ebe829324340e (HEAD -> dev7, origin/dev7)
Author: huluwa <391655435@qq.com>
Date:   Mon Aug 9 16:40:33 2021 +0800

    dev7 v2

commit af00d0b7c68407b4d751d72d810644b839cfb28e
Author: huluwa <391655435@qq.com>
Date:   Mon Aug 9 16:35:52 2021 +0800

    dev7 v1

commit b0724fe0685e60cd678972ad617639aa9c5d2d2c (origin/dev4, dev4)
Author: 何建博 <[email protected]>
Date:   Mon Aug 9 16:21:48 2021 +0800

    new
fetch后,我们成功切换到了dev7,现在看dev7的提交历史,我们接下来把dev7 v1与dev7 v2合并成一条记录:
$ git rebase -i b0724fe
执行后打开了默认的vi编辑器:
pick af00d0b dev7 v1
pick aa6d997 dev7 v2
# Rebase b0724fe..aa6d997 onto b0724fe (2 commands)
#
# Commands:
# p, pick = use commit
# r, reword = use commit, but edit the commit message
# e, edit = use commit, but stop for amending
# s, squash = use commit, but meld into previous commit
# f, fixup = like "squash", but discard this commit's log message
# x, exec = run command (the rest of the line) using shell
# b, break = stop here (continue rebase later with 'git rebase --continue')
# d, drop = remove commit
# l, label
# t, reset
# m, merge [-C | -c ]
# . create a merge commit using the original merge commit's
# . message (or the oneline, if no original merge commit was
# . specified). Use -c to reword the commit message.
#
# These lines can be re-ordered; they are executed from top to bottom.
#
# If you remove a line here THAT COMMIT WILL BE LOST.
#
# However, if you remove everything, the rebase will be aborted.
#
# Note that empty commits are commented out
这里列出了我们指定的提交(b0724fe)之后的所有提交(实际上就是我们要合并为一条的两个提交),并且提示了操作说明:
每一行第一个单词代表要对这一行的这次提交做的操作:
pick:保留该提交,缩写为p;reword:保留该提交,但我需要修改该提交的提交信息;缩写r;edit:保留该提交,但我要停下来修改该提交(包括提交内容和提交说明),缩写esquash:将该提交和前一个提交合并,缩写sfixup:将该提交和前一个提交合并,但不保留该提交的提交说明,缩写fexec: 执行shell命令,缩写xdrop: 我要丢弃该提交,缩写d
根据我们的需求,我们修改如下:
pick af00d0b dev7 v1
s aa6d997 dev7 v2

#……
按:wq保存,然后来到提交说明修改界面:
# This is a combination of 2 commits.
# This is the 1st commit message:

dev7 v1

# This is the commit message #2:

dev7 v2

# Please enter the commit message for your changes. Lines starting
# with '#' will be ignored, and an empty message aborts the commit.
#
# Author:    huluwa <[email protected]>
# Date:      Mon Aug 9 16:35:52 2021 +0800
#
# interactive rebase in progress; onto b0724fe
# Last commands done (2 commands done):
#    pick af00d0b dev7 v1
#    squash aa6d997 dev7 v2
# No commands remaining.
# You are currently rebasing branch 'dev7' on 'b0724fe'.
#
# Changes to be committed:
#       new file:   dev7.txt
我们将其修改为如下:
# This is a combination of 2 commits.
# This is the 1st commit message:

new on dev7

# This is the commit message #2:
# Please enter the commit message for your changes. Lines starting
# with '#' will be ignored, and an empty message aborts the commit.
#
# Author:    huluwa <[email protected]>
# Date:      Mon Aug 9 16:35:52 2021 +0800
#
# interactive rebase in progress; onto b0724fe
# Last commands done (2 commands done):
#    pick af00d0b dev7 v1
#    squash aa6d997 dev7 v2
# No commands remaining.
# You are currently rebasing branch 'dev7' on 'b0724fe'.
#
# Changes to be committed:
#       new file:   dev7.txt
然后保存退出。
$ git rebase -i b0724fe
[detached HEAD 0ffdc30] new on dev7
 Author: huluwa <391655435@qq.com>
 Date: Mon Aug 9 16:35:52 2021 +0800
 1 file changed, 2 insertions(+)
 create mode 100644 dev7.txt
Successfully rebased and updated refs/heads/dev7.

$ git log -3
commit 0ffdc303e673c25cc686ebecf0dc66ca24809fb5 (HEAD -> dev7)
Author: huluwa <391655435@qq.com>
Date:   Mon Aug 9 16:35:52 2021 +0800

    new on dev7

commit b0724fe0685e60cd678972ad617639aa9c5d2d2c (origin/dev4, dev4)
Author: 何建博 <[email protected]>
Date:   Mon Aug 9 16:21:48 2021 +0800

    new

commit 3d9cb7e51fbaa6a3192d83fb6a24d4f97b0b48ca (tag: v2.0.0)
Author: 何建博 <[email protected]>
Date:   Thu Aug 5 17:24:43 2021 +0800

    from tag

$ git cat-file -p 0ffdc30
tree db6c9e02fe57878f0ba6b98fa277cfedd3740d65
parent b0724fe0685e60cd678972ad617639aa9c5d2d2c
author huluwa <391655435@qq.com> 1628498152 +0800
committer 何建博 <[email protected]> 1628499758 +0800

new on dev7
可以看到,修改后,原来的两个提交不见了,变成一个新的提交了,
并且可以看到,新生成的提交,作者仍旧是合并前两个提交的作者huluwa,而提交者却已经变成了进行rebase操作的人(何建博)。
结论22:git rebase 新生成的提交,作者是源提交的作者,提交者将变成执行rebase操作的人
总结
以上,我们通过实时追踪Git仓库内部文件的变化,演示了大多数常用Git命令的原理,在这个过程中还发现了一些以前不曾注意到的特性。
现在,我们来对以上学习的成果做个总结:
0. 核心——快照和指针
快照是Git版本库的核心:
- 一个快照实际上就是一个存储着特定对象的二进制文件,它的文件名就是使用SHA-1算法对它的内容计算后的SHA值。
- 有四种快照:
- 文件快照:一个存储着
Blob对象的二进制文件,当项目中一个被git add过的文件每次发生变化时,就会生成一个新的文件快照,里面存储着这个文件在最后一次被git add时的内容和状态(文件类型等元信息)。 - 目录快照:一个存储着
tree对象的二进制文件,当在项目里git commit时,会将每个目录的结构生成一个目录快照,快照里的tree对象存储着自己的子目录的快照的SHA值和目录内文件的SHA值。 - 提交快照:一个存储着
commit对象的二进制文件,当在项目里进行提交操作时,会生成一个提交快照,这个快照的commit对象里存储着项目最顶级目录快照的SHA值,以及本次提交所涉及的内容变动的作者,本次提交的提交者,本次提交的提交时间,和提交者对本次提交所做的提交说明等信息,以下名令会进行提交操作git commitgit merge的非快速前进模式(--no-ff)git rebasegit cherry-pick
- 标签快照:一个存储着
tag对象的二进制文件,当在项目里使用git tag -a新建【附注标签】时,会生成一个标签快照,这个标签快照的tag对象里存储着tag所指向的对象(一般为commit对象)的SHA值和类型,标签的名称,打标签的人的信息和时间,以及标签说明等信息。
- 文件快照:一个存储着
指针,是一个记录着内部路径引用和内部快照SHA值的特殊文件:
- 我们所说的分支就是一个指针,它存储着该分支上最近一次的提交快照的SHA值
- 我们所说的
HEAD也是一个指针,在非游离状态,它存储着当前分支指针的文件路径,在游离状态,它存储着当前所处的快照对象的SHA值 - 我们所说的
tag也是一个指针, 对于轻量标签,它存储着打标签时所在的那个提交快照的SHA值,对于附注标签,它存储着一个tag对象的SHA值,这个tag对象里存储着打标签时所在的那个提交快照的SHA值。 - 我们所说的
stash,也是一个指针,它存储着我们进行git stash操作时,Git针对当前工作区和暂存区以及前一次提交所做的一个新的提交快照的SHA值。
1. 四个空间
在Git中,一共有四种空间:
- 工作目录。这是我们实际编辑文件的地方。
- 本地仓库。这是Git存储快照与各种指针的地方。
- 暂存区。 这是Git用来存储索引文件的地方,索引文件记录的是自上次提交后,当前工作目录已修改并
git add的文件与其对应的blob对象之间的映射关系。 - 远程仓库。一个远端服务器上的一片存储空间,用来进行多人协作的地方。
2. 三种状态
- 未暂存。 文件的全部或部分内容存在于工作目录中,但暂存区尚未对其进行索引。
- 未跟踪:新添加的文件,从来没有向暂存区添加过
- 已跟踪:已经向暂存区添加过的文件
- 待提交。暂存区已对其索引,并建立快照,但是本地仓库中尚不存在其对应的提交对象和提交记录。
- 已提交。本地仓库已经建立了其对应的提交对象和提交记录。
用一张图来描述空间、文件状态、快照、指针等之间的关系:

3. 若干个结论:
- Git无法跟踪空目录
git status显示的状态信息中的变化类型是相对于上一次暂存区更新时文件的状态的。- 对于一个文件,每次重新被添加到暂存区时,都会将当时那个状态的文件内容做一次全文快照(SHA-1计算),并保存为二进制的
blob对象——Git的版本库保存的是每次变化后的全文快照,而非增量内容。 - 对于一个文件,当其内容改变并被重新添加到暂存区时,暂存区会更新它与
.git/objects目录下所对应的最新文件快照的映射关系。 - 在没有进行
git暂存区或提交操作前,单纯对工作目录的文件进行增删改操作,只会影响git status的输出,不会影响暂存区和本地仓库的内容 git add实际上执行了两个操作:1.建立最新的文件快照;2.更新暂存区索引- 如果两个文件的内容一模一样,无论它们的路径和文件名是否一样,在Git本地仓库里,它们共享同一个文件快照。
git status反映的是执行命令时所在工作目录文件的变化,其输出信息中的文件路径是相对于执行命令时的目录的。- Git提交不会改变暂存区的内容
- Git提交的作者和提交者之间的差别是:作者指的是实际作出修改的人,提交者指的是最后将此工作成果提交到仓库的人
- Git的每次提交,都会根据本次提交与上次提交的不同,生成新的目录快照(
tree对象)和提交快照(commit对象),并更新日志目录里的操作记录和对应分支的操作记录 git diff默认不带参数执行时, 对比暂存区快照与工作目录中文件内容的差异git mv更改工作目录中文件的文件名,并将暂存区中对应的文件名使用修改后的名称进行替换,执行此操作后不用git add就可以直接提交- Git新建分支其实就是新建了一个引用指针而已,这个指针存储了新建分支时所在那个分支当时所指向的提交快照的SHA值
- Git分支合并时的ff 模式(快速前进模式)只有在顺着一个分支走下去可以到达另一个分支时才会选用
- Git合并的非快速模式会在合入分支上新建一个提交快照,该提交快照包含并合并了两个分支所指向的提交快照。而快速前进模式则是直接将合入分支的指针指向被合入分支所指向的提交快照上。
- Git合并的快速前进模式无法如实反映分支历史。所以建议除非有特殊需求,否则始终使用非快速前进模式。
- Git在向远程仓库推送时,会压缩本地仓库,将全文快照格式转换为增量快照格式。
- 当我们从一个源分支上切出一个新分支,然后在新分支上进行若干次提交而源分支不做任何提交后,此时将新分支衍合(即
rebase)到源分支,其效果是和git merge的快速前进模式(--ff)是一样的 git rebase操作实际上是- 从当前分支上,找到与目标分支的【共同祖先提交快照】之后的那次提交快照
- 从那次提交快照开始,把之后的所有提交挨个提取出来
- 在目标分支的最新提交基础上将提取出来的提交挨个再重做一次
- 将当前分支指向目标分支重做后的最后一个提交。
- 可以在自己的分支之间进行衍合(
rebase)操作,但不要在自己的分支与其他人的分支(包括所有远程分支)之间进行衍合操作,因为会造成分支线和时间线混乱, git cherry-pick与git rebase一样,无法在提交历史图谱里体现哪些提交是从哪个分支复制过来的git stash对未加入暂存区的文件,只会存入那些已跟踪的,而不会存入未跟踪的- 【轻量标签】和【附注标签】的区别:
- 轻量标签只是一个指向提交对象的指针,不生成任何对象
- 附注标签会生成一个标签对象来存储标签信息,标签指针指向这个标签对象。
- 除非我们手动推送,否则本地仓库的分支和标签都不会自动同步到远程仓库去
- 我们在哪个分支上执行的
git fetch,那么默认git pull时就会对哪个分支执行合并操作 git rebase新生成的提交,作者是源提交的作者,提交者将变成执行rebase操作的人
参考
SCCS ↩︎ ↩︎ ↩︎
git merge 原理(递归三路合并算法) ↩︎
git 格式的 diff 输出内容含义 ↩︎
关于 git 提示 “warning: LF will be replaced by CRLF” 终极解答 ↩︎
git-merge 完全解析 ↩︎