保姆级 Keras 实现 Faster R-CNN 九
保姆级 Keras 实现 Faster R-CNN 九
- 一. 预测函数
- 二. 利用回归修正量修正 anchor box
- 三. 显示预测结果
- 四. 非极大值抑制(Non-Maximum Suppression)
上一篇 文章中我们完成了 RPN 网络加载训练好的参数再进行训练, 接下来看一下训练后的效果怎么样
一. 预测函数
这里的预测函数和 保姆级 Keras 实现 Faster R-CNN 六 中只有 anchor box 分类预测相比差不多, 只是返回值多了个回归修正量. 只需要修改最后两行
# RPN 模型预测
# 一次预测一张图像
# x: 输入图像或图像路径
# 返回值: 返回原图像和预测结果
def rpn_predict(x):
    # 如果是直接线的图像路径, 那要将图像预处理成网络输入格式
    # 如果不是则是 input_reader 返回的图像, 已经满足僌格式
    if isinstance(x, str):
        img_src = cv.imread(x)
        img_new, scale = new_size_image(img_src, SHORT_SIZE)
        x = [img_new]
        x = np.array(x).astype(np.float32) / 255.0 - 0.5

    y_cls, y_reg = rpn_model.predict(x) # 修改成两个输出
    # 因为一次预测一张图像, 所以返回第 0 个 可以去掉 batch_size 维度, 方便后面处理
    return x[0], y_cls[0], y_reg[0]
二. 利用回归修正量修正 anchor box
现在既然已经有了 anchor box 的修正参数, 那我们就把它用起来. 在打回归标签的时候, y 是修正量. 现在要做逆运算来计算修正后的 anchor box 的位置
x = x a + w a ∗ Δ x y = x y + h a ∗ Δ y w = w a ∗ e Δ w h = h a ∗ e Δ h \begin{aligned} x = x_a + w_a * Δx \\ y = x_y + h_a * Δy \\ w = w_a * e^{Δw} \\ h = h_a * e^{Δh} \\ \end{aligned} x=xa+wa∗Δxy=xy+ha∗Δyw=wa∗eΔwh=ha∗eΔh
x a x_a xa: anchor box 中心横坐标
y a y_a ya: anchor box 中心纵坐标
w a w_a wa: anchor box 宽
h a h_a ha: anchor box 高
Δ x Δx Δx: 网络输出 x 修正量
Δ y Δy Δy: 网络输出 y 修正量
Δ w Δw Δw: 网络输出 宽 修正量
Δ h Δh Δh: 网络输出 高 修正量
x x x: 修正后 anchor box 中心横坐标
y y y: 修正后 anchor box 中心纵坐标
w w w: 修正后 anchor box 宽
h h h: 修正后 anchor box 高
按照公式, 就可以写代码了
# 调整 anchor_box 函数
# image_shape: new_size_image 函数返回的图像尺寸
# a: 需要调整的 anchor box
# v: 调整量, 也就是 rpn 网络输出的回归值
def anchor_adjust(image_shape, a, v):
    a[0] = max(a[0], 0)
    a[1] = max(a[1], 0)
    a[2] = min(a[2], image_shape[1] - 1)
    a[3] = min(a[3], image_shape[0] - 1)

    # 将 x1, x2, y1, y2 的形式转换成 x, y, w, h 的形式
    a_center_x = (a[0] + a[2]) * 0.5
    a_center_y = (a[1] + a[3]) * 0.5
    w_a = a[2] - a[0] # anchor_box 宽
    h_a = a[3] - a[1] # anchor_box 高

    new_x = a_center_x + w_a * v[0]
    new_y = a_center_y + h_a * v[1]
    new_w = w_a * math.exp(v[2])
    new_h = h_a * math.exp(v[3])

    # 将 x, y, w, h 的形式转换成 x1, x2, y1, y2 的形式
    a[0] = new_x - new_w * 0.5
    a[1] = new_y - new_h * 0.5
    a[2] = new_x + new_w * 0.5
    a[3] = new_y + new_h * 0.5

    # 超过边界的要截断
    a[0] = max(a[0], 0)
    a[1] = max(a[1], 0)
    a[2] = min(a[2], image_shape[1] - 1)
    a[3] = min(a[3], image_shape[0] - 1)
上面代码的很简单, 只是要注意两种坐标形式的转换
三. 显示预测结果
保姆级 Keras 实现 Faster R-CNN 六 中的预测结果只是显示了 anchor box 是否为目标, 现在我们把修正量加上看一下效果
# 显示预测结果
# image: rpn_predict 函数返回图像
# targets: rpn_predict 函数预测分类结果
# adjust: rpn_predict 函数预测回归结果
# base_anchors: k 个基础 anchor box
# thres: 判断为目标的阈值
def rpn_targets_show(image, targets, adjust, base_anchors, thres = 0.5):
    feature_size = (image.shape[0] // FEATURE_STRIDE, image.shape[1] // FEATURE_STRIDE)
    anchors = create_train_anchors(feature_size, base_anchors, FEATURE_STRIDE)

    max_score = 0 # 记录最大的分数, 没有实际用处, 只是想看一下
    max_adj_value = 0 # 记录最大的修正量绝对值, 没有实际用处, 只是想看一下
    img_show = image.copy()

    for row in range(targets.shape[0]):
        for col in range(targets.shape[1]):
            for ch in range(targets.shape[2]):
                score = targets[row, col, ch]
                max_score = max(score, max_score)

                if score >= thres:
                    adj_val = adjust[row, col, ch * 4: ch * 4 + 4]
                    max_adj_value = max(max_adj_value, max(abs(adj_val)))

                    idx = int(row * feature_size[1] * ANCHOR_NUM + col * ANCHOR_NUM + ch)
                    a = anchors[idx]
                    # 没有修正的 anchor box 用偏红色的随机色表示
                    cv.rectangle(img_show, (a[0], a[1]), (a[2], a[3]),
                                 (random.randint(0, 128) / 255,
                                  random.randint(0, 128) / 255,
                                  random.randint(128, 256) / 255), 1)

                    # 利用回归参数修正 anchor_box
                    anchor_adjust(image.shape, a, adj_val)

                    # 修正后的 anchor box 用绿色表示
                    cv.rectangle(img_show,
                                 (int(a[0]), int(a[1])), (int(a[2]), int(a[3])),
                                 (0.0, 1.0, 0.0), 1)

    print("max_score:", max_score, "max_adj_value:", max_adj_value)
    plt.figure("rpn_pred", figsize = (6, 4))
    plt.imshow(img_show[..., : : -1])

    plt.show()
现在我们就以训练时划分的测试集来测试一下(保姆级 Keras 实现 Faster R-CNN 六 中有其他的测试数据来源方式)
# 利用训练时划分的测试集
test_reader = input_reader(test_set, CATEGORIES, train_num = TRAIN_NUM, train_mode = False)
# 预测和标记
x, y = next(test_reader)
print(x.shape)

image, targets, adjust = rpn_predict(x)
rpn_targets_show(image, targets, adjust, base_anchors, thres = 0.5
(1, 300, 470, 3)
max_score: 1.0 max_adj_value: 1.3491914
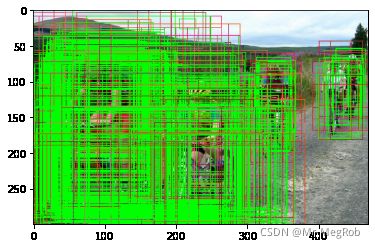
可以看到, 修正后的绿色框还是比较集中的
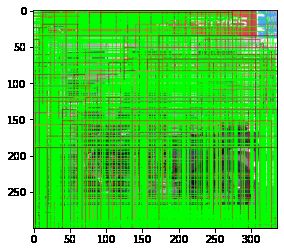
但是有一些图会密密麻麻的, 什么都看不到, 比如下面的图. 这是因为判别为目标的框比较多, 修正后相距较近, 所以有很多是重叠的
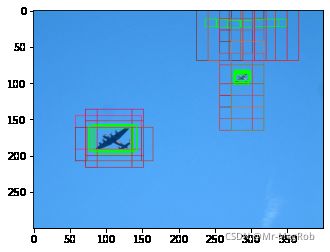
挑一张框少的, 修正的效果还是比较明显的
四. 非极大值抑制(Non-Maximum Suppression)
上面的测试图中, 有很多框是重叠的, 可以使用非极大值抑制(NMS) 将冗余的框去除. NMS 的原理也很简单, 按如下操作
- 从所有的 修正 后的 anchor box 中选出分数最大那个, 假设名字是 max_score_target, 放到一个容器中, 再假设这个容器的名字是 target_holder
- 遍历所有 修正 后的 anchor box. 如果当前 anchor box 和 max_score_target 的 IoU 大于指定值, 比如 0.5, 就把这个 anchor box 除去
- 重复 1, 2 步骤, 直到除去所有 anchor box. 这时 target_holder 中就是需要留下来的目标 anchor box
接下来是代码实现
# 非极大值抑制(NMS)
# targets: 修正后的 anchor box
# adjust: 修正量
# iou_thres: 大于此值认为是冗余框
# score_thres: 其实可以不需要, 只是为了计算可以早点结束
def nms(image_shape, targets, adjust, iou_thres = 0.5, score_thres = 0.1):
    anchors = create_train_anchors((targets.shape[0], targets.shape[1]),
                                   base_anchors, FEATURE_STRIDE)

    target_list = targets.reshape((len(anchors), )).tolist()
    adjust_list = adjust.reshape((-1, 4)).tolist()

    for i in range(len(anchors)):
        # 调整每一个 anchor box
        anchor_adjust(image.shape, anchors[i], adjust_list[i])

    target_holder = []

    for t in range(len(anchors)):
        max_score = max(target_list)
        if max_score < score_thres:
            break

        idx = target_list.index(max_score)
        max_a = anchors[idx] # 最高分数的那个 anchor box
        target_list[idx] = 0 # 把原本的分数变成 0, 就相当于除去了这个 anchor box
        target_holder.append(max_a)

        for i, a in enumerate(anchors):
            if i == idx:
                continue

            iou = get_iou(max_a, a)
            if iou > iou_thres:
                target_list[i] = 0

    return target_holder
有了 nms 后, 就可以进行测试了, 以下代码可以看到没有经过 nms 和经过 nms 后的比较
# 预测和标记
x, y = next(test_reader)
print(x.shape)

image, targets, adjust = rpn_predict(x)
rpn_targets_show(image, targets, adjust, base_anchors, thres = 0.5)

# nms 后的 anchor box
target_pos = nms(image.shape, targets, adjust, iou_thres = 0.5, score_thres = 0.1)

img_show = image.copy()
for i, a in enumerate(target_pos):
    rgb = (0, 0, 1.0)

    if i > 0:
        rgb = (random.randint(32, 256) / 255, random.randint(32, 256) / 255,
               random.randint(32, 256) / 255)

    cv.rectangle(img_show, (int(a[0]), int(a[1])), (int(a[2]), int(a[3])),
                 rgb, 2 if 0 == i else 1)

plt.figure("nms", figsize = (6, 4))
plt.imshow(img_show[..., : : -1])
plt.show()
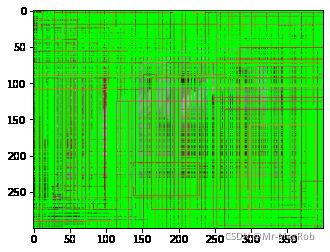
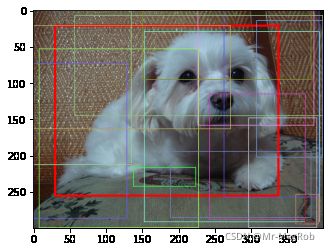
左边的图是没有经过 nms, 有很多的冗余框, 但是经过 nms 后, 看起来就正常多了
经过 nms 后的 anchor box 就是最终的 RPN 的输出, 相当于 Selective Search 的功能了
上一篇: 保姆级 Keras 实现 Faster R-CNN 八
下一篇: 保姆级 Keras 实现 Faster R-CNN 十