Docker 网络详解
这一篇文章将介绍Docker中的网络情况,欢迎大家学习讨论。
docker网络官网 https://docs.docker.com/network/
计算机网络模型
OSI七层模型

TCP/IP四层模型

Linux中网卡
查看网卡[网络接口]
ip link show
ls /sys/class/net
ip a
网卡
ip a解读
状态:UP/DOWN/UNKOWN等

link/ether:MAC地址

inet:绑定的IP地址
配置文件
在Linux中网卡对应的其实就是文件,所以找到对应的网卡文件即可

比如:cat /etc/sysconfig/network-scripts/ifcfg-eth0
给网卡添加IP地址
这块可以直接修改ifcfg-*文件,但是我们通过命令添加试试
(1)ip addr add 192.168.0.100/24 dev eth0

(2)删除IP地址

ip addr delete 192.168.0.100/24 dev eth0
网卡启动与关闭
重启网卡 :service network restart / systemctl restart network
启动/关闭某个网卡 :ifup/ifdown eth0 or ip link set eth0 up/down
Network Namespace
在linux上,网络的隔离是通过network namespace来管理的,不同的network namespace是互相隔离的
ip netns list:查看当前机器上的network namespace
network namespace的管理
ip netns list #查看
ip netns add ns1 #添加
ip netns delete ns1 #删除
namespace实战
(1)创建一个network namespace
ip netns add ns1(2)查看该namespace下网卡的情况
ip netns exec ns1 ip a(3)启动ns1上的lo网卡
ip netns exec ns1 ifup lo
or
ip netns exec ns1 ip link set lo up
(4)再次查看
可以发现state变成了UNKOWN
ip netns exec ns1 ip a(5)再次创建一个network namespace
ip netns add ns2
(6)此时想让两个namespace网络连通起来
veth pair :Virtual Ethernet Pair,是一个成对的端口,可以实现上述功能

(7)创建一对link,也就是接下来要通过veth pair连接的link
ip link add veth-ns1 type veth peer name veth-ns2(8)查看link情况
ip link(9)将veth-ns1加入ns1中,将veth-ns2加入ns2中
ip link set veth-ns1 netns ns1
ip link set veth-ns2 netns ns2
(10)查看宿主机和ns1,ns2的link情况
ip link
ip netns exec ns1 ip link
ip netns exec ns2 ip link
(11)此时veth-ns1和veth-ns2还没有ip地址,显然通信还缺少点条件
ip netns exec ns1 ip addr add 192.168.0.11/24 dev veth-ns1
ip netns exec ns2 ip addr add 192.168.0.12/24 dev veth-ns2
(12)再次查看,发现state是DOWN,并且还是没有IP地址
ip netns exec ns1 ip link
ip netns exec ns2 ip link
(13)启动veth-ns1和veth-ns2
ip netns exec ns1 ip link set veth-ns1 up
ip netns exec ns2 ip link set veth-ns2 up
(14)再次查看,发现state是UP,同时有IP
ip netns exec ns1 ip a
ip netns exec ns2 ip a
(15)此时两个network namespace互相ping一下,发现是可以ping通的
ip netns exec ns1 ping 192.168.0.12
ip netns exec ns2 ping 192.168.0.11
Container的NS
按照上面的描述,实际上每个container,都会有自己的network namespace,并且是独立的,我们可以进入到容器中进行验证
(1)不妨创建两个container看看?
docker run -d --name tomcat01 -p 8081:8080 tomcat
docker run -d --name tomcat02 -p 8082:8080 tomcat
(2)进入到两个容器中,并且查看ip
docker exec -it tomcat01 ip a
docker exec -it tomcat02 ip a
(3)互相ping一下是可以ping通的
值得我们思考的是,此时tomcat01和tomcat02属于两个network namespace,是如何能够ping通的?有些小伙伴可能会想,不就跟上面的namespace实战一样吗?注意这里并没有veth-pair技术
深入分析container网络-Bridge
docker0默认bridge
(1)查看centos的网络:ip a,可以发现

(2)查看容器tomcat01的网络:docker exec -it tomcat01 ip a,可以发现

(3)在centos中ping一下tomcat01的网络,发现可以ping通

(3)既然可以ping通,而且centos和tomcat1又属于不同的network namespace,是怎么连接的?
(4)也就是说,在tomcat01中有一个eth0和centos的docker0中有一个veth3是成对的,类似于之前实战中的veth-ns1和veth-ns2,不妨再通过一个命令确认下:brctl
安装一下:yum install bridge-utils
brctl show
(5)那为什么tomcat01和tomcat02能ping通呢?不多说,直接上图

(5)这种网络连接方法我们称之为Bridge,其实也可以通过命令查看docker中的网络模式:docker network ls
bridge也是docker中默认的网络模式
(6)不妨检查一下bridge:docker network inspect bridge
"Containers": {
            "d81f393d1715aa6aeab38638a8849045fcca9efe4cea81aa0fa14e025aab761c": {
                "Name": "tomcat01",
                "EndpointID": "83af74d69bcd0add3cc95381788bb9a4756a8f9502cca640c1bb12f92cdcd79a",
                "MacAddress": "02:42:ac:11:00:02",
                "IPv4Address": "172.17.0.2/16",
                "IPv6Address": ""
            }
        }
(6)在tomcat01容器中是可以访问互联网的,顺便把这张图画一下咯,NAT是通过iptables实现的

创建自己的network
(1)创建一个network,类型为bridge
docker network create tomcat-net
or
docker network create --subnet=172.18.0.0/24 tomcat-net
(2)查看已有的network:docker network ls

(3)查看tomcat-net详情信息:docker network inspect tomcat-net
(4)创建tomcat的容器,并且指定使用tomcat-net
docker run -d --name custom-net-tomcat --network tomcat-net tomcat(5)查看custom-net-tomcat的网络信息
docker exec -it custom-net-tomcat ip a(6)查看网卡信息
ip a

(7)查看网卡接口
brctl show
(8)此时在custom-net-tomcat容器中ping一下tomcat01的ip会如何?发现无法ping通

(9)此时如果tomcat01容器能够连接到tomcat-net上应该就可以咯
docker network connect tomcat-net tomcat01(10)查看tomcat-net网络,可以发现tomcat01这个容器也在其中
(11)此时进入到tomcat01或者custom-net-tomcat中,不仅可以通过ip地址ping通,而且可以通过名字ping
到,这时候因为都连接到了用户自定义的tomcat-net bridge上
docker exec -it tomcat01 bash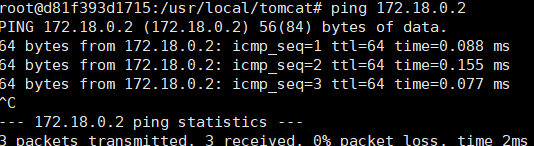
通过名称ping

但是ping tomcat02是不通的

深入分析Container网络-Host & None
Host
(1)创建一个tomcat容器,并且指定网络为none
docker run -d --name my-tomcat-host --network host tomcat(2)查看ip地址
可以发现和centos是一样的
(3)检查host网络
"Containers": {
            "d4bec93254c65d7ab5edcb555db6c4368652815dcbb1e16da28baaec7138d271": {
                "Name": "my-tomcat-host",
                "EndpointID": "a354a59a3178b88fe381114cf32ccf51f10ce8e133e63afbaedcb39ee533dbbb",
                "MacAddress": "",
                "IPv4Address": "",
                "IPv6Address": ""
            }
        }
None
(1)创建一个tomcat容器,并且指定网络为none
docker run -d --name my-tomcat-none --network none tomcat(2)查看ip地址
docker exec -it my-tomcat-none ip a
(3)检查none网络

端口映射及折腾
端口映射
(1)创建一个tomcat容器,名称为port-tomcat
docker run -d --name port-tomcat tomcat(2)思考一下要访问该tomcat怎么做?肯定是通过ip:port方式
docker exec -it port-tomcat bash
curl localhost:8080
(3)那如果要在centos7上访问呢?
docker exec -it port-tomcat ip a ---->得到其ip地址,比如172.17.0.4
curl 172.17.0.4:8080
小结 :之所以能够访问成功,是因为centos上的docker0连接了port-tomcat的network namespace
(4)那如果要在centos7通过curl localhost方式访问呢?显然就要将port-tomcat的8080端口映射到centos上
docker rm -f port-tomcat
docker run -d --name port-tomcat -p 8090:8080 tomcat
curl localhost:8090
windows访问
(1)centos7是运行在win10上的虚拟机,如果想要在win10上通过ip:port方式访问呢?
#此时需要centos和win网络在同一个网段,所以在Vagrantfile文件中
#这种方式等同于桥接网络。也可以给该网络指定使用物理机哪一块网卡,比如
#config.vm.network"public_network",:bridge=>'en1: Wi-Fi (AirPort)'
config.vm.network"public_network"
centos7: ip a --->192.168.8.118
win10:浏览器访问 http://192.168.8.118:8090/
(2)如果也想把centos7上的8090映射到win10的某个端口呢?然后浏览器访问localhost:port
#此时需要将centos7上的端口和win10上的端口做映射
config.vm.network"forwarded_port",guest:8098,host:8090
#记得vagrant reload生效一下
win10:浏览器访问 localhost:8098
多机之间的container通信
在同一台centos7机器上,发现无论怎么折腾,我们一定有办法让两个container通信。
那如果是在两台centos7机器上呢?
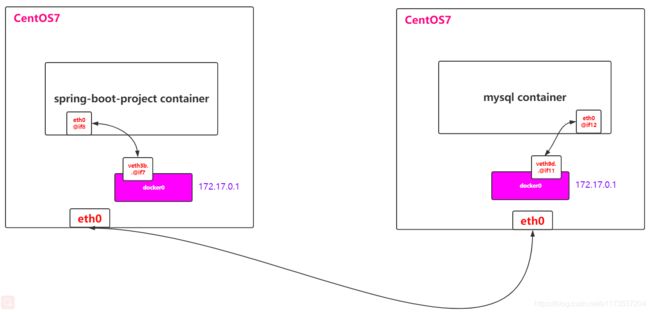
(1)使得两边的eth0能够通信
(2)前提要确保spring-boot-project container和mysql container的IP地址不一样
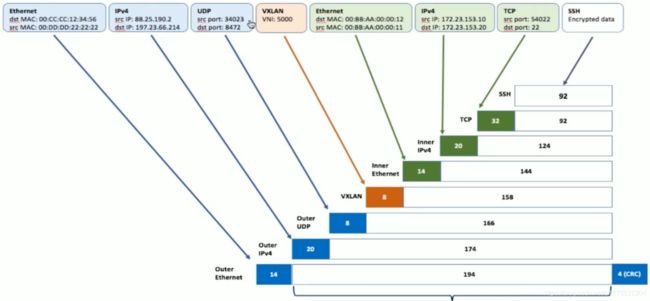
(3)将spring-boot-project中的所有信息当成eth0要传输给另外一端的信息
(4)具体通过vxlan技术实现
www.evoila.de/2015/11/06/what-is-vxlan-and-how-it-works
(5)处在vxlan的底层:underlay
处在xxlan的上层:overlay