【多目标跟踪与计数】(一)YOLOV5实战口罩识别
项目概述
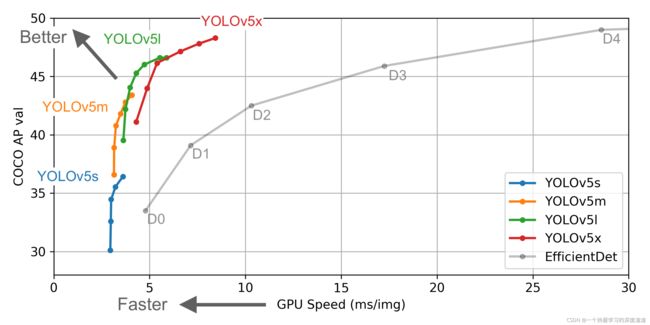
本篇介绍本实战系列的第一篇——YOLOV5的基本原理及实践,作为对工业界最友好的检测网络,本次主要讲解其原理以及如何训练自己的数据集;会主要结合源码进行讲解,像一些检测相关的基础知识不在这过多介绍,V5版本是基于V4进行一系列的消融实验,可以先参考YOLOV4的论文进行初步了解;
YOLOV4论文地址:https://arxiv.org/pdf/2004.10934v1.pdf
本次项目地址:https://github.com/ultralytics/yolov5
一、数据获取
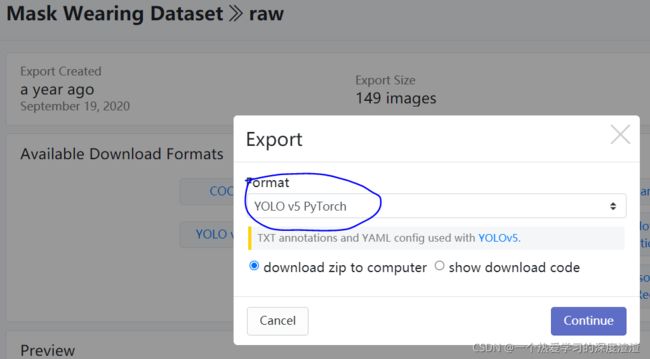
这里推荐一个小数据集的网站:https://public.roboflow.com/
大家可以下载自己想要的数据集,我这边就以人脸口罩数据集为例;
!!!注意数据集格式需要选择YOLO v5 PyTorch的格式,和本次项目相匹配;
二、简单测试
预训练模型下载地址:https://github.com/ultralytics/yolov5/releases
这里可以下载最轻量的模型yolov5s.pt对代码进行验证;
推理测试
运行detect.py做简单测试,运行前需要将需要推理的图片放在文件夹中,并且添加以下参数:
--source ./image_path	// 图片所在的路径
--output ./save_path	// 图片保存的路径
--weights yolov5s.pt	// 传入模型权重
--conf 0.4			   // 给定一个阈值
上图是口罩数据集训练后的一个测试结果,当然YOLOV5的功能很强大,支持多种数据格式传入,包括视频以及视频流;
训练测试
运行train.py做简单训练,需要将第一步获得的数据集放到项目同级目录下,添加对应参数:
--data ../MaskDataSet/data.yaml		// 数据集路径
--cfg models/yolov5s.yaml 		    // 模型的配置文件
--weights models/yolov5s.pt 		// 预训练模型,可以设置为空
--batch-size 16					   // batchsize设置
出现上图信息表示训练成功;
实际运行项目中还可以设置很多参数,包括epochs、多卡训练、多尺度训练等,最终训练好的模型保存在runs目录下;
三、代码解读
!!!前提说明:由于YOLOV5的开源·代码不断在更新,所以最新的代码可能和本次讲解有细微不同;
DataLoader
主要解读datasets.py部分的代码;
1、参数的设置(这里根据项目可设置不同的参数)
dataset = LoadImagesAndLabels(path, imgsz, batch_size,
                              augment=augment,  # augment images 数据增强
                              hyp=hyp,  # augmentation hyperparameters
                              rect=rect,  # rectangular training, 矩形训练策略
                              cache_images=cache,	# 图片数据缓存
                              single_cls=opt.single_cls,	# 单类别时才用到
                              stride=int(stride),		# 最终降采样和输入的比例
                              pad=pad,
                              rank=rank)
2、将训练数据设置缓存,再训练时可直接读取缓存文件
实现代码在LoadImagesAndLabels函数中:
cache_path = str(Path(self.label_files[0]).parent) + '.cache'  # cached labels
if os.path.isfile(cache_path):
    cache = torch.load(cache_path)  # load
    if cache['hash'] != get_hash(self.label_files + self.img_files):  # dataset changed
        cache = self.cache_labels(cache_path)  # re-cache
	else:
		cache = self.cache_labels(cache_path)  # cache
3、矩形训练
实现代码在LoadImagesAndLabels函数中:
if self.rect: #矩形
    # Sort by aspect ratio
    s = self.shapes  # wh
    ar = s[:, 1] / s[:, 0]  # aspect ratio
    irect = ar.argsort()
    self.img_files = [self.img_files[i] for i in irect]
    self.label_files = [self.label_files[i] for i in irect]
    self.labels = [self.labels[i] for i in irect]
    self.shapes = s[irect]  # wh
    ar = ar[irect]

    # Set training image shapes
    shapes = [[1, 1]] * nb
	for i in range(nb):
		ari = ar[bi == i]
		mini, maxi = ari.min(), ari.max()
		if maxi < 1:
        	shapes[i] = [maxi, 1]
		elif mini > 1:
			shapes[i] = [1, 1 / mini]

	self.batch_shapes = np.ceil(np.array(shapes) * img_size / stride + pad).astype(np.int) * stride
简单来说,原来训练需要416x416的正方形图像,现在只需要将长边设置为416,短边按比例缩放后再填充到32的倍数;
参考文章:Rectangular training/inference
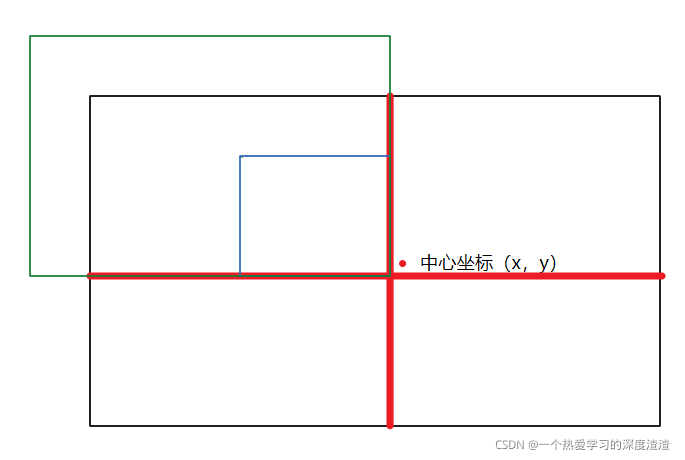
4、mosaic数据增强操作
实现代码在load_mosaic函数中:
def load_mosaic(self, index):
	# 这里创建一个列表,保存四张图片的标签数据
    labels4 = []
    s = self.img_size
    # 随机生成一个中心点,表示四个图像区域的大小(尽量控制在中心附近)
    yc, xc = [int(random.uniform(-x, 2 * s + x)) for x in self.mosaic_border]  # mosaic center x, y
    indices = [index] + [random.randint(0, len(self.labels) - 1) for _ in range(3)]  # 3 additional image indices

	for i, index in enumerate(indices):
        # Load image
        img, _, (h, w) = load_image(self, index)

        # place img in img4
        if i == 0:  # top left  主要分了三步:1.初始化大图;2.计算当前图片放在大图中什么位置;3.计算在小图中取哪一部分放到大图中
            img4 = np.full((s * 2, s * 2, img.shape[2]), 114, dtype=np.uint8)  # 构建一个大图
            x1a, y1a, x2a, y2a = max(xc - w, 0), max(yc - h, 0), xc, yc  # 计算图像的左上坐标
            x1b, y1b, x2b, y2b = w - (x2a - x1a), h - (y2a - y1a), w, h  # 计算在小图中选取的位置
        elif i == 1:  # top right
            x1a, y1a, x2a, y2a = xc, max(yc - h, 0), min(xc + w, s * 2), yc
            x1b, y1b, x2b, y2b = 0, h - (y2a - y1a), min(w, x2a - x1a), h
        elif i == 2:  # bottom left
            x1a, y1a, x2a, y2a = max(xc - w, 0), yc, xc, min(s * 2, yc + h)
            x1b, y1b, x2b, y2b = w - (x2a - x1a), 0, w, min(y2a - y1a, h)
        elif i == 3:  # bottom right
            x1a, y1a, x2a, y2a = xc, yc, min(xc + w, s * 2), min(s * 2, yc + h)
            x1b, y1b, x2b, y2b = 0, 0, min(w, x2a - x1a), min(y2a - y1a, h)

        #1.截图小图中的部分放到大图中 2.由于小图可能填充不满,所以还需要计算差异值,因为一会要更新坐标框标签
        img4[y1a:y2a, x1a:x2a] = img[y1b:y2b, x1b:x2b]  # img4[ymin:ymax, xmin:xmax]
        padw = x1a - x1b
        padh = y1a - y1b

        # Labels 标签值要重新计算,因为现在都放到大图中了
        x = self.labels[index]
        labels = x.copy()
        if x.size > 0:  # Normalized xywh to pixel xyxy format
            labels[:, 1] = w * (x[:, 1] - x[:, 3] / 2) + padw
            labels[:, 2] = h * (x[:, 2] - x[:, 4] / 2) + padh
            labels[:, 3] = w * (x[:, 1] + x[:, 3] / 2) + padw
            labels[:, 4] = h * (x[:, 2] + x[:, 4] / 2) + padh
        labels4.append(labels)

    # Concat/clip labels 坐标计算完之后可能越界,调整坐标值,让他们都在大图中
    if len(labels4):
        labels4 = np.concatenate(labels4, 0)
        np.clip(labels4[:, 1:], 0, 2 * s, out=labels4[:, 1:])  # use with random_perspective
可以简单从上图理解一下这个过程,重点是标签坐标的转换比较麻烦;
进行完mosaic增强后,还会进行一些常见的增强方式,用的是opencv变换矩阵的函数:
# 这里省略放射变换矩阵的生成,详细代码可看random_perspective这个函数
M = T @ S @ R @ P @ C  # order of operations (right to left) is IMPORTANT
if (border[0] != 0) or (border[1] != 0) or (M != np.eye(3)).any():  # image changed
	if perspective:
		img = cv2.warpPerspective(img, M, dsize=(width, height), borderValue=(114, 114, 114))
	else:  # affine
		img = cv2.warpAffine(img, M[:2], dsize=(width, height), borderValue=(114, 114, 114))
Model
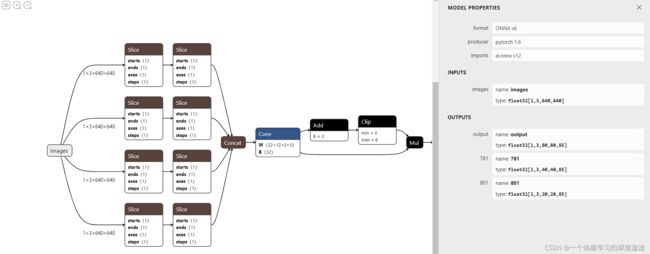
首次按推荐一个好用的可视化工具:NETRON,网页版地址:https://netron.app/
(注意:pt模型可视化并不详细,需要将pt格式转换成onnx格式,这样可视化才更加详细)
可视化结果如下图所示:
1、配置文件的说明:
在YOLOV5中,结构的定义是由配置文件来完成的,相对于YOLOV3来说,配置文件更加简洁;
上图中参数为最重要的三个参数:
nc:类别数量
depth_multiple:决定模型深度
width_multiple:决定卷积核数量
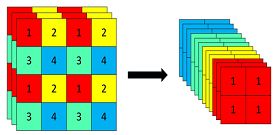
2、Focus模块说明:
原理:先分块,后拼接,再卷积;
作用:为了加速网络的训练,并不会增加AP值;
例子:YOLOV5s输入为原始的640 x 640 x 3的图像,先经过分块操作,变成320 x 320 x 12的特征图,再经过一次卷积操作,最终变成320 x 320 x 32的特征图;
特征变化图如下:
参考文章:https://blog.csdn.net/qq_39056987/article/details/112712817
重要文件说明:
model/yolo.py:读取配置网络配置文件,定义网络结构;
model/common.py:网络层具体实现,包括卷积层、分类层等;
Train
这里主要讲解train.py文件;
1、保存日志参数
logger.info(f'Hyperparameters {hyp}')# 作者考虑得很多,训练时候参数,各epoch情况,损失,测试集的结果全部保存
log_dir = Path(tb_writer.log_dir) if tb_writer else Path(opt.logdir) / 'evolve'  # logging directory
wdir = log_dir / 'weights'  # weights directory
os.makedirs(wdir, exist_ok=True)#保存路径
last = wdir / 'last.pt'
best = wdir / 'best.pt'
results_file = str(log_dir / 'results.txt')#训练过程中各种指标
epochs, batch_size, total_batch_size, weights, rank = \
	opt.epochs, opt.batch_size, opt.total_batch_size, opt.weights, opt.global_rank

# Save run settings 保存当前参数
with open(log_dir / 'hyp.yaml', 'w') as f:
	yaml.dump(hyp, f, sort_keys=False)
with open(log_dir / 'opt.yaml', 'w') as f:
	yaml.dump(vars(opt), f, sort_keys=False)
训练过程的结果以及模型权重、配置参数等信息都会保存在runs目录下;
下图为我训练完成保存的一个信息:
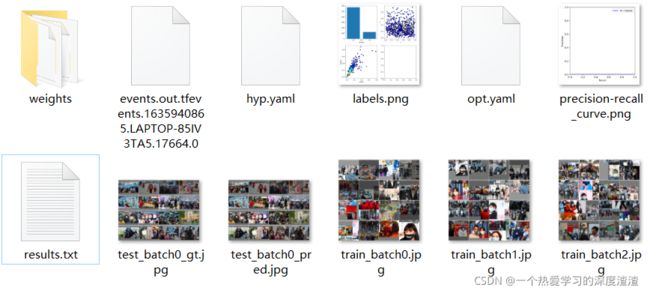
YOLOV5对于工程化十分友好,在训练过程中能看到很多的信息,来判断模型学习的好坏;
2、累计batch进行更新
# Optimizer
nbs = 64  # nominal batch size 累计多少次更新一次模型,咱们的话就是64/16=4次,相当于扩大batch
accumulate = max(round(nbs / total_batch_size), 1)  # accumulate loss before optimizing
hyp['weight_decay'] *= total_batch_size * accumulate / nbs  # scale weight_decay
通过设定参数nbs,决定累计多少次更新一次模型,这样有扩充batch的作用;
3、多卡训练
如果你的机器里面有过个GPU,需要改一些参数。官网教程:https://github.com/ultralytics/yolov5/issues/475
if cuda and rank == -1 and torch.cuda.device_count() > 1:
	model = torch.nn.DataParallel(model)
# SyncBatchNorm 多卡同步做BN
if opt.sync_bn and cuda and rank != -1:
    model = torch.nn.SyncBatchNorm.convert_sync_batchnorm(model).to(device)
    logger.info('Using SyncBatchNorm()')
4、混合精度训练
Pytorch1.6的新功能,fp32与fp16混合,提速较多
官方说明:https://pytorch.org/docs/stable/amp.html
from torch.cuda import amp
scaler = amp.GradScaler(enabled=cuda)

scaler.scale(loss).backward()
scaler.step(optimizer)
scaler.update()
总结
本篇主要讲解了YOLOV5检测网络的使用,最终将集成到项目的检测模块中,下一篇将讲解DeepSort的原理与实践,讲述如何将检测到的目标进行追踪,敬请期待!
