一、XIB的创建:
XIB的创建有两种方法:
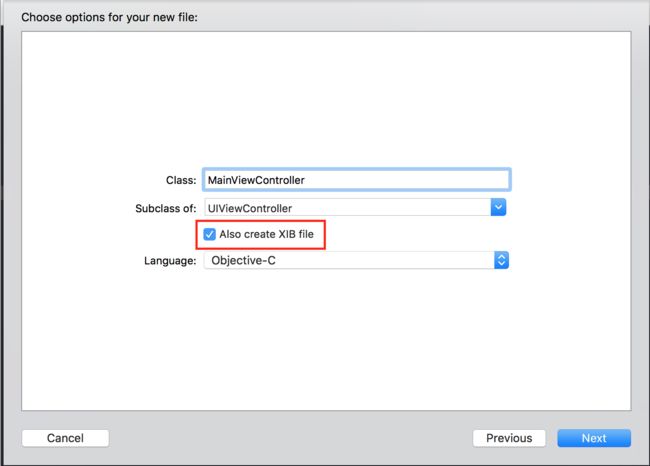
第一种方法是在工程中创建类文件的时候自动生成XIB文件(并非所有的类文件创建时都能生成XIB文件,如不能生成请看第二种方法),如下图:
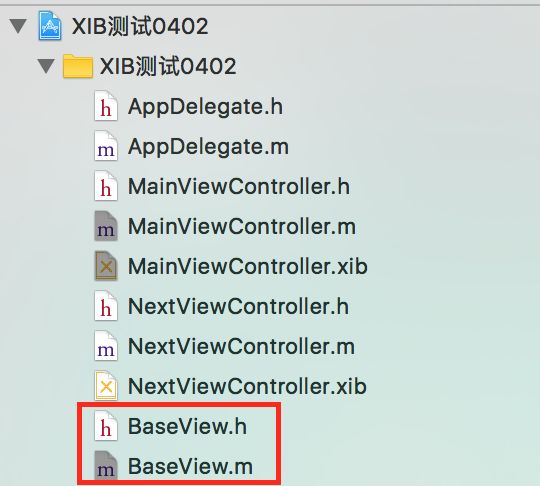
点击next生成的类文件如下图:
然后就可以直接使用创建好的XIB了。
第二种方法是在工程中创建类文件的时候不能自动生成XIB文件的时候,如下图:
这时候生成的类文件不带有XIB,如下图:
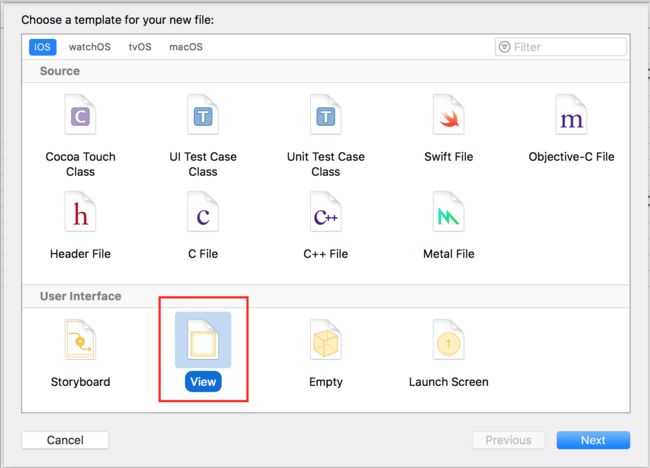
这时候需要使用XIB的话就要去创建该类文件的XIB了,command + N创建文件界面选择User Interface的View(Empty指创建一个空的XIB),如下图:
保存为与原文件类名一致(也可另起名,建议一致),如下图:
点击创建,所需要的XIB就创建成功了,如下图:
注意:第二种方法创建的XIB,需要手动去设置XIB关联的类,如下图:
选择需要关联的class,然后就可以直接使用创建好的XIB了。
二、XIB的使用:
在使用XIB之前需要设置一下XIB与类文件之间的关联项,如下图。以在MainViewController中创建TableView为例,左手按着control健,同时按住鼠标左键从1或2区域的按钮拉向图中View区域(1和2的关联均为已设置好的关联)。其中从1处的按钮分别拉向对应的Table View和View区域形成关联,从2处的按钮都拉向对应的Table View设置delegate和dataSoure。
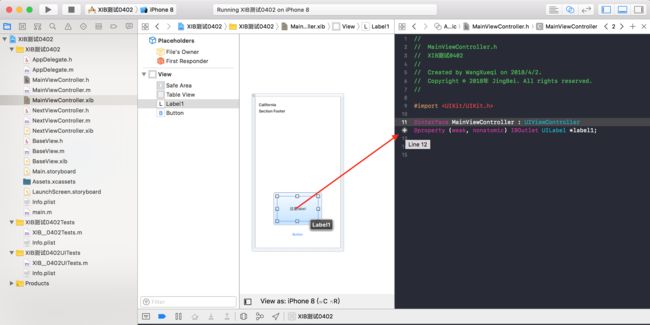
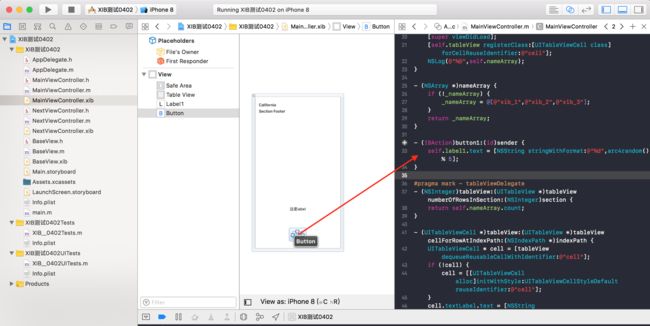
然后将在XIB中创建的TableView和Label分别在类文件中生成对应的属性以及Button在类文件中生成对应的响应方法(左手按着control健,同时按住鼠标左键从左边区域拉向图中代码区域),如下图:
@property (weak, nonatomic) IBOutlet UITableView *tableView;
@property (weak, nonatomic) IBOutlet UILabel *label1;
- (IBAction)button1:(id)sender {
    self.label1.text = [NSString stringWithFormat:@"%d",arc4random() % 5];
}
设置好button之后,显示为9图中的3.
最后:
加载以UIViewController为基类的控制器MainViewController的XIB时,加载方法如下:
MainViewController * main = [[MainViewController alloc]initWithNibName:@"MainViewController" bundle:[NSBundle mainBundle]];
加载以UIView为基类的子视图BaseView的XIB时,加载方法如下:
BaseView * base = [[[NSBundle mainBundle]loadNibNamed:@"BaseView" owner:self options:nil] firstObject];
类文件MainViewController的.h文件和.m文件对应的代码如下:
#import

@interface MainViewController : UIViewController
@property (weak, nonatomic) IBOutlet UILabel *label1;

@end
#import "MainViewController.h"
#import "NextViewController.h"

@interface MainViewController ()
@property (weak, nonatomic) IBOutlet UITableView *tableView;
@property(nonatomic,strong)NSArray * nameArray;
@end

@implementation MainViewController

- (void)viewDidLoad {
    [super viewDidLoad];
    [self.tableView registerClass:[UITableViewCell class] forCellReuseIdentifier:@"cell"];
    NSLog(@"%@",self.nameArray);
}

- (NSArray *)nameArray {
    if (!_nameArray) {
        _nameArray = @[@"xib_1",@"xib_2",@"xib_3"];
    }
    return _nameArray;
}

- (IBAction)button1:(id)sender {
    self.label1.text = [NSString stringWithFormat:@"%d",arc4random() % 5];
}

#pragma mark - tableViewDelegate
- (NSInteger)tableView:(UITableView *)tableView numberOfRowsInSection:(NSInteger)section {
    return self.nameArray.count;
}

- (UITableViewCell *)tableView:(UITableView *)tableView cellForRowAtIndexPath:(NSIndexPath *)indexPath {
    UITableViewCell * cell = [tableView dequeueReusableCellWithIdentifier:@"cell"];
    if (!cell) {
        cell = [[UITableViewCell alloc]initWithStyle:UITableViewCellStyleDefault reuseIdentifier:@"cell"];
    }
    cell.textLabel.text = [NSString stringWithFormat:@"qqq%@",self.nameArray[indexPath.row]];
    cell.textLabel.textColor = [UIColor redColor];
    return cell;
}

- (void)tableView:(UITableView *)tableView didSelectRowAtIndexPath:(NSIndexPath *)indexPath {
    NextViewController * next = [[NextViewController alloc]init];
    [self presentViewController:next animated:YES completion:nil];
}
Demo地址:XIB的创建使用
