一、创建工程
到自己创建项目的文件夹下输入命令:
react-native init 项目名
当然如果你想指定安装react-native版本的话你也可以这样
后面的0.57.1可以自定义成自己的版本
react-native init 项目名 --version 0.57.1
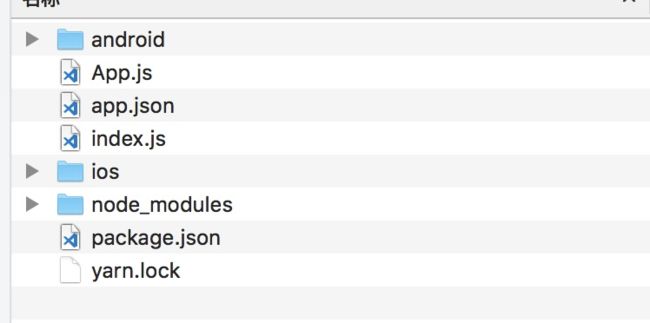
目录结构还这样的
这里android和ios 文件夹你可以删掉换成自己的现有iOS和安卓项目.
删掉android和iOS文件夹后
添加React Native所需要的依赖
目录结构如下
RN项目
├── Android项目
├── iOS项目
├── package.json
├── node_modules
└── .gitignore
我们来先说安卓怎么配置
第一步:配置maven
接下来我们需要为已经存在的RN项目添加 React Native依赖,在RN项目/Android项目/app/build.gradle文件中添加如下
dependencies {
    compile 'com.android.support:appcompat-v7:+'
    ...
    compile "com.facebook.react:react-native:+" // From node_modules
}
然后,我们为RN项目配置使用的本地React Native maven目录,在RN项目/Android项目/build.gradle文件中添加如下代码:
allprojects {
    repositories {
        mavenLocal()
        maven {
            // All of React Native (JS, Obj-C sources, Android binaries) is installed from npm
            url "$rootDir/../node_modules/react-native/android"
        }
        ...
    }
    ...
}
这里需要注意的是
url "$rootDir/../node_modules/react-native/android"路径的问题
如果你是把package.json文件放在Android项目目录下的话
也就是说RN项目/Android项目/package.json
那么这里你要这么写
提示:为确保你配置的目录正确,可以通过在Android Studio中运行Gradle sync 看是否有 “Failed to resolve: com.facebook.react:react-native:0.x.x” 的错误出现,没有错误则说明配置正确,否则说明配置路由有问题。
url "$rootDir/node_modules/react-native/android
第二步:配置权限
接下来我们为APP运行配置所需要的权限:检查你项目中的AndroidManifest.xml文件中看是否有如下权限:
另外,如果你需要用到RN的Dev Settings功能:
则需要在AndroidManifest.xml文件中添加如下代码:
上面这些Android就简单的配置完成了
然后修改RN项目的index.js文件
如果你项目比较老的话,那么这个文件将是index.ios.js和index.android.js请自行选择
有些同学不会导入包裹
import { AppRegistry } from 'react-native';
import App from './App';

AppRegistry.registerComponent('App1', () => App);
App1就是以后你要跳转到的RN 项目的页面
另外,在上述代码中我们引用了一个App.js文件
import React, { Component } from 'react';
import {
  Platform,
  StyleSheet,
  Text,
  View
} from 'react-native';

type Props = {};
export default class App extends Component {
  render() {
    return (


          我是RN页面


    );
  }
}

const styles = StyleSheet.create({
  container: {
    flex: 1,
    justifyContent: 'center',
    alignItems: 'center',
    backgroundColor: '#F5FCFF',
  },
  welcome: {
    fontSize: 20,
    textAlign: 'center',
    margin: 10,
  }
 });
为React Native创建一个Activity来作为容器
创建RNPageActivity
首先我们需要创建一个Activity来作为React Native的容器,
//有些同学不知道包名是什么这里我都直接导入复制进来
import android.app.Activity;
import android.databinding.Bindable;
import android.os.Bundle;
import android.view.KeyEvent;

import com.facebook.react.ReactActivity;
import com.facebook.react.ReactInstanceManager;
import com.facebook.react.ReactRootView;
import com.facebook.react.common.LifecycleState;
import com.facebook.react.modules.core.DefaultHardwareBackBtnHandler;
import com.facebook.react.shell.MainReactPackage;
import com.lanto.goodfix.base.SimpleActivity;
public class RNPageActivity extends AppCompatActivity implements DefaultHardwareBackBtnHandler {
    private ReactRootView mReactRootView;
    private ReactInstanceManager mReactInstanceManager;
    @Override
    protected void onCreate(Bundle savedInstanceState) {
        super.onCreate(savedInstanceState);

        mReactRootView = new ReactRootView(this);
        mReactInstanceManager = ReactInstanceManager.builder()
            .setApplication(getApplication())
            .setBundleAssetName("index.android.bundle")
            .setJSMainModulePath("index")
            .addPackage(new MainReactPackage())
            .setUseDeveloperSupport(BuildConfig.DEBUG)
            .setInitialLifecycleState(LifecycleState.RESUMED)
            .build();
        // 这个"App1"名字一定要和我们在index.js中注册的名字保持一致AppRegistry.registerComponent()
        mReactRootView.startReactApplication(mReactInstanceManager, "App1", null);

        setContentView(mReactRootView);
    }

    @Override
    public void invokeDefaultOnBackPressed() {
        super.onBackPressed();
    }
}
//为ReactInstanceManager添加Activity的生命周期回调
//一个 ReactInstanceManager可以被多个activities或fragments共享,
//所以我们需要在Activity的//生命周期中回调ReactInstanceManager的对于的方法。
@Override
protected void onPause() {
    super.onPause();

    if (mReactInstanceManager != null) {
        mReactInstanceManager.onHostPause(this);
    }
}

@Override
protected void onResume() {
    super.onResume();

    if (mReactInstanceManager != null) {
        mReactInstanceManager.onHostResume(this, this);
    }
}

@Override
public void onBackPressed() {
    if (mReactInstanceManager != null) {
        mReactInstanceManager.onBackPressed();
    } else {
        super.onBackPressed();
    }
}

@Override
protected void onDestroy() {
    super.onDestroy();

    if (mReactInstanceManager != null) {
        mReactInstanceManager.onHostDestroy(this);
    }
    if (mReactRootView != null) {
        mReactRootView.unmountReactApplication();
    }
}
@Override
public void invokeDefaultOnBackPressed() {
    super.onBackPressed();
}
public boolean onKeyUp(int keyCode, KeyEvent event) {
    if (getUseDeveloperSupport()) {
        if (keyCode == KeyEvent.KEYCODE_MENU) {//Ctrl + M 打开RN开发者菜单
            mReactInstanceManager.showDevOptionsDialog();
            return true;
        }
    }
    return super.onKeyUp(keyCode, event);
}
参数说明
setBundleAssetName:打包时放在assets目录下的JS bundle包的名字,App release之后会从该目录下加载JS bundle;
setJSMainModulePath:JS bundle中主入口的文件名,也就是我们上文中创建的那个index.js文件;
addPackage:向RN添加Native Moudle,在上述代码中我们添加了new MainReactPackage()这个是必须的,另外,如果我们创建一些其他的Native Moudle也需要通过addPackage的方式将其注册到RN中。需要指出的是RN除了这个方法外,也提供了一个addPackages方法用于批量向RN添加Native Moudle;
setUseDeveloperSupport:设置RN是否开启开发者模式(debugging,reload,dev memu),比如我们常用开发者弹框;
setInitialLifecycleState:通过这个方法来设置RN初始化时所处的生命周期状态,一般设置成LifecycleState.RESUMED就行,和下文讲的Activity容器的生命周期状态关联;
mReactRootView.startReactApplication:它的第一个参数是mReactInstanceManager,第二个参数是我们在index.js中注册的组件的名字,第三个参数接受一个Bundle来作为RN初始化时传递给JS的初始化数据
在中AndroidManifest.xml注册一个RNPageActivity
运行React Native
找到你package.json的所在文件夹输入
npm start
然后我们打开AndroidStudio,点击运行按钮或者通过快捷键Ctrl+R来将项目安装到模拟器上:
添加更多React Native的组件
import { AppRegistry } from 'react-native';
import App from './App';
import App2 from './App2';

AppRegistry.registerComponent('App1', () => App);
AppRegistry.registerComponent('App2', () => App);
//这里可以添加多个,只要对应就可以了
//目前这种方法是可以自定义比较灵活的一种集成方式
//祝大家好运,到此安卓就集成完成了
下面再说几句
如果你是在模拟器上运行,那么这样就可以了
如果是真机,你要这样输入
先安装index.android.bundle
//先创建下面路径的assets文件夹
react-native bundle --platform android --dev false --entry-file index.js --bundle-output 安卓项目名/app/src/main/assets/index.android.bundle --assets-dest app/src/main/res/

//一定要注意你的路径

//然后终端输入
adb reverse tcp:8081 tcp:8081
npm start
^^^^^^^^^^^^^^^^^^^^^^^^^^^^^^^分割线^^^^^^^^^^^^^^^^^^^^^^^^^^^^^^^^^^^^^^^
下面就是iOS项目的集成了
iOS项目我们采用pod来集成,相对简单,不会出现各种添加错误的问题
首先在pod Podfile文件中添加
这里需要主语rn_path 路径问题,写你自己的路径
rn_path = '../node_modules/react-native'
    pod 'React', :path => '../node_modules/react-native', :subspecs => [
    'Core',
    'ART',
    'CxxBridge',
    'RCTActionSheet',
    'RCTGeolocation',
    'RCTImage',
    'RCTAnimation’,
    'RCTNetwork',
    'RCTPushNotification',
    'RCTSettings',
    'RCTText',
    'RCTVibration',
    'RCTWebSocket',
    'RCTLinkingIOS',
    'DevSupport'
    ]
    pod 'yoga', path: "#{rn_path}/ReactCommon/yoga"
    pod 'glog', :podspec => "#{rn_path}/third-party-podspecs/glog.podspec"
#
    # React Native third party dependencies podspecs
    pod 'DoubleConversion', :podspec => "#{rn_path}/third-party-podspecs/DoubleConversion.podspec"
    pod 'Folly', :podspec => "#{rn_path}/third-party-podspecs/Folly.podspec"
然后到podfile所在文件夹 再次
pod install
如果运行起来后报这个错误的话
请用以下解决
在podfile 文件中添加如下代码
def change_lines_in_file(file_path, &change)
    print "Fixing #{file_path}...\n"

    contents = []

    file = File.open(file_path, 'r')
    file.each_line do | line |
        contents << line
    end
    file.close

    File.open(file_path, 'w') do |f|
        f.puts(change.call(contents))
    end
end

post_install do |installer|
    # https://github.com/facebook/yoga/issues/711#issuecomment-381098373
    change_lines_in_file('./Pods/Target Support Files/yoga/yoga-umbrella.h') do |lines|
        lines.reject do | line |
            [
            '#import "Utils.h"',
            '#import "YGLayout.h"',
            '#import "YGNode.h"',
            '#import "YGNodePrint.h"',
            '#import "YGStyle.h"',
            '#import "Yoga-internal.h"',
            ].include?(line.strip)
        end
    end

    # https://github.com/facebook/yoga/issues/711#issuecomment-374605785
    change_lines_in_file('../node_modules/react-native/React/Base/Surface/SurfaceHostingView/RCTSurfaceSizeMeasureMode.h') do |lines|
        unless lines[27].include?("#ifdef __cplusplus")
            lines.insert(27, "#ifdef __cplusplus")
            lines.insert(34, "#endif")
        end
        lines
    end

    # https://github.com/facebook/react-native/issues/13198
    change_lines_in_file('../node_modules/react-native/Libraries/NativeAnimation/RCTNativeAnimatedNodesManager.h') do |lines|
        lines.map { |line| line.include?("#import ") ? '#import "RCTValueAnimatedNode.h"' : line }
    end

    # https://github.com/facebook/react-native/issues/16039
    change_lines_in_file('../node_modules/react-native/Libraries/WebSocket/RCTReconnectingWebSocket.m') do |lines|
        lines.map { |line| line.include?("#import ") ? '#import "fishhook.h"' : line }
    end
end
接下来你需要配置index.js文件 这里就省略了 同安卓那边的,可以自己看
也就是这步
import { AppRegistry } from 'react-native';
import App from './App';
import App2 from './App2';

AppRegistry.registerComponent('App1', () => App);
AppRegistry.registerComponent('App2', () => App);
接下来在你需要跳转的地方OC代码里加入
 NSURL *jsCodeLocation = [[RCTBundleURLProvider sharedSettings] jsBundleURLForBundleRoot:@"index" fallbackResource:nil];


        RCTRootView *rootView =

        [[RCTRootView alloc] initWithBundleURL: jsCodeLocation
                                    moduleName: @"QiXiu"
                             initialProperties:
         @{
           @"name" : @[
                   @{
                       @"name" : @"Alex",
                       @"value": @"42"
                       },
                   @{
                       @"name" : @"Joel",
                       @"value": @"10"
                       }
                   ]
           }
                                 launchOptions: nil];
        UIViewController *vc = [[SHCustomerViewController alloc] init];
        vc.view = rootView;
        //[self presentViewController:vc animated:YES completion:nil];
        [self.navigationController pushViewController:vc animated:nil];
        vc.title = @"我是RN页面";
注意这行代码[[RCTRootView alloc] initWithBundleURL: jsCodeLocation moduleName: @"App1" initialProperties:
这里的 App1 就是你配置的页面


