阅读前所需知识
- 拥有Node.js语言基础
- 了解http模块
- 有Koa框架使用经验
首先看一下官方的HelloWorld示例:
const Koa = require('koa');
const app = new Koa();

// logger

app.use(async (ctx, next) => {
  await next();
  const rt = ctx.response.get('X-Response-Time');
  console.log(`${ctx.method} ${ctx.url} - ${rt}`);
});

// x-response-time

app.use(async (ctx, next) => {
  const start = Date.now();
  await next();
  const ms = Date.now() - start;
  ctx.set('X-Response-Time', `${ms}ms`);
});

// response

app.use(async ctx => {
  ctx.body = 'Hello World';
});

app.listen(3000);
我们将使用步骤拆解开
第一步、new一个koa实例
const Koa = require('koa');
const app = new Koa();
Koa的构造函数可以传一些参数进去,一会儿在源码处会看到有哪些参数可传。
第二步、传入中间件
// logger

app.use(async (ctx, next) => {
  await next();
  const rt = ctx.response.get('X-Response-Time');
  console.log(`${ctx.method} ${ctx.url} - ${rt}`);
});

// x-response-time

app.use(async (ctx, next) => {
  const start = Date.now();
  await next();
  const ms = Date.now() - start;
  ctx.set('X-Response-Time', `${ms}ms`);
});
第三步、放入业务处理函数
// response

app.use(async ctx => {
  ctx.body = 'Hello World';
});
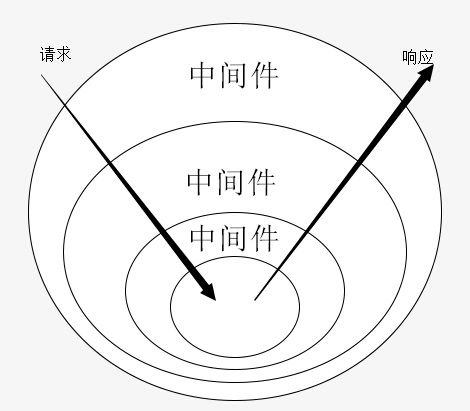
可以看到,业务处理函数和中间件用法上其实没什么不同。可以把业务处理函数看做最后一个中间件,也就是洋葱模型的核心。
第四步、开始端口监听
app.listen(3000);
我们来深入源码去研究Koa每一步在干些什么
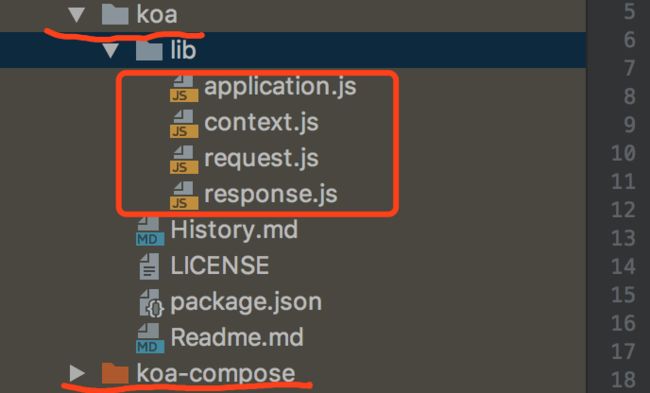
Koa2源码组成
两个核心包:koa和koa-compose
四个核心文件:application.js、context.js、request.js和response.js
new Koa()
application.js
module.exports = class Application extends Emitter {
  /**
   * Initialize a new `Application`.
   *
   * @api public
   */

  /**
    *
    * @param {object} [options] Application options
    * @param {string} [options.env='development'] Environment
    * @param {string[]} [options.keys] Signed cookie keys
    * @param {boolean} [options.proxy] Trust proxy headers
    * @param {number} [options.subdomainOffset] Subdomain offset
    * @param {boolean} [options.proxyIpHeader] proxy ip header, default to X-Forwarded-For
    * @param {boolean} [options.maxIpsCount] max ips read from proxy ip header, default to 0 (means infinity)
    *
    */

  constructor(options) {
    super();
    options = options || {};
    this.proxy = options.proxy || false;
    this.subdomainOffset = options.subdomainOffset || 2;
    this.proxyIpHeader = options.proxyIpHeader || 'X-Forwarded-For';
    this.maxIpsCount = options.maxIpsCount || 0;
    this.env = options.env || process.env.NODE_ENV || 'development';
    if (options.keys) this.keys = options.keys;
    this.middleware = [];
    this.context = Object.create(context);
    this.request = Object.create(request);
    this.response = Object.create(response);
    if (util.inspect.custom) {
      this[util.inspect.custom] = this.inspect;
    }
  }

  ...
}
可以看到,构造函数其实只是简单地处理options,有哪些参数以及参数的用户在源码注释里写的很清楚。
注册中间件
application.js
  /**
   * Use the given middleware `fn`.
   *
   * Old-style middleware will be converted.
   *
   * @param {Function} fn
   * @return {Application} self
   * @api public
   */

  use(fn) {
    if (typeof fn !== 'function') throw new TypeError('middleware must be a function!');
    if (isGeneratorFunction(fn)) {
      deprecate('Support for generators will be removed in v3. ' +
                'See the documentation for examples of how to convert old middleware ' +
                'https://github.com/koajs/koa/blob/master/docs/migration.md');
      fn = convert(fn);
    }
    debug('use %s', fn._name || fn.name || '-');
    this.middleware.push(fn);
    return this;
  }
关键操作:this.middleware.push(fn);。构造函数将this.middleware初始化为[],koa.use(做的事情只是将中间件
注册处理函数
同 注册中间件 原理一样,只是处理函数位于this.middleware数组的末尾。
监听端口
application.js
  /**
   * Shorthand for:
   *
   *    http.createServer(app.callback()).listen(...)
   *
   * @param {Mixed} ...
   * @return {Server}
   * @api public
   */

  listen(...args) {
    const server = http.createServer(this.callback());
    return server.listen(...args);
  }

  /**
   * Return a request handler callback
   * for node's native http server.
   *
   * @return {Function}
   * @api public
   */

  callback() {
    const fn = compose(this.middleware);

    const handleRequest = (req, res) => {
      const ctx = this.createContext(req, res);
      return this.handleRequest(ctx, fn);
    };

    return handleRequest;
  }

  /**
   * Handle request in callback.
   *
   * @api private
   */

  handleRequest(ctx, fnMiddleware) {
    const onerror = err => ctx.onerror(err);
    const handleResponse = () => respond(ctx);
    return fnMiddleware(ctx).then(handleResponse).catch(onerror);
  }

  /**
 * Response helper.
 */

function respond(ctx) {
  const res = ctx.res;
  let body = ctx.body;
  const code = ctx.status;

  // responses
  if (Buffer.isBuffer(body)) return res.end(body);
  if ('string' == typeof body) return res.end(body);
  if (body instanceof Stream) return body.pipe(res);

  // body: json
  body = JSON.stringify(body);
  if (!res.headersSent) {
    ctx.length = Buffer.byteLength(body);
  }
  res.end(body);
}
listen行为比较复杂,做一下步骤拆解
步骤一
  listen(...args) {
    const server = http.createServer(this.callback());
    return server.listen(...args);
  }
创建了一个http服务器,传入处理函数,透传监听参数。this.callback()将返回一个(req, res) => {}签名函数用来处理http请求逻辑。
步骤二
  callback() {
    const fn = compose(this.middleware);

    const handleRequest = (req, res) => {
      const ctx = this.createContext(req, res);
      return this.handleRequest(ctx, fn);
    };

    return handleRequest;
  }
用koa-compose将多个中间件组合成洋葱模型并返回一个Promise。同时用http模块的原生对象req和res创建一个Koa上下文实例Context。
步骤三
  handleRequest(ctx, fnMiddleware) {
    const onerror = err => ctx.onerror(err);
    const handleResponse = () => respond(ctx);
    return fnMiddleware(ctx).then(handleResponse).catch(onerror);
  }
参数:ctx即上下文,fnMiddleware即compose完成后Promise对象。
逻辑非常简单,执行洋葱模型Promise,执行成功就调用respond(),执行失败就调用ctx.onerror()。
respond()会调用res.end(ctx.body),即设置http响应体并且结束http的response流。
小结
Koa框架非常轻巧。从http模块的处理函数入手,将req和res组装为Context,并将Context传入由多个中间件组成的洋葱模型中执行,最后将ctx.body响应给客户端。
个人认为Koa框架最核心最黑科技的模块是koa-compose,搞清楚koa-compose后你也能写一个koa框架出来,下一节讲koa-compose。