数据库-ElasticSearch入门(索引、文档、查询)
目录
ES启动与可视化
索引
倒排索引
创建
查询
单个索引
所有索引
删除
文档
创建
查询
主键查询
搜索所有文档
条件查询
分页查询
排序
多条件查询
范围查询
完全匹配
高亮查询
聚合查询
映射
修改
全量修改
局部修改
删除
Python API
安装与导入
初始化
参数
索引
创建
创建映射
删除索引
查询
文档
创建
删除
修改
查询
查询所有
根据id查询
根据条件查询
单个条件
分页查询
对结果排序
多个条件查询
范围查询
完全匹配
高亮查询
聚合查询
参考
前面文章,安装了ES,请再安装chrome插件elasticsearch-head。由于需要发送http的请求,可以安装postman,当然,你用其他命令行工具也可以,另外,如果不了解HTTP协议、RestFul,Json格式可以自行补充一下。
ES启动与可视化
双击elasticsearch.bat即可,之后会检查环境,加载模块,打开端口等
 启动图
启动图
注意安装好jdk(自带jdk,自己装的话推荐1.8+),9300是内部组件通信端口,9200是访问端口。
 可视化
可视化
打开浏览器插件可以看到信息,跟着博主下面操作的话可以时常看看可视化插件,我就不再截图了。
索引
类似关系型数据库中的“数据库”这一概念
倒排索引
正排(正向)索引:根据id去寻找内容,例如Mysql
| id | words |
|---|---|
| 1 | hi, l am lady killer 9 |
| 2 | hello, i like young lady |
我们易于根据id去查询内容,但当查询lady是否存在时,却抛弃了索引,全表查询,即正排索引不利于全文检索,尤其是模糊查询时(Lady,LADY这种非完全匹配)。
倒排索引就是来解决这个问题的,通过分词,权重等来快速检索
| words | id |
|---|---|
| lady | 1,2 |
| killer | 1 |
后序就不再画了,通过这种方式更加快速全文搜索。
创建
http://ip:9200/index_name,注意使用幂等的PUT,POST会显示错误如下。
 使用POST
使用PUT
 使用PUT创建索引
创建后结果如下:
 结果
结果
查询
单个索引
http://ip:9200/index_name,使用GET方法
 获取索引
获取索引
所有索引
http://ip:9200/_cat/indices?v,使用GET方法,其中,参数v是为了显示更详细
创建索引killer后,可以看到如下结果
 所有索引
所有索引
删除
和创建时的url一致,只需要使用DELETE方法删除即可。
 删除索引killer
文档
类似关系型数据库中的表数据
创建
http://ip:9200/index_name/_doc/[_id],使用方法POST,需要有请求体,JSON格式。
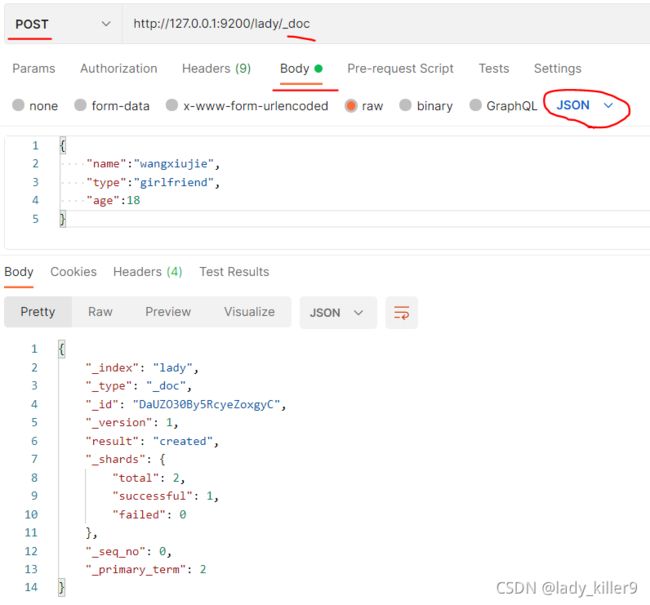 创建文档
创建文档
可以看到,生成了一个随机的_id,即同样的请求,返回不一致,由于PUT是幂等的,所以也就只能用POST。当指定_id时,可以使用POST。
 指定_id创建文档
查询
主键查询
和创建时的地址一致,需要指定_id,方法改为GET即可
 查询单个数据
搜索所有文档
http://ip:9200/index_name/_search,方法仍然使用GET
 获取索引的所有文档
条件查询
http://ip:9200/index_name/_search?q=key:value,方法使用GET
 单条件查询
单条件查询
请求体方式:不在url中使用参数,而是请求体,这种方式更常见,更安全。
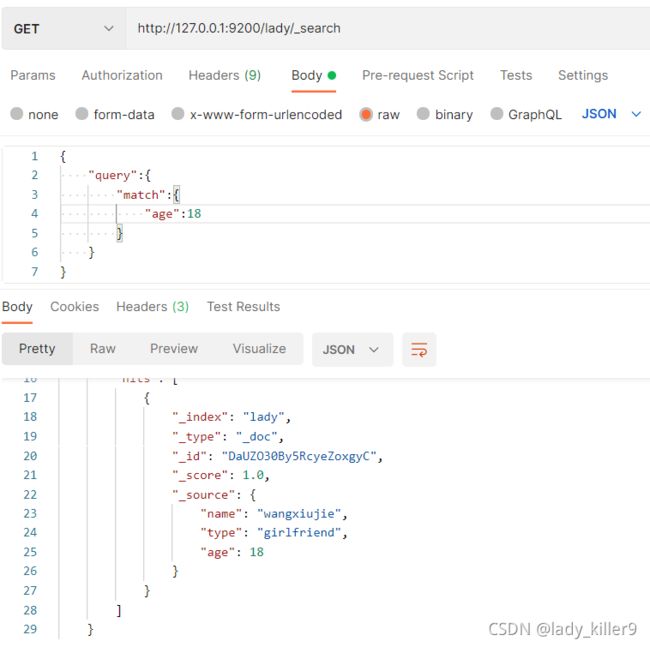 请求体查询
请求体查询
分页查询
在上面的基础上,添加from和size,代表从哪条数据开始查询和每页显示的条数
from=(pagenum-1)*size,查询第一页的数据,就是(1-1)*2,即从第0条数据开始查,显示2条
查询之前,我添加了两条数据
{
    "name":"leilei",
    "type":"friend",
    "age":20
}
{
    "name":"jiajia",
    "type":"friend",
    "age":20
}
条件是"type":"friend",结果如下
 结果如下
结果如下
排序
在查询的基础上,添加sort字段,里面再添加要排序的字段,选择升序还是降序可以再嵌套order
 排序
排序
多条件查询
稍微复杂一些,bool里面嵌套must或should,类似and或or,,must not 类似not,看下面的请求体
{
    "query":{
        "bool":{
            "must":[
                {
                    "match":{
                        "age":18
                    }
                },
                {
                    "match":{
                        "type":"girlfriend"
                    }
                }
            ]
        }
    }
}
这样两个match必须全部匹配到即可。类似京东选择游戏笔记本,又选择处理器是i7。
 多条件查询must
使用should匹配girlfriend和20时,就能找到多个。
 多条件查询should
范围查询
使用filter,gt表示大于,lt表示小于。放到bool里面,和must/must not/should并列。
            "filter":{
                "range":{
                    "age":{
                        "lt":19
                    }
                }
            }
age>19的结果
完全匹配
前面使用的match是全文匹配,也就是进行了分词,不完全一致时也会匹配到
自带的分词器对于拼音的分词不太好,加了两条中文的

查询小贝结果如下:
 小贝查询到宝贝、贝贝
这就类似于你在京东查询一个商品,可能没有一样的,但是并不是显示没有,而是显示类似的
使用match_phrase可以进行完全匹配查询
 完全匹配小贝没有结果
高亮查询
添加highlight
 高亮部分添加了em标签
聚合查询
使用aggs,表示聚合操作,嵌套分组terms,添加分组字段
 聚合查询
聚合查询
可以看到19 20 18岁的doc数量
映射
将字段映射为关键字或文本类型,关键字不可拆分,设置index为false时不可拆分。
添加索引killer,给killer添加映射,http:///ip:9200/index_name/_mapping,方法使用PUT
{
    "properties":{
        "name":{
            "type":"keyword",
            "index":true
        },
        "hobby":{
            "type":"text",
            "index":true
        }
    }
}
添加映射
添加映射
名字是关键字,不可拆分,爱好是文本,可以拆分。
添加两个文档
{
    "name":"弗兰克",
    "hobby":"枪杀"
}
{
    "name":"弗兰克林",
    "hobby":"捧杀"
}
按名字查询
按名字查询
 按爱好查询
按爱好查询
可以看到名字作为关键字,必须一样才能查到,爱好却能查到类似的
修改
全量修改
http://ip:9200/index_name/_doc/_id,使用PUT方法,添加请求体。
 全量修改
全量修改
可以看到上面数据没有全部改动,大部分情况下还是部分修改的。
局部修改
http://ip:9200/index_name/_update/_id,方法为POST,请求体使用doc字段嵌套修改内容,见下图。
 部分修改
部分修改
删除
http://ip:9200/index_name/_doc/_id,方法使用DELETE
 删除文档
删除文档
Python API
又支持异步的版本和不支持异步的,这里就使用简单的不支持异步的
安装与导入
pip install elasticsearch==7.10from elasticsearch import Elasticsearch 包内容
包内容
 项目结构
项目结构
使用单元测试对API进行简单测试。后续仅展示esclient里面的函数即test_函数
初始化
    def __init__(self, host="127.0.0.1", port: int = 9200):
        self._client = Elasticsearch(host=host, port=port)
参数
host: es的ip
port: es的端口
测试代码
es = Elasticsearch()索引
创建
    def index_create(self, index_name: str, map=None):
        if map is None:
            map = {}
        res = self._client.index(index=index_name, body=map)
        return res
参数
index:索引名
body:请求体
测试代码
    def test_index_create(self):
        res = es.index_create("lady1")
        print(res)
        res = es.index_create("heros", map={
            "mapping": {
                "doc": {
                    "properties": {
                        "name": {
                            "type": "text",
                            "index": True
                        },
                        "age": {
                            "type": "keyword",
                            "index": True
                        },
                        "role": {
                            "type": "keyword",
                            "index": True
                        }
                    }
                }
            }
        })
        print(res)
结果

使用wireshark抓包

可以看到是一个POST包,使用的是json格式,body是空的


这个是有body的,但是映射貌似也不对,没有向_mapping发送,后面我们自己发送一个PUT数据包
创建映射
测试代码
    def test_mapping(self):
        import requests
        import json
        url_put = "http://127.0.0.1:9200/heros/_mapping"
        headers_put = {
            'Content-Type': "application/json"
        }

        param ={
            "properties": {
                "name": {
                    "type": "text",
                    "index": True
                },
                "role": {
                    "type": "keyword",
                    "index": True
                }
            }
        }
        payload = json.dumps(param)
        response_put = requests.put(url_put, data=payload, headers=headers_put)
        print(response_put.text)
测试结果

之后就不再展示Wireshark抓包结果了
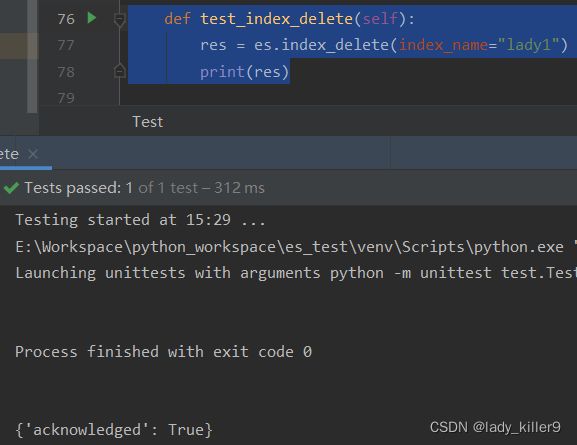
删除索引
    def index_delete(self, index_name: str):
        res = self._client.indices.delete(index=index_name)
        return res
参数
index_name:索引的名字
测试代码
    def test_index_delete(self):
        res = es.index_delete(index_name="lady1")
        print(res)
结果
查询
单个索引
    def index_get(self, index_name: str):
        res = self._client.indices.get(index=index_name)
        return res
参数
index_name:索引的名字
测试代码
    def test_index_get(self):
        res = es.index_get("heros")
        print(res)
结果

文档
创建
    def doc_create(self, index_name, body, id_):
        res = self._client.create(index=index_name, body=body, id=id_)
        return res
参数
index_name:索引的名字
body:请求体
id_:文档的id
测试代码
    def test_doc_create(self):
        zhaoyun = {
            "name": "赵云",
            "age": 25,
            "role": "打野"
        }
        yunzhongjun = {
            "name": "云中君",
            "age": 25,
            "role": "打野"
        }
        yao = {
            "name": "瑶",
            "age": 16,
            "role": "辅助"
        }
        sunshangxiang = {
            "name": "孙尚香",
            "age": 18,
            "role": "射手"
        }
        liubei = {
            "name": "刘备",
            "age": 30,
            "role": "打野"
        }
        heros = [zhaoyun, yunzhongjun, yao, sunshangxiang, liubei]
        init_id = 1000
        for h in heros:
            res = es.doc_create("heros", h, str(init_id))
            init_id += 1
            print(res)
结果

删除
    def doc_delete(self, index_name, doc_id):
        res = self._client.delete(index=index_name, id=doc_id)
        return res
参数
index_name:索引的名字
doc_id:文档的id
一共就这几个数据,我就不删除了
修改
    def doc_update(self, index_name, doc_id, doc):
        res = self._client.update(index=index_name, id=doc_id, body=doc)
        return res
参数
index_name:索引的名字
doc_id:文档的id
doc:文档
测试代码
    def test_doc_update(self):
        sun = {
            "doc": {
                "age": 21
            }
        }
        res = es.doc_update("heros", "1002", sun)
        print(res["result"])
结果

查询
查询所有
    def doc_get__all(self, index_name):
        res = self._client.search(index=index_name)
        return res['hits']['hits']
参数
index_name:索引的名字
这里仅返回hit到的json对象列表
测试代码
    def test_doc_get_all(self):
        res = es.doc_get__all("heros")
        for hit in res:
            print(hit["_source"])
结果

根据id查询
    def doc_get_id(self, index_name, id_):
        res = self._client.get(index=index_name, id=id_)
        return res["_source"]
参数
index_name:索引的名字
id_:文档的id
测试代码
    def test_doc_get_id(self):
        res = es.doc_get_id("heros", "1002")
        print(res)
结果

根据条件查询
    def doc_get_condition(self, index_name, con):
        res = self._client.search(index=index_name, body=con)
        return res['hits']['hits']
参数
index_name:索引的名字
con:查询的请求体,即条件
单个条件
测试代码
    def test_doc_get_con_1(self):
        name = {
            "name": "小云"
        }
        con = {
            "query": {
            }
        }
        con["query"]["match"] = name
        res = es.doc_get_condition("heros", con)
        for hit in res:
            print(hit["_source"])
结果

因为name在前面设置映射时,设置为了text,所以即使不完全匹配也会有类似的结果。
分页查询
测试代码
    def test_doc_get_page(self):
        page_num = 2
        size = 3
        con = {
            "from": (page_num - 1) * size,
            "size": size
        }
        res = es.doc_get_condition("heros", con)
        for hit in res:
            print(hit["_source"])
结果

对结果排序
测试代码
    def test_doc_get_sort(self):
        page_num = 1
        size = 3
        field = "age"
        order = "desc"
        con = {
            "from": (page_num - 1) * size,
            "size": size,
            "sort": {
                field: {
                    "order": order
                }
            }
        }
        res = es.doc_get_condition("heros", con)
        for hit in res:
            print(hit["_source"])
结果

多个条件查询
测试代码
    def test_doc_get_con_more(self):
        eighteen_match = {
            "match": {
                "age": "18"
            }
        }
        daye_match = {
            "match": {
                "role": "打野"
            }
        }
        con = {
            "query": {
                "bool": {
                    "must_not": []
                }
            }
        }
        con["query"]["bool"]["must_not"].append(eighteen_match)
        con["query"]["bool"]["must_not"].append(daye_match)
        res = es.doc_get_condition("heros", con)
        for hit in res:
            print(hit["_source"])
结果
![]()
范围查询
测试代码
    def test_doc_get_scope(self):
        filter = {
            "range": {
                "age": {
                    "gt": 19
                }
            }
        }
        con = {
            "query": {
                "bool": {
                    "filter": filter
                }
            }
        }
        res = es.doc_get_condition("heros", con)
        for hit in res:
            print(hit["_source"])
结果

完全匹配
测试代码
    def test_doc_get_phrase(self):
        name = {
            "name": "赵云"
        }
        con = {
            "query": {
            }
        }
        con["query"]["match_phrase"] = name
        res = es.doc_get_condition("heros", con)
        for hit in res:
            print(hit["_source"])
结果

高亮查询
测试代码
    def test_doc_get_highlight(self):
        name = {
            "name": "云"
        }
        con = {
            "query": {
            },
            "highlight": {
                "fields": {
                    "name": {}
                }
            }
        }
        con["query"]["match"] = name
        res = es.doc_get_condition("heros", con)
        for hit in res:
            print(hit["highlight"])
结果

聚合查询
    def doc_get__agg(self, index_name, con):
        res = self._client.search(index=index_name, body=con)
        return res['aggregations']
参数
index: 索引的名字
body:请求体,即聚合的字段
测试代码
    def test_doc_get_aggs(self):
        con = {
            "aggs": {
                "role_groups": {
                    "terms": {
                        "field": "role"
                    }
                }
            },
        }
        res = es.doc_get__agg("heros", con)
        for cnt in res["role_groups"]["buckets"]:
            print(cnt["key"], " ", cnt["doc_count"])
结果

参考
Postman
网络-http协议学习笔记(消息结构、请求方法、状态码等)_lady_killer9的博客-CSDN博客
Quick start | Elasticsearch Guide [7.15] | Elastic
Elasticsearch Python Client [7.16] | Elastic
Python Elasticsearch Client — Elasticsearch 8.0.0 documentation
Elasticsearch: 权威指南 | Elastic
更多ELK相关内容:数据库-ElasticSearch学习笔记_lady_killer9的博客-CSDN博客
喜欢本文的请动动小手点个赞,收藏一下,有问题请下方评论,转载请注明出处,并附有原文链接,谢谢!
如有侵权,请及时联系。如果您感觉有所收获,自愿打赏,可选择支付宝18833895206(小于),您的支持是我不断更新的动力。